Introduction
==================================
Sitara™ processors can connect to various industrial Ethernet networks like PROFINET® RT, PROFINET IRT, EtherCAT®, and EtherNet/IP™. This means you can manufacture connected devices that support a range of Ethernet protocols using a single board design. The flexibility Sitara processors brings to connected products is made possible by a programmable core on the SoC we call PRU-ICSS (Programmable Real-Time Unit, Industrial Communication Subsystem).
This guide explains how to connect a Sitara AMIC110 evaluation module (TMDXICE110) to three networks: EtherCAT, PROFINET IRT/RT and EtherNet/IP, as demonstrated in the video below. Demo software is also available for , Sitara AM335x and AM437x, evaluation modules, and this guide may be used as a reference for those platforms too.
# Demo Video
<iframe width="560" height="315" src="https://www.youtube.com/embed/W8yOJaRyazo" frameborder="0" allow="accelerometer; autoplay; encrypted-media; gyroscope; picture-in-picture" allowfullscreen></iframe>
# Materials needed
The following hardware is required for this demonstration:
1. [TMDXICE110 evaluation module](https://www.ti.com/tool/TMDXICE110)
2. [XDS200 JTAG emulator](https://www.ti.com/tool/TMDSEMU200-U)
3. 5V power supply (not included in TMDXICE110 box)
4. Ethernet cable (not included in TMDXICE110 box)
5. [PC with TwinCAT (free software)](https://www.beckhoff.co.in/english.asp?download/tc3-download-xae.htm)
# EtherCAT Slave Demo
## EtherCAT Setup
In this section of the guide, you will learn how to connect a TMDXICE110 EVM to a PC running TwinCAT over an EtherCAT network.
### EtherCAT Hardware Setup
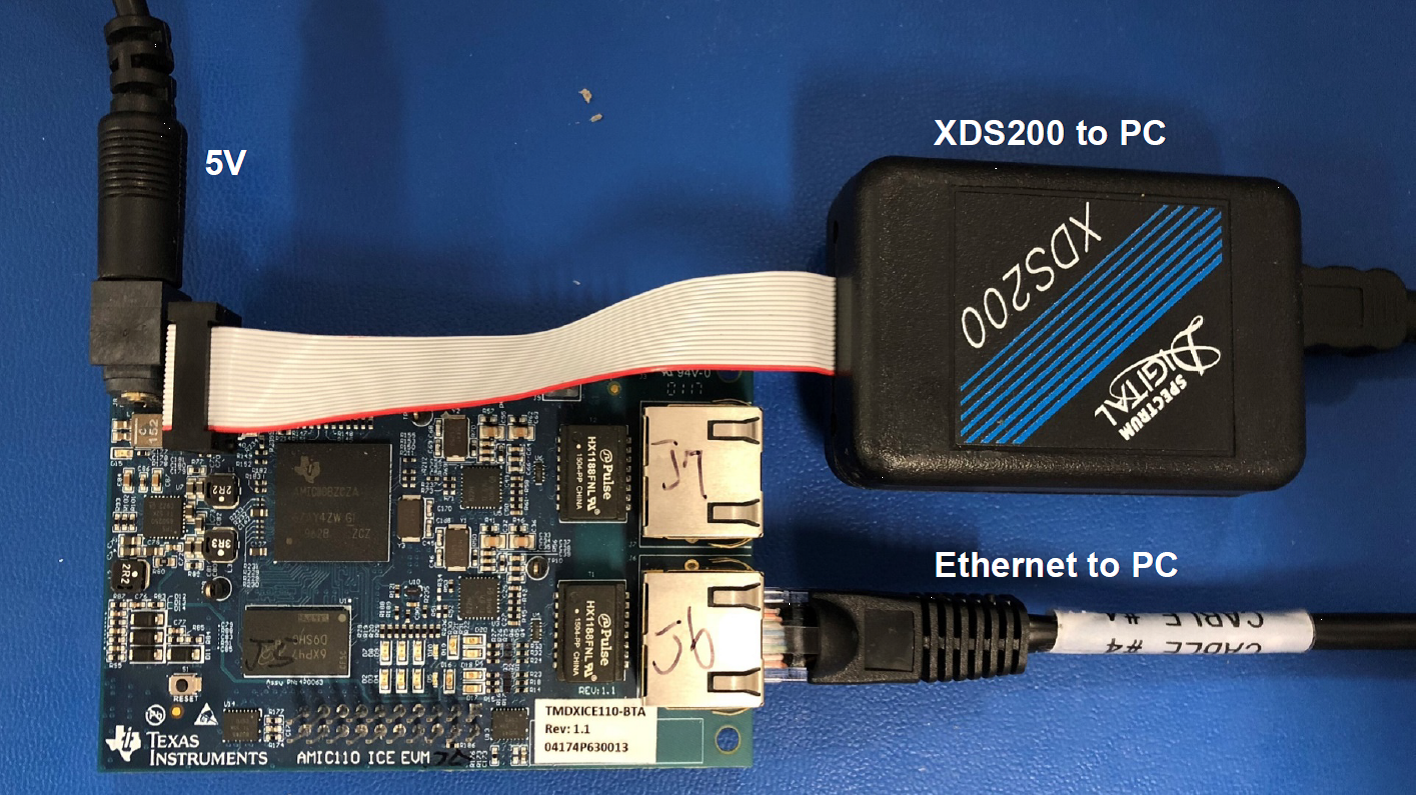
**Figure 1. AMIC110 ICE Hardware Setup**
### EtherCAT Software Setup
Steps 1-3 are cover our pre-built demo. Steps 4-5 are required if you would like to modify the code or pursue your own development efforts.
1. Install [Code Composer Studio v9.3+](https://www.ti.com/tool/download/CCSTUDIO/9.3.0.00012)
2. Install TwinCAT (Evaluation version is available for download from [TWINCAT3 Download website](https://www.beckhoff.co.in/english.asp?download/tc3-download-xae.htm))
3. EtherCAT Slave Demo Application: Copy {EtherCAT_package_install_path}\examples\ethercat_slave\esi\TiEtherCATLib.xml to <Drive>:\TwinCAT\Io\EtherCAT folder. If you are using TwinCAT 3.1, the folder path is <Drive>:\TwinCAT\3.1\Config\Io\EtherCAT
4. Download and install [PROCESSOR-SDK-RTOS-AM335X v5_01_00_11](https://software-dl.ti.com/processor-sdk-rtos/esd/AM335X/05_01_00_11/index_FDS.html) to c:\ti.
5. Download and install [PRU-ICSS-ETHERCAT-SLAVE v01_00_07_02](https://software-dl.ti.com/processor-industrial-sw/esd/PRU-ICSS-ETHERCAT-SLAVE/01_00_07_02/index_FDS.html) to c:\ti.
## EtherCAT Procedure
1. Power up the AMIC110 ICE board with a 5V power supply.
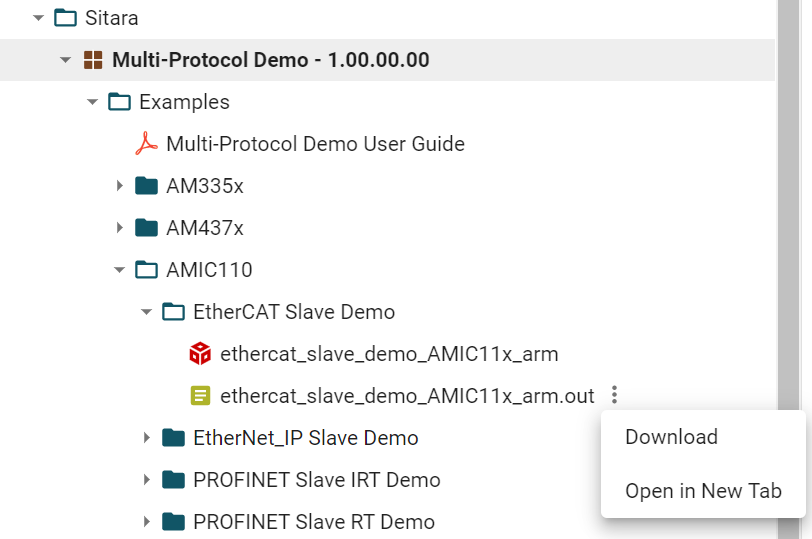
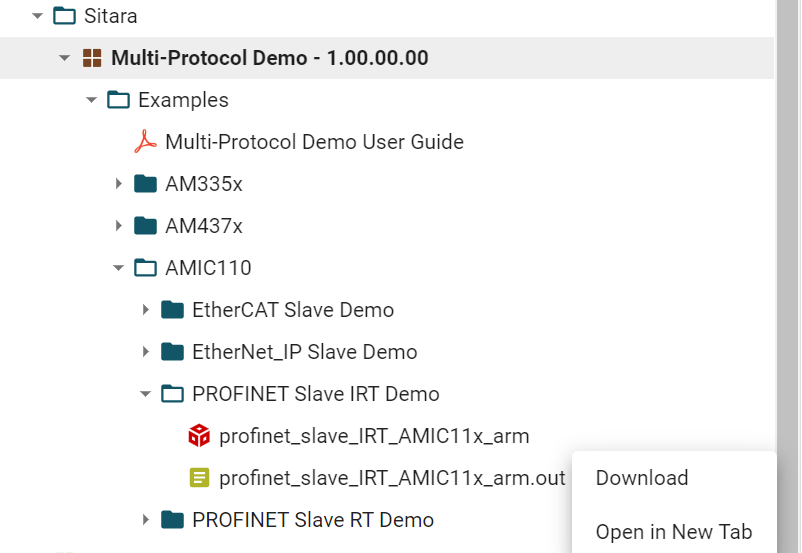
2. To run the pre-built demo, select ethercat_slave_demo_AMIC11x_arm.out under AMIC110 folder in the TI Resource Explorer and move cursor to the icon for download, click Download, chose any desired folder to save the binary.
3. Start Code Composer Studio (CCS), create a target configuration and choose AMIC110 ICE as the target. Launch the target configuration and load/run the ethercat_slave_demo_AMIC11x_arm.out to Cortex-A8 core. If you are new to Code Composer Studio, please visit the [training section](https://www.ti.com/tool/CCSTUDIO#supportandcommunity) for help on how to use the tool.
4. Observe the LEDs for a pattern as shown on Figure 3 to confirm that EtherCAT application has started.
5. Start TwinCAT, refer to the steps #4 through #12 from section 1.1.11.2. Setup For EtherCAT Operation in the [PRU ICSS EtherCAT Slave User Guide](https://software-dl.ti.com/processor-industrial-sw/esd/docs/indsw/EtherCAT_Slave/01_00_08/PRU_ICSS_EtherCAT.html#setup-for-ethercat-operation) to scan the AMIC110 EtherCAT slave device and operate LEDs.
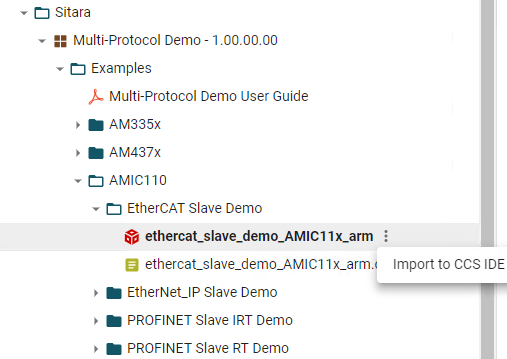
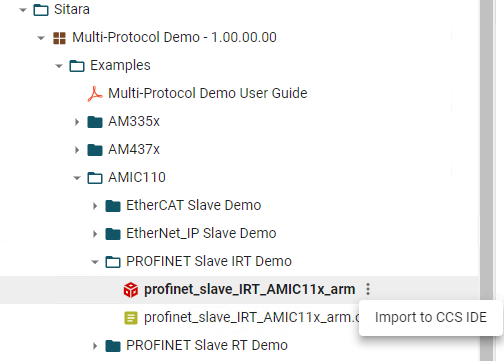
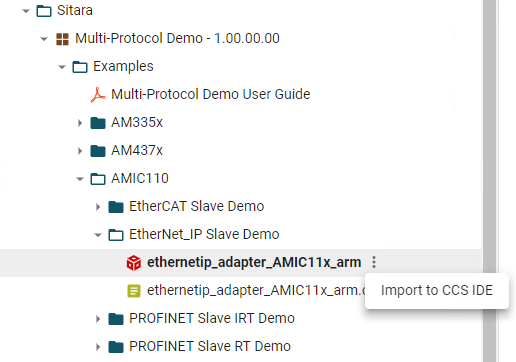
6. To get access to the full source code, you can import the ethercat_slave-mdeo_AMIC11x_arm project from CCS View menu - > Resource Exploer and build its binary. Then follow steps 3-5.
## EtherCAT Result
Online write to the ‘<RxPDO> 32Bit Output’ corresponds to LED status change.
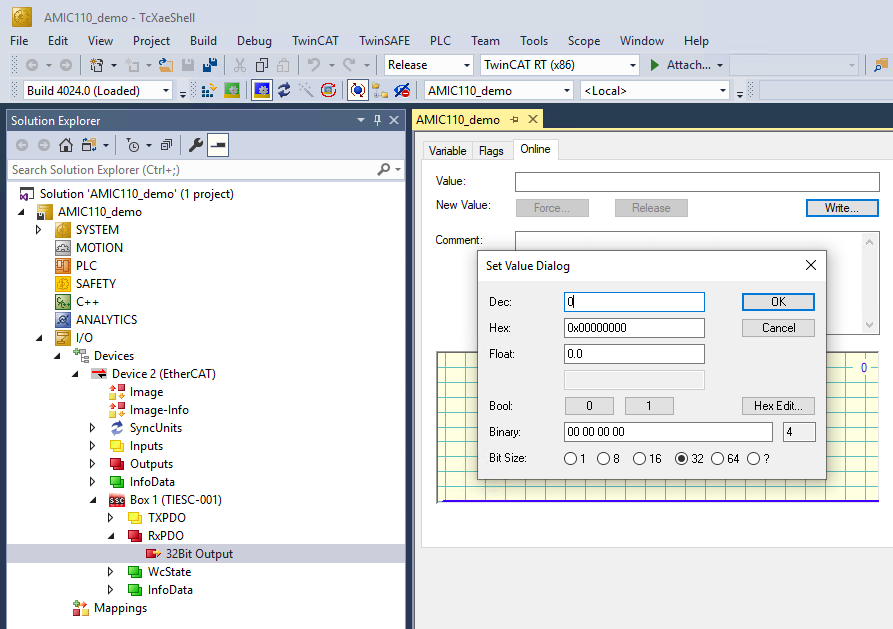
**Figure 2. TwinCAT 3.1 and AMIC110 Project**
<br><br>
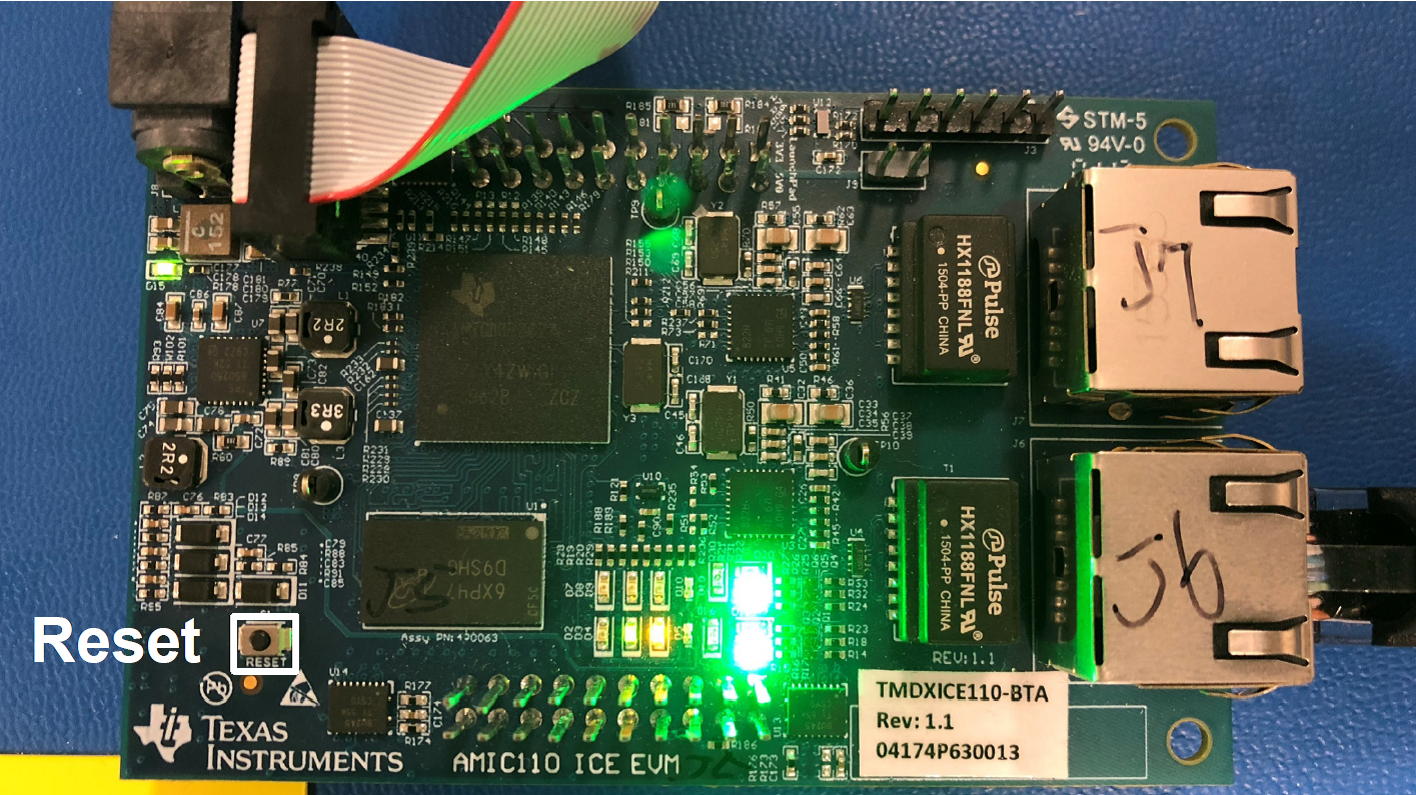
**Figure 3. AMIC110 LED Status**
# PROFINET IRT Demo
## PROFINET IRT Setup
In this section of the guide, you will learn how to connect a TMDXICE110 EVM to a PLC over a PROFINET IRT network.
### PROFINET IRT Hardware Setup
1. Install [Code Composer Studio v9.3+](https://www.ti.com/tool/download/CCSTUDIO/9.3.0.00012)
2. Install TIA Portal for Siemens S7-1500 PLC Configuration. TIA Portal software from Siemens is used to configure S7-1500 PROFINET PLC. A trial version and service pack is available at:
- [SIMATIC STEP 7 (TIA Portal) V13 TRIAL Download](https://support.industry.siemens.com/cs/document/78793685/simatic-step-7-(tia-portal)-v13-trial-download)
- [Service Pack 1 for SIMATIC STEP 7 V13 including PLCSIM (TIA Portal)](https://support.industry.siemens.com/cs/document/105825934/service-pack-1-for-simatic-step-7-v13-incl-plcsim-(tia-portal))
3. Refer to the [Getting Started SIMATIC S7-1500 TIA Portal](https://www.automation.siemens.com/salesmaterial-as/interactive-manuals/getting-started_simatic-s7-1500/_content/EN/content_en.html) guide.
4. Download and install [PROCESSOR-SDK-RTOS-AM335X v5_01_00_11](https://software-dl.ti.com/processor-sdk-rtos/esd/AM335X/05_01_00_11/index_FDS.html) to c:\ti, skip the step if it has been installed in EtherCAT slave demo
5. Download and install [PRU-ICSS-PROFINET-SLAVE v01_00_03_04](https://software-dl.ti.com/processor-industrial-sw/esd/PRU_ICSS_PROFINET_Slave/latest/index_FDS.html)
1. Refer to materials needed
2. In addition, you’ll need a Siemens S7 1500 PLC
3. Connect Ethernet port 0 (J6) on AMIC110 ICE to Siemen S7 1500 PLC port 0 instead of PC
4. Connect Siemen S7 1500 PLC port 1 to the PC with STEP 7 software installed.
### PROFINET IRT Software setup
Only steps 1-3 are required to run the pre-built demo. The additional steps are required for development and modification of the demo code.
1. Install [Code Composer Studio v9.3+](https://www.ti.com/tool/download/CCSTUDIO/9.3.0.00012)
2. Install TIA Portal for Siemens S7-1500 PLC Configuration. TIA Portal software from Siemens is used to configure S7-1500 PROFINET PLC. A trial version and service pack is available at:
- [SIMATIC STEP 7 (TIA Portal) V13 TRIAL Download](https://support.industry.siemens.com/cs/document/78793685/simatic-step-7-(tia-portal)-v13-trial-download)
- [Service Pack 1 for SIMATIC STEP 7 V13 including PLCSIM (TIA Portal)](https://support.industry.siemens.com/cs/document/105825934/service-pack-1-for-simatic-step-7-v13-incl-plcsim-(tia-portal))
3. Refer to the [Getting Started SIMATIC S7-1500 TIA Portal guide](https://www.automation.siemens.com/salesmaterial-as/interactive-manuals/getting-started_simatic-s7-1500/_content/EN/content_en.html).
4. Download and install [PROCESSOR-SDK-RTOS-AM335X v5_01_00_11](https://software-dl.ti.com/processor-sdk-rtos/esd/AM335X/05_01_00_11/index_FDS.html) to c:\ti, skip the step if it has been installed in EtherCAT slave demo
5. Download and install [PRU-ICSS-PROFINET-SLAVE v01_00_03_04](https://software-dl.ti.com/processor-industrial-sw/esd/PRU_ICSS_PROFINET_Slave/latest/index_FDS.html)
## PROFINET IRT Procedure
1. Power up the AMIC110 ICE board with a 5V power supply.
2. Select profinet_slave_IRT_AMIC11x_arm.out under AMIC110 folder in the TI Resource Explorer and move cursor to the icon for download, click Download, chose any desired folder to save the binary.
3. The application uses DMTimer4 as the clock source for the SYSBIOS Ticks (refer to .cfg file for details). The DMTimer module needs to be enabled in the GEL file cs\ccs_base\emulation\boards\ice_amic110\gel\iceAMIC110.gel.
- Add the line inside hotmenu AMIC110_ICE_Initialization()
``` WR_MEM_32(CM_PER_TIMER4_CLKCTRL, PRCM_MODULEMODE_ENABLE); ```
- Add the defines in the GEL File<br>
```#define CM_PER_TIMER4_CLKCTRL (PRCM_BASE_ADDR + 0x88)```<br>
```#define PRCM_MODULEMODE_ENABLE (2U) ```
4. Start CCS, create a target configuration for AMIC110 if needed, and choose AMIC110 ICE as target. If you are new to Code Composer Studio, please visit the [training section](https://www.ti.com/tool/CCSTUDIO#supportandcommunity) for help on how to use the tool.
5. Launch the target configuration and load/run the profinet_slave_IRT_AMIC11x_arm.out to Cortex-A8 core.
6. Configure Siemens S7-1500 PLC
7. Refer to the [System overview SIMATIC S7-1500](https://new.siemens.com/global/en/products/automation/systems/industrial/plc/simatic-s7-1500.html) for S7-1500 PLC setup. Details on setting up a PROFINET Connection with a PLC is included in [PRU-ICSS-PROFINET-SLAVE INSTALL-DIR]\third_party\protocols\profinet_slave\docs
8. To get access to the full source code, you can import the profinet_slave_IRT_AMIC11x_arm project from CCS View menu - > Resource Exploer and build its binary. Then follow steps 3-7.
## PROFINET IRT Result
Complete green status will be shown in TIA online view. Also the GREEN status LED will be glowing permanently in the PLC top lid.

**Figure 4. TIA Online View of PROFINET IRT on AMIC110**
# EtherNet/IP Demo
## EtherNet/IP Setup
In this section of the guide, you will learn how to connect a TMDXICE110 EVM to a PLC over an EtherNet/IP network.
### EtherNet/IP Hardware Setup
1. Refer to materials needed
2. In addition, you will need a CompactLogix L18ER PLC
3. Connect Ethernet port 0 (J6) on AMIC110 ICE to CompactLogix L18ER PLC instead of PC with Logix Designer installed.
### EtherNet/IP Software Setup
1. Install [Code Composer Studio v9.3+](https://www.ti.com/tool/download/CCSTUDIO/9.3.0.00012)
2. Order and Install [Logix Designer](https://www.rockwellautomation.com/en_NA/products/factorytalk/overview.page?pagetitle=Studio-5000-Logix-Designer&docid=924d2f2060bf9d409286937296a18142) software for configuring CompactLogix L18ER PLC
3. Download and install [PROCESSOR-SDK-RTOS-AM335X v5_01_00_11](https://software-dl.ti.com/processor-sdk-rtos/esd/AM335X/05_01_00_11/index_FDS.html) to c:\ti, skip the step if it has been installed in EtherCAT slave or PROFINET slave demo
4. Download and install [PRU-ICSS-ETHERNETIP-ADAPTER 01_00_03_04](https://software-dl.ti.com/processor-industrial-sw/esd/PRU-ICSS-ETHERNETIP-ADAPTER/latest/index_FDS.html)
## EtherNet/IP Procedure
1. Power up the AMIC110 ICE board with a 5V power supply.
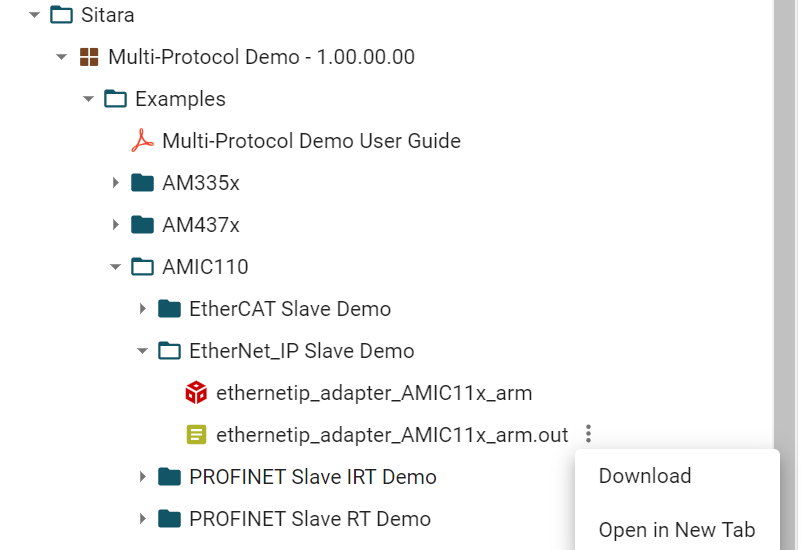
2. Select ethernetip_adapter_AMIC11x_arm.out under AMIC110 folder in the TI Resource Explorer and move cursor to the icon for download, click Download, chose any desired folder to save the binary.
3. Start CCS, create a target configuration for AMIC110 if needed, and choose AMIC110 ICE as target.
4. The application uses DMTimer4 as the clock source for the SYSBIOS Ticks (refer to .cfg file for details). The DMTimer module needs to be be enabled in the GEL file cs\ccs_base\emulation\boards\ice_amic110\gel\iceAMIC110.gel:
- Add the line inside hotmenu AMIC110_ICE_Initialization()
``` WR_MEM_32(CM_PER_TIMER4_CLKCTRL, PRCM_MODULEMODE_ENABLE); ```
- Add the defines in the GEL File<br>
```#define CM_PER_TIMER4_CLKCTRL (PRCM_BASE_ADDR + 0x88)```<br>
```#define PRCM_MODULEMODE_ENABLE (2U) ```
5. Launch the target configuration and load/run the ethernetip_adapter_AMIC11x_arm.out to Cortex-A8 core.
6. Refer to [Communication between EtherNet/IP Adapter and Scanner devices](https://processors.wiki.ti.com/index.php/ICSS_EIP_Adapter_Developer_Guide#Communication_between_EtherNet.2FIP_Adapter_and_Scanner_devices) to configure CompactLogix L18ER PLC.
7. To get access to the full source code, you can import the ethernetip_adapter_AMIC11x_arm project from CCS View menu - > Resource Exploer and build its binary. Then follow steps 3-6.
## EtherNet/IP Result
When the I/O connection is established, successful I/O connection will be indicated by ‘I/O OK’ as shown in Figure 5.
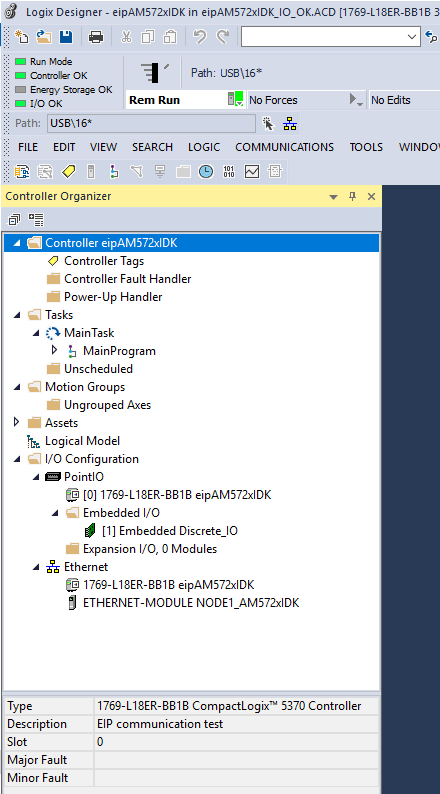
**Figure 5. I/O OK Status of Ethernet/IP on Logix Designer**
<div align="center" style="margin-top: 4em; font-size: smaller;">
<a rel="license" href="https://creativecommons.org/licenses/by-nc-nd/4.0/"><img alt="Creative Commons License" style="border-width:0" src="./web_support/cc_license_icon.png" /></a><br />This work is licensed under a <a rel="license" href="https://creativecommons.org/licenses/by-nc-nd/4.0/">Creative Commons Attribution-NonCommercial-NoDerivatives 4.0 International License</a>.</div>