Introduction
This workshop is a detailed description of how to use the advertising and scanning features of the TI BLE-Stack. All tasks in this lab session are targeted to be completed within a 2-4 hour time frame. You should have an intermediate level of knowledge of the C programming language as well as experience with embedded software development to be able to complete the tasks.
The first section describes the advertising and scanning functions, and the subsequent tasks will explore the wireless BLE interface and how to make some small changes to the BLE application.
For the tasks in this module, a pair of evaluation kits (CC2640R2 LaunchPad) running a TI application (simple_central or simple_peripheral) is required.
It is recommended to read the TI BLE-Stack User's Guide alongside this lab for details and further information. Some references will also be made to this document as well as the Bluetooth Core Spec V4.2 which specifies how BLE devices should operate and communicate with other devices.
Prerequisites
Completed material
- BLE Fundamentals SimpleLink Academy Lab Module
Software for desktop development
- CCS 8.3+ or IAR 8.20.2+
- SimpleLink™ CC2640R2 SDK
Hardware
This module requires the following kits:
Recommended reading
These chapters in the TI BLE-Stack User's Guide
- Getting Started
- The CC2640R2F SDK Platform
- Developing a Bluetooth low energy Application
Getting started – Desktop
Install the software
- Run the SimpleLink CC2640R2 SDK installer:
simplelink_cc2640r2_sdk_2_40_00_xx.exe.
This gives you:
- The SDK with TI-RTOS included at
<SIMPLELINK_CC2640R2_SDK_INSTALL_DIR>which defaults toC:\ti\simplelink_cc2640r2_sdk_2_40_00_xx.
Modify/Load the software
- Load Board #1 with simple_central project that supports the scanning procedure found here:
<SIMPLELINK_CC2640R2_SDK_INSTALL_DIR>\examples\rtos\CC2640R2_LAUNCHXL\blestack\simple_central\tirtos - Load Board #2 with simple_peripheral project that supports the advertising procedure found here:
<SIMPLELINK_CC2640R2_SDK_INSTALL_DIR>\examples\rtos\CC2640R2_LAUNCHXL\blestack\simple_peripheral\tirtos
Note: Be sure to build/load both the stack and app projects.
The following tasks will show how to modify the above projects to showcase scanning and advertising features in the respective projects. The user will have to modify these existing projects in the SimpleLink CC2640R2 SDK to experiment with the tasks.
Background
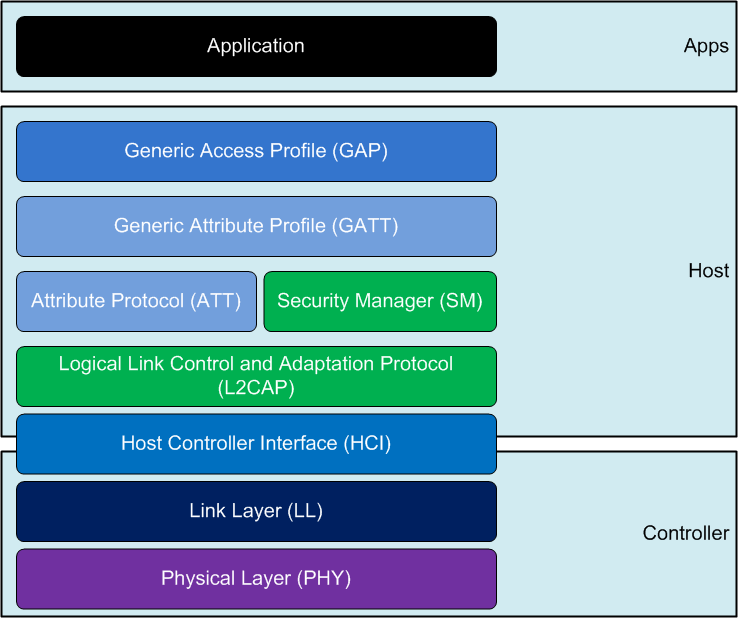
The Generic Access Profile (GAP) is a top layer in the host protocol stack that defines how BLE devices behave in standby and connecting states to maintain interoperability with peer devices. GAP also describes discovery, link establishment and security procedures. The GAP APIs can be called from the application layer.
- You can read about GAP in the BLE5-Stack User's Guide and proceed to Developing a Bluetooth Low Energy Application → The Stack → Generic Access Profile (GAP)
The following figure visually shows the GAP layer in relation to other layers in the software hierarchy:
The following GAP roles are defined in the
Bluetooth core specification
and described in gap.h:
| GAP Role | Description |
|---|---|
| BROADCASTER | A device that only sends advertising events. |
| OBSERVER | A device that only receives advertising events. |
| PERIPHERAL | A device that accepts the establishment of an LE physical link using the connection establishment procedure. |
| CENTRAL | A device that supports the Central role initiates the establishment of a physical connection. |
The GAP layer API gives very fine-grained control of the device behavior. To remove some complexity, the sample applications use an interface called GAPRole which provide a subset of streamlined APIs for each GAP role such as Central, Observer and Peripheral.
Usually a project implements one of these profile roles, however multiple GAP roles may be supported at the same time. A GAP profile is initialized by passing in the desired GAP role(s) as a parameter to the GAP_DeviceInit() function.
The GAPRole APIs provide high level functions while the GAP APIs are used to configure the low level states that the BLE devices operate in.
The project provides GAPRole interface in a file under the project Profiles folder along with helper functions and parameters. For example, for a peripheral project, peripheral.c provides
APIs for the application to accept establishment of connections and advertising procedures. The GAPRole also passes events to the application via callbacks.
Which GAP Roles are connectionless (do not support the connected state)?
Choose the correct answer(s).
Advertising
Advertising Basics
Bluetooth devices send advertising packets (PDUs) to broadcast data, and to allow other devices (scanners) to find and connect to them. The advertising data consists up to 31 bytes of user configurable data. An additional 31 bytes can be sent as a scan response to a scan request. There are four different types of advertising packets listed in the table below.
| Advertising PDU | Description | Max Adv Data Len | Max Scan Res Len | Allow Connect |
|---|---|---|---|---|
| ADV_IND | Used to send connectable undirected advertisement | 31 bytes | 31 bytes | Yes |
| ADV_DIRECT_IND | Used to send connectable directed advertisement | N/A | N/A | Yes |
| ADV_SCAN_IND | Used to send scannable undirected advertisement | 31 bytes | 31 bytes | No |
| ADV_NONCONN_IND | Used to send non-connectable undirected advertisement | 31 bytes | N/A | No |
The above table shows that all the advertising modes use the 31 payload bytes for advertisement data except directed advertising, which uses the 6-byte device address of the initiating device. Directed advertisements have an intended receiving device (scanner), while undirected advertisements do not have a specific intended receiver. In addition, all the advertising types enable sending a scan response, except for the directed and non-connectable advertising. See BT Core Spec V4.2 Vol. 6, Part B, Section 4.4 for more information.
Which type of advertising does not receive (RX) any packets (is transmit (TX) only)?
Choose the correct answer(s).
The following table summarizes the parameters that can be configured for advertising.
| Advertising Parameter | Description | Range |
|---|---|---|
| Advertising Interval | Time between the start of two consecutive advertising events | 20ms to 10.24s |
| Advertising Types | Different PDUs are sent for different types of advertising | Connectable undirected, connectable directed, scannable undirected, non-connectable |
| Advertising Channels | Advertising packets are sent on three channels | Different combinations of channels 37, 38 and 39. |
The device advertises on three channels. The advertising channels are channel 37 (2402 MHz), channel 38 (2426 MHz), and channel 39 (2480 MHz). These channels are selected to minimize interference from Wi-Fi channels. The following diagram shows an advertising event when advertising on all three channels.
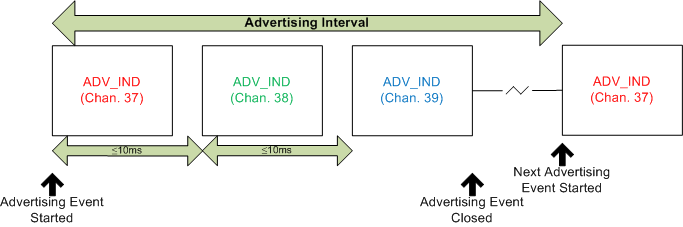
Note that the same data (ADV_IND) is sent on all three channels. The device can be modified to advertise only on selected channels. Advertising on fewer channels will save power, however using more channels will increase the likelihood of a peer device receiving the packet.
The following tasks will demonstrate advertising using the simple_peripheral_cc2640r2lp_app project.
Advertising Task 1 – Change Advertising Parameters
In this task, we will configure the device to advertise on one channel every 200ms using the simple_peripheral project. If you haven't loaded the simple_peripheral project into your device yet - do it now! Build the stack library project first, then build and flash the app project.
The following API will set up the GAPRole to advertise on channel 37 in simple_peripheral.c:
// === SOLUTION [Add/change GAP advertising params] ===
// Advertising interval when device is discoverable (units of 625us, 320=200ms)
#define DEFAULT_ADVERTISING_INTERVAL          320
#define DEFAULT_ADVERTISING_CHANNEL_MAP       GAP_ADVCHAN_37
// ==== END SOLUTION ====

// ...
static void SimplePeripheral_init(void)
{
  // ...
  // Set advertising interval.
  {
    uint16_t advInt = DEFAULT_ADVERTISING_INTERVAL;

    GAP_SetParamValue(TGAP_LIM_DISC_ADV_INT_MIN, advInt);
    GAP_SetParamValue(TGAP_LIM_DISC_ADV_INT_MAX, advInt);
    GAP_SetParamValue(TGAP_GEN_DISC_ADV_INT_MIN, advInt);
    GAP_SetParamValue(TGAP_GEN_DISC_ADV_INT_MAX, advInt);
  }
  // ...

  // === SOLUTION [Configure advertising channel map] ===
  // Configure advertising channel map.
  uint8_t advChannelMap = DEFAULT_ADVERTISING_CHANNEL_MAP;
  GAPRole_SetParameter(GAPROLE_ADV_CHANNEL_MAP, sizeof(uint8_t), &advChannelMap);
// ==== END SOLUTION ====

// ...
simple_peripheral.c :: SimplePeripheral_init() – Configuring advertising interval and advertising channel
The default value of the advertising channel map is set to GAP_ADVCHAN_ALL;
advertise on all three channels.
The user can configure the advertising interval based on the application use case. For example,
if a door lock is advertising at a slower interval, it will take longer for the peer device
to connect to the door lock which would adversely affect user experience.
Which advertising interval is best suited for a door lock application powered by battery?
Choose the correct answer.
Which advertising interval is best suited for a temperature sensor application powered by battery?
Choose the correct answer.
Limited advertising can be used to conserve power by advertising for a limited amount of time. General advertisers will continue advertising indefinitely, while limited advertisers advertise for about 30 seconds, enough time for any devices trying to scan and/or connect.
To use limited advertising, in simple_peripheral.c, set DEFAULT_DISCOVERABLE_MODE to GAP_ADTYPE_FLAGS_LIMITED inside the advertData array. To do this, modify the following define. This will configure the device to use limited advertising mode:
// Limited discoverable mode advertises for 30.72s, and then stops
// General discoverable mode advertises indefinitely
#define DEFAULT_DISCOVERABLE_MODE             GAP_ADTYPE_FLAGS_LIMITED
Enable limited advertising
Limited advertising can be used to further classify/filter devices. For example, devices that are scanning in limited discovery mode can only receive advertisement data from limited advertising devices. See BT Core Spec V4.2 Vol. 3, Part C, Section 9.2.5 for more information on the limited discovery procedure.
The parameters set in SimplePeripheral_init() are used when the advertising procedure is started. Advertising can be started many ways by the application. Look at peripheral.c under the Profiles folder to see all the ways advertising can be started. One way to start advertising is used initially in simple_peripheral.c:
uint8_t initialAdvertEnable = TRUE;
GAPRole_SetParameter(GAPROLE_ADVERT_ENABLED, sizeof(uint8_t), &initialAdvertEnable);
Starting the advertising procedure
Advertising Task 2 – Change the Advertising Data
In this task, we will change the advertisement data periodically (in this case, every 5 seconds). In order to make sure our advertising data successfully updates, we will toggle an LED.
First, add the following code to the Local Variables section of simple_peripheral.c:
// GAP GATT Attributes
static uint8_t attDeviceName[GAP_DEVICE_NAME_LEN] = "Simple Peripheral";

// === SOLUTION [Add LED Support] ===
/* Pin driver handles */
static PIN_Handle ledPinHandle;

/* Global memory storage for a PIN_Config table */
static PIN_State ledPinState;

/*
 * Initial LED pin configuration table
 *   - LEDs Board_LED0 is off.
 */
PIN_Config ledPinTable[] = {
  Board_LED0 | PIN_GPIO_OUTPUT_EN | PIN_GPIO_LOW | PIN_PUSHPULL | PIN_DRVSTR_MAX,
  PIN_TERMINATE
};
// ==== END SOLUTION ====

/*********************************************************************
simple_peripheral.c :: Local Variables – Add LED Configuration
To use the LED, the PIN driver must be opened. This can be done at the end of
SimplePeripheral_init():
#endif // !defined (USE_LL_CONN_PARAM_UPDATE)

// === SOLUTION [Add Open PIN Driver] ===
  ledPinHandle = PIN_open(&ledPinState, ledPinTable);
// ==== END SOLUTION ====

  Display_print0(dispHandle, 0, 0, "BLE Peripheral");
simple_peripheral.c :: SimplePeripheral_init() – Open the PIN Driver
Next, we will start the clock for our periodic event. simple_peripheral
already has an event that is called periodically - the SBP_PERIODIC_EVENT. In
the default simple_peripheral.c, the periodic clock is first started from the
GAPROLE_CONNECTED state of
SimplePeripheral_processStateChangeEvt(gaprole_States_t newState). Since we
are not expecting to form a connection in this case, we will move the
call to Util_startClock(&periodicClock); from case GAPROLE_CONNECTED: to
the end of SimplePeripheral_init:
#endif // !defined (USE_LL_CONN_PARAM_UPDATE)

  ledPinHandle = PIN_open(&ledPinState, ledPinTable);

// === SOLUTION [Start Periodic Clock] ===
  Util_startClock(&periodicClock);
// ==== END SOLUTION ====

  Display_print0(dispHandle, 0, 0, "BLE Peripheral");
simple_peripheral.c :: SimplePeripheral_init() – Start Periodic Clock
The advertisement data can be changed at runtime by changing the contents of the
advertData[] variable, and updating it by using GAPRole_SetParameter(). To
make the data easier to work with, we will define a couple symbols in the
Constants section of simple_peripheral.c:
// Bitwise OR of all events to pend on
#define SBP_ALL_EVENTS                        (SBP_ICALL_EVT        | \
                                               SBP_QUEUE_EVT        | \
                                               SBP_PERIODIC_EVT)

// === SOLUTION [Add Advertising Defines] ===
#define ADV_MAX_LEN 31
#define ADVDATA_MANUF_DATA_IDX 5
// ==== END SOLUTION ====

/*********************************************************************
simple_peripheral.c :: Constants – Adding advertising defines
Additionally, we must set the size of advertData[] to ADV_MAX_LEN. Make the following change to the variable declaration:
// Advertisement data (max size = 31 bytes, though this is
// best kept short to conserve power while advertising)
static uint8_t advertData[ADV_MAX_LEN] =
{
//...
simple_peripheral.c :: – Set advertData to max size (31 bytes)
Finally, we will add the following code to the SBP_PERIODIC_EVENT case in
SimplePeripheral_taskFxn():
  if (events & SBP_PERIODIC_EVT)
  {

    Util_startClock(&periodicClock);

// === SOLUTION [Change advertising data] ===
    uint8_t i = 0;
    bStatus_t status = 0;

    static uint8_t advData = 0;

    advertData[i++] = 0x02;   // length of this data
    advertData[i++] = GAP_ADTYPE_FLAGS;
    advertData[i++] = DEFAULT_DISCOVERABLE_MODE | GAP_ADTYPE_FLAGS_BREDR_NOT_SUPPORTED;

    //Setup up custom user data initially
    advertData[i++] = ADV_MAX_LEN - i - 1; // length of this data
    advertData[i++] = GAP_ADTYPE_MANUFACTURER_SPECIFIC; // length of this data

    //populate the remaining with custom ADV data (i.e. 0x00,0x01, 0x02, etc.)
    for(i = ADVDATA_MANUF_DATA_IDX; i < ADV_MAX_LEN; i++)
    {
      advertData[i] = advData++;
    }
    status = GAPRole_SetParameter(GAPROLE_ADVERT_DATA, sizeof(advertData), advertData);

    if(status == SUCCESS)
    {
      //Toggle LED to indicate successful advertising data change
      PIN_setOutputValue(ledPinHandle, Board_LED0, PIN_getOutputValue(Board_LED0)^1);
    }
// ==== END SOLUTION ====

// ...
simple_peripheral.c :: SimplePeripheral_taskFxn() – Changing advertising data
advertData[] is defined in the beginning of simple_peripheral.c, but it can be called again to change the advertising data at runtime.
Note that advertising data should follow a certain format described in BT Core Spec V4.2 Vol. 3, Part C, Ch. 11. The different data types that can be used in the advertisement data are further explained in the Core Specification Supplement (CSSv7) along with examples.
Advertising Task 3 – Change Filter Policy
Since the advertisement data is broadcasted, any scanning device can pick it up. Furthermore, the scanner can send a scan request to request more data from the advertiser. The advertiser will then send a scan response. However, the advertiser can choose to send the scan response data only to certain devices that are contained in its white list. Also, the advertiser can limit which devices can connect to it (to only the devices contained in the white list).
Use the following code to restrict scan response (and thereby connection) to devices which are added to the white list. Remember to change the bdAddressPeer[] to the BDA of your central device.
static void SimplePeripheral_init(void)
{
// ...
// === SOLUTION [Change filter policy] ===
  //set ADV filter policy to allow scan and connect request from white list only
  uint8_t advFilterPolicy = GAP_FILTER_POLICY_WHITE;

  //remember to change the values below to the BDA of your central device
  static uint8 bdAddressPeer[6] = {0x00,0x90,0x78,0x56,0x34,0x12};
  HCI_LE_AddWhiteListCmd(ADDRMODE_PUBLIC, bdAddressPeer);

  GAPRole_SetParameter(GAPROLE_ADV_FILTER_POLICY, sizeof(uint8_t), &advFilterPolicy);
// ==== END SOLUTION ====

  // Set the GAP Characteristics
  GGS_SetParameter(GGS_DEVICE_NAME_ATT, GAP_DEVICE_NAME_LEN, attDeviceName);
// ...
simple_peripheral.c :: SimplePeripheral_init() – Configuring advertising filter policy
Scanning
Scanning Basics
When not connected, Bluetooth devices can either advertise their presence by transmitting advertisement packets or scan for nearby devices that are advertising. This process of scanning for devices is called device discovery. There are two types of scanning; active and passive. The difference is that an active scanner can send a scan request to request additional information from the advertiser, while a passive scanner can only receive data from advertising device. Note that the terms discovery and scanning may be used interchangeably. The figure below shows the sequence where the scanner sends a scan request to an advertiser during an advertising event.
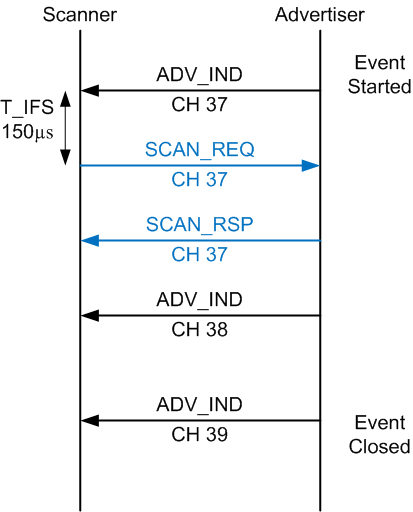
When it comes to the timing of a scan, there are a few parameters you need to get familiar with. Each of these parameters has a range dictated by the Bluetooth Core Spec. The Time Inter Frame Space(T_IFS) is the time interval between two consecutive packets on the same channel index and is set to 150us by the BLE specification.
| Scan Parameter | Description | Range |
|---|---|---|
| Scan Interval | Interval between the start of two consecutive scan windows | 10ms to 10.24s |
| Scan Window | The duration in which the Link Layer scans on one channel | 10ms to 10.24s |
| Scan Duration | The duration in which the device stays in the scanning state | 10ms to infinity |
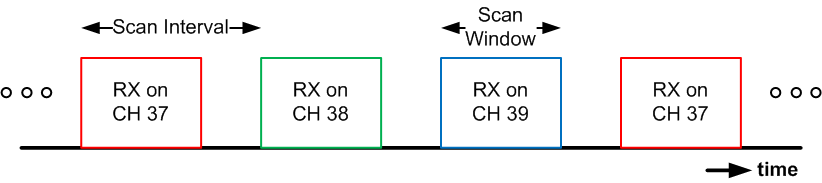
Note that the order of the scanning channels are not configurable, the device will scan on channel 37 (2402 MHz), channel 38 (2426 MHz), and channel 39 (2480 MHz) respectively and in that order on every scanning interval for the length of time defined by the scanning window. The following diagram visually shows the scanning parameters:
Which type of scanning does not transmit (TX) any packets, only receives (RX) advertisement packets?
Choose the correct answer(s).
The following tasks will demonstrate scanning using the simple_central_cc2640r2lp_app project.
Scanning Task 1 – Change Scanning Parameters
In this task, we will scan continuously with the following scan parameters:
- Scan interval: 150 milliseconds(ms)
- Scan window: 150 milliseconds(ms)
- Scan duration: 5 seconds(s)
- Scan type: Passive
When setting the scan interval equal to the scan window the device will scan continuously. On the other hand, if the scan interval is larger than the scan window the device will duty-cycle scanning.
If you haven't loaded the simple_central project into your device yet - now is the time! Build the stack library project first, then build and flash the app project. In simple_central.c, change the default scan parameters as shown below:
// === SOLUTION [Add GAP discovery settings] ===
  // Scan duration in ms
  #define DEFAULT_SCAN_DURATION                 5000
  // Scan interval in units of 0.625 ms
  #define DEFAULT_SCAN_INTERVAL                 240 //(240 * 0.625) = 150 ms
  // Scan window in units of 0.625 ms
  #define DEFAULT_SCAN_WINDOW                   240 //(240 * 0.625) = 150 ms
  // FALSE to use passive scan
  #define DEFAULT_DISCOVERY_ACTIVE_SCAN         FALSE
// ==== END SOLUTION ====

// ...

static void SimpleCentral_init(void)
{
// ...
    //Setup the Central GAPRole Profile.
    {
    uint8_t scanRes = DEFAULT_MAX_SCAN_RES;

    GAPCentralRole_SetParameter(GAPCENTRALROLE_MAX_SCAN_RES, sizeof(uint8_t),
                                &scanRes);
    }

  // Set GAP Parameters to set the discovery duration
  GAP_SetParamValue(TGAP_GEN_DISC_SCAN, DEFAULT_SCAN_DURATION);
  GAP_SetParamValue(TGAP_LIM_DISC_SCAN, DEFAULT_SCAN_DURATION);

// === SOLUTION [Add GAP discovery settings] ===
  GAP_SetParamValue(TGAP_GEN_DISC_SCAN_INT, DEFAULT_SCAN_INTERVAL); //period for one scan channel
  GAP_SetParamValue(TGAP_GEN_DISC_SCAN_WIND, DEFAULT_SCAN_WINDOW); //active scanning time within interval
// ==== END SOLUTION ====

  GGS_SetParameter(GGS_DEVICE_NAME_ATT, GAP_DEVICE_NAME_LEN,
                  (void *)attDeviceName);
simple_central.c :: SimpleCentral_init() – Configuring scan parameters
The above parameters are used to set up how the device will behave during the discovery process. If the application is scanning at a low duty cycle, it might take longer to receive the advertisement report thus also delaying connection to the peer device which can adversely affect user experience. Additionally, the following parameters can be configured when starting discovery:
| Scan Parameter | Default Value | Description |
|---|---|---|
| DEFAULT_DISCOVERY_MODE | GAP_ADTYPE_FLAGS_GENERAL | Choose between limited, general, or all discoverable mode |
| DEFAULT_DISCOVERY_ACTIVE_SCAN | TRUE | Choose between active and passive scanning |
| DEFAULT_DISCOVERY_WHITE_LIST | FALSE | Choose to use white list or no white list |
These parameters are passed into GAPCentralRole_StartDiscovery() to start scanning when BTN2 is pressed.
static void SimpleCentral_handleKeys(uint8_t shift, uint8_t keys)
{
  // ...
  if (keys & KEY_RIGHT)
  {
      // Start or stop discovery
      // ...
        if (!scanningStarted)
        {
        // ...
          GAPCentralRole_StartDiscovery(DEFAULT_DISCOVERY_MODE,
                                        DEFAULT_DISCOVERY_ACTIVE_SCAN,
                                        DEFAULT_DISCOVERY_WHITE_LIST);
        }
        // === SOLUTION [Cancel discovery if enabled] ===
        else
        {
          GAPCentralRole_CancelDiscovery();
        }
        // ==== END SOLUTION ====
      // ...
}
simple_central.c :: SimpleCentral_handleKeys() – Starting/stopping device discovery procedure
Two Kinds of Discovery
Note that this discovery procedure to discover nearby devices is not to be confused with the characteristic discovery procedure which is usually called after a connection is established.
Note that the above parameters are used for general scanning. Different parameters are used for scanning after connection has been established. For example TGAP_CONN_SCAN_INT and TGAP_CONN_SCAN_WIND are used when scanning after a connection has been established.
If a set of devices are known (i.e. the device addresses are known), the application can use the white list to only involve those devices in the BLE procedures. The set of devices that the BLE controller uses for device filtering is called the white list. When scanning with white list enabled, the device will only return scan results for those devices in the white list. See BT Core V4.2 Vol 6, Part B, Section 4.3.3 for more information on scanner filter policy.
To add devices to the white list, simply call the HCI_LE_AddWhiteListCmd() and pass in the device address and its type. For example, to add a device with public address of 0x001234567890 :
static void SimpleCentral_init(void)
{
// ...
  static uint8 bdAddressPeer[6] = {0x90,0x78,0x56,0x34,0x12,0x00};
  HCI_LE_AddWhiteListCmd(ADDRMODE_PUBLIC, bdAddressPeer);
// ...
Adding a device to the white list
Note the device has only one white list, so manually modifying the white list is not a good idea. It would interfere with other white list operations, including the auto sync of white list during device pairing and bonding (if enabled).
Scanning Task 2 – Print scanning results
Every time a device is discovered, a GAP_DEVICE_INFO_EVENT occurs. When scanning ends, aGAP_DEVICE_DISCOVERY_EVENT is sent to the application. When performing passive scanning, the device only receives BLE packets, it does not send any. On the other hand, in active scanning, the controller will request more information (a scan response packet) from the advertiser (after it receives an advertisement packet). The advertiser will then send additional data in the form of a scan response which gets passed to the scanner application.
After receiving which type of advertisement can an active scanner send a scan request?
Choose the correct answer(s).
The device info is encapsulated in the gapDeviceInfoEvent_t structure. The following code demonstrates printing the received advertising data:
const char *AdvTypeStrings[] = {"Connectable undirected","Connectable directed", "Scannable undirected", "Non-connectable undirected", "Scan response"};
// ...
char *Util_convertBytes2Str(uint8_t *pData, uint8_t length)
{
  uint8_t     charCnt;
  char        hex[] = "0123456789ABCDEF";
  static char str[(3*31)+1];
  char        *pStr = str;

  //*pStr++ = '0';
  //*pStr++ = 'x';

  for (charCnt = 0; charCnt < length; charCnt++)
  {
    *pStr++ = hex[*pData >> 4];
    *pStr++ = hex[*pData++ & 0x0F];
    if(!((charCnt+1) >= length)) {
        *pStr++ = ':';
    }
  }
  pStr = NULL;

  return str;
}
// ...
static void SimpleCentral_processRoleEvent(gapCentralRoleEvent_t *pEvent)
{
switch (pEvent->gap.opcode)
        {
        // ...
        case GAP_DEVICE_INFO_EVENT:
     {
        // ...
// === SOLUTION [Print scan results] ===
        //Print scan response data or advertising data
        if(pEvent->deviceInfo.eventType == GAP_ADRPT_SCAN_RSP)
        {
            Display_print1(dispHandle, 4, 0, "ScanResponseAddr: %s",
                           Util_convertBdAddr2Str(pEvent->deviceInfo.addr));

            Display_print1(dispHandle, 5, 0, "ScanResponseData: %s",
                           Util_convertBytes2Str(pEvent->deviceInfo.pEvtData,
                           pEvent->deviceInfo.dataLen));
        }
        else
        {
            Display_print1(dispHandle, 6, 0, "Advertising Addr: %s",
                           Util_convertBdAddr2Str(pEvent->deviceInfo.addr));
            Display_print1(dispHandle, 7, 0, "RSSI: %d", pEvent->deviceInfo.rssi );
            Display_print1(dispHandle, 8, 0, "Advertising Type: %s",
                           AdvTypeStrings[pEvent->deviceInfo.eventType]);
            Display_print1(dispHandle, 9, 0, "Advertising Data: %s",
                           Util_convertBytes2Str(pEvent->deviceInfo.pEvtData,
                           pEvent->deviceInfo.dataLen));
        }

// ==== END SOLUTION ====
// ...
  }
simple_central.c :: SimpleCentral_processRoleEvent() – Adding functionality to print scan results
Canceling Discovery
Note that when canceling discovery (by calling GAPCentralRole_CancelDiscovery()), the application will always return "0 devices found" in the GAP_DEVICE_DISCOVERY_EVENT.
Scanning Task 3 – Scan Indefinitely
When the application needs to scan for nearby devices at all times, i.e. always be in the scanning state, set DEFAULT_SCAN_DURATION to 0.
Note that even in indefinite scanning, the number of scanned results will still be limited by DEFAULT_MAX_SCAN_RES.
// === SOLUTION [Scan indefinitely] ===
// Scan duration in ms
#define DEFAULT_SCAN_DURATION                 0
// ...
static void SimpleCentral_init(void)
{
// ...
  GAP_SetParamValue(TGAP_GEN_DISC_SCAN, DEFAULT_SCAN_DURATION);
  GAP_SetParamValue(TGAP_LIM_DISC_SCAN, DEFAULT_SCAN_DURATION);

// ==== END SOLUTION ====
simple_central.c :: SimpleCentral_init() – Configuring scan duration to scan indefinitely.
Note
Be mindful that if scanning indefinitely, a GAP_DEVICE_DISCOVERY_EVENT will never be received since the scanning process never ends.
The exception is when the GAPCentralRole_CancelDiscovery() API is called to cancel the discovery. Regardless of the number of devices the scanner has discovered, the application will return "0 Devices Found".
Enable Unlimited Scanning
Certain applications require the ability to scan for an unknown number (i.e. unlimited) of devices. The Unlimited Scanning feature was developed for this reason. When enabling the unlimited scan feature, the stack passes the scan result to the application whenever a broadcaster/advertiser device is found. The BLE-Stack will not save the result in the stack and thus further save RAM usage. The application layer will then receive the scan result one by one under GAP_DEVICE_INFO_EVENT state.
To enable this feature, simply set ENABLE_UNLIMITED_SCAN_RES to TRUE. This allows scanning without an upper limit of discovered devices.
Similar to indefinite scanning, the number of scanned results is governed by DEFAULT_MAX_SCAN_RES as shown below.
| Value | Description |
|---|---|
| 0 | Enable unlimited scan. Scan results are only available under GAP_DEVICE_INFO_EVENT |
| ~1-256 | Maximum number of scan reports to application. Scan results are available under both GAP_DEVICE_INFO_EVENT and GAP_DEVICE_DISCOVERY_EVENT |
Filter Duplicate Advertisers
For some applications, processing multiple advertisements by the same peer device can be useful. E.g. when collecting information from a beacon that updates its advertisement data frequently. By default, the scanning device will filter advertising data. To turn off the filter for duplicate advertisers, use the following API:
GAP_SetParamValue(TGAP_FILTER_ADV_REPORTS, FALSE);
Configuring duplicate filter for advertisements.
This will enable the controller to receive all the advertisement packets it sees over the air, and send it to the application for further processing.
Caution
Note that when filtering is turned on, the scanner filters advertisements by device address only. This means that even if the advertising data is changed, it will not get passed to the application.
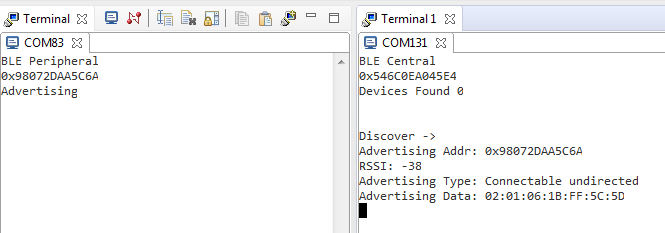
Example UART Output from Tasks 1-3
In the figure below, 2 serial COM ports emulators are opened in CCS which show the printed result of simple_peripheral and simple_central due to the above changes in both Scanning Task 1-3 and Advertising Task 1-3.
Once the updated projects are loaded, remember to press the right button (BTN2) on the central device to start scanning.
  static uint8 bdAddressPeer[6] = {0x6A,0x5C,0xAA,0x2D,0x07,0x98};
  HCI_LE_AddWhiteListCmd(ADDRTYPE_PUBLIC, bdAddressPeer);
Enable whitelist on simple_central.
Miscellaneous Guidelines
Choosing advertising interval: Fast or slow?
The advertising interval should be set based on use case. Both fast or slow advertising have pros and cons:
- Slow advertising: higher advertising interval, lower power consumption, low probability of short discovery time.
- Fast advertising: lower advertising interval, higher power consumption, high probability of short discovery time.
Optimizing Scanning: How to get data fast?
- In a time-constrained application, when the user needs to receive the data as fast as possible, make sure that scanning window is more than the advertising interval + 10ms to guarantee discovery. (The 10 ms extra account for the 0 ms to 10 ms of pseudo-random delay in between each advertising event, assuming no interference.) Following this rule will increase the chance of receiving the advertising packet on the first scan.
Scanning in multirole configurations: Any limitations?
- Note that the scanning during a connection uses different set of scan parameters(such as
TGAP_CONN_SCAN_INT) than outside a connection(such asTGAP_GEN_DISC_SCAN_INT). - Scanning is allowed in most multirole configurations, however, scanning while initiating connection is not allowed. (You cannot do multiple simultaneous scan procedures on one single radio.)
- Many BLE procedures can be running simultaneously on the same device, but what happens when their timings collide? The controller will automatically interleave advertising/connection events with scanning when operating in a multirole configuration.
This work is licensed under a Creative Commons Attribution-NonCommercial-NoDerivatives 4.0 International License.