Introduction
SimpleLink SDK Plugins (referred simply to as "plugins" from here forward) are power software packages that are designed to extend the base functionality of one or more SimpleLink SDKs. Plugins provide use case application functionalities that are outside the scope of each platform SDK's base functionality. These plugins provide developers with a way to enhance support of their SDK to better match their application's individual needs. This SimpleLink Academy module is made to deep dive into the definition of an SDK Plugin as well as give users a couple of specific examples of plugin usage.
Prerequisites
Suggested SimpleLink Academy Labs
Software
Hardware
- MSP-EXP432P401R LaunchPad
- BOOSTXL-SENSORS Sensors BoosterPack
- BOOSTXL-CC2650MA Module BoosterPack OR LAUNCHXL-CC2640R2 LaunchPad
SDK Plugin Concept
Plugins are intended to extend functionality of each individual SimpleLink SDK to include specialized use-cases. These specialized use cases can range anywhere from adding wireless functionality to extending a platform SDK's example base.
While all of the plugins have the same basic structure and look-and-feel of an SDK, they are not meant as standalone applications and rely heavily on components from the base platform SDK. The SimpleLink MSP432 Sensors and Actuator Interface Library Plugin, for example, relies heavily on the TI-Drivers, RTOS kernels, DriverLib, and various other components from the platform SDK. A high level block diagram of these dependencies can be seen in the image below:
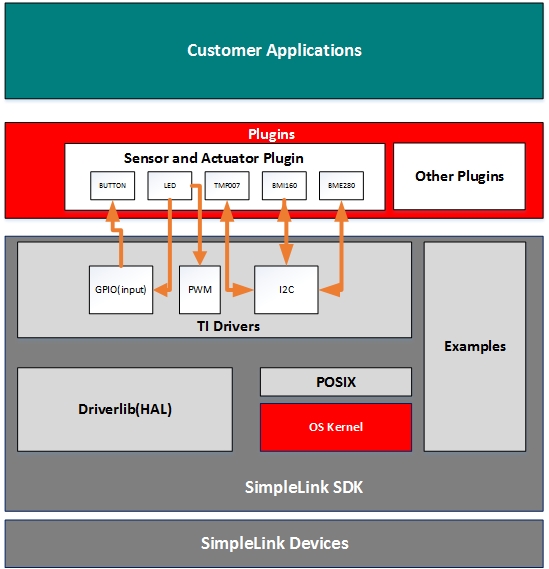
It is important to note that each plugin contains all of the necessary components to function fully alongside the platform SDK. Plugins do not install inside of the SDK itself, but rather in a folder next to the SDK. This is to simplify the maintenance model as well as provide customers with a organic experience for updating and switching between plugin versions.
SDK Version Requirement
Each plugin has been tested and verified against a specific version of the platform SDK. The version of the SDK that the plugin has been verified against is referred to as the "compatible version" of the SDK. While versions other than the "compatible version" of the SDK will likely work with the plugin, the "compatible version" of the SDK is guaranteed work. Refer to each plugin's release notes for the compatible version of the SDK.
One plugin for multiple SDKs
Through the use of the highly portable TI-Driver libraries and utilization of standardized POSIX APIs it is possible for one plugin to support multiple SDKs. The Sensor and Actuator Interface Layer Plugin (commonly referred to as SAIL) is a prime example of a plugin that provides support for multiple platform SDKs.
Plugin Directory Structure
Plugins are designed to have have a uniform look-and-feel as well as a common user experience across platforms. The folder structure for SimpleLink SDK Plugins is made to mimic the standard folder structure that the base SimpleLink SDK adheres to.
On the file system, where do SDK plugins reside?
On what software packages can plugins rely on (multiple answers can be selected)?
TI Resource Explorer Simplification
Note that the section below describes the folder structure of an SDK plugin as it exists on your computer's local file system. If you are relying on TI Resource Explorer for your sole development experience then the following section will be hidden from the development experience.
From the root directory, typical folders that are included in a standard SDK plugin are listed below:
- .metadata/ - Internal folder for product integration into Code Composer Studio. You do not have to edit any files in this folder.
- docs/ - Contains all documentation related to the SDK plugin
- kernel/ - Contains any custom RTOS kernel configuration files
- examples/ - Contains all of the code examples and their IDE project files
- source/ - Contains generic/reusable code that can be imported into end applications
- tools/ - Contains various tools/utilities that supplement the release
The source/ folder contains the code that is likely to end up seeing its way into an end application. Within the this folder there are likely the two following folders:
- third_party/ - Third party source code
- ti/ - TI provided collateral
SimpleLink MSP432 SDK Requirement
The directory structure below are listed as guidelines. Different plugins with different application requirements may not have all of the above folders or may define custom folders as dictated by the plugin's requirements.
Plugins depending on other plugins
Plugins extend functionality of a platform SDK, however there is nothing stopping a plugin from providing additional functionality and support to another SimpleLink SDK Plugin. A good example of this inter-plugin dependency is showcased in the hands-on portion of this training module. In this training module the Sensors BoosterPack code example is used from the SimpleLink MSP432 SDK Bluetooth plugin. This code example not only relies heavily on components from the SimpleLink MSP432 SDK, however also components from the Sensors and Actuator Interface Library Plugin.
Customers are able to utilize as many SDK plugins in their project as their project requirements dictate. It is important to note that individual plugin version dependencies must be sanity checked against the target platform SDK in order to ensure compatibility.
Which platform SDK does the Sensor and Actuator Interface Library (SAIL) Plugin support?
Downloading and Installing FreeRTOS
Due to maintenance concerns and logistical difficulties it is required to download the FreeRTOS kernel from the web before it is usable within the SimpleLink SDK (or plugin ecosystem). The download site for FreeRTOS can be found at the link below:
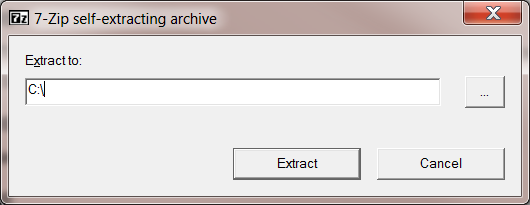
Downloading FreeRTOS is fast, free, and does not require any cumbersome registration process. Once the FreeRTOS installation has been downloaded, run the installer and extract the files to your directory of choice:
In order for Code Composer Studio to build the FreeRTOS kernel it is required to point CCS to directory that you installed FreeRTOS to in the previous step. From the CCS menu bar, click Window->Preferences to pull up the option menu:
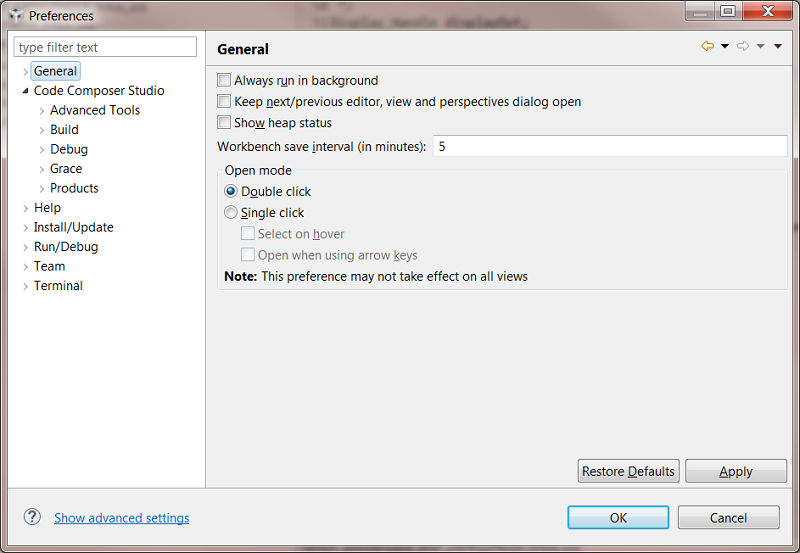
Under the tab menu on the side navigate to General->Workspace->Linked Resources:

On this window you will have the ability to define custom path variables. Click on the New.. button to open the path variable window:
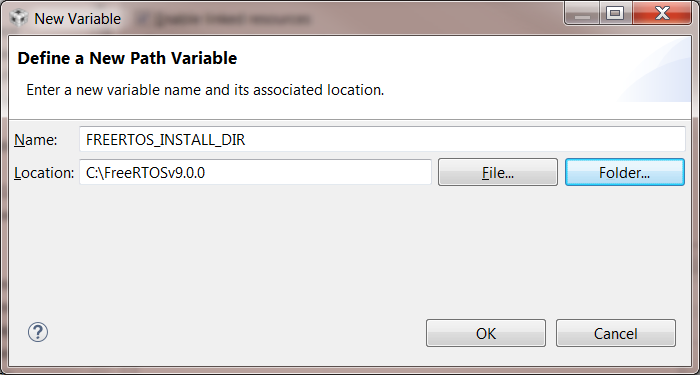
The variable that needs to be defined is named FREERTOS_INSTALL_DIR. Enter FREERTOS_INSTALL_DIR into the Name field and enter the path where you installed FreeRTOS into the Location field. After doing this click OK to define the new variable and OK again to then save the settings. After defining this variable once for a CCS workspace there is no need to repeat the steps per project as the FREERTOS_INSTALL_DIR variable will persist to all projects in your CCS workspace.
Setting up the hardware
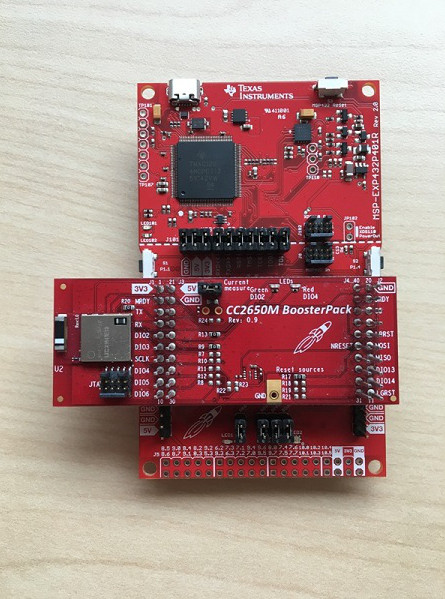
Attach the CC2650 BoosterPack on top of the MSP432 LaunchPad while being very careful not to bend any pins. When finished, the stacked configuration should look similar to the image below:
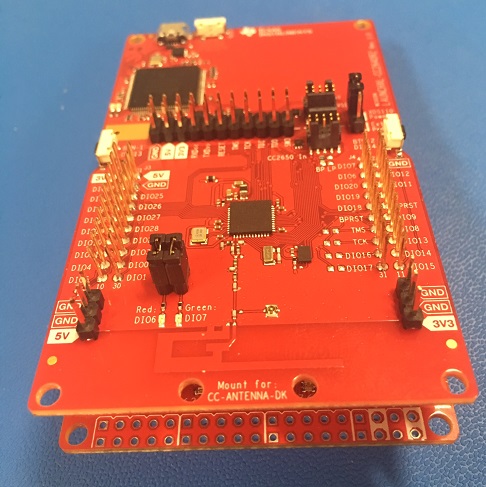
Alternatively, the CC2640R2 LaunchPad can be used in lieu of the CC2650 BoosterPack. In this case the CC2640R2 LaunchPad should be stacked on the MSP432 LaunchPad as seen below:
Special SNP Firmware Required
Note if you are using the CC2640R2 LaunchPad as your BLE radio a special version of the SNP firmware must be flashed onto the LaunchPad. Please refer to the Bluetooth Plugin documentation on the necessary steps to flash this firmware.
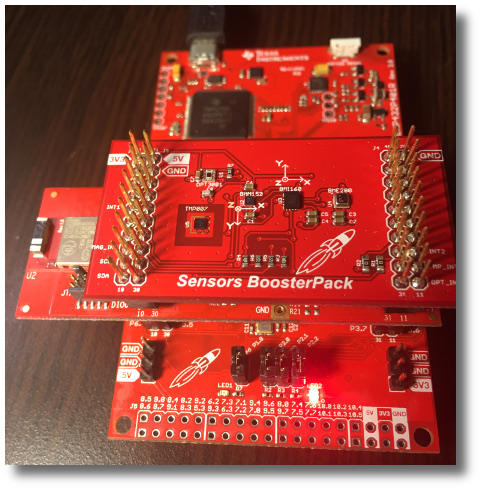
As a third layer to this hardware configuration the lab in this SimpleLink Academy module requires the BOOSTXL-SENSORS Sensors BoosterPack. This module should be stacked upon the hardware configuration described above and should look similar to the picture below:
Running the code example
This training module leverages the BOOSTXL-SENSORS Sensors BoosterPack combined with the Sensors BoosterPack code example that is part of the SimpleLink MSP432 SDK Bluetooth Plugin. The BOOSTXL-SENSORS BoosterPack contains a wide variety of sensors including optical, movement, temperature, pressure, and humidity sensors. As external sensor interfacing falls outside of the generic scope of the MSP432 SDK, the Sensors and Actuator Interface Library (SAIL) Plugin provides a generic set of APIs that are used to setup, configure, and access each sensor on the BOOSTXL-SENSORS BoosterPack. The Sensors Code Example in the Bluetooth Plugin will read out sensor readings using the relevant SAIL calls and advertise these readings over BLE using the collateral included with the SimpleLink MSP432 SDK Bluetooth Plugin.
It's important to note that while the MSP432 SDK is used in conjunction with the SAIL plugin, conceivably any SimpleLink SDK could use SAIL and the libraries that it has to offer. All sensor interaction in the SAIL source code is done so by using generic TI-Drivers thus making the code highly portable across all devices in the SimpleLink SDK family. Additionally, since SAIL (and the Bluetooth plugin) are written in generic POSIX API calls either FreeRTOS or TI-RTOS could be used. In this training module FreeRTOS is used to show the versatility and portability of the POSIX API standard. If TI-RTOS is preferred, please refer to the various TI-RTOS based training modules for further instructions.
The first SDK Plugin that is needed is the SimpleLink MSP432 SDK Bluetooth Plugin. As BLE radio functionality is not integrated for the MSP432 microcontroller the libraries that enable communication with an external BLE radio have been abstracted out into an SDK Plugin.
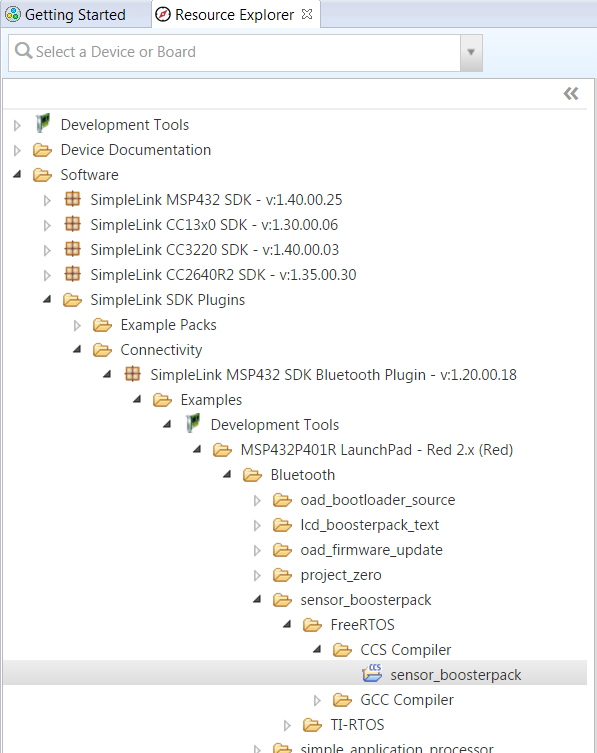
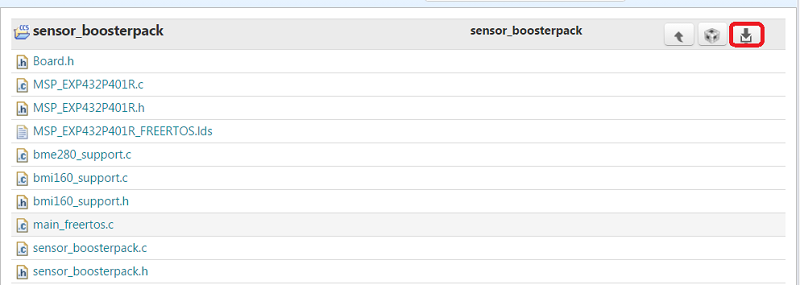
From the TI Resource Explorer, navigate to the Sensor BoosterPack code example under the Examples menu item. This code example is located under Software->SimpleLink SDK Plugins->Connectivity->SimpleLink MSP432 SDK Bluetooth Plugin->Examples->Development Tools->MSP-EXP432P401R->Bluetooth->sensor_boosterpack->FreeRTOS->CCS Compiler->sensor_boosterpack:
Before any code examples can be imported into your local CCS installation, the SDK Plugin and the SDK both need to be made available offline. To do this, click the Install on Desktop button to the top right of the code example and select Make Available Offline.
Code Composer Cloud Support
All of the code examples included in the SimpleLink MSP432 SDK Plugin are supported with Code Composer Studio Cloud Tools. When using Code Composer Studio and TI Resource Explorer from the cloud the software packages do not need to be made available offline. Note that FreeRTOS examples are currently not supported in Code Composer Studio on the cloud so the offline version must be used in order to take advantage of using the FreeRTOS kernel.
This will prompt you to install the SimpleLink MSP432 SDK Bluetooth Plugin to the desktop to make available for offline use.
Version Numbers
Note version numbers on your environment might vary slightly from those in the screenshots
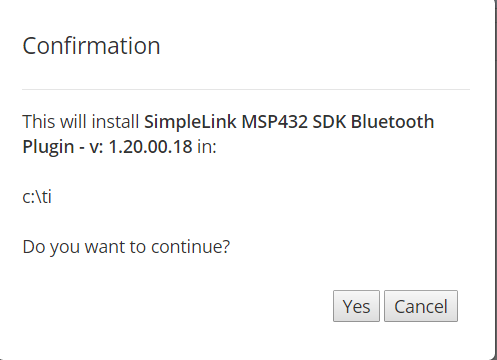
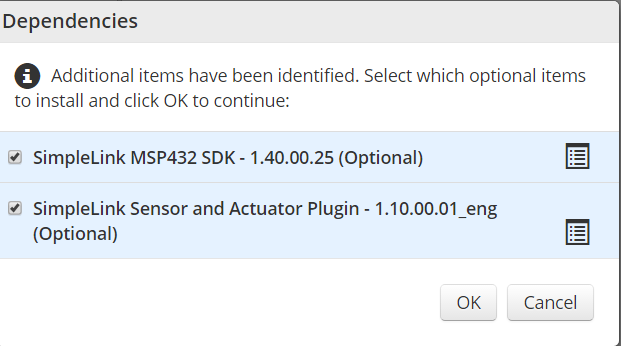
As the SimpleLink MSP432 SDK Bluetooth plugin requires the base SimpleLink MSP432 SDK, TI Resource Explorer will prompt you to install the SimpleLink MSP432 SDK if it is not already installed. Make sure to follow the prompts to also make the SDK available offline. Additionally, since the SAIL plugin is required for the SimpleLink MSP432 SDK Plugin, TI Resource Explorer will prompt you to download the relevant SAIL plugin as well.
Not Optional
Note that while CCS will mark these dependencies as optional, they are required for correct operation of this code example.
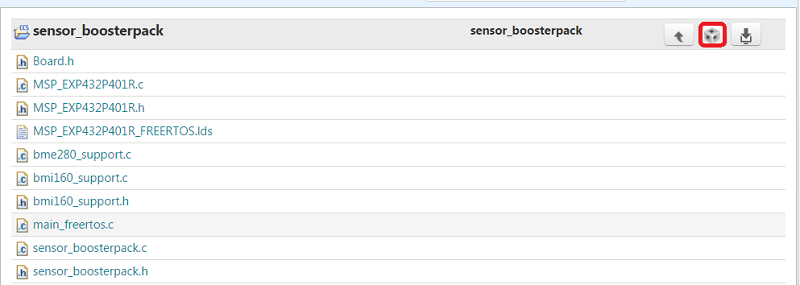
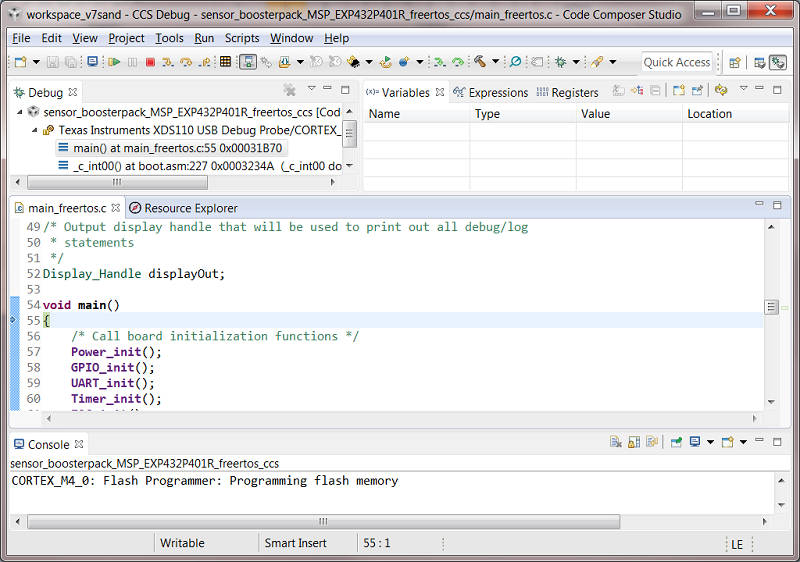
To import the Sensors BoosterPack project into your workspace, click the Import to IDE button.
After the project is imported into your IDE workspace an additional FreeRTOS kernel project should also automatically be imported. This project will automatically compile the FreeRTOS kernel (located at the directory specified earlier) and link it against the Sensors BoosterPack code example. Build your application and run it as you would any normal CCS project.
Mechanics and components of the code example
The Sensors BoosterPack code example follows the same basic model as all other code examples in the SimpleLink MSP432 SDK Bluetooth Plugin. Once the FreeRTOS scheduler starts, separate pthreads are started for each sensor that is included on the Sensors BoosterPack. Each sensor also has its own BLE profile and characteristics that are being advertised as a part of the whole device advertisement. These profiles and characteristics are listed in the table below:
| Purpose | UUID | Format | Unit | Properties | Profile Source |
|---|---|---|---|---|---|
| IR Temperature Data | F000AA01-0451-4000-B000-000000000000 | IEEE-754 32-bit floating point | °C | Notify | ir_temp_service.c |
| IR Temperature Config (enable) | F000AA02-0451-4000-B000-000000000000 | Integer | N/A | Read/Write | ir_temp_service.c |
| IR Temperature Notification Period | F000AA03-0451-4000-B000-000000000000 | Integer | ms | Read/Write | ir_temp_service.c |
| Humidity Data | F000AA21-0451-4000-B000-000000000000 | IEEE-754 32-bit floating point | Percent | Notify | humidity_service.c |
| Humidity Config (enable) | F000AA22-0451-4000-B000-000000000000 | Integer | N/A | Read/Write | humidity_service.c |
| Humidity Notification Period | F000AA23-0451-4000-B000-000000000000 | Integer | ms | Read/Write | humidity_service.c |
| Barometer Data | F000AA41-0451-4000-B000-000000000000 | Integer | Pascals | Notify | barometer_service.c |
| Barometer Config (enable) | F000AA42-0451-4000-B000-000000000000 | Integer | N/A | Read/Write | barometer_service.c |
| Barometer Notification Period | F000AA43-0451-4000-B000-000000000000 | Integer | ms | Read/Write | barometer_service.c |
| Optic Data | F000AA71-0451-4000-B000-000000000000 | IEEE-754 32-bit floating point | lux | Notify | optic_service.c |
| Optic Config (enable) | F000AA72-0451-4000-B000-000000000000 | Integer | N/A | Read/Write | optic_service.c |
| Optic Notification Period | F000AA73-0451-4000-B000-000000000000 | Integer | ms | Read/Write | optic_service.c |
| Movement Data | F000AA81-0451-4000-B000-000000000000 | Integer | Custom | Notify | movement_service.c |
| Movement Config (enable) | F000AA82-0451-4000-B000-000000000000 | Integer | N/A | Read/Write | movement_service.c |
| Movement Notification Period | F000AA83-0451-4000-B000-000000000000 | Integer | ms | Read/Write | movement_service.c |
Each individual pthread will be disabled by default and start when an integer value of "1" is written to the corresponding Config characteristic. By default, the period of each sensor is set to 1000ms. This means that once enabled, a new sensor reading will be initiated and advertised every 1000ms. While there are no explicit restrictions on this period parameter, sensor capabilities will dictate how fast the sampling rate can be set.
How many BLE profiles are a part of the Sensors BoosterPack code example?
How many BLE characteristics are a part of the Sensors BoosterPack code example?
Each sensor on the Sensors BoosterPack will have its own dedicated pthread and service associated with it. Additionally, a separate BLE connection pthread (as a part of project_zero.c) is running that handles all BLE advertisement, connection management, and firmware bootloading.
Running the code example (iOS)
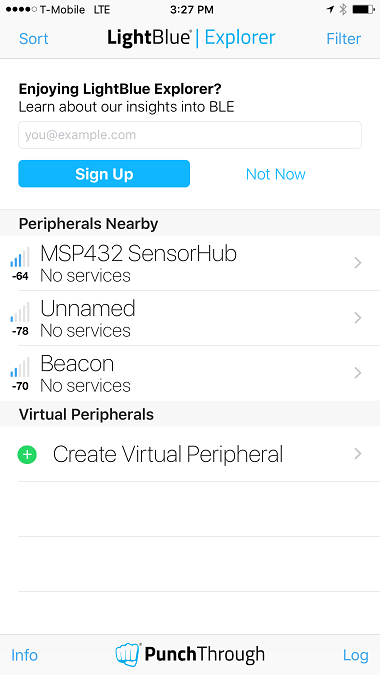
A generic application used to configure and manipulate BLE devices on iOS is LightBlue Explorer. This is a third party application that has the ability to fully configure and manipulate any generic BLE device.
To use LightBlue Explorer, first download it from the AppStore on your iOS device. After opening the application it will start scanning for BLE devices in your general vicinity. Press the S1 button on the side of your LaunchPad to start advertisement. Once advertising, the MSP432 will show up in LightBlue Explorer as "MSP432 SensorHub".
Touch this entry to connect to the device. Once connected and negotiated, a list of all advertised profiles and characteristics will be displayed (you may have to scroll down past the device descriptors):
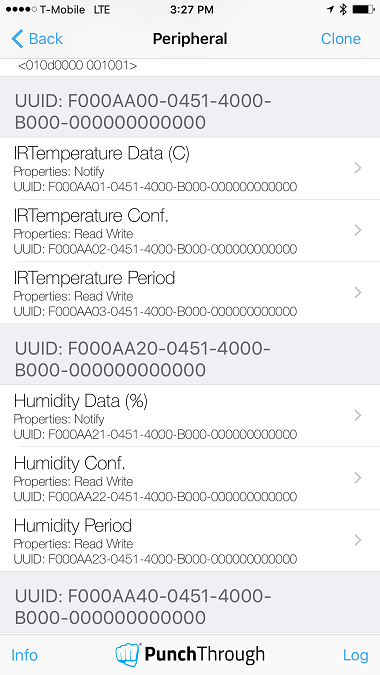
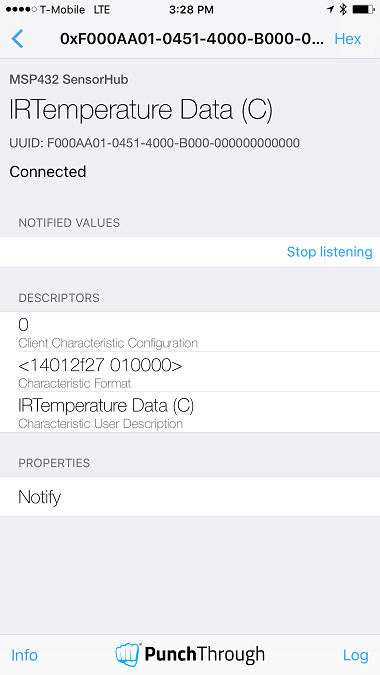
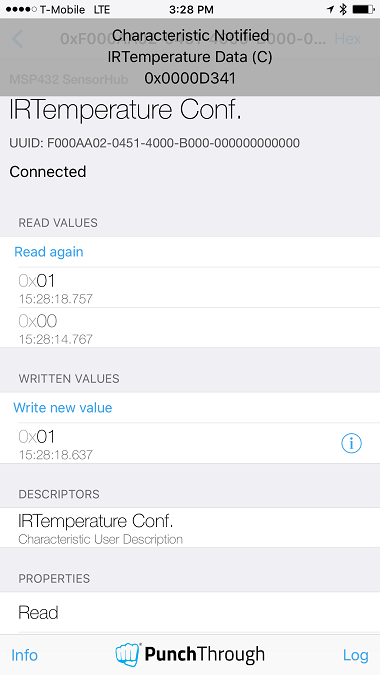
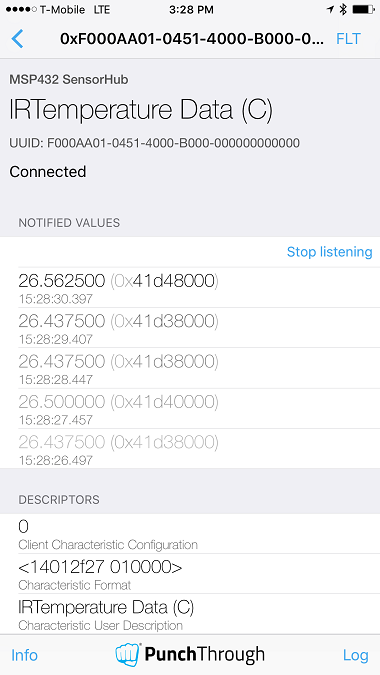
These profiles and characteristics will correspond to those listed above in the profile and characteristic table. Touch the Data notification of one of the sensor profiles. On this screen touch the Listen for notifications button to start subscribing to notifications for the selected sensor:
Return to the profile overview view and select the Config characteristic of the profile that you subscribed to. Touch Write new value and enter a value of "1" to start the sensor:
Once written, the sensor task on the MSP432 will actively start to sample data and send notifications back to your iOS device. These notifications will show up under the Data characteristic.
To change the period of notifications the Period characteristic can be written to. Note that there is no safeguard on this value so only choose sampling periods that are supported by the sensor that is being controlled.
Floating Point Display
You will have to change the display format of the notifications to match that of the sensor. For example temperature should be displayed as a floating point value. Refer to the table above for data formats for each individual sensor.
Running the code example (Android)
A generic Android application that can be used to configure and control your code example on Android based systems is the BLE Scanner application located at the link below:
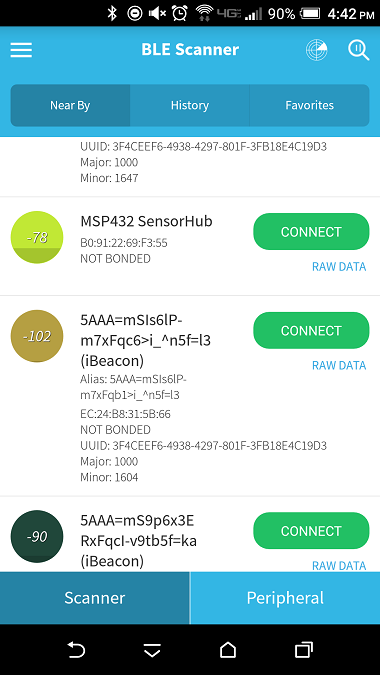
BLE Scanner is a generic Android application that can connect to an arbitrary BLE device and read, write, and configure attached services and characteristics. Download this application from the Google Play store and launch it from your home screen. Once open, press the S1 button on your LaunchPad to begin advertisement. The "MSP432 SensorHub" device should show up in the device list.
Once connected a list of characteristics will be displayed. Find one of the characteristics that matches the Data UUID listed in the service/characteristic table above. Touch the small N located next to this service to enable notifications.
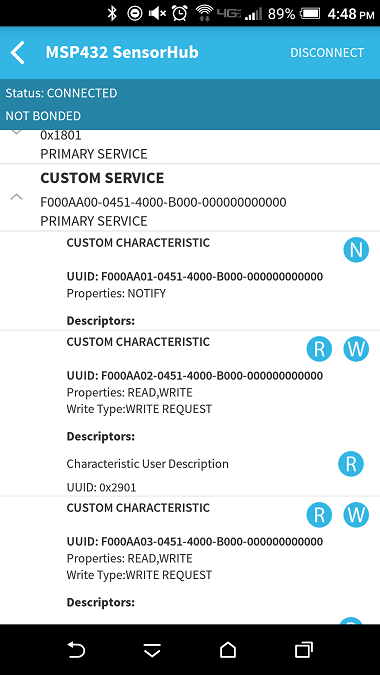
Once notifications are enabled, write a value of "1" text value by touching the small W next to the corresponding Data characteristic. This will enable notifications to start on the original Data characteristic.
Floating Point Display
Note the data format being notified may be floating point format so manual conversion will have to occur in order to decipher the data.
Running the code example (SimpleLink SDK Explorer)
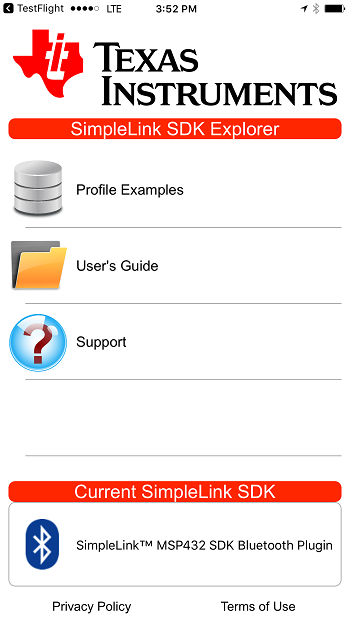
SimpleLink SDK Explorer is a customized mobile application from Texas Instruments that is designed to compliment various aspects of the SimpleLink SDK mobile ecosystem. Currently this application is available for iOS devices. Android support is currently not available. The code examples included in the SimpleLink MSP432 SDK plugin are fully modeled and showcased as a part of SimpleLink SDK Explorer. From the Apple AppStore search for SimpleLink SDK and download the SimpleLink SDK Explorer. Open the mobile application once it has been downloaded.
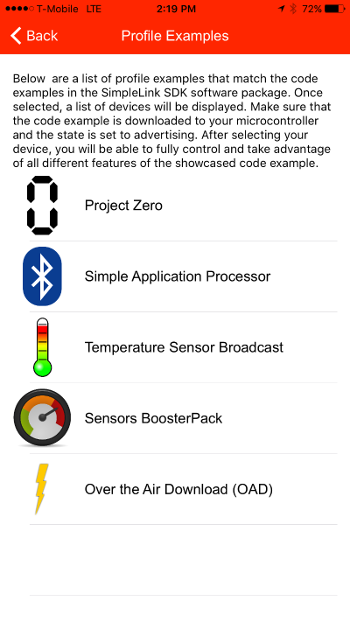
From the main screen select the Profile Examples menu item. This will take you to a list of profile examples that correspond to each code example in the SimpleLink MSP432 SDK Bluetooth Plugin:
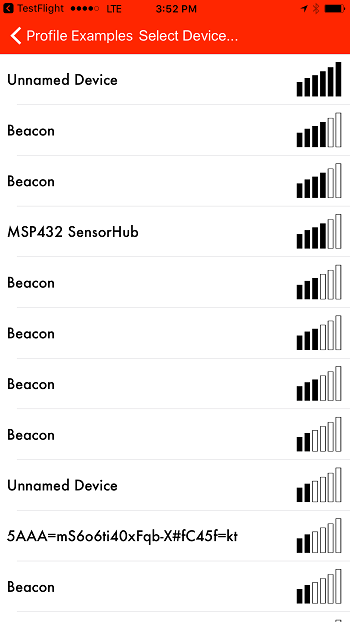
Select the Sensors BoosterPack menu item. On the next screen SimpleLink SDK Explorer will automatically scan for BLE devices in your vicinity. After pressing S1 on your MSP432 LaunchPad the Sensors Code Example will start to advertise and show up as "MSP432 SensorHub":
Make sure Bluetooth is enabled
Make sure Bluetooth is enabled on your iOS device or else no devices will show up in this view.
Select this device. After a series of negotiation and handshaking the sensors overview is displayed:
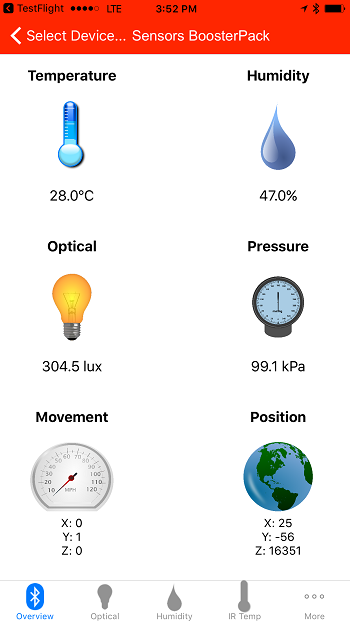
All sensors will automatically be enabled and the period of each sensor will be set to a period of 100ms. Each sensor task will also have an associated graph view. These graphs are accessible through the tab bar located at the bottom of the screen. Click on the movement tab to open the gyrometer graph:
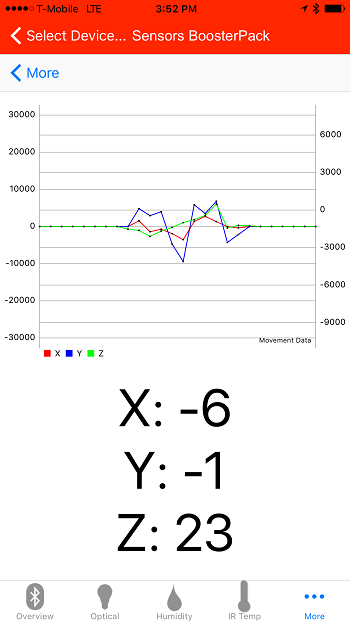
One the graph view you will have the ability to change the period of the sensor sampling rate. Move the LaunchPad around on the screen and you will see the X, Y, and Z values change on the graph and value labels accordingly.
Where to find plugins and support
A current set of supported plugins can be found on TI Resource Explorer under the SDK Plugins category. Additionally, outside of TI Resource Explorer, plugins can be found on individual download pages for each SDK. The MSP432 SDK, for example, has a subset of plugins located at the following link:
SimpleLink MSP432 SDK Download Page
Support is encouraged through use of the TI E2E Community. Additional support can be garnered through the various documentation provided with associated SimpleLink SDKs and SimpleLink SDK Plugins.
This work is licensed under a Creative Commons Attribution-NonCommercial-NoDerivatives 4.0 International License.