Congratulations on choosing the CC1350 Wireless MCU and LaunchPad ecosystem! The CC1350 wireless microcontroller(MCU) device is part of TI’s SimpleLink MCU platform, offering a single development environment that delivers flexible hardware, software and tool options for customers developing wired and wireless applications. For more information about the SimpleLink MCU platform, visit www.ti.com/simplelink. This example will show you how to build/compile your own images for use with the BLE OAD service using Code Composer Studio.
Before starting on this tutorial you need to download and install Code Composer Studio 7.1 or later.
You will also need the CC13x0 SDK 1.30 or later installed.
We will use the rfWsnDmNode example in CCS as a basis for this tutorial. Basically any of the examples in the CC13x0 SDK 1.30 (or later) can be used to build a OAD capable image, but since the rfWsnNode and rfWsnConcentrator examples already contain code for getting back to BLE stack mode (i.e. double button press > 5s) we will for the sake of simplicity use this as a starting point.
- bim_extflash_cc1350lp
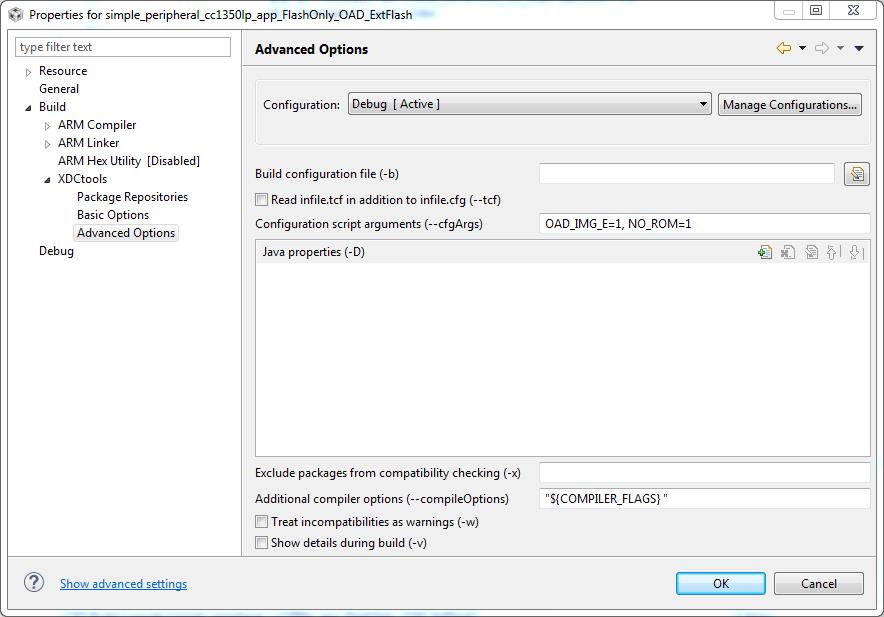
- simple_peripheral_cc1350lp_app_FlashOnly_OAD_ExtFlash
- rfWsnDmNode_CC1350_LAUNCHXL_tirtos_ccs
Clone or copy the OAD conversion script at ti-simplelink Github
- Click on the folder `oad`
- Click on the file `oad_image_tool.py`
- Make a note of the Python version required (scroll down).
- Copy the content to a text file, save as `oad_image_tool.py`
install `python`
- Use version stated in `oad_image_tool.py`
- During setup, enable feature `Add python.exe to path`
install `crcmod`
- Download sourcefile from python.org
- Extract the files
- Cd into the dir and run 'python setup.py install'
install `intelhex`
- Download from python.org
- Extract the files
- Cd into the dir and run 'python setup.py install'
- bim_extflash_cc1350lp
- simple_peripheral_cc1350lp_app_FlashOnly_OAD_ExtFlash
- bim_extflash_cc1350lp/FlashOnly
- simple_peripheral_cc1350lp_app_FlashOnly_OAD_ExtFlash/Debug
- simple_peripheral_cc1350lp_stack_FlashROM/Debug
to the same directory as oad_image_tool.py on your PC.
- cd [path_to_script]
- python oad_image_tool.py bim_extflash_cc1350lp.hex simple_peripheral_cc1350lp_app_FlashOnly_OAD_ExtFlash.hex simple_peripheral_cc1350lp_stack_FlashROM.hex -o simple_peripheral_cc1350lp_OAD_bim-app-stack.hex -i production -t offchip
- cd [path_to_script]
- python oad_image_tool.py simple_peripheral_cc1350lp_app_FlashOnly_OAD_ExtFlash.hex simple_peripheral_cc1350lp_stack_FlashROM.hex -ob simple_peripheral_cc1350lp_OAD_app-stack.bin -i stack -t offchip
- python oad_image_tool.py rfWsnDmNode_CC1350_LAUNCHXL_tirtos_ccs.hex -ob rfWsnDmNode_CC1350_LAUNCHXL_tirtos_ccs_oad-app.bin -i app -t offchip -m 0x1000
To see all available resources associated with the CC1350, click on this link to filter out all the incompatible projects and collateral.
Available in resource explorer are code examples from the CC13x0 SDK, documentation, Software Developers Guide and links to wiki articles and more. Feel free to navigate the available resources to jump-start your development.
- CCS Cloud IDE: Develop your code right in the cloud. Use this tool to import, modify and program code examples for your LaunchPad. Click CCS Project Import Icon anywhere in TI Resource Explorer to import that project into Cloud IDE. Cloud IDE will be automatically started with that project to get your started with development. my.ti.com login is required for use of Cloud IDE.
- Booster Pack checker: Verify whether Booster Packs are compatible with your LaunchPad.