Assigning a specific LaunchPad to a CCS project
Each CCS project can be configured to use a specific LaunchPad for all the relevant operations, such as programming and debugging. When only a single LaunchPad is connected to the PC, this is not required, since this LaunchPad will be selected automatically by CCS. On the other hand, when more than one LaunchPad is connected to the PC simultaneously, you must associate a target LaunchPad with each project you wish to program or debug (There is no mechanism to select it on-the-fly).
The following steps will guide you through specifying a target board for CCS projects.
In CCS' Project Explorer view, select the required project.
Expand the folder targetConfigs
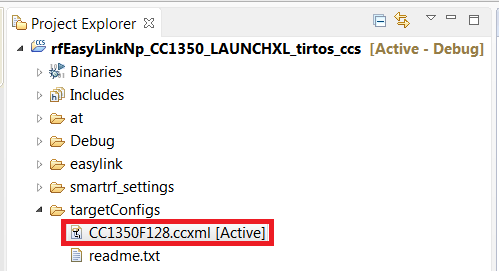
Double click on the ccxml file for your target. In the captures above, the project is rfEasyLinkNp and the target is CC13xxF128 - your project and target may be different, depending on the Lab you are currently doing. E.g., if you're working on a CC2640R2 LaunchPad, the file is called CC2640R2F.ccxml.
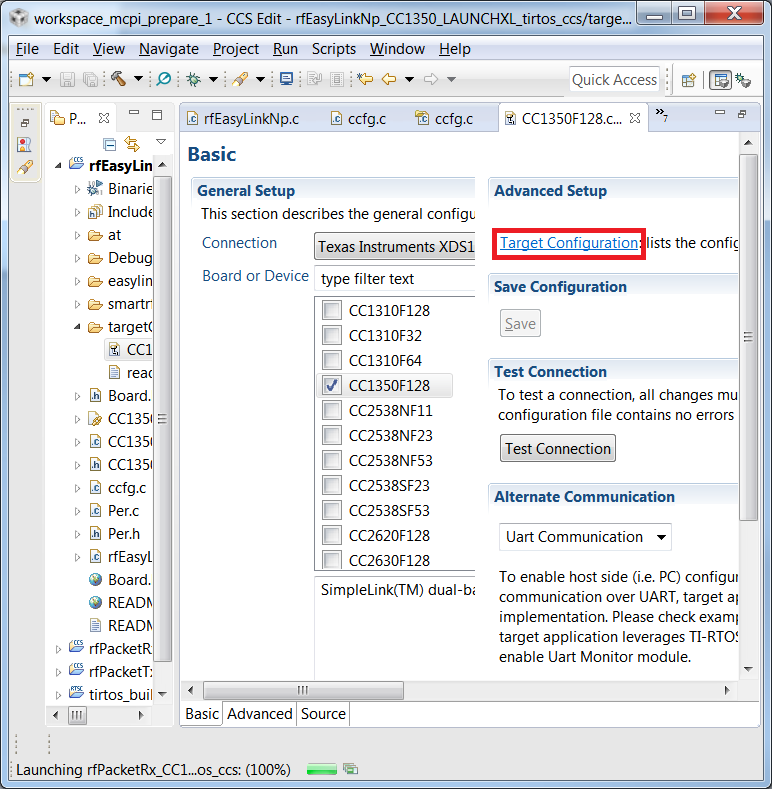
Click on Target configuration
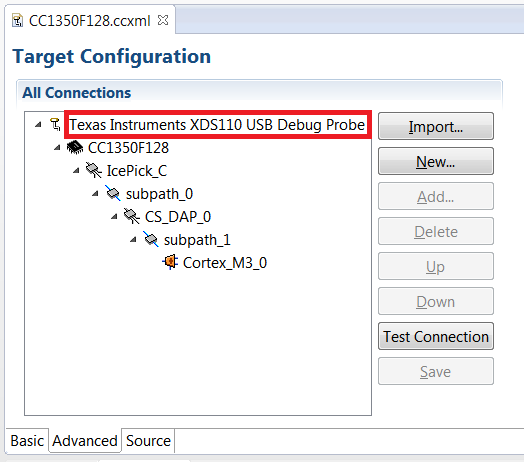
Click on Texas Instruments XDS110 USB Debug Probe
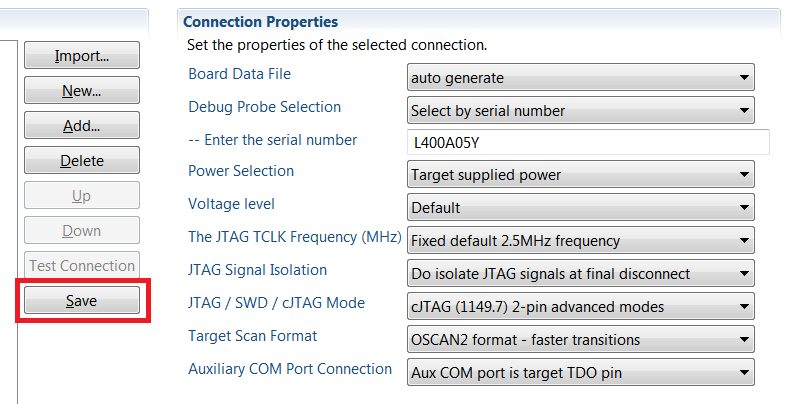
Connection Properties frame will open on the right side. In the drop-down list near Debug Probe Selection, click Select by serial number
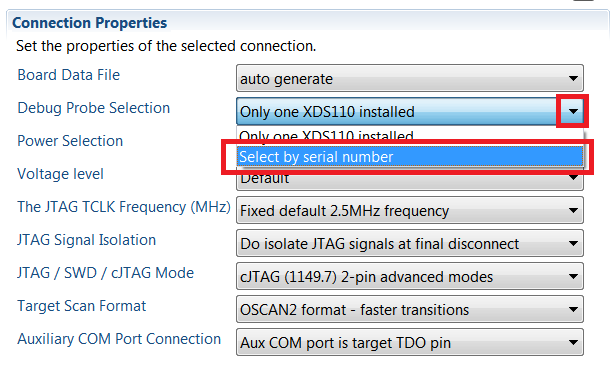
A new line will appear in the Connection Properties frame, With a text box titled -- Enter the serial number. Delete any text that may already be in this text box, and then enter the XDS Device ID of the selected LaunchPad - make sure to specify all letters and digits (e.g. L400A05Y)
To find the serial number of your device you can use SmartRF studio. Alternatively, start command prompt and call
c:\ti\ccsv7\ccs_base\common\uscif\xds110\xdsdfu.exe -eto enumerate the connected debugger.
C:\ti>c:\ti\ccs\ccs_base\common\uscif\xds110\xdsdfu.exe -e

USB Device Firmware Upgrade Utility
Copyright (c) 2008-2015 Texas Instruments Incorporated.  All rights reserved.

Scanning USB buses for supported XDS110 devices...


<<<< Device 0 >>>>

VID: 0x0451    PID: 0xbef3
Device Name:   XDS110 with CMSIS-DAP
Version:       2.3.0.4
Manufacturer:  Texas Instruments
Serial Num:    L400A05Y
Mode:          Runtime

Found 1 device.

C:\ti>
Finding XDS110 serial numberInsert the serial number. Above it's
L400A05Y.Click on Save
You can also change the serial number to something easier to remember, or in case two debuggers have the same serial number.
C:\ti>c:\ti\ccs\ccs_base\common\uscif\xds110\xdsdfu.exe -m

USB Device Firmware Upgrade Utility
Copyright (c) 2008-2015 Texas Instruments Incorporated.  All rights reserved.

Scanning USB buses for supported XDS110 devices...


<<<< Device 0 >>>>

VID: 0x0451    PID: 0xbef3
Device Name:   XDS110 with CMSIS-DAP
Version:       2.3.0.4
Manufacturer:  Texas Instruments
Serial Num:    BADEABBA
Mode:          Runtime

Switching device into DFU mode.

C:\ti>c:\ti\ccs\ccs_base\common\uscif\xds110\xds110\xdsdfu.exe -s ABCDEF01 -r

USB Device Firmware Upgrade Utility
Copyright (c) 2008-2015 Texas Instruments Incorporated.  All rights reserved.

Scanning USB buses for supported XDS110 devices...

Setting serial number to "ABCDEF01"...

c:\ti>
Optionally change the serial numberThis work is licensed under a Creative Commons Attribution-NonCommercial-NoDerivatives 4.0 International License.