Introduction
Over-The-Air (OTA) firmware updates are a way to dynamically update the various firmware and software components of an embedded solution using the device's active wireless connection. In this training session, we will demonstrate the method to perform over-the-air updates using the MSP432P4 host microcontroller connected with a CC31xx Wi-Fi® network processor. It is important to note that there is a similar training module for CC32xx, however this tutorial will be focusing on the two-chip solution that is part of the SimpleLink™ SDK Wi-Fi Plugin.
Prerequisites
Suggested SimpleLink Academy Labs
Many of the concepts from the CC32xx Wi-Fi OTA lab are reused and rehashed in this training module. While the core elements between the one-chip CC32xx and two-chip MSP432 + CC31xx OTA mechanisms will remain the same, several components will inevitably vary on account of the underlying hardware differences.
Notably, the following differences will be observed:
- The CC32xx has a hardware SHA-256 accelerator while the MSP432 depends on the third-party mBedTLS software package for SHA-256 hash calculation
- The mechanism for updating the firmware running on the MSP432 varies from updating the firmware on the CC32xx given the underlying differences in the flash architecture
- Importing the OTA libraries has been simplified in the CC31xx plugin to cater towards ease-of-use
Software
- IDE of choice including:
- SimpleLink SDK Wi-Fi Plugin 2.40.00.22 or newer
- SimpleLink MSP432P4 SDK 2.40.00.10 or newer
- UniFlash 4.6.0 or newer
- RTOS Configuration of choice including:
In this lab, we will use a configuration of Code Composer Studio and TI-RTOS using the TI ARM compiler. However, the functionality of the end application described in this tutorial will be identical for all permutations of the IDEs/RTOSs supported by the MSP432P4 SDK.
Hardware
- MSP-EXP432P401R LaunchPad OR MSP-EXP432P4111 LaunchPad
- CC3120 BoosterPack OR CC3135 BoosterPack
- CC31XXEMU BoosterPack
Mechanics of Over-The-Air Update
OTA updates are useful in updating all components of an embedded system throughout its extended life cycle. After an application is deployed to the field, it may become unrealistic to update the firmware on the device via a hardwired connection such as UART or USB. For this reason, TI has developed a software solution that allows customers to update the firmware running on the MSP432 host microcontroller as well as the user files stored on the CC31xx flash storage.
In an OTA-enabled application for MSP432 (either MSP432P401 or MSP432P111), the first 32KB of flash memory is reserved for a customized bootloader. This bootloader will start up a small NoRTOS implementation of the CC31xx host driver, open the image stored as /sys/hostmcuimg.bin on the CC31xx file system, and dynamically program that image to the MSP432 flash memory at a starting base address of 0x8000. The memory map of a typical MSP432 OTA-enabled device can be seen below.

MSP432P4111
Note that this example is for an MSP432P401, however on an MSP432P4111 the structure will be adjusted for the MSP432P111's larger memory footprint.
Initially, when the UniFlashTARfile is being programmed to the CC31xx over the active Wi-Fi connection, the firmware running on the MSP432 will detect if a new MSP432 firmware image exists in the package at the location /sys/hostmcuimg.bin. If so, the MSP432's firmware will set a flag (a variable named appTransferKey at a specific area of SRAM and initiate a hard reset of the device (causing execution to be handed over to the custom bootloader).
Which software components can be updated using the Over-The-Air firmware updates included in the SimpleLink SDK Wi-Fi Plugin?
Building an MSP432P4 Firmware Image
The format of the MSP432P4's firmware for OTA Wi-Fi updates is a simple compiled binary .bin file. This file is a contiguous binary chunk of memory that is programmed to a known base address on the MSP432 that represents byte-for-byte the firmware to be run on the MSP432. In our case, the known base address resides at 0x8000- right below the code for the MSP432's custom bootloader.
In both of the MSP432P4 OTA code examples included with the SimpleLink SDK Wi-Fi Plugin, one of the two following files exists (depending on which MSP432P4 device you are using):
msp432p401_bootloader.cmsp432p4111_bootloader.c
When opening these files, you can see that they contain large C byte arrays that are placed at a specific area of memory:
#if defined(__TI_COMPILER_VERSION__)
#pragma DATA_SECTION(ota_bootloader, "OAD_BSL")
#pragma RETAIN (ota_bootloader)
const unsigned char ota_bootloader[] =
#elif defined(__GNUC__)
const unsigned char __attribute__((section (".oad_bsl"))) ota_bootloader[] =
#elif defined(__IAR_SYSTEMS_ICC__)
#pragma location="OTA_BSL"
__root const unsigned char ota_bootloader[] =
#endif
{
    0x00, 0x00, 0x01, 0x20, 0x7D, 0x68, 0x00, 0x00, 0x3B, 0x6C, 0x00, 0x00,
    0x39, 0x6C, 0x00, 0x00, 0x37, 0x6C, 0x00, 0x00, 0x33, 0x6C, 0x00, 0x00,
    0x37, 0x6C, 0x00, 0x00, 0x00, 0x00, 0x00, 0x00, 0x00, 0x00, 0x00, 0x00,
    0x00, 0x00, 0x00, 0x00, 0x00, 0x00, 0x00, 0x00, 0x37, 0x6C, 0x00, 0x00,
    0x37, 0x6C, 0x00, 0x00, 0x00, 0x00, 0x00, 0x00, 0x37, 0x6C, 0x00, 0x00,
    0x37, 0x6C, 0x00, 0x00, 0x37, 0x6C, 0x00, 0x00, 0x37, 0x6C, 0x00, 0x00,

    ...
}
msp432p401_bootloader.c
This C array represents the compiled custom bootloader that resides in the top 32KB of the MSP432's memory. The collection of pragmas and compiler keywords on top of the definition along with custom linker files make sure that this firmware array gets programmed at physical address 0x00000000. Including this firmware image with the OTA projects as a C-Array gives the ease-of-use benefit of the user not having to explicitly program a separate project for the bootloader.
When compiling a firmware image to be included in an OTA firmware update package, it is important to not include the bootloader in the generated binary image. The absolute address of where to program the firmware image is specified by the APP_SW_START_ADDRESS define in the ota_extended.h file included in the OTA code examples:
#define APPLICATION_PERFORM_BSL    (0xABCD55AA)
#define APP_SW_START_ADDRESS       (0x00008000)
#define SHARED_MEMORY_LOCATION     (0x20002000)
#define OTA_BUFFER_SIZE            (256)
#define OTA_FIRMWARE_NAME          "hostmcuimg.bin"
#define OTA_FIRMWARE_PATH          "/sys/hostmcuimg.bin"
ota_extended.h
If the bootloader was included in the binary file for the OTA package, a redundant bootloader would be programmed at 0x8000 and the application would fail to operate correctly. To prevent the bootloader from being integrated into the firmware image being generated for OTA, simply comment out the contents of the msp432p401_bootloader.c file. When programming the MSP432 via an IDE, leave the contents of msp432p401_bootloader.c in the build to enable the programming of the bootloader.
MSP432 Bootloader
Note that when running/flashing your program for the first time through CCS, the bootloader must be included. Subsequently when sending firmware updates through OTA, the firmware must be omitted from the binary image.
What information is included in the compiled binary format that is used for MSP432P4 OTA updates?
MSP432 Firmware Bootloader
The bootloader that resides at the start of the MSP432's memory is a custom bootloader specially developed to work with the OTA firmware mechanism running in the main application. This bootloader is provided as a precompiled C file (see the section above) as well as a full source implementation. The projects for the bootloaders can be found under the following two folders:
examples/nortos/MSP_EXP432P401R/demos/msp432p401_bootloaderexamples/nortos/MSP_EXP432P4111/demos/msp432p4111_bootloader
Different Flash Drivers
The MSP432P401 and MSP432P4111 have slightly different flash drivers requiring two separate projects for the bootloader.
It's important to note that the bootloader running on the MSP432 does include a bare-bones Wi-Fi host driver. Although no Wi-Fi communication is taking place, the bootloader does make use of the filesystem APIs to dynamically read chunks of data from the sys/hostmcuimg.bin on the CC31xx's file system.
About NoRTOS
No-RTOS refers to the "No RTOS" implementation provided by the platform SDK and is not associated with TI-RTOS or FreeRTOS. However, the underlying software does have a mandatory elementary scheduler that consumes the SysTick of the core.
At the start of every boot of the MSP432 (regardless if an OTA package was received), the custom bootloader will do a quick check to see if a "flag" has been set in a shared SRAM address. This shared SRAM address is specified as a precompiler macro in the ota_extended.h header file:
#define APPLICATION_PERFORM_BSL    (0xABCD55AA)
#define APP_SW_START_ADDRESS       (0x00008000)
#define SHARED_MEMORY_LOCATION     (0x20002000)
#define OTA_BUFFER_SIZE            (256)
#define OTA_FIRMWARE_NAME          "hostmcuimg.bin"
#define OTA_FIRMWARE_PATH          "/sys/hostmcuimg.bin"
ota_extended.h
In both the source for the bootloader and the application source, this shared area of SRAM is defined as such:
#if defined(__TI_COMPILER_VERSION__)
#pragma RETAIN(appTransferKey)
#pragma LOCATION(appTransferKey, SHARED_MEMORY_LOCATION)
volatile uint32_t appTransferKey;
#elif defined(__GNUC__)
volatile uint32_t __attribute__((section (".shared_memory"))) appTransferKey;
#elif defined(__IAR_SYSTEMS_ICC__)
__no_init volatile uint32_t appTransferKey @ SHARED_MEMORY_LOCATION;
#endif
platform.c
The macros around the variable declaration work with the IDE-specific linker files to explicitly place the variable in the memory address specified by SHARED_MEMORY_LOCATION. If the value at appTransferKey is equal to the flagged value of APPLICATION_PERFORM_BSL, the bootloader will assume that a valid hostmcuimg.bin exists on the CC31xx's flash memory and proceed with the bootloader logic. If the value of appTransferKey is anything other than APPLICATION_PERFORM_BSL, the bootloader will jump to the reset vector of the main application.
The logic for the actual bootloader itself is somewhat standard. The program will read the file information of hostmcuimg.bin, erase the necessary segments, and then program in chunks specified by OTA_BUFFER_SIZE. If any error occurs during operation, the bootloader will spin in an infinite LED toggle loop. In this error state, a reset will cause the application to jump to the main application code (as the appTransferKey gets cleared with each bootload attempt).
A flow chart of the custom OTA bootloader in the presence of a MSP432 firmware image can be seen below:

SHA-256 Signature/Digest Verification
Additional security precautions must be added to foster security and prevent any malicious updates of unwanted code on the embedded system. The Wi-Fi stack running on the CC31xx and the application firmware running on the MSP432 have a couple of mechanisms for doing this; one of the most prominent is SHA-256 cryptographic hashing.
Software SHA-256
The MSP432 depends on the third-party mBedTLS software package for SHA-256 hash calculation.
Quiz - Does the SHA-256 functionality encrypt your firmware image and user files?
When an OTA firmware image is created by UniFlash, two specific pieces of metadata are created:
ota.cmdota.sign
The ota.cmd file contains a list of all the firmware files that are included in the firmware package as well as additional file information such as size and a SHA-256 digest. These digests are used to verify the integrity of each individual file.
The ota.sign file is a chunk of data that is referred to as the SHA-256 signature. This signature is generated against the bytes of the ota.cmd file using the private key that we used to sign the generated Tar file (dummy_ota_vendor_cert.der). This private key should be kept secret in a production environment as it is the main mechanism that the firmware author has to prevent any malicious code updates of the firmware device.
A block diagram of each individual step regarding the SHA-256 hash calculation can be seen below:

While the individual file hash calculation is performed using software SHA-256 locally on the MSP432, the signature verification of the ota.sign file is offloaded to the crypto engine on the CC31xx. Once a SHA-256 digest has been calculated against ota.cmd, both the bytes contained in ota.sign and the calculated SHA-256 digest are passed using a host command to the CC31xx using the following code:
/* Verify the signature using the installed certificate */
memcpy(verifyBuf, pDigest, SHA256_DIGEST_SIZE);
memcpy(verifyBuf + SHA256_DIGEST_SIZE, pSig, SigFileSize);

verAttrib.Flags = 0;
verAttrib.ObjId = OTA_CERTIFICATE_INDEX;
verAttrib.SigType = SL_NETUTIL_CRYPTO_SIG_DIGESTwECDSA;
verAttrib.MsgLen = SHA256_DIGEST_SIZE;
verAttrib.SigLen = SigFileSize;
resultLen = 4;

Status = sl_NetUtilCmd(SL_NETUTIL_CRYPTO_CMD_VERIFY_MSG, (_u8 *) &verAttrib,
                       sizeof(SlNetUtilCryptoCmdVerifyAttrib_t), verifyBuf,
                       SHA256_DIGEST_SIZE + SigFileSize,
                       (_u8 *) &verifyResult, &resultLen);

/* In case the signature is not valid, return a special error code */
if((Status == 0) && (verifyResult < 0))
{
    free(verifyBuf);
    /* The process succeeded (Status == 0) and the verification
     *  failed - Security Alert
     */
    return (ARCHIVE_STATUS_BUNDLE_CMD_SIGNATURE_NOT_VALID);
}
ota_archive.c
OTA Library
The ota library is used in both the Cloud OTA and Local OTA examples included in the plugin, and it is automatically imported when either one of the code examples is imported into CCS. This library contains various tools and utilities for controlling all aspects of the OTA update. This library needs to be built (this is built automatically in CCS) for use with either the OTA code examples.
Difference from the CC32xx SDK
Note in the SimpleLink CC32XX SDK the OTA project does not auto-import, and you have to explicitly import and build it in your project.
The main user APIs for the OTA library are included in the ota.h file. This file contains all of the necessary OTA accessing APIs that are used in the normal flow for a typical OTA update. These are the APIs that are used as a primary mechanism for the OTA update by the Cloud OTA project.
Separate auxillary APIs for managing the SHA-256 hash generation and file parsing are included in the ota_archive.h file. The Local OTA example accesses these functions directly and bypasses the use of the main ota.h APIs. Within ota_archive.h, the following parameters exist:
#define TAR_HDR_SIZE            512
#define MAX_SIGNATURE_SIZE      256
#define MAX_FILE_NAME_SIZE      128
#define MAX_SHA256_DIGEST_SIZE  65
#define MAX_BUNDLE_CMD_FILES    8
Specifically, the MAX_BUNDLE_CMD_FILES define is of interest here. This define specifies the max number of files that can be included in an OTA update and correlates to the size of the following main control structure in ota_lib.h:
typedef struct
{
    OtaState_e State;
    uint32_t Options;

    /* Keep OTA parameters */
    uint8_t VendorDir[MAX_VENDIR_DIR_SIZE];
    Ota_optServerInfo OtaServerInfo;

    /* OTA objects */
    CdnClient_t CdnClient;
    OtaArchive_t OtaArchive;

    /* OtaDir and FileUrl info */
    uint8_t  *pOtaFileName;
    int32_t OtaFileSize;
    uint8_t FileUrlBuf[MAX_URL_SIZE];

    /* file content buffer */
    uint8_t *pRecvChunk;
    int16_t RecvChunkSize;
    int16_t RecvChunkOffset;
    int16_t RecvChunkForceReadMode;
    int16_t RecvChunkReserved;

    /* send/recv buffer - must be 4 bytes alignment */
    uint8_t NetBuf[NET_BUF_SIZE + 1];

    /* Retries */
    int8_t ConsecutiveOtaErrors;
} OtaLib_t;
ota_lib.h
The larger the value of MAX_BUNDLE_CMD_FILES, the larger the memory structure becomes (and the larger the SRAM footprint becomes). This is only an issue when using the main program flow (such as cloud_ota) with the APIs included in ota.h. For examples that directly access the utility APIs (like local_ota), this is no longer an issue.
JSON Library
A library for parsing and processing JSON files is also used by OTA examples. This project is not automatically imported, however is provided as a static library. As long as the user is not making changes to the JSON library, it does not have to be imported.
For a more detailed explanation of the APIs that make up the OTA library, please refer to the OTA library section in the CC32xx OTA module.
Lab Preparation
Task 1: Programming Local OTA Files with UniFlash
To get started, we first need to program the CC31xx with the initial user files, certificates, and web files that will prompt the user and accept the TAR file for the firmware update. The initial programming of the CC31xx requires the CC31XXEMUBOOST BoosterPack in conjunction with the Image Creator utility within UniFlash.
Connect the CC31XXEMUBOOST to the CC31xx BoosterPack as seen below while being careful not to mount the pins upside down:

Dual Connections
Note that while connected to the CC31XXEMUBOOST, the normal programming of the MSP432 LaunchPad will not work correctly. It is not required for the CC31xx to be connected to the MSP432 when programming with the CC31XXEMUBOOST.
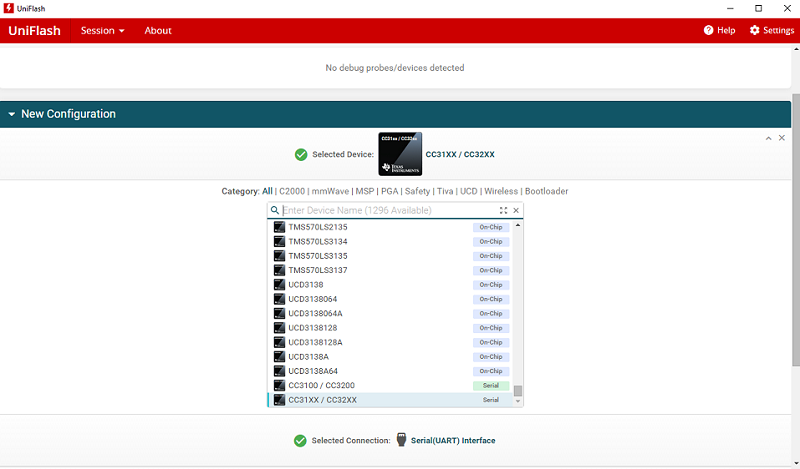
Plug the USB cable from your computer into the right USB port of the CC31XXEMUBOOST (labeled SPI/GPIO/UART/NWP). Once connected, open up the UniFlash application. In the device list, select CC31xx / CC32xx. Once selected, click Start Image Creator to start the Image Creator application.
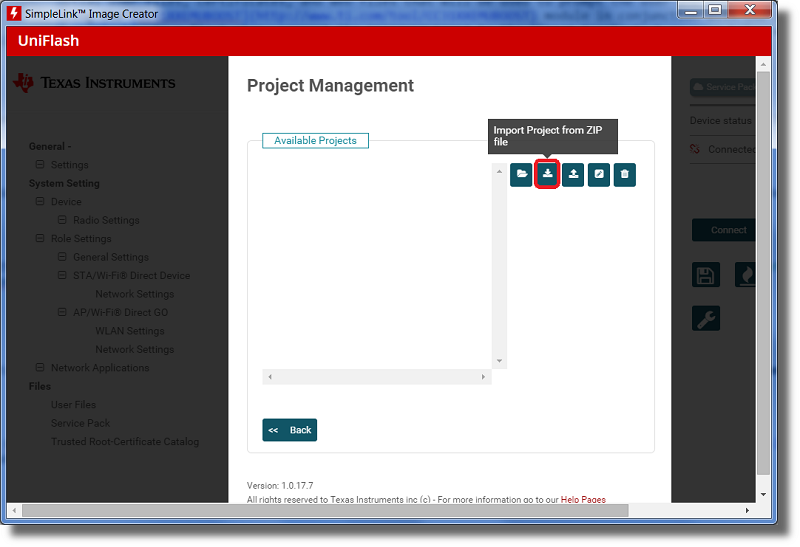
On the following screen we need to import the example project for
local_otathat is included with the plugin release. Select the Manage Projects button.
Next select the Import button to select an Image Creator project (in ZIP format).
The ZIP file you will download will depend on if you are using the CC3120 or the CC3135.
- If you are using the CC3120, navigate to the example ZIP file located at
<SimpleLink SDK Wi-Fi Plugin>/examples/rtos/MSP_EXP432P401R/demos/local_ota/uniflash_cc3120/local_ota_CC3120.zip If you are using the CC3135, navigate to the example ZIP file located at
<SimpleLink SDK Wi-Fi Plugin>/examples/rtos/MSP_EXP432P401R/demos/local_ota/uniflash_cc3135/local_ota_CC3135.zip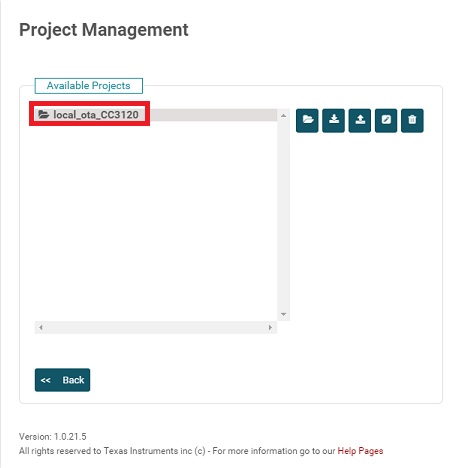
- If you are using the CC3120, navigate to the example ZIP file located at
Double click on the imported project to open it in UniFlash. Note that the service pack version in the screenshot may be different from what is included in your zip file. Program the image as described in Program an Image
Task 2: Setting up the Hardware
The code examples in this lab use a standard MSP-EXP432P401R LaunchPad connected to a CC3120 BoosterPack. As previously stated, a CC3135 BoosterPack can be used as well. Connect your BoosterPack to the LaunchPad as seen below.

Note for an MSP-EXP432P4111 LaunchPad the setup will look like the picture below.

Task 3: Setting up the terminal
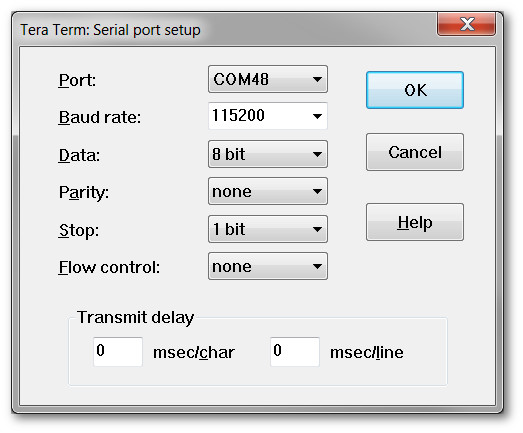
The LaunchPad uses the back channel serial port for logging and debugging messages. In order to read these messages, use your favorite serial terminal program (such as Tera Term or PuTTY). The COM port number will be different depending on the system configuration, however it should show up as XDS110 Class Application/User UART.
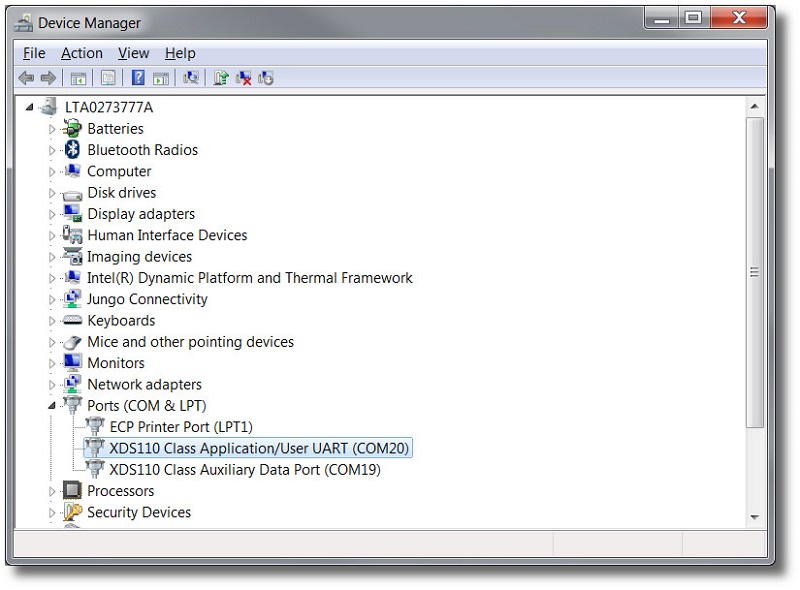
Make sure to use the Application/User UART and not the Auxiliary Data Port. Along with the COM port of the XDS110 UART, the back channel UART defaults to the following serial port values:
Local Over-The-Air Update
The local_ota example starts up a HTTP web server on the SimpleLink device. This web server presents a landing page for the user to upload their TAR file (described in building a firmware image section of this document) to update firmware directly without the need for any cloud interaction.
CCS Cloud use not recommended
This code example explicitly requires manipulation and accessing of files that are located in the install directory of the Wi-Fi plugin. For this reason, it is recommended to use a local IDE installation (CCS, IAR, or GCC) versus CCS Cloud Tools.
Task 4: Importing the Code Example
First we need to import the
local_otacode example into your workspace. In Code Composer Studio, select Projects → Import CCS Projects from the menu bar: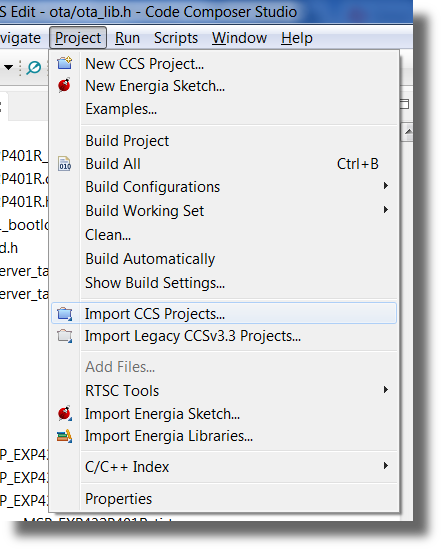
Navigate to the
<SimpleLink SDK Wi-Fi Plugin>\examples\rtos\MSP_EXP432P401R\demos\local_ota\tirtos\ccsdirectory (or the relevant path for your RTOS/toolchain configuration).
Automatic Imports
When importing the local_ota or cloud_ota examples for TI-RTOS, an additional special build of the TI-RTOS kernel will be imported that was designed to work well with the custom MSP432 bootloader.
Task 5: Provisioning the Device
The local_ota code example is provisioned by hard coding the relevant router/access point information into the local_ota.h source file using the following defines:
/* Values for below defines shall be modified for setting the AP connection properties */
#define SECURITY_KEY            ""
#define SECURITY_TYPE           SL_WLAN_SEC_TYPE_OPEN
#define SSID_NAME               "cc31xxdemo"
local_ota.h
Change this configuration to match your router/network. Realistically speaking, most routers are going to have a secured network with a WPA2 security key. The following, for example, would setup the code example to connect to the network with the SSID of sushi and a WPA key of lupiniii.
/* Values for below defines shall be modified for setting the AP connection properties */
#define SECURITY_KEY            "lupiniii"
#define SECURITY_TYPE           SL_WLAN_SEC_TYPE_WPA_WPA2
#define SSID_NAME               "sushi"
local_ota.h
Task 6: Building the MSP4324P4 Firmware Image
As part of the local_ota code example, an example zip file of a firmware update package is provided with the plugin. This example zip file can be used as is, but in this lab we wil modify it with our own host MCU image.
In
local_ota.h, find theAPPLICATION_NAMEmacro. Modify this to "Local OTA EX0 Example" or any name of your choosing. This is help us in differentiating that a new image has been downloaded after the update./* Application Version and Naming*/ #define APPLICATION_NAME "Local OTA EX0 Example" #define APPLICATION_VERSION "1.50.00.00"local_ota.h
Go to
msp432p401r_bootloader.c. If you are using the MSP432P4111, this file will instead be namedmsp432p4111_bootloader.c. Comment out the contents of the whole file. The reasoning for this is explained in depth in Building an MSP432P4 Firmware Image.To have Code Composer Studio explicitly generate a binary file in its output directory, a custom post-build step must be added to the project configuration. Right-click your project settings and select Properties. Select the Build menu item on the left and select the Steps tab. Copy and paste the following into the Post-build steps text area:
"${CCS_INSTALL_ROOT}/utils/tiobj2bin/tiobj2bin" "${BuildArtifactFileName}" "${BuildArtifactFileBaseName}.bin" "${CG_TOOL_ROOT}/bin/armofd" "${CG_TOOL_ROOT}/bin/armhex" "${CCS_INSTALL_ROOT}/utils/tiobj2bin/mkhex4bin"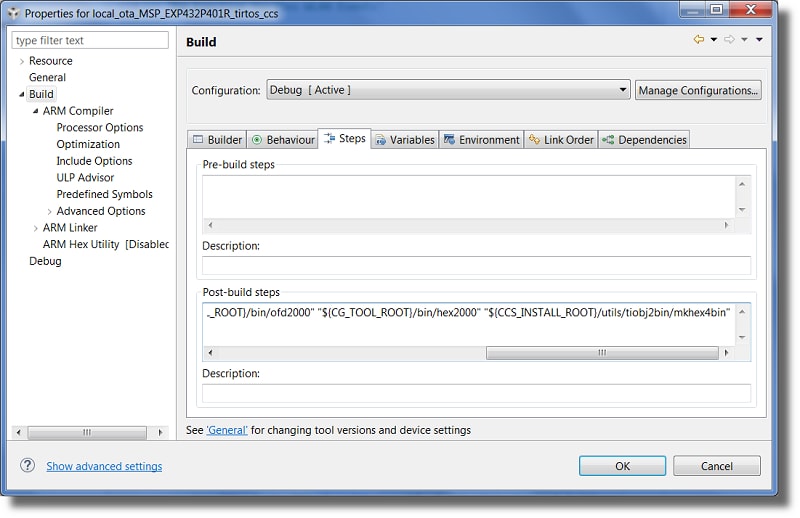
Select OK and build your project. In the output build directory of your project, a
.binfile should now be generated: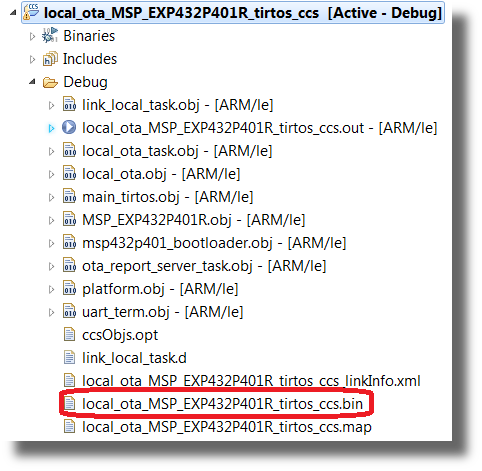
Task 7: Creating the OTA Image
The package you will import depends on whether you are using the CC3120 or the CC3135.
- If you are using the CC3120, import
<SimpleLink SDK Wi-Fi Plugin>/examples/rtos/MSP_EXP432P401R/demos/local_ota/uniflash_cc3120/tar_local_ota_CC3120.zip. - If you are using the CC3120, import
<SimpleLink SDK Wi-Fi Plugin>/examples/rtos/MSP_EXP432P401R/demos/local_ota/uniflash_cc3135/tar_local_ota_CC3135.zip.
- If you are using the CC3120, import
After importing the correct project, click on Advanced on the left side. In the menu that appears, click on User Files.
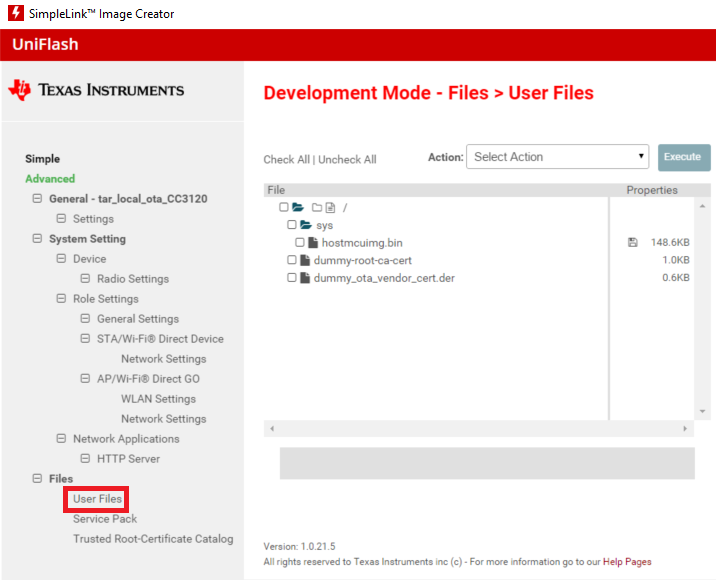
Hover your cursor over
hostmcuimg.bin. This is the file we are going to replace with the binary we created in the last task. Click on Overwrite, and then select the new binary file you created.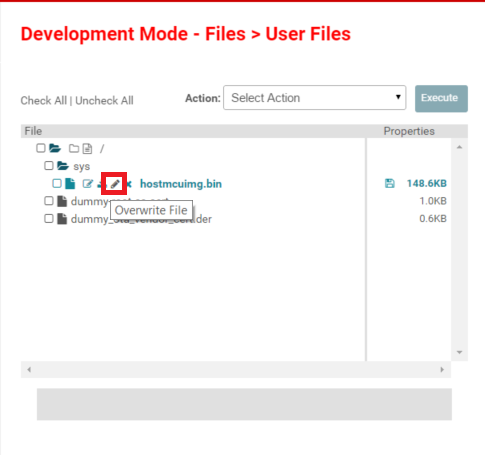
In the next screen, make sure the filename is still
hostmcuimg.bin, and that Failsafe is selected. Then click Overwrite.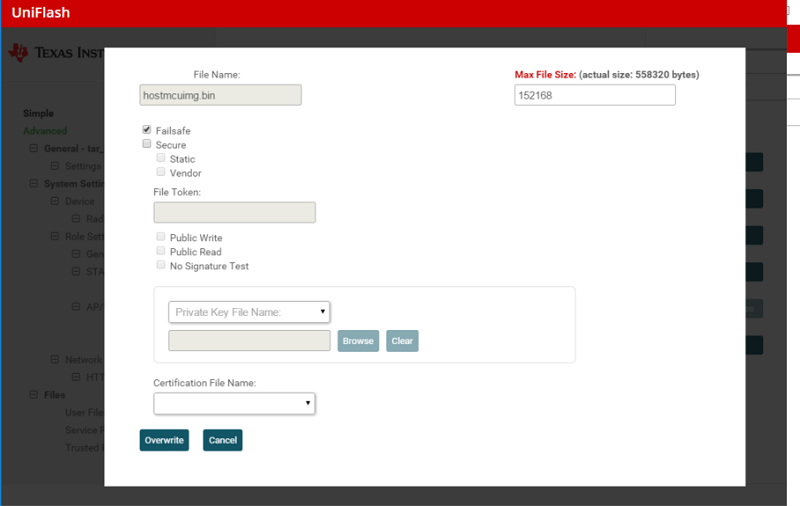
Now it is time to generate the TAR file. To do this, click on Burn on the right side. Then click on Create OTA.

This will prompt you for the private key used for the SHA-256 signature definition. This is the key detailed in the SHA-256 digest verification section. As mentioned, a dummy key can be found at
<SimpleLink SDK Wi-Fi Plugin>/tools/cc31xx_tools/ota-example-cert/dummy_ota_vendor_key.der. Navigate to the location of your key and click Create OTA. This will generate the the TAR file and prompt for a location to save. Save the TAR file to a known location. Notice that the generated file has a filename such as:20190131125713_CC3120R_tar_local_ota_CC3120.tarThe first part of the file name (20171023153905 in this case) corresponds to the version number. The embedded OTA code running on the MSP432 uses this information to determine if the firmware that was sent over OTA is an older or newer revision of the current firmware on the system. Whenever a firmware update over OTA occurs, a file named
ota.datis stored in the root of the file system with the version of firmware that was programmed. When a new OTA firmware image is loaded via Wi-Fi, a decimal comparison of the new image is done with the version number inota.datto determine if the application should proceed with the firmware update.
Task 8: Running the Code Example
Now go back to CCS. Uncomment out the contents of
msp432p401_bootloader.c.Go to
local_ota.hand change theAPPLICATION_NAMEback to "Local OTA Example".Build your program and download it to your LaunchPad.
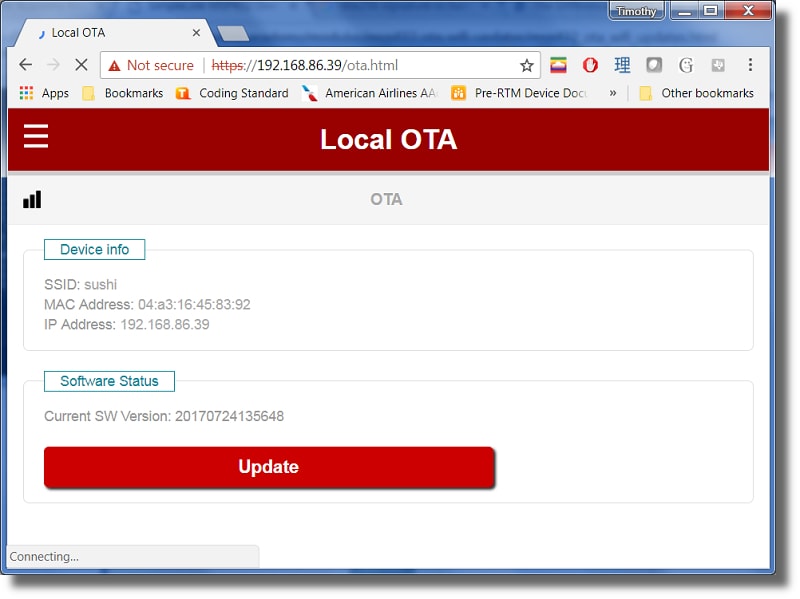
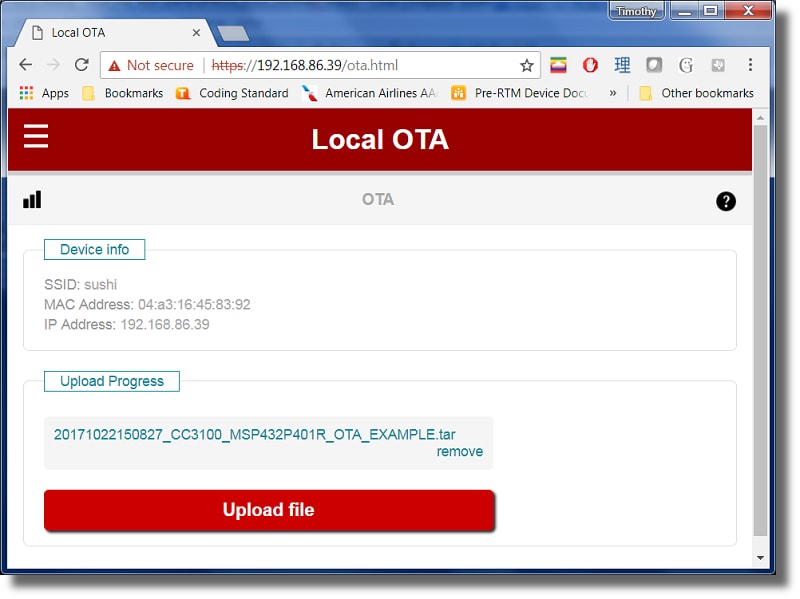
After running the program you should see the code example start up and information such as the IP and network diagnostic being displayed on the terminal output. In this case the application was assigned an IP of 192.168.86.39.

From your PC, open up a web browser and navigate to the address
https://192.168.86.39/ota.html, replacing the IP address with the one assigned to you specifically. Make sure your PC is on the same network that your device is connected to.Invalid Certificate
Note that you will most likely get an "invalid certificate" warning as we are using a dummy development certificate. This can be safely ignored during development.
Click the Upload button on the web interface and the Choose File button. Navigate to your TAR file package that we created in the last task and press Upload File.
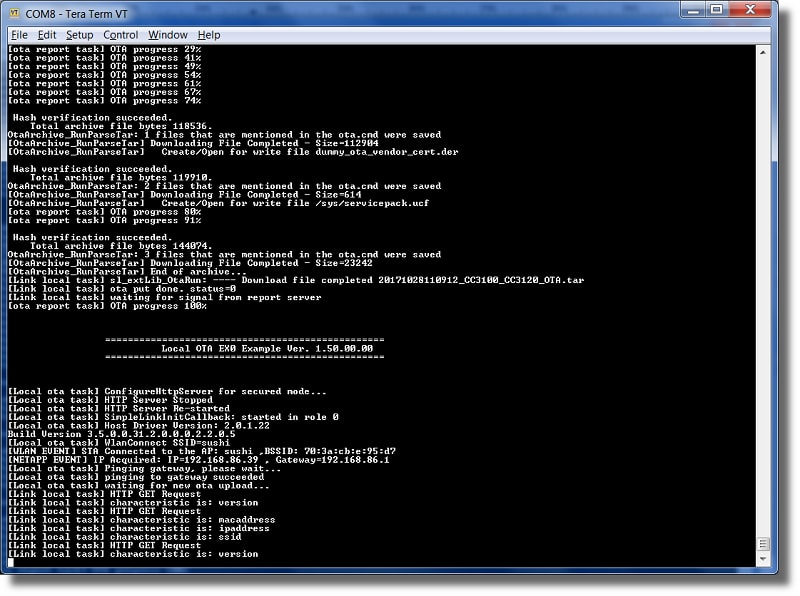
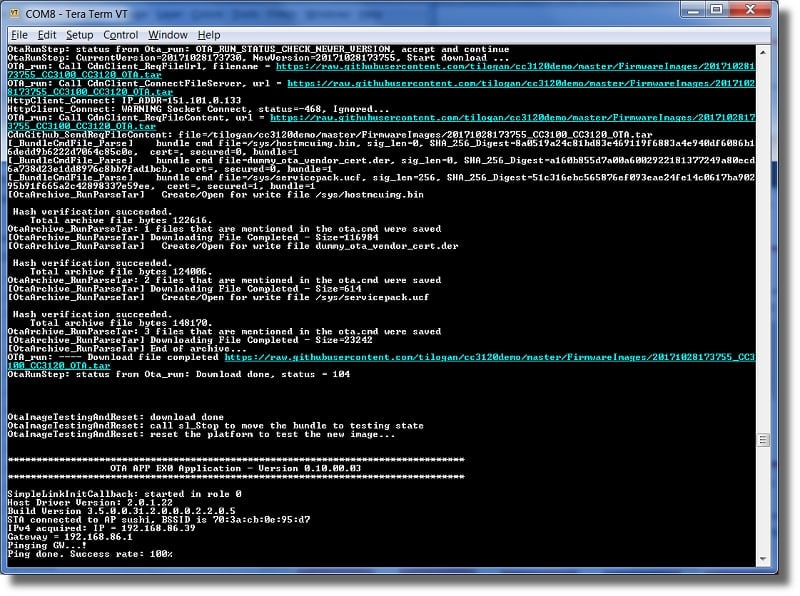
This will initiate the firmware update. Note that the terminal screen will output the progress of the firmware update as well as provide miscellaneous information such as hash calculation.

Once the firmware has been downloaded and verified on the device, the MSP432 will reboot and LED2 on the LaunchPad will turn solid blue to signify the MSP432's firmware is being updated.

Note that in our example the firmware image changed titles. When we downloaded the code from CCS and ran it initially the title of the firmware image in the terminal output was Local OTA Example. After the update, it was Local OTA EX0 Example.
Also note that once the firmware update occurs and the firmware is updated on the MSP432, the device will reset and connect to the same Wi-Fi network as before. Once connected, the web interface will probe the version number from the device (remember, this is stored in
ota.dat) and then verify that the TAR file sent to the device actually persisted. If the version check passes, the Finalize button will become available. Click this button to persist the firmware update to the local device.
Cloud Over-The-Air Update
The cloud_ota example achieves the same end functionality as the local_ota example, however with the cloud_ota example the firmware for the update comes from a cloud service provider. The SimpleLink SDK Wi-Fi Plugin currently supports the two following cloud content providers for OTA updates:
Start by importing the cloud_ota project into your CCS workspace. The cloud_ota project can be found at SimpleLink SDK Wi-Fi Plugin → examples → rtos → MSP_EXP432P401R → demos → cloud_ota
Cloud services that provide a vessel for the SimpleLink Wi-Fi device to download firmware packages from are called Content Delivery Networks (CDNs). The configuration parameters in the user code to communicate with these cloud services can be found in the otauser.h file in the ota project that gets automatically imported into your workspace with any OTA project. The parameters defined in this file will be used for the cloud_ota labs in the following sections.
DropBox Setup
The first cloud service that will be examined is DropBox. To get started with DropBox, login to the Applications page on the developer website at the following URL:
Click the Create app button and create a custom application similar to the parameters below.

On the next page scroll down to the Generate access token field under the OAuth 2 section. Click the Generate button. This will generate an access token that your
cloud_otaexample will use to connect and authenticate to your DropBox application.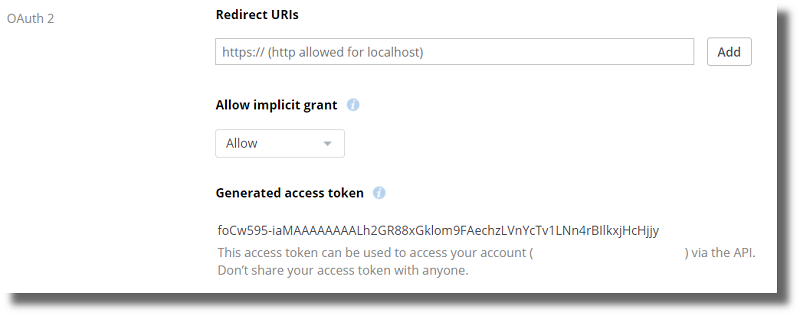
Copy the generated access token to your clipboard. Back in Code Composer Studio, open the
otauser.hfile and find theOTA_VENDOR_TOKENmacro. Paste the generated access token into theOTA_VENDOR_TOKEN.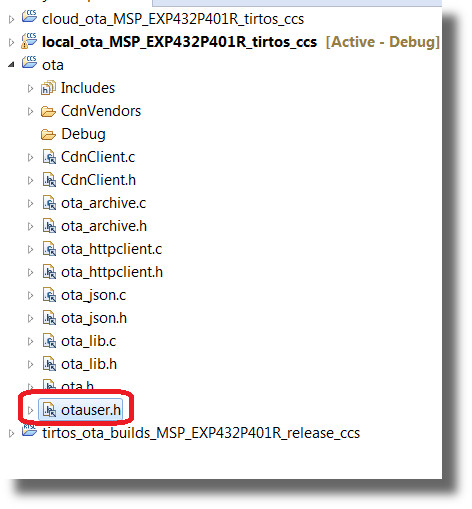
 /* Dropbox V2 vendor info */
 #define OTA_VENDOR_TOKEN              ""
otauser.h
Scroll up to the top of the file to the following section:
 /* USER SHOULD DEFINE HERE WHICH CLOUD TO USE */
 /* -------------------------------------------*/
 //#define OTA_SERVER_TYPE    OTA_SERVER_GITHUB
 #define OTA_SERVER_TYPE    OTA_SERVER_DROPBOX_V2

 /* OTA server info */
 /* --------------- */
 #define OTA_VENDOR_DIR  ""
otauser.h
Make sure that
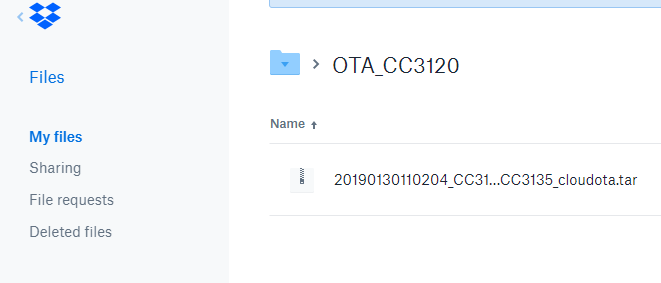
OTA_SERVER_DROPBOX_V2is defined as theOTA_SERVER_TYPE.OTA_VENDOR_DIRallows you to specify the string of the folder where you want to store firmware images in your DropBox application. The default name isOTA_CC3120.Next, go back to the Apps Homepage in DropBox. You should now see a new folder with the name of the application that you created (in our case CC3120OTATest).

Click on this folder. Inside this folder is the root directory as it is seen by your
cloud_otaapplication. Make a new folder with the name ofOTA_CC3120and open the folder. This is the folder where you will upload the new firmware package. Create this TAR file by following the steps in Creating the OTA ImageSelect Upload files from the menu box. Navigate to the directory of your TAR file and upload your file to DropBox.
Flashing the CC31xx BosterPack
Next we will obtain the certificate used for verification with the cloud server and put this on the CC31xx filesystem in order for the cloud communication to work. One of the common certificates used by DropBox is titled DigiCert High Assurance EV Root CA. If you've visited DropBox via the web, then this certificate is likely installed locally on your computer.
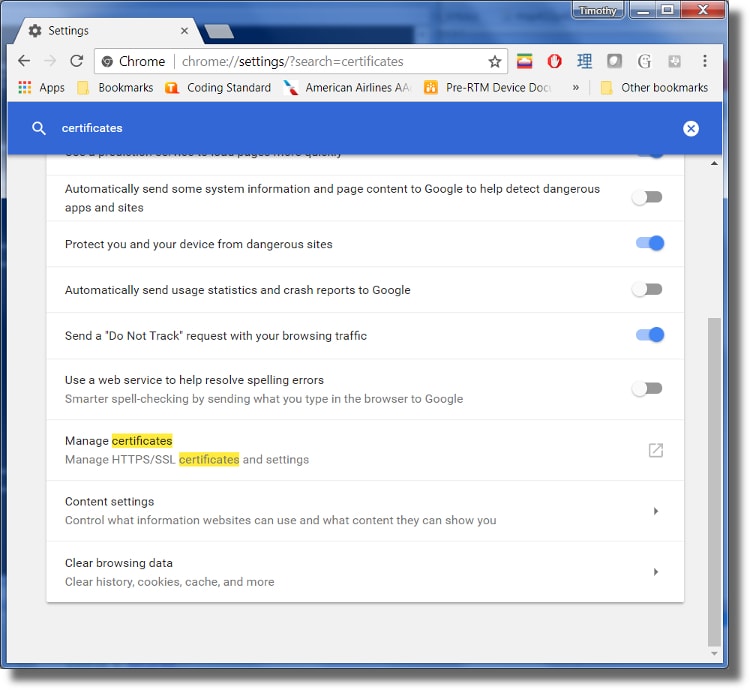
To see a list of certificates currently installed on your system using Google Chrome, go to the Settings pane and search for Certificates:
From here click Manage certificates to open up the certificate manager. Select the Trusted Root Certification Authorities and scroll down to
DigiCert High Assurance EV Root CA.
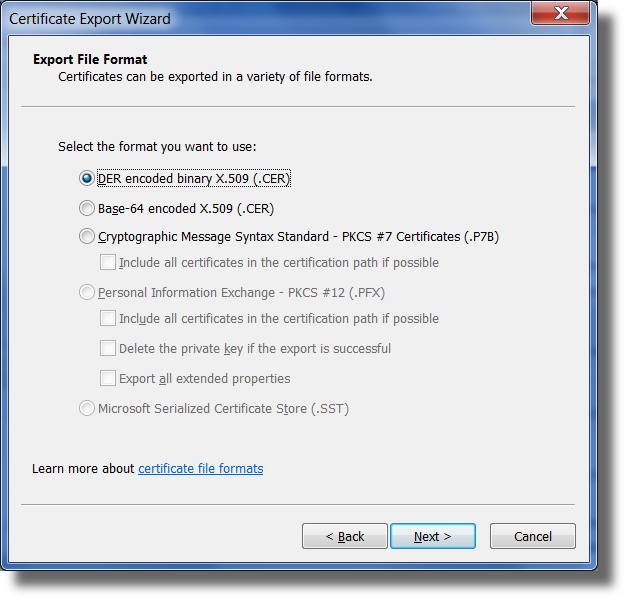
Click on Export. When prompted for the certificate type, select DER encoded binary x.509 (.CER).
Follow the prompts and save the certificate to a known location with a file name of
cloud_certificate.cer. Open the UniFlash application and create a new project the same way that is described in Creating a New Project.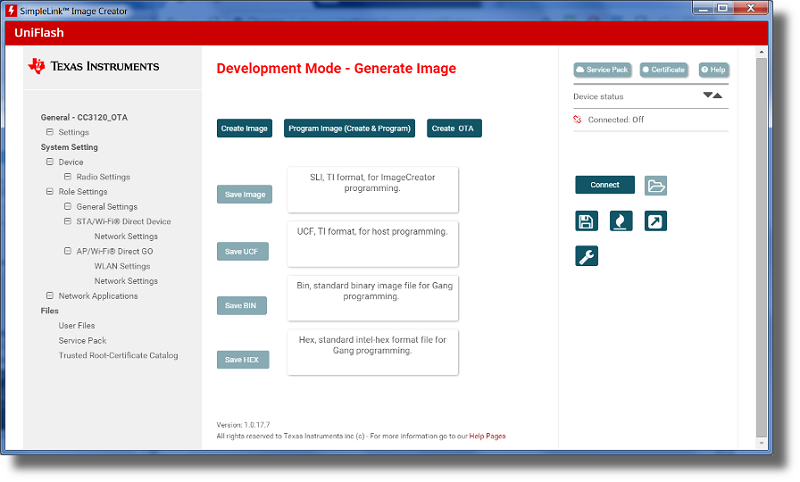
Next, mount the CC31XXEMUBOOST module on your CC31xx BoosterPack and connect the USB cable from your PC to the right USB port on the CC31XX module as seen below:
Click Connect on the right side of the UniFlash window to open an active connection to the CC31xx.
Click on the Add file button in the root directory and add the
cloud_certificate.certhat you exported from the earlier step.Press Add file and add
dummy_ota_vendor_cert.der, which can be found in<SimpleLink Wi-Fi Plugin>\tools\cc31xx_tools\ota-example-cert. This is the OTA certificate used for SHA-256 hash generation exists in the file system.Additionally, add the entire "dummy" certificate chain (i.e.
summy-trusted-ca-cert,dummy-trusted-ca-cert-key,dummy-root-ca-cert, anddummy-root-ca-cert-key). These files can be found in<SimpleLink Wi-Fi Plugin>\tools\cc31xx_tools\certificate-playground. Ensure that Failsafe is chosen when adding each file. After adding all of the files, your User Files should look similar to the image below: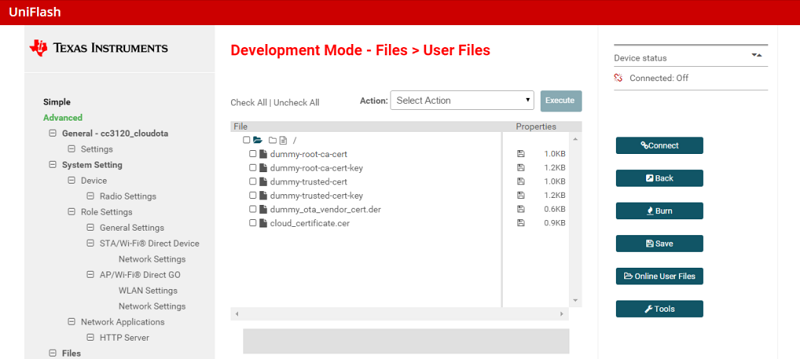
Navigate to to Service Pack in the left menu, and add the correct service pack for your device as described in Adding the Latest Service Pack
- If you are using the CC3120, the service pack is in
<SimpleLink Wi-Fi Plugin>\tools\cc31xx_tools\servicepack-cc3x20 - If you are using the CC3135, the service pack is in
<SimpleLink Wi-Fi Plugin>\tools\cc31xx_tools\servicepack-cc3x35
- If you are using the CC3120, the service pack is in
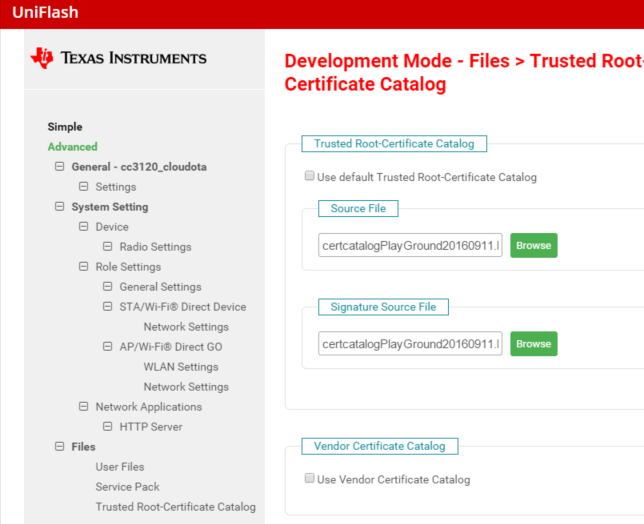
Add the playground trusted root-certificate catalog for the LaunchPad, as described in Changing the Trusted Root-Certificate Catalog. Make sure to add the correct BIN depending on if you are using the CC3120 or CC3135.
Program the image to your CC31xx BoosterPack.
Disconnect from the device using the Disconnect button to the right, remove the CC31XXEMUBOOST module, and plug in the LaunchPad to your PC.
Running the Example
Save all open files and compile/run the
cloud_otaapplication. Note that because the header file changed in theotaproject, you may need to right click theotalibrary project and select Clean to make sure the latest changes are built.When the application is run it will automatically start and wait to be provisioned. Provisioning in the
cloud_otaapplication is done by use of a mobile application. You can either user SimpleLink SDK Explorer (for iOS) or SimpleLink Wi-Fi Starter Pro (for iOS and Android). Please refer to the links in the support section of this document to find detailed user's guides on how to provision via a mobile application.
After provisioned, you should see the device starting to ping the remove server as seen below:
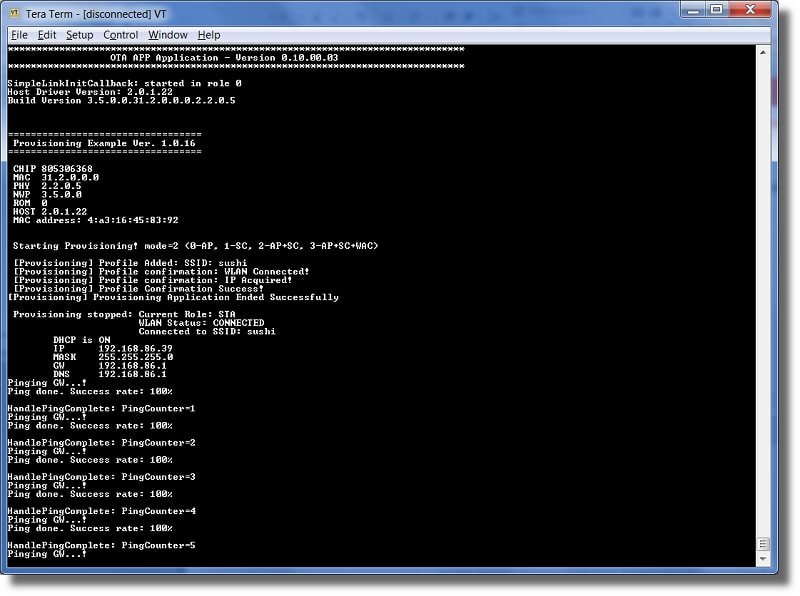
The
cloud_otaprogram will now proceed to connect to DropBox, detect that a new firmware package has been uploaded, and then download/flash the firmware file from DropBox.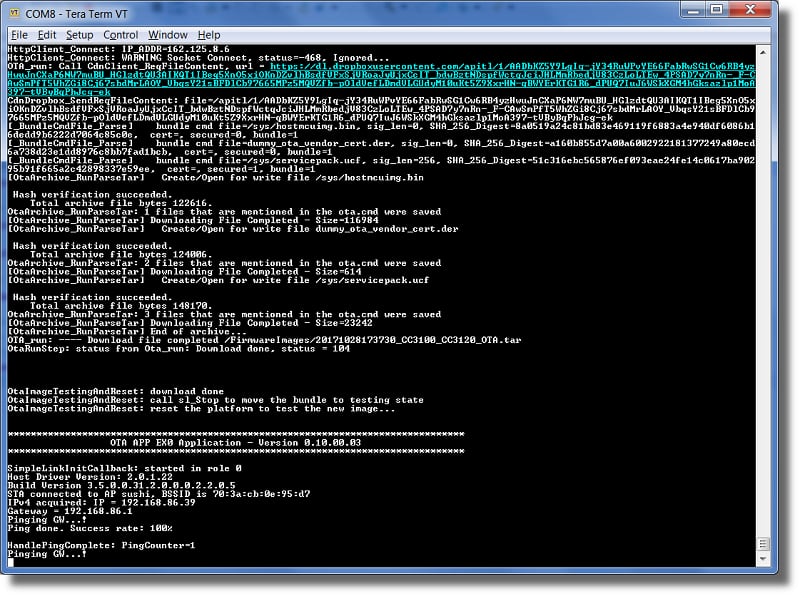
Invalid Certificate
If the certificate is still invalid, the name of the expected certificate will be displayed. Repeat the steps to download/program the CC31xx with the correct certificate.
Note that the name of the certificate used by the OTA library to authenticate with DropBox can be manually specified using the following define in
otauser.h.#define OTA_SERVER_ROOT_CA_CERT "cloud_certificate.cer" #define OTA_SERVER_AUTH_IGNORE_DATA_TIME_ERROR #define OTA_SERVER_AUTH_DISABLE_CERT_STOREotauser.h
As with the
local_otaapplication, the microcontroller will reboot itself after the firmware has been updated, the LED on LED2 will turn blue, and the new firmware will be flashed/run.
GitHub
Note that the GitHub portion of the cloud_ota code example is very similar to the DropBox portion. Many of the same concepts (such as installing the right certificates) apply exactly to the GitHub portion as they do the DropBox portion.
To get started with cloud updates through GitHub, open the
otauser.hfile located in theotaproject. Scroll to the following lines of code and ensure thatOTA_SERVER_TYPEis set toOTA_SERVER_GITHUB./* USER SHOULD DEFINE HERE WHICH CLOUD TO USE */ /* -------------------------------------------*/ #define OTA_SERVER_TYPE OTA_SERVER_GITHUB //#define OTA_SERVER_TYPE OTA_SERVER_DROPBOX_V2otauser.h
Scroll down to the following definitions:
 /* Github server info */
 #define OTA_SERVER_NAME                 "api.github.com"
 #define OTA_SERVER_IP_ADDRESS           0x00000000
 #define OTA_SERVER_SECURED              1

 /* Github vendor info */
 #define OTA_VENDOR_ROOT_DIR \
     "/repos/<user account>/<user directory>"

 #define OTA_VENDOR_TOKEN              "<User defined Github token>"
 #define OTA_SERVER_ROOT_CA_CERT         "cloud_certificate.cer"
 #define OTA_SERVER_AUTH_IGNORE_DATA_TIME_ERROR
 #define OTA_SERVER_AUTH_DISABLE_CERT_STORE
otauser.h
No special access token needs to be generated for GitHub as we did on DropBox. For
<user_account>put your GitHub user account, and for<user_directory>put the name of the repository where you want to store firmware images.Make sure that the
cloud_certificate.ceris programmed in the correct location as described in the DropBox section.The
OTA_VENDOR_TOKENfor GitHub should be set to the user account that contains the relevant repository that you are probing.Also make sure that a valid value is specified for the
OTA_VENDOR_DIRmacro. This will be the folder within the specified Git repository that thecloud_otaproject will be probing for firmware images./* OTA server info */ /* --------------- */ #define OTA_VENDOR_DIR "OTA_CC3120"otauser.h
After all of the relevant information is filled out, build/run the
cloud_otaapplication. Once run, the program will connect to the provisioned access point and start pinging the resolved gateway.Through a Git client of your choice (command line Git is shown below), clone your configured repository, add your new firmware image to the
OTA_CC3120directory, and then push your local changes to GitHub. An example of this can be seen below.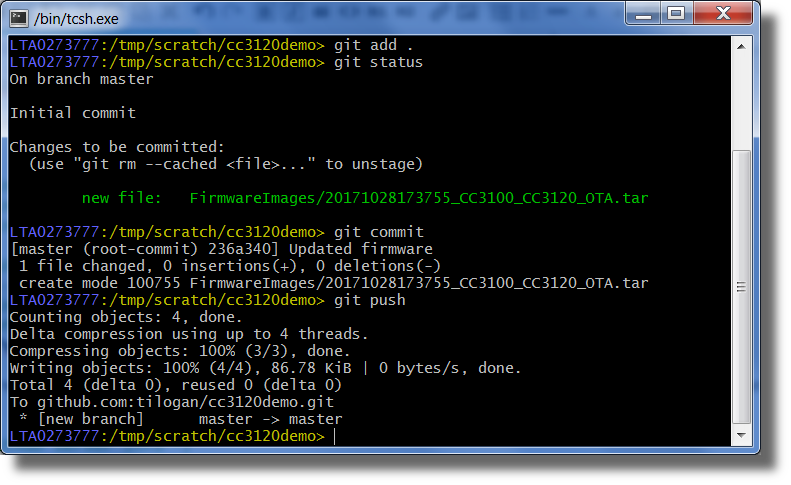
Once pushed, press the S1 button on the LaunchPad to initiate the firmware update. Once initiated, the device will connect to GitHub, detect a new version of the firmware, and then download/flash the firmware to the MSP432 and CC31xx.
Invalid Certificate
Note that if an invalid certificate or HTTP connection error is thrown, refer to the section on exporting/flashing a custom certificate in the DropBox example.
Where to Find Support
For provisioning mobile applications, please refer to the relevant documentation in the Provisioning SimpleLink Academy module. The following two mobile applications are supported.
- SimpleLink SDK Explorer (iOS only)
- Simplelink Wi-Fi Starter Pro (iOS and Android)
Support is encouraged through use of the TI E2E Community. Additional support can be garnered through the various documentation provided with the SimpleLink SDK Wi-Fi Plugin package.
This work is licensed under a Creative Commons Attribution-NonCommercial-NoDerivatives 4.0 International License.