Bluetooth Low Energy Enhanced Over the Air Download (OAD) Advanced#
Introduction#
This module is an advanced study of the Over the Air Download (OAD) feature of the TI BLE5-Stack. The estimated time to complete this lab is between 1-2.5 hours. It is assumed that the reader has a basic knowledge of embedded C tool chains and general C programming concepts. This lab is intended as additional material for users who are already familiar with the OAD concepts presented in the OAD Chapter of the BLE5-Stack User’s Guide.
OAD refers to the ability for an image to download a new executable image, over the air using the BLE5 protocol stack. A number of software components are involved in this process and TI uses OAD to refer to all of them as a software system.
This lab will be based on the
OAD Fundamentals lab. The OAD
distributor (host_test and btool) will be re-used and basic OAD knowledge
is being expected.
The first task is to add OAD to an existing project, using multi_role as an
example. After learning how to debug OAD code, the lab will explain how to
create an OAD production image.
Prerequisites#
Hardware#
For this lab, you need two Bluetooth-enabled development boards. Supported devices are:
These devices are interchangeable in the lab.
Software for desktop development#
Required reading#
SimpleLink Academy: Bluetooth Low Energy Enhanced Over the Air Download (OAD) Fundamentals
Recommended reading#
SimpleLink Academy: Bluetooth Low Energy Fundamentals
SimpleLink Academy: Making a Custom Profile
Note
It is recommended to review the OAD Chapter of the BLE5-Stack User’s Guide before starting this lab.
Getting started – Desktop#
Install the Software#
The same software will be used as described in OAD Fundamentals (Install the Software).
Import Software Projects#
Multi_Role
In addition to the projects used in
OAD Fundamentals,
we need to import multi_role from the following directory:
<SDK_INSTALL_DIR>\examples\rtos\<BOARD_NAME>\ble5stack\multi_role\tirtos7
This lab is designed for TI-RTOS7 based projects.
Task 1 – Add Off-Chip OAD to Multi Role#
This section will detail how to add BLE Off-Chip OAD to an existing project. The intention is to start with an unmodified example app from the SDK that does not currently use OAD, and add OAD to it.
Customers can use this section to add OAD to their existing projects.
The example project used to demonstrate these steps will be multi_role.
Project Changes for Off-Chip#
In order to add OAD, certain files and include paths should be added to the project, these are detailed in the list below.
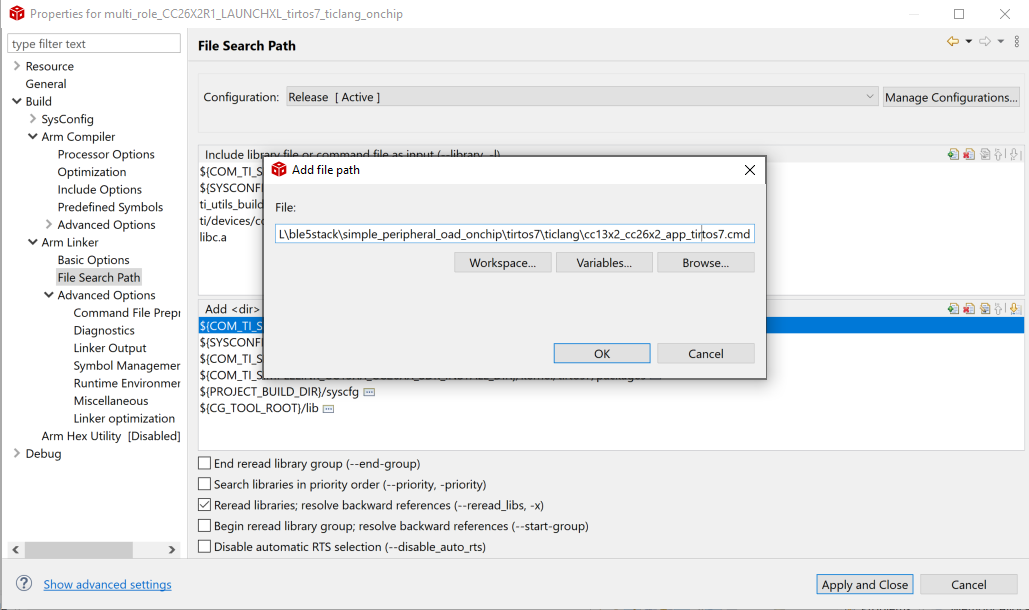
Change the linker file
Remove
cc13x2_cc26x2_app_tirtos7.cmdfile from the projectAdd the following line to Include library file or command file as input
${COM_TI_SIMPLELINK_CC13XX_CC26XX_SDK_INSTALL_DIR}/examples/rtos/CC26X2R1_LAUNCHXL/ble5stack/simple_peripheral_oad_offchip/tirtos7/ticlang/cc13x2_cc26x2_app_tirtos7.cmd
The linker command file from simple_peripheral_oad_offchip is used as it
is already configured for off-chip OAD.
Note
Be sure to add the correct path for the used LaunchPad and navigate to the setting by right clicking on the project, click Project Properties → Arm Linker → File Search Path → Add
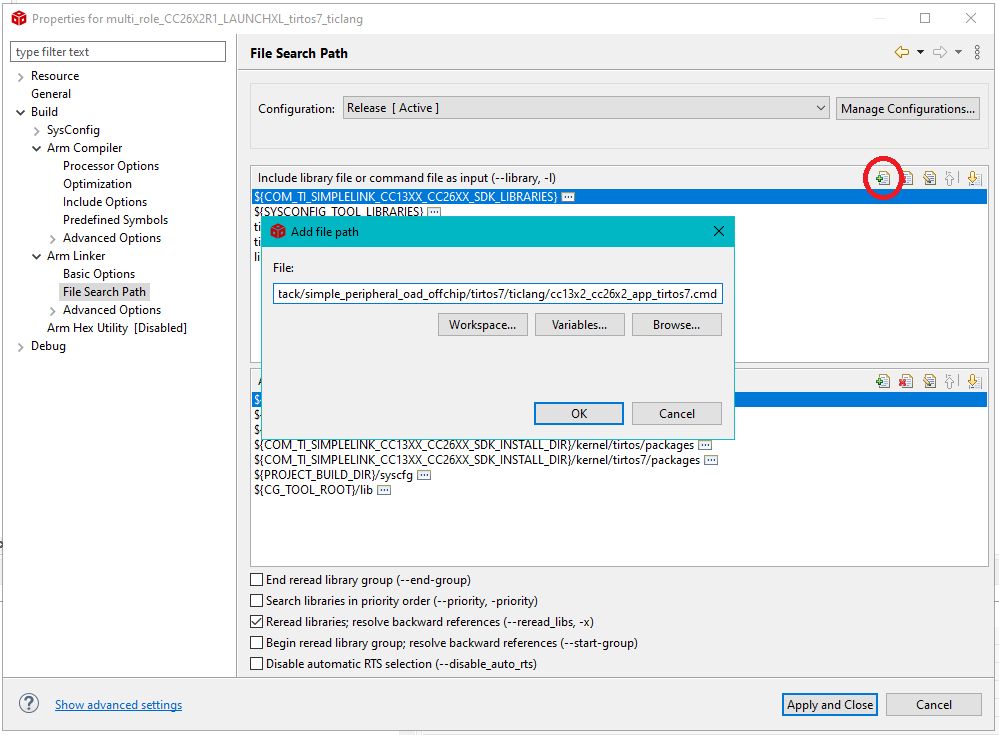
Add Linker file#
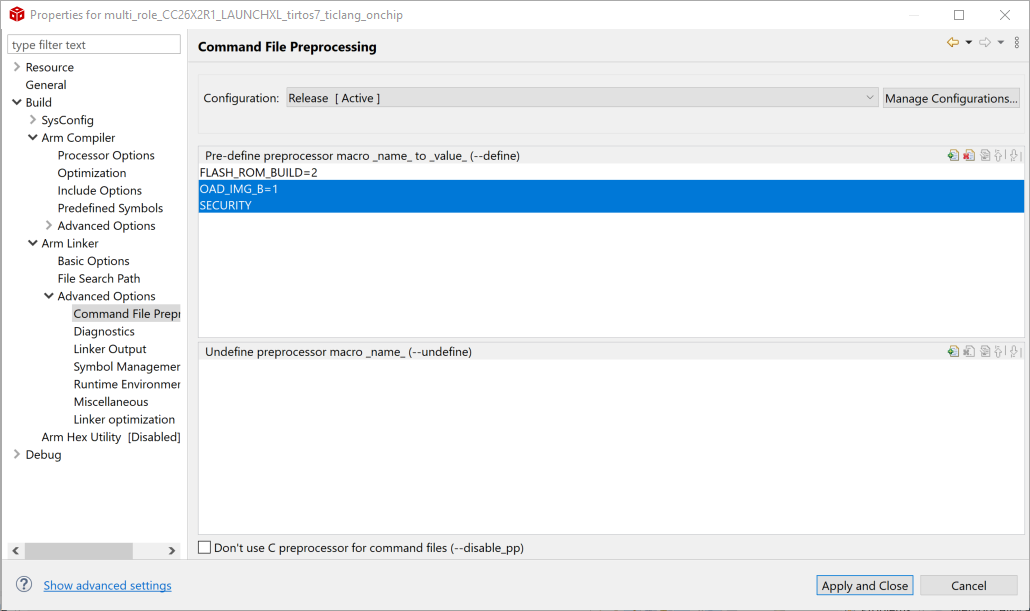
Add the following to the linker defines (Project → Properties → ARM Linker → Advanced Options → Command File Preprocessing → Pre-define preprocessor macro):
OAD_IMG_E=1: Tell the linker that off-chip OAD is to be usedSECURITY: Enable security if desired
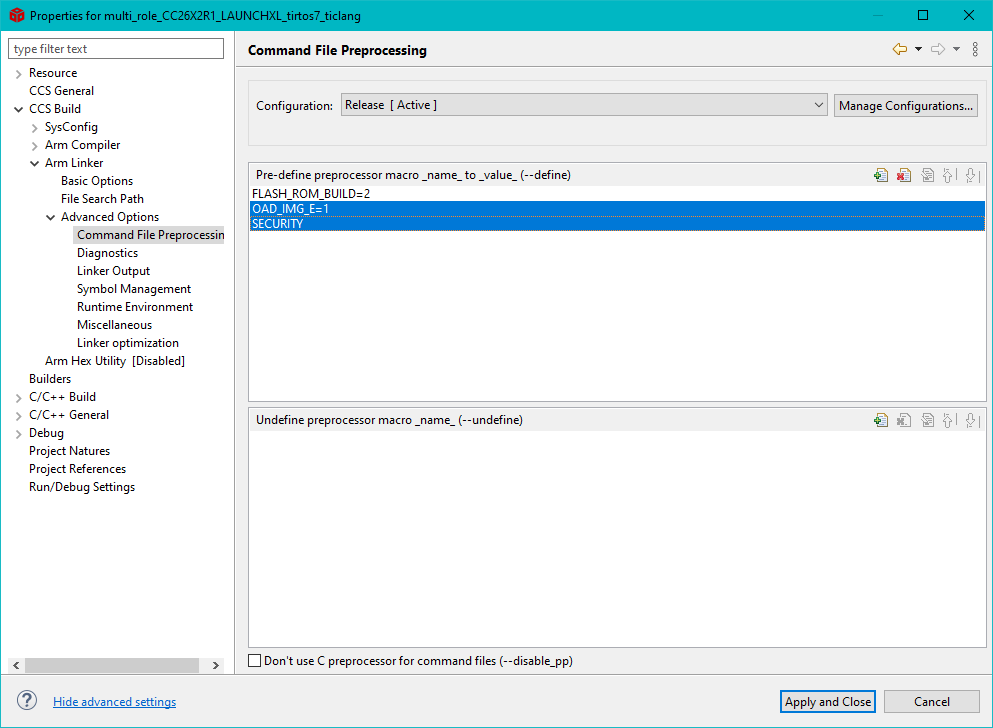
Add linker defines#
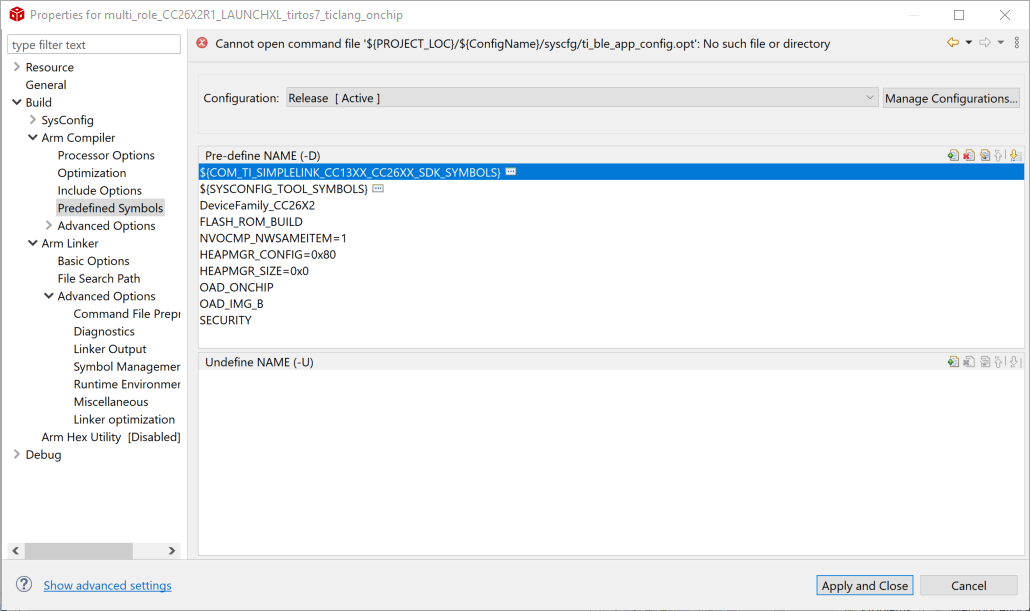
Add the following define to the compiler predefined symbols (Project → Properties → BUILD → ARM Compiler → Predefined Symbols)
SECURITY: Enable security if desired
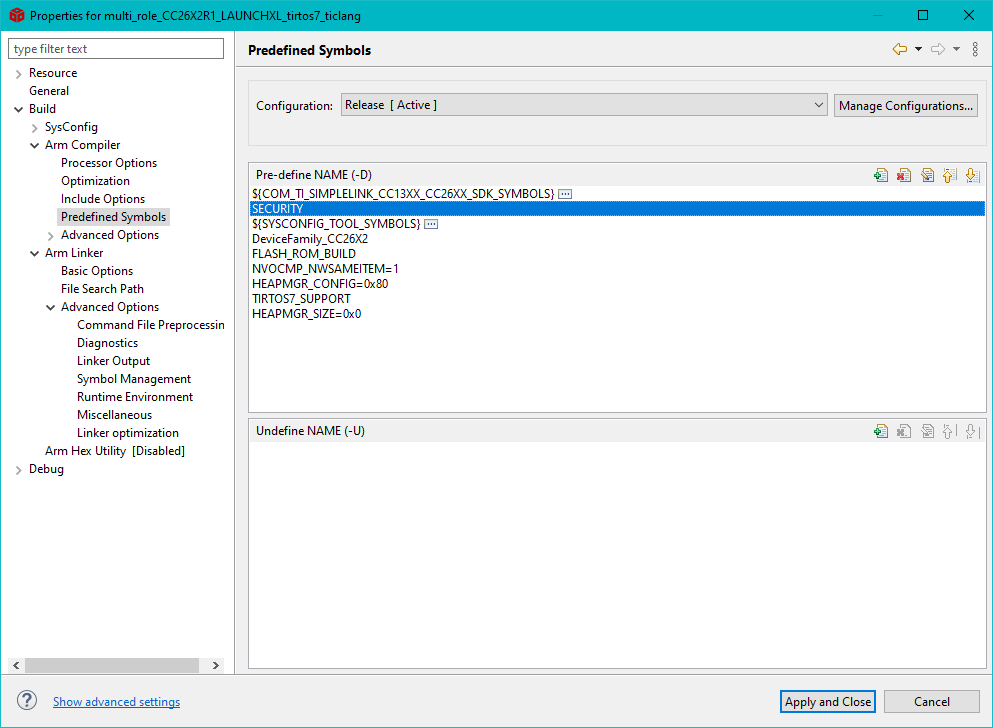
Add compiler defines#
In SysConfig, change the following configurations:
In BLE → General Configuration, set Maximum size of PDU (bytes) to 251. This is done to ensure higher throughput during the OAD.
Note
This define will control the negotiated block size. Block Size is derived from MTU size, which is derived by the minimum of the local supported PDU size and peer’s supported MTU. Refer to the notes about OAD Block size in the BLE5-Stack User’s Guide (Over the Air Download (OAD) → BLE-Stack OAD Profile → OAD Block Size Rules)
In Advanced Settings → OAD Only Defines, check for Led Debug and OAD Feature.
In TI Devices → Device Configuration, uncheck the Enable Bootloader box.For OAD projects, we will use the BIM as our Bootloader.
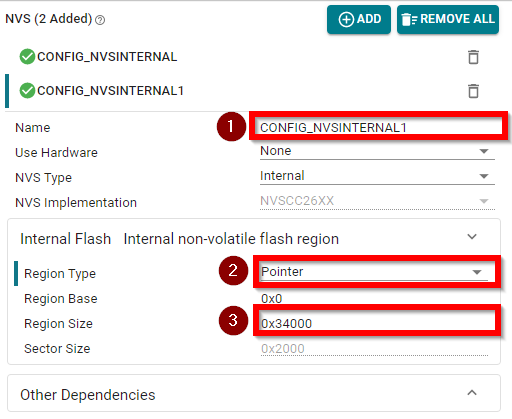
In TI DRIVERS config, add an NVS instance to the project by pressing the plus sign next to NVS. We must add an extra NVS instance for the external flash used in the off-chip OAD. Configure it as follows:
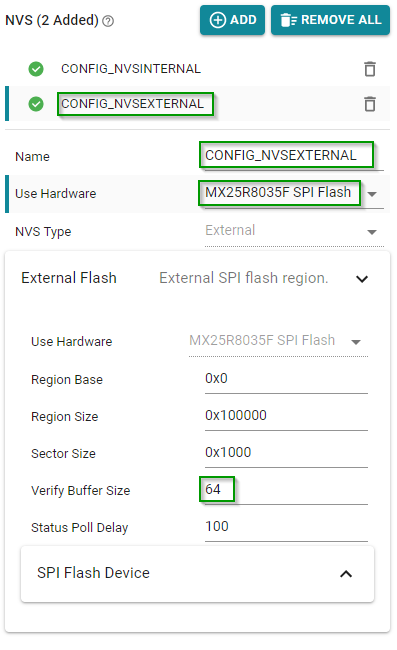
SysConfig add NVS#
Add the following files to the project. Use the “Link to Files” option to avoid any problems with file paths. Note that changes to linked files will impact every project that references these files. If changes to these files are required, copy the file to the project so that the original copy in the SDK is kept. If prompted by CCS, select the option to add these files to the compiler include-path. These files can be found in the following locations:
{SimpleLink SDK}\source\ti\ble5stack\profiles\oad\cc26xx
mark_switch_factory_img.h* : Public API definition for factory image switch.mark_switch_factory_img.c* : Implementation of factory image switching mechanism.oad.c: OAD profile implementationoad.h: Public OAD profile API definitionoad_defines.h: Common header containing OAD definitionsoad_image_header_app.c: Application definition of image header.oad_util.c: Implementation of OAD utility functionsoad_util.h: Public API definition of OAD utility functions
*This file is only required if the optional revert to factory image feature is required.
{SimpleLink SDK}\source\ti\common\cc26xx\crc
crc32.c: CRC32 algorithm and helper functionscrc32.h: CRC32 public API definition
{SimpleLink SDK}\source\ti\common\cc26xx\flash_interface
flash_interface.h: A flash abstraction layer that abstracts flash operations for on and off-chip OAD.
{SimpleLink SDK}\source\ti\common\cc26xx\flash_interface\external
flash_interface_ext_rtos_NVS.c: TI-RTOS NVS driver implementation of flash interface for off-chip OAD.
{SimpleLink SDK}\source\ti\common\cc26xx\oad
oad_image_header.h: Structure definitions for the OAD image header
{SimpleLink SDK}\source\ti\common\c26xx\bim
bim_util.h: Public API definition of utility functions shared between the BIM and application.bim_util.c: Implementation of BIM utility functions
Verify the following pre-processor include paths (Project → Properties → ARM Compiler → Include Options) are added to the project. They are already present in
multi_role.${COM_TI_SIMPLELINK_CC13XX_CC26XX_SDK_INSTALL_DIR}/source/ti${COM_TI_SIMPLELINK_CC13XX_CC26XX_SDK_INSTALL_DIR}/source/ti/ble5stack(You can use SRC_BLE_DIR for this)
Add the OAD image tool[post build step (Project → Properties → Build → Steps) to the project.
Be sure to not delete the existing hex file step. Place the OAD step after it!
The following should be used with secure OAD (i.e. SECURITY defined)
;${COM_TI_SIMPLELINK_CC13XX_CC26XX_SDK_INSTALL_DIR}/tools/common/oad/oad_image_tool --verbose ccs ${PROJECT_LOC} 7 -hex1 ${ConfigName}/${ProjName}.hex -k ${COM_TI_SIMPLELINK_CC13XX_CC26XX_SDK_INSTALL_DIR}/tools/common/oad/private.pem -o ${ConfigName}/${ProjName}_oad
The following should be used with unsecure OAD (i.e. no SECURITY defined):
;${COM_TI_SIMPLELINK_CC13XX_CC26XX_SDK_INSTALL_DIR}/tools/common/oad/oad_image_tool --verbose ccs ${PROJECT_LOC} 7 -hex1 ${ConfigName}/${ProjName}.hex -o ${ConfigName}/${ProjName}_oad
Warning
Some applications in the SDK will generate output files that are formatted as ${ProjName}_${ConfigName}.hex while others are ${ProjName}.hex. Check to be sure that your ouput hex file format matches the one in the OAD post build step above.
Change the linker file
Remove
cc26xx_app_and_stack_agama_tirtos7.icffile from the projectCopy the linker file from
simple_peripheral_oad_offchipand add it tomulti_roleinstead.Change also the linker file (Linker → Config → Linker configuration file) in the project options.
$SIMPLELINK_CC13XX_CC26XX_SDK_INSTALL_DIR$/examples/rtos/CC26X2R1_LAUNCHXL/ble5stack/simple_peripheral_oad_offchip/tirtos/iar/cc26xx_app_and_stack_agama.icf
Add the following to the linker defines (Options → Linker → Config → Configuration file symbol definitions) :
OAD_IMG_E=1: Tell the linker that off-chip OAD is to be usedSECURITY=1: Enable security (optional)
Add the following define to the compiler predefined symbols (Options → C/C++ Compiler → Preprocessor)
SECURITY: Enable security (optional)
In SysConfig, make the following configurations:
In BLE config → General Configuration, set Maximum size of PDU (bytes) to 251.
Note
This define will control the negotiated block size. Block Size is derived from MTU size, which is derived by the minimum of the local supported PDU size and peer’s supported MTU. Refer to the notes about OAD Block size in the BLE5-Stack User’s Guide (Over the Air Download (OAD) → BLE-Stack OAD Profile → OAD Block Size Rules)
In Advanced Settings → OAD Only Defines, check for Led Debug and OAD Feature.
In TI Devices → Device Configuration, uncheck the Enable Bootloader box.
In TI DRIVERS config, add an NVS instance by pressing the plus sign next to NVS. Configure it as follows:
SysConfig add NVS#
Add the following files to the project. Use the “Link to Files” option to avoid any problems with file paths. Note that changes to linked files will impact every project that references these files. If changes to these files are required, copy the file to the project so that the original copy in the SDK is kept. These files can be found in the following locations:
{SimpleLink SDK}\source\ti\ble5stack\profiles\oad\cc26xx
mark_switch_factory_img.h* : Public API definition for factory image switch.mark_switch_factory_img.c* : Implementation of factory image switching mechanism.oad.c: OAD profile implementationoad.h: Public OAD profile API definitionoad_defines.h: Common header containing OAD definitionsoad_image_header_app.c: Application definition of image header.oad_util.c: Implementation of OAD utility functionsoad_util.h: Public API definition of OAD utility functions
*This file is only required if the optional revert to factory image feature is required.
{SimpleLink SDK}\source\ti\common\cc26xx\crc
crc32.c: CRC32 algorithm and helper functionscrc32.h: CRC32 public API definition
{SimpleLink SDK}\source\ti\common\cc26xx\flash_interface
flash_interface.h: A flash abstraction layer that abstracts flash operations for on and off-chip OAD.
{SimpleLink SDK}\source\ti\common\cc26xx\flash_interface\external
flash_interface_ext_rtos_NVS.c: TI-RTOS NVS driver implementation of flash interface for off-chip OAD.
{SimpleLink SDK}\source\ti\common\cc26xx\oad
oad_image_header.h: Structure definitions for the OAD image header
{SimpleLink SDK}\source\ti\common\c26xx\bim
bim_util.h: Public API definition of utility functions shared between the BIM and application.bim_util.c: Implementation of BIM utility functions
The following pre-processor include paths (C/C++ Compiler → Preprocessor → Additional include directories) should be added to the project.
$SIMPLELINK_CC13XX_CC26XX_SDK_INSTALL_DIR$/source/ti$SIMPLELINK_CC13XX_CC26XX_SDK_INSTALL_DIR$/source/ti/ble5stack
Modify the post build step (Build Actions → Post-build command line) to support OAD on the project. On IAR, a batch script is used to execute multiple post build commands.
Ensure the following post-build command line is entered in IAR:
$SIMPLELINK_CC13XX_CC26XX_SDK_INSTALL_DIR$/tools/ble5stack/oad/oad_postbuild.bat $TARGET_BPATH$ $PROJ_DIR$ $CONFIG_NAME$ $PROJ_FNAME$ $SIMPLELINK_CC13XX_CC26XX_SDK_INSTALL_DIR$ $EXE_DIR$ $TARGET_BNAME$
With the above post-build command entered, navigate to the oad_postbuild.bat. Located in \(SIMPLELINK_CC13XX_CC26XX_SDK_INSTALL_DIR\) → tools → ble5stack → oad → oad_postbuild.bat file and open it with a text editor.
Note
Example projects in the SDK supporting OAD have SECURITY defined by default. As such, the above oad_postbuild.bat script should only be used for secure OAD.
If an unsecure OAD is desired, the oad_postbuild.bat script needs to be modified. The instructions below should only be followed for unsecure OAD.
Warning
Do not modify the oad_postbuild.bat script directly. This will likely break the functionality of the out-of-box, default example OAD projects in the SDK.
Copy the oad_postbuild.bat script and rename it to oad_postbuild_unsecure.bat. When doing this, don’t forget to modify the post-build command line mentioned above to point to the new unsecure version you just created.
After you’ve followed the above instructions for unsecure OAD, proceed by modifying the oad_postbuild_unsecure.bat file. Be sure to only modify the second command in the file.
The following should be used with unsecure OAD (i.e. no SECURITY defined):
%5/tools/common/oad/oad_image_tool.exe --verbose iar %2 7 -hex1 %3/Exe/%4.hex -o %6/%7_oad
Warning
Some applications in the SDK will generate output files that are formatted as ${ProjName}_${ConfigName}.hex while others are ${ProjName}.hex. Check to be sure that your output hex file format matches the one in the OAD post build step above.
Code Changes for Off-Chip#
The following changes need to be performed in the source code of the application:
Performing the following changes in the high level application task file.
Add the required include directives in
multi_role.cnear the other include directives:
  #include <profiles/oad/cc26xx/oad.h>
  #include <ti/common/cc26xx/oad/oad_image_header.h>
  #include <ti/devices/DeviceFamily.h>
  #include DeviceFamily_constructPath(driverlib/sys_ctrl.h)
Add the OAD events to the app’s
*_ALL_EVENTSmacro (be sure to add line breaks as necessary) in `multi_role.c. These macros have already been defined in oad.h.
   OAD_QUEUE_EVT | \
   OAD_DL_COMPLETE_EVT)
Define an application event to process a connection event in multi_role.c:
#define MR_CONN_EVT 14
After the above step the
MR_ALL_EVENTSshould look like this
    #define MR_ALL_EVENTS                (MR_ICALL_EVT           | \
                                          MR_QUEUE_EVT           | \
                                          OAD_QUEUE_EVT          | \
                                          OAD_DL_COMPLETE_EVT)
Add the following declarations under the LOCAL VARIABLES section in
multi_role.c:
    static uint8_t numPendingMsgs = 0;
    static bool oadWaitReboot = false;
Add the following forward declarations under the LOCAL FUNCTIONS section in
multi_role.c
    static void multi_role_processOadWriteCB(uint8_t event, uint16_t arg);
    static void multi_role_processL2CAPMsg(l2capSignalEvent_t *pMsg);
    static void multi_role_connEvtCB(Gap_ConnEventRpt_t *pReport);
    static void multi_role_processConnEvt(Gap_ConnEventRpt_t *pReport);
Add the following callback initializers under the PROFILE CALLBACKS section in
multi_role.c
    static oadTargetCBs_t multi_role_oadCBs =
    {
      .pfnOadWrite = multi_role_processOadWriteCB // Write Callback.
    };
At the end of the
multi_role.c::multi_role_init(), add the following:
   // Open the OAD module and add the OAD service to the application
   if(OAD_SUCCESS != OAD_open(OAD_DEFAULT_INACTIVITY_TIME))
   {
       /*
        *  OAD cannot be opened, steps must be taken in the application to
        *  handle this gracefully, this can mean an error, assert,
        *  or print statement.
        */
   }
   else
   {
       // Register the OAD callback with the application
       OAD_register(&multi_role_oadCBs);
   }
Add the OAD event processing in
multi_role.c::multi_role_taskFxn()do this after ICall event processing:
   // OAD events
   if(events & OAD_QUEUE_EVT)
   {
       // Process the OAD Message Queue
       uint8_t status = OAD_processQueue();

       // If the OAD state machine encountered an error, print it
       // Return codes can be found in oad_constants.h
       if(status == OAD_DL_COMPLETE)
       {
           // Report status
       }
       else if(status == OAD_IMG_ID_TIMEOUT)
       {
           // This may be an attack, terminate the link
           GAP_TerminateLinkReq(OAD_getactiveCxnHandle(),
                                HCI_DISCONNECT_REMOTE_USER_TERM);
       }
       else if(status != OAD_SUCCESS)
       {
           // Report Error
       }
   }

   if(events & OAD_DL_COMPLETE_EVT)
   {
       // Register for L2CAP Flow Control Events
       L2CAP_RegisterFlowCtrlTask(selfEntity);
   }
Process L2CAP messages from the stack. This will replace the existing
L2CAP_SIGNAL_EVENTcase statement inside ofmulti_role.c::multi_role_processStackMsg().
   case L2CAP_SIGNAL_EVENT:
   {
       // Process L2CAP free buffer notification
       multi_role_processL2CAPMsg((l2capSignalEvent_t *)pMsg);
       break;
   }
Make an application level L2CAP handler function as below. Add this function at the end of
multi_role.c
  static void multi_role_processL2CAPMsg(l2capSignalEvent_t *pMsg)
  {
      static bool firstRun = TRUE;

      switch (pMsg->opcode)
      {
      case L2CAP_NUM_CTRL_DATA_PKT_EVT:
      {
          /*
           * We cannot reboot the device immediately after receiving
           * the enable command, we must allow the stack enough time
           * to process and respond to the OAD_EXT_CTRL_ENABLE_IMG
           * command. This command will determine the number of
           * packets currently queued up by the LE controller.
           */
          if (firstRun)
          {
              firstRun = false;

              // We only want to set the numPendingMsgs once
              numPendingMsgs = MAX_NUM_PDU
                      - pMsg->cmd.numCtrlDataPktEvt.numDataPkt;

              // Wait until all PDU have been sent on cxn events
              Gap_RegisterConnEventCb(multi_role_connEvtCB, GAP_CB_REGISTER,
              GAP_CB_CONN_EVENT_ALL, OAD_getactiveCxnHandle());

              /* Set the flag so that the connection event callback will
               * be processed in the context of a pending OAD reboot
               */
              oadWaitReboot = true;
          }
          break;
      }
      default:
          break;
      }
  }
Add connection event processing functions. Note: multi_role_connEvtCB will be called in stack context, so we must post an application event to process the connection event. Failure to do so in this lab will result in an ICall_abort. This is because we are calling a stack function inside a stack callback.
Add the following to the bottom ofmulti_role.c
  /*********************************************************************
  * @fn      multi_role_connEvtCB
  *
  * @brief   Connection event callback.
  *
  * @param pReport pointer to connection event report
  */
  static void multi_role_connEvtCB(Gap_ConnEventRpt_t *pReport)
  {
    // Enqueue the event for processing in the app context.
    if(multi_role_enqueueMsg(MR_CONN_EVT, pReport) != SUCCESS)
    {
      ICall_freeMsg(pReport);
    }
  }

  static void multi_role_processConnEvt(Gap_ConnEventRpt_t *pReport)
  {
    /* If we are waiting for an OAD Reboot, process connection events to ensure
    * that we are not waiting to send data before restarting
    */
    if(oadWaitReboot)
    {
        // Wait until all pending messages are sent
        if(numPendingMsgs == 0)
        {
            // Reset the system
            SysCtrlSystemReset();
        }
        else
        {
          numPendingMsgs--;
        }
    }
    else
    {
      // Process connection events normally
    }
  }
Add an event handler function to process OAD events, do this at the bottom of
multi_role.c
  static void multi_role_processOadWriteCB(uint8_t event, uint16_t arg)
  {
    Event_post(syncEvent, event);
  }
Add the following code to the
ATT_MTU_UPDATED_EVENThandler. This should be processed by the application when it receives a messages ofgattMsgEvent_tfrom the stack. You can find this inmulti_role.c::multi_role_processGATTMsg()
OAD_setBlockSize(pMsg->msg.mtuEvt.MTU);
Reset OAD if connection drops
Add the following code to the
GAP_LINK_TERMINATED_EVENThandler. This can be found inmulti_role.c::multi_role_processGapMsg()
   // Cancel the OAD if one is going on
   // A disconnect forces the peer to re-identify
   OAD_cancel();
(Optional) Add revert to factory image feature to application:
Add the following code to
main.c
  #include <profiles/oad/cc26xx/mark_switch_factory_img.h>
  #include <ti/drivers/GPIO.h>
Place this code inside main( ) before ICall_init()
  if(!GPIO_read(CONFIG_GPIO_BTN1))
  {
     markSwitchFactoryImg();
  }
(Optional) Changing external flash pins:
Note
Custom Hardware This step is only required for customers wishing to add OAD to their custom boards. The LaunchPad board files will work out of the box.
The examples will work on a LaunchPad out of the box, but for custom hardware the following is recommended.
Change the pins for the BIM. See
bsp.h, change the defines below.
   // Board external flash defines
   #define BSP_IOID_FLASH_CS       IOID_20
   #define BSP_SPI_MOSI            IOID_9
   #define BSP_SPI_MISO            IOID_8
   #define BSP_SPI_CLK_FLASH       IOID_10
Now that we successfully added OAD to the multi_role project, perform an OAD
to update simple_peripheral_oad_offchip to multi_role.
Hint
You have now performed an OAD that enabled major application and stack features.
Implementing OAD on CC2651x3 projects
The above steps can be followed when using a CC2651x3 BLE5-Stack based project,
with slight modifications as described below. Note, project_zero enables OAD
and is available for reference.
Project Changes
In step 1, use project_zero’s linker file located here:
${COM_TI_SIMPLELINK_CC13XX_CC26XX_SDK_INSTALL_DIR}/examples/rtos/LP_CC2651P3/ble5stack/project_zero/tirtos7/ticlang/cc13x1_cc26x1_app_tirtos7.cmd.
In step 5, make sure to add the OAD files from the ble5stack_flash folder instead of the ble5stack directory shown in the first group of files. This is because the CC2651x3 device places the BLE5-stack in flash.
${COM_TI_SIMPLELINK_CC13XX_CC26XX_SDK_INSTALL_DIR}>/source/ti/ble5stack_flash/profiles/oad/cc26xx.
In step 6, ensure the ble5stack_flash pre-processor include path is added instead of the ble5stack path, as shown below. This should already be present on the CC2651x3 BLE5-Stack example project.
${COM_TI_SIMPLELINK_CC13XX_CC26XX_SDK_INSTALL_DIR}/source/ti/ble5stack_flash
Task 2 – Add On-Chip OAD to Multi Role#
This section will detail how to add Bluetooth LE On-Chip OAD to an existing project. The intention is to start with an unmodified example app from the SDK that does not currently use OAD, and add OAD to it.
Customers can use this section to add on-chip OAD to their existing projects.
The example project used to demonstrate these steps will be multi_role.
Project Changes for On-Chip#
In order to add on-chip OAD, certain files and include paths should be added to the project, these are detailed in the list below.
Change the linker file
Remove
cc13x2_cc26x2_app_tirtos7.cmdfile from the projectAdd the following line to Include library file or command file as input
${COM_TI_SIMPLELINK_CC13XX_CC26XX_SDK_INSTALL_DIR}/examples/rtos/CC26X2R1_LAUNCHXL/ble5stack/simple_peripheral_oad_onchip/tirtos7/ticlang/cc13x2_cc26x2_app_tirtos7.cmd
Note
Be sure to add the correct path for the used LaunchPad and navigate to the setting by right clicking on the project, click Project Properties → Arm Linker → File Search Path → Add
Add Linker file#
Add the following to the linker defines (Project → Properties → ARM Linker → Advanced Options → Command File Preprocessing → Pre-define preprocessor macro):
OAD_IMG_B=1: Tell the linker that on-chip OAD is to be usedSECURITY: Enable security (optional)
Add linker defines#
Add the following define to the compiler predefined symbols (Project → Properties → BUILD → ARM Compiler → Predefined Symbols)
OAD_ONCHIP: Tell the compiler that on-chip OAD is to be usedOAD_IMG_B: Tell the compiler that this is the application image (not the persistent image)SECURITY: Enable security (optional)
Add compiler defines#
In SysConfig, make the following configurations:
In BLE → General Configuration, set Maximum size of PDU (bytes) to 251.
Note
This define will control the negotiated block size. Block Size is derived from MTU size, which is derived by the minimum of the local supported PDU size and peer’s supported MTU. Refer to the notes about OAD Block size in the BLE5-Stack User’s Guide (Over the Air Download (OAD) → BLE-Stack OAD Profile → OAD Block Size Rules)
In Advanced Settings → OAD Only Defines, check for Led Debug and OAD Feature.
In TI Devices → Device Configuration, uncheck the Enable Bootloader box.
In TI DRIVERS config, reconfigure the existing NVS region for the application to match the linker file, as shown below:

SysConfig add NVS#
In TI DRIVERS config, add an NVS instance by pressing the plus sign next to NVS. Configure it as follows:
SysConfig add NVS#
In BLE → General Configuration, change the Address Mode to Public Address.
Add the following files to the project. Use the “Link to Files” option to avoid any problems with file paths. These files can be found in the following locations:
{SimpleLink SDK}\source\ti\ble5stack\profiles\oad\cc26xx
oad.c: OAD profile implementationoad.h: Public OAD profile API definitionoad_defines.h: Common header containing OAD definitionsoad_image_header_app.c: Application definition of image headeroad_reset_service.c: OAD Reset Service profile implementationoad_reset_service.h: OAD Reset Service header file definition
{SimpleLink SDK}\source\ti\common\cc26xx\crc
crc32.c: CRC32 algorithm and helper functionscrc32.h: CRC32 public API definition
{SimpleLink SDK}\source\ti\common\cc26xx\flash_interface
flash_interface.h: A flash abstraction layer that abstracts flash operations for on and off-chip OAD.
{SimpleLink SDK}\source\ti\common\cc26xx\flash_interface\internal
flash_interface_int_rtos_NVS.c: TI-RTOS NVS driver implementation of flash interface for on-chip OAD.
{SimpleLink SDK}\source\ti\common\cc26xx\oad
oad_image_header.h: Structure definitions for the OAD image header
{SimpleLink SDK}\source\ti\common\c26xx\bim
bim_util.h: Public API definition of utility functions shared between the BIM and application.bim_util.c: Implementation of BIM utility functions
The following pre-processor include paths (Project → Properties → ARM Compiler → Include Options) should be added to the project. They are already present in
multi_role.
${COM_TI_SIMPLELINK_CC13XX_CC26XX_SDK_INSTALL_DIR}/source/ti${COM_TI_SIMPLELINK_CC13XX_CC26XX_SDK_INSTALL_DIR}/source/ti/ble5stack(You can use SRC_BLE_DIR for this)
Modfify the post build step post build step (Project → Properties → Build → Steps) to invoke the OAD image tool in the project.
Be sure to not delete the existing hex file step. Place the OAD step after it!
The following should be used with secure OAD (i.e. SECURITY defined)
;${COM_TI_SIMPLELINK_CC13XX_CC26XX_SDK_INSTALL_DIR}/tools/common/oad/oad_image_tool --verbose ccs ${PROJECT_LOC} 7 -hex1 ${ConfigName}/${ProjName}.hex -k ${COM_TI_SIMPLELINK_CC13XX_CC26XX_SDK_INSTALL_DIR}/tools/common/oad/private.pem -o ${ConfigName}/${ProjName}_oad
The following should be used with unsecure OAD (i.e. no SECURITY defined):
;${COM_TI_SIMPLELINK_CC13XX_CC26XX_SDK_INSTALL_DIR}/tools/common/oad/oad_image_tool --verbose ccs ${PROJECT_LOC} 7 -hex1 ${ConfigName}/${ProjName}.hex -o ${ConfigName}/${ProjName}_oad
Warning
Some applications in the SDK will generate output files that are formatted as ${ProjName}_${ConfigName}.hex while others are ${ProjName}.hex. Check to be sure that your ouput hex file format matches the one in the OAD post build step above.
Change the linker file
Remove
cc26xx_app_and_stack_agama_tirtos7.icffile from the projectCopy the linker file from
simple_peripheral_oad_onchipand add it tomulti_roleinstead.Change also the linker file (Linker → Config → Linker configuration file) in the project options.
$SIMPLELINK_CC13XX_CC26XX_SDK_INSTALL_DIR$/examples/rtos/CC26X2R1_LAUNCHXL/ble5stack/simple_peripheral_oad_onchip/tirtos/iar/cc26xx_app_and_stack_agama.icf
Add the following to the linker defines (Options → Linker → Config → Configuration file symbol definitions) :
OAD_IMG_B=1: Tell the linker that on-chip OAD is to be usedSECURITY=1: Enable security (optional)
Add the following define to the compiler predefined symbols (Options → C/C++ Compiler → Preprocessor)
OAD_ONCHIP: Tell the compiler that on-chip OAD is to be usedOAD_IMG_B: Tell the compiler that this is the application image (not the persistent image)SECURITY: Enable security (optional)
In SysConfig, make the following configurations:
In BLE → General Configuration, set Maximum size of PDU (bytes) to 251.
Note
This define will control the negotiated block size. Block Size is derived from MTU size, which is derived by the minimum of the local supported PDU size and peer’s supported MTU. Refer to the notes about OAD Block size in the BLE5-Stack User’s Guide (Over the Air Download (OAD) → BLE-Stack OAD Profile → OAD Block Size Rules)
In Advanced Settings → OAD Only Defines, check for Led Debug and OAD Feature.
In TI Devices → Device Configuration, uncheck the Enable Bootloader box.
In TI DRIVERS config, reconfigure the existing NVS region for the application to match the linker file, as shown below:
SysConfig add NVS#
In TI DRIVERS config, add an NVS instance by pressing the plus sign next to NVS. Configure it as follows:
SysConfig add NVS#
In BLE → General Configuration, change the Address Mode to Public Address.
Add the following files to the project. Use the “Link to Files” option to avoid any problems with file paths. These files can be found in the following locations:
{SimpleLink SDK}\source\ti\ble5stack\profiles\oad\cc26xx
oad.c: OAD profile implementationoad.h: Public OAD profile API definitionoad_defines.h: Common header containing OAD definitionsoad_image_header_app.c: Application definition of image headeroad_reset_service.c: OAD Reset Service profile implementationoad_reset_service.h: OAD Reset Service header file definition
{SimpleLink SDK}\source\ti\common\cc26xx\crc
crc32.c: CRC32 algorithm and helper functionscrc32.h: CRC32 public API definition
{SimpleLink SDK}\source\ti\common\cc26xx\flash_interface
flash_interface.h: A flash abstraction layer that abstracts flash operations for on and off-chip OAD.
{SimpleLink SDK}\source\ti\common\cc26xx\flash_interface\internal
flash_interface_int_rtos_NVS.c: TI-RTOS NVS driver implementation of flash interface for on-chip OAD.
{SimpleLink SDK}\source\ti\common\cc26xx\oad
oad_image_header.h: Structure definitions for the OAD image header
{SimpleLink SDK}\source\ti\common\c26xx\bim
bim_util.h: Public API definition of utility functions shared between the BIM and application.bim_util.c: Implementation of BIM utility functions
The following pre-processor include paths (Project → Properties → ARM Compiler → Include Options) should be added to the project. Some are already present in
multi_role.
$SIMPLELINK_CC13XX_CC26XX_SDK_INSTALL_DIR$/source/ti$SIMPLELINK_CC13XX_CC26XX_SDK_INSTALL_DIR$/source/ti/ble5stack$SIMPLELINK_CC13XX_CC26XX_SDK_INSTALL_DIR$/source/ti/common/cc26xx/flash_interface
Modify the post build step (Build Actions → Post-build command line) to support OAD on the project. On IAR, a batch script is used to execute multiple post build commands.
Ensure the following post-build command line is entered in IAR:
$SIMPLELINK_CC13XX_CC26XX_SDK_INSTALL_DIR$/tools/ble5stack/oad/oad_postbuild.bat $TARGET_BPATH$ $PROJ_DIR$ $CONFIG_NAME$ $PROJ_FNAME$ $SIMPLELINK_CC13XX_CC26XX_SDK_INSTALL_DIR$ $EXE_DIR$ $TARGET_BNAME$
With the above post-build command entered, navigate to the oad_postbuild.bat. Located in $SIMPLELINK_CC13XX_CC26XX_SDK_INSTALL_DIR$ → tools → ble5stack → oad → oad_postbuild.bat file and open it with a text editor.
Note
Example projects in the SDK supporting OAD have SECURITY defined by default. As such, the above oad_postbuild.bat script should only be used for secure OAD.
If an unsecure OAD is desired, the oad_postbuild.bat script needs to be modified. The instructions below should only be followed for unsecure OAD.
Warning
Do not modify the oad_postbuild.bat script directly. This will likely break the functionality of the out-of-box, default example OAD projects in the SDK . Copy the oad_postbuild.bat script and rename it to oad_postbuild_unsecure.bat. When doing this, don’t forget to modify the post-build command line mentioned above to point to the new unsecure version you just created.
After you’ve followed the above instructions for unsecure OAD, proceed by modifying the oad_postbuild_unsecure.bat file. Be sure to only modify the second command in the file.
The following should be used with unsecure OAD (i.e. no SECURITY defined):
%5/tools/common/oad/oad_image_tool.exe --verbose iar %2 7 -hex1 %3/Exe/%4.hex -o %6/%7_oad
Warning
Some applications in the SDK will generate output files that are formatted as ${ProjName}_${ConfigName}.hex while others are ${ProjName}.hex. Check to be sure that your output hex file format matches the one in the OAD post build step above.
Code Changes for On-Chip#
The following changes need to be performed in the source code of the application
Performing the following changes in the high level application task file.
Add the required include directives in
multi_role.cnear the other include directives:
  #include "onboard.h"
  #include <profiles/oad/cc26xx/oad.h>
  #include <profiles/oad/cc26xx/oad_reset_service.h>
  #include <ti/common/cc26xx/oad/oad_image_header.h>
  #include <ti/common/cc26xx/flash_interface/flash_interface.h>
  #include <ti/devices/DeviceFamily.h>
  #include DeviceFamily_constructPath(driverlib/sys_ctrl.h)
Define an application event to process an OAD reset event, a connection event, and add the following to the app’s
*_ALL_EVENTSmacro (be sure to add line breaks as necessary) inmulti_role.c:
  #define MR_OAD_RESET_EVT           14
  #define MR_CONN_EVT                15

  #define MR_OAD_QUEUE_EVT                     OAD_QUEUE_EVT       // Event_Id_01
  #define MR_OAD_COMPLETE_EVT                  OAD_DL_COMPLETE_EVT // Event_Id_02
  #define MR_OAD_NO_MEM_EVT                    OAD_OUT_OF_MEM_EVT  // Event_Id_03
After the above step the
MR_ALL_EVENTSshould look like this
  #define MR_ALL_EVENTS                (MR_ICALL_EVT           | \
                                        MR_QUEUE_EVT           | \
                                        MR_OAD_QUEUE_EVT       | \
                                        MR_OAD_COMPLETE_EVT | \
                                        MR_OAD_NO_MEM_EVT)
Add the following declarations under the LOCAL VARIABLES section in
multi_role.c:
  //reset connection handle
  uint16_t resetConnHandle = LINKDB_CONNHANDLE_INVALID;

  static uint8_t numPendingMsgs = 0;
  static bool oadWaitReboot = false;

  // Flag to be stored in NV that tracks whether service changed
  // indications needs to be sent out
  static uint32_t  sendSvcChngdOnNextBoot = FALSE;
Add the following forward declarations under the LOCAL FUNCTIONS section in
multi_role.c
  void multi_role_processOadResetWriteCB(uint16_t connHandle, uint16_t bim_var);
  static void multi_role_processOadResetEvt(oadResetWrite_t *resetEvt);
  static void multi_role_processL2CAPMsg(l2capSignalEvent_t *pMsg);
  static void multi_role_connEvtCB(Gap_ConnEventRpt_t *pReport);
  static void multi_role_processConnEvt(Gap_ConnEventRpt_t *pReport);
Add the following callback initializers under the PROFILE CALLBACKS section in
multi_role.c
  static oadResetWriteCB_t multi_role_oadResetCBs =
  {
    multi_role_processOadResetWriteCB // Write Callback.
  };
Inside the
multi_role.c::multi_role_init(), add the following:
    Reset_addService((oadUsrAppCBs_t *)&multi_role_oadResetCBs);

    /*
    * When switching from persistent app back to the user application for the
    * for the first time after an OAD the device must send a service changed
    * indication. This will cause any peers to rediscover services.
    *
    * To prevent sending a service changed IND on every boot, a flag is stored
    * in NV to determine whether or not the service changed IND needs to be
    * sent
    */
   uint8_t status = osal_snv_read(BLE_NVID_CUST_START,
                                   sizeof(sendSvcChngdOnNextBoot),
                                   (uint8 *)&sendSvcChngdOnNextBoot);
   if(status != SUCCESS)
   {
     /*
      * On first boot the NV item will not have yet been initialzed, and the read
      * will fail. Do a write to set the initial value of the flash in NV
      */
      osal_snv_write(BLE_NVID_CUST_START, sizeof(sendSvcChngdOnNextBoot),
                     (uint8 *)&sendSvcChngdOnNextBoot);
   }
Add the OAD event processing in
multi_role.c::multi_role_taskFxn()do this after ICall event processing:
  // OAD events
  if(events & MR_OAD_NO_MEM_EVT)
  {
    // Report Error
    // The OAD module is unable to allocate memory, print failure, cancel OAD
    OAD_cancel();
  }
  // OAD queue processing
  if(events & MR_OAD_QUEUE_EVT)
  {
    // Process the OAD Message Queue
    uint8_t status = OAD_processQueue();

    // If the OAD state machine encountered an error, print it
    // Return codes can be found in oad_constants.h
    if(status == OAD_DL_COMPLETE)
    {
      // Report status
    }
    else if(status == OAD_IMG_ID_TIMEOUT)
    {
      // This may be an attack, terminate the link,
      // Note HCI_DISCONNECT_REMOTE_USER_TERM seems to most closet reason for
      // termination at this state
      MAP_GAP_TerminateLinkReq(OAD_getactiveCxnHandle(), HCI_DISCONNECT_REMOTE_USER_TERM);
    }
    else if(status != OAD_SUCCESS)
    {
      // Report Error
    }
  }
  if(events & MR_OAD_COMPLETE_EVT)
  {
    // Register for L2CAP Flow Control Events
    L2CAP_RegisterFlowCtrlTask(selfEntity);
  }
Process L2CAP messages from the stack. This will replace the existing
L2CAP_SIGNAL_EVENTcase statement inside ofmulti_role.c::multi_role_processStackMsg().
    case L2CAP_SIGNAL_EVENT:
    {
        // Process L2CAP free buffer notification
        multi_role_processL2CAPMsg((l2capSignalEvent_t *)pMsg);
        break;
    }
Make an application level L2CAP handler function as below. Add this function at the end of
multi_role.c
  static void multi_role_processL2CAPMsg(l2capSignalEvent_t *pMsg)
  {
      static bool firstRun = TRUE;

      switch (pMsg->opcode)
      {
      case L2CAP_NUM_CTRL_DATA_PKT_EVT:
      {
          /*
            * We cannot reboot the device immediately after receiving
            * the enable command, we must allow the stack enough time
            * to process and respond to the OAD_EXT_CTRL_ENABLE_IMG
            * command. This command will determine the number of
            * packets currently queued up by the LE controller.
            */
          if (firstRun)
          {
              firstRun = false;

              // We only want to set the numPendingMsgs once
              numPendingMsgs = MAX_NUM_PDU
                      - pMsg->cmd.numCtrlDataPktEvt.numDataPkt;

              // Wait until all PDU have been sent on cxn events
              Gap_RegisterConnEventCb(multi_role_connEvtCB, GAP_CB_REGISTER,
              GAP_CB_CONN_EVENT_ALL, resetConnHandle);

              /* Set the flag so that the connection event callback will
                * be processed in the context of a pending OAD reboot
                */
              oadWaitReboot = true;
          }
          break;
      }
      default:
          break;
      }
  }
Add connection event processing functions. Note: multi_role_connEvtCB will be called in stack context, so we must post an application event to process the connection event. Failure to do so in this lab will result in an ICall_abort. This is because we are calling a stack function inside a stack callback.
Add the following to the bottom ofmulti_role.c
    /*********************************************************************
    * @fn      multi_role_connEvtCB
    *
    * @brief   Connection event callback.
    *
    * @param pReport pointer to connection event report
    */
    static void multi_role_connEvtCB(Gap_ConnEventRpt_t *pReport)
    {
      // Enqueue the event for processing in the app context.
      if(multi_role_enqueueMsg(MR_CONN_EVT, pReport) != SUCCESS)
      {
        ICall_freeMsg(pReport);
      }
    }

    static void multi_role_processConnEvt(Gap_ConnEventRpt_t *pReport)
    {
      /* If we are waiting for an OAD Reboot, process connection events to ensure
        * that we are not waiting to send data before restarting
        */
      if(oadWaitReboot)
      {
        // Wait until all pending messages are sent
        if(numPendingMsgs == 0)
        {
          // Store the flag to indicate that a service changed IND will
          // be sent at the next boot
          sendSvcChngdOnNextBoot = TRUE;

          uint8_t status = osal_snv_write(BLE_NVID_CUST_START,
                                          sizeof(sendSvcChngdOnNextBoot),
                                          (uint8 *)&sendSvcChngdOnNextBoot);
          if(status != SUCCESS)
          {
            // Report NV write failure
          }

          // Reset the system
          SystemReset();
        }
        else
        {
          numPendingMsgs--;
        }
      }
      else
      {
        // Process connection events normally
      }
    }
Add an event handler function to process OAD events, do this at the bottom of
multi_role.c
  static void multi_role_processOadWriteCB(uint8_t event, uint16_t arg)
  {
    Event_post(syncEvent, event);
  }
Add a handler function to process the OAD reset event, do this at the bottom of
multi_role.c
  static void multi_role_processOadResetEvt(oadResetWrite_t *resetEvt)
  {
    /* We cannot reboot the device immediately after receiving
      * the enable command, we must allow the stack enough time
      * to process and responsd to the OAD_EXT_CTRL_ENABLE_IMG
      * command. The current implementation will wait one cxn evt
      */
    // Register for L2CAP Flow Control Events
    L2CAP_RegisterFlowCtrlTask(selfEntity);

    resetConnHandle = resetEvt->connHandle;

    uint8_t status = FLASH_FAILURE;
    //read the image validation bytes and set it appropriately.
    imgHdr_t imgHdr = {0};
    if(flash_open())
    {
      status = readFlash(0x0, (uint8_t *)&imgHdr, OAD_IMG_HDR_LEN);
    }

    if ((FLASH_SUCCESS == status) && ( imgHdr.fixedHdr.imgVld != 0))
    {
      if ( OAD_evenBitCount(imgHdr.fixedHdr.imgVld) )
      {
        imgHdr.fixedHdr.imgVld = imgHdr.fixedHdr.imgVld << 1;
        writeFlash((uint32_t)FLASH_ADDRESS(0, IMG_VALIDATION_OFFSET),
                    (uint8_t *)&(imgHdr.fixedHdr.imgVld), sizeof(imgHdr.fixedHdr.imgVld));
      }
    }
  }
Add an event handler function to process OAD events, do this at the bottom of
multi_role.c
  void multi_role_processOadResetWriteCB(uint16_t connHandle,
                                        uint16_t bim_var)
  {
      // Allocate memory for OAD EVT payload, the app task must free this later
      oadResetWrite_t *oadResetWriteEvt = ICall_malloc(sizeof(oadResetWrite_t));

      oadResetWriteEvt->connHandle = connHandle;
      oadResetWriteEvt->bim_var = bim_var;

      // This function will enqueue the messsage and wake the application
      multi_role_enqueueMsg(MR_OAD_RESET_EVT, (uint8_t *)oadResetWriteEvt);
  }
Add the following code to the
ATT_MTU_UPDATED_EVENThandler. This should be processed by the application when it receives a messages ofgattMsgEvent_tfrom the stack. You can find this inmulti_role.c::multi_role_processGATTMsg()
OAD_setBlockSize(pMsg->msg.mtuEvt.MTU);
Add the following code to handle the newly defined application events inside
multi_role.c::multi_role_processAppMsg():
  case MR_CONN_EVT:
    multi_role_processConnEvt((Gap_ConnEventRpt_t *)(pMsg->pData));
    break;

  case MR_OAD_RESET_EVT:
    multi_role_processOadResetEvt((oadResetWrite_t *)(pMsg->pData));
    break;
(Optional) Changing external flash pins:
Note
Custom Hardware This steps is only required for customers wishing to add OAD to their custom boards. The LaunchPad board files will work out of the box.
The examples will work on the LaunchPad out of the box, but for custom hardware the following is recommended.
Change the pins for the BIM. See
bsp.h, change the defines below.
    // Board external flash defines
    #define BSP_IOID_FLASH_CS       IOID_20
    #define BSP_SPI_MOSI            IOID_9
    #define BSP_SPI_MISO            IOID_8
    #define BSP_SPI_CLK_FLASH       IOID_10
Now that we successfully added OAD to the multi_role project, perform an OAD
to update simple_peripheral_oad_onchip to multi_role.
Hint
You have now performed an OAD that enabled major application and stack features.
Task 3 – Advanced OAD Debugging#
This task divided into a number of subtasks that aim to highlight a debugging technique specific to OAD enabled projects. For each subtask, we will force an issue to occur in order to show a novel way to debug it.
Debugging from the BIM to the application#
Start debugging OAD enabled application by pressing the debug icon in the IDE
Verify that the program runs correctly while debugging, but do not disconnect the debugger.
Add the BIM’s symbols to the debug session, these should be located in
<CCS_WORKSPACE_DIR>\bim_offchip_CC26X2R1_LAUNCHXL_nortos_ticlang\Debug\bim_offchip_CC26X2R1_LAUNCHXL_nortos_ticlang.out
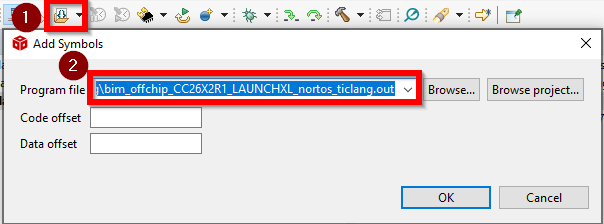
Add BIM Symbols#
Load the same symbols from the BIM to the debug session.
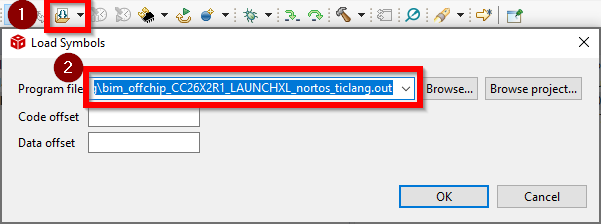
Add BIM Symbols#
Reset the device using the debugger.
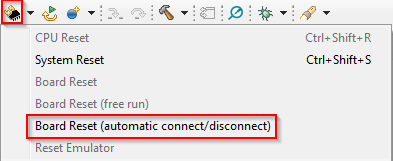
CCS Hard Reset#
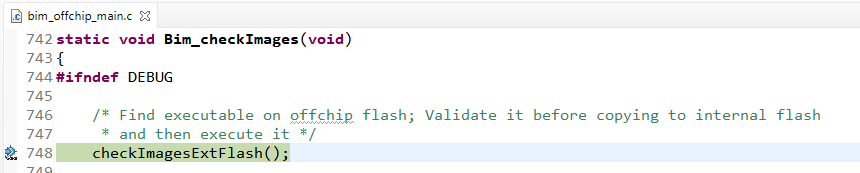
Set a breakpoint in
bim_offchip_main.c::Bim_checkImages()from the BIM project
Debugging the BIM#
At this point you should be able to single step through the BIM code.
Debugging Slow OAD Download Speeds#
One of the major improvements of the enhanced OAD profile are its utilization of MTU exchange and scalability of over the air block sizes. There are two major factors that determine the speed of an OAD download:
The connection interval
The OAD block size
The connection interval is set by the Central in the connection, but an update can be requested by the Peripheral device. Ultimately, it is up to the Central to set the connection parameters. To configure this request, open the SysConfig file and navigate to BLE → Peripheral Configuration → Connection Update Request Parameters. Here you can set the time for how long the Peripheral will wait from connection is formed until it sends the request, and the parameters to request.
In the case of the OAD sample applications, both project_zero and
simple_peripheral_oad_offchip will request a connection parameter update
about PZ_SEND_PARAM_UPDATE_DELAY or SP_PERIODIC_EVT_PERIOD after a link is
established based on a RTOS clock timeout.
One way to force a slow OAD is to prevent BTool from sending a connection parameter update at the start of OAD. In this case, the OAD Target device will send the parameter update that will slow the connection interval. This is normally a good practice for power savings reasons, but if an OAD is occurring this can be detrimental to speed.
Connect to the OAD Target device via BTool.
Navigate to the Over the Air Download tab
Select the options pane and disable the check box near Use These Connection Settings During OAD. This will prevent BTool from sending a new connection parameter update at the beginning of an OAD.
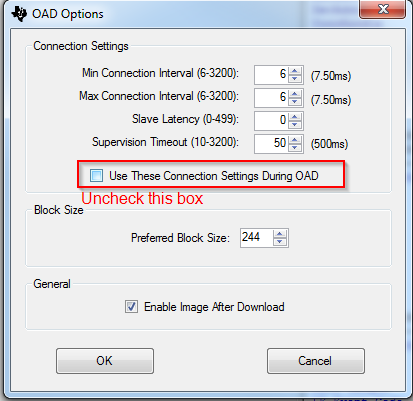
Disable BTool Parameter Update#
Wait for the application to send its parameter update, this will appear as an event in the logs.

BTool Connection Parameter Update#
Start the OAD, observe slow speeds
Cancel the OAD, re-check the box from step 3, and re-start the OAD.
Repeat step 4
After the parameter update is received, start the OAD via BTool. Observe that the speed will be much quicker.
Another contributing factor to the overall OAD throughput is the MTU size. The OAD block size is set by the OAD target device based on the MTU exchange. MTU exchanges are initiated by the GATT client device. There are three ways that the OAD session may potentially suffer from low throughput due to MTU size.
The OAD Target device is not built to support large MTU.
This is controlled by the Maximum size of PDU (Found in SysConfig → BLE → General Configuration). This define can range up to 255.
The formula for supported MTU based on the PDU size is
local supported MTU = PDU_SIZE - L2CAP_HDR_SIZE
The OAD Distributor device does not support a large MTU, or the GATT client has not initiated an MTU exchange
Just as locally the device must support large MTU, so must the peer, legacy or memory constrained peer devices may not support large MTU.
The OAD target is not reporting a negotiated MTU event to the OAD module.
This is achieved by the the call to
OAD_setBlockSize()
The following steps will detail how to perform an OAD with smaller MTU size
Open the BTool OAD Options window, and set Preferred Block Size to 24.
Connect to the device and re-start the OAD.
Observe that the total download time has greatly increased as the total blocks have increased to ~8000.
Task 4 – Creating a Production Image#
A production image is a single image that is made of all the images involved in an OAD system. In the case of off-chip OAD, the production image will consist of the app image and the BIM. Production images are desirable because they can be used to program devices in a test environment or production line using a single image. These images also must contain a valid image header.
Since the production image must contain a valid image header, the _oad.bin
image output by the TI OAD Image Tool must be used. The TI OAD Image Tool fills in
important sections of the image header. This bin file contains the
app image. However, the app image cannot boot without a BIM included on the
device, so for a production image the app image must be merged with the BIM image.
Change to Release BIM#
By default, the projects in the SimpleLink CC13xx/CC26xx SDK will use a debug version of the BIM. This is helpful for evaluation of the TI OAD solution, but is not recommended for a production OAD build for the following reasons:
The debug configuration of BIM will not check the CRC of the image before booting. This removes a layer of redundancy in the system in favor of allowing the develop to load an OAD image straight from the IDE
The debug configuration has LED output that may not be desirable in production.
Warning
When switching to a release configuration of BIM, images loaded straight from the IDE will not run after a reset. This is expected behavior as the oad_image_tool is responsible for populating the CRC field in these images. See the Loading a Production Image section for more information.
Additionally, it may be desirable to remove the secondary device trim in the
application for production images. See Device trim within the BIM section of
the User Guide for more information.
Secure OAD: Change default keys#
If you are using the secure version of OAD, new OAD keys should be generated and
stored on the device. It is a security risk to use the placeholder keys that are
provided with TI as these are publically available. See Generating New Security Keys (Embedded) in the User Guide for more information on how to generate and
install new keys on the device. If using unsecure OAD, this step is not
necessary.
Loading a Production Image#
Images loaded straight from the IDE will not have a valid CRC or signature.
However, the oad_image_tool will add the CRC and signature automatically at
the completion of each build.
Before loading the application, be sure to load the release BIM project. This can be flashed via the BIM’s hex file in UNIFLASH.
Warning
If flashing the BIM image (or a merged image containing BIM) using uniflash, be sure that the Keep CCFG data box is not checked. (Settings & Utilities –> Download).
BIM will use a custom CCFG, so it is important that any existing image on the device is removed. Another safeguard is the mass erase the device before starting with OAD.
Combined Production Image#
To combine the images, we will use the SRecord tool.
The below steps assume that the Debug configuration of the BIM is used, and
the Release configuration of multi_role is used.
The steps can be easily modified or adapted to cover other configurations or
sample applications. The CCS workspace location will be referred to as
<CCS_WORKSPACE_LOC>
Download SRecord
Unzip the SRecord package into a location that will be referred to as <SREC_LOC>
Make sure your application and BIM have been built
Run the following command, you will need to replace <SREC_LOC> and <CCS_WORKSPACE_LOC> to match your environment. This will generate a production image titled
mutli_role_oad_production.hexin <SREC_LOC>
./<SREC_LOC>/srec_cat.exe <CCS_WORKSPACE_LOC>/bim_offchip_CC26X2R1_LAUNCHXL_nortos_ticlang/Debug/bim_offchip_CC26X2R1_LAUNCHXL_nortos_ticlang.hex -intel <CCS_WORKSPACE_LOC>/multi_role_CC26X2R1_LAUNCHXL_tirtos7_ticlang/Release/multi_role_CC26X2R1_LAUNCHXL_tirtos7_ticlang_oad.bin -bin -o multi_role_oad_production.hex -intel
Use Uniflash to flash the
multi_role_oad_production.hexon the device, verify that the device is working and runs through a reset.
Note
You have now created an OAD production image.
For more information and SRecord usage samples please see SRecord Examples