5.2. EdgeAI Building Access Demo
The AM62X is well suited to human-machine interface (HMI) applications like a building access system. AM62X can drive multiple displays, collect, process, and fuse data from cameras and other sensors, and communicate with other devices on the network. It is a practical, cost-effective processor for low-end machine learning inference (up to 0.5 TOPS) on vision or time-series data alongside visual display elements.
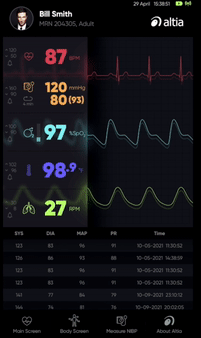
Fig. 5.1 Example of visual elements
For example, the image below from a medical HMI demo from Altia shown in the AM62x Design Gallery shows multiple biometric signals, and the AM62x is well-equipped to collect, process, and display such information.
The EdgeAI Building Access Demo combines vision and radar inputs to create a multimodal, touchless entry system that requires no keys or RFID tags. As shown in the video below, a user approaches the system and enters a code using swiping gestures in front of the industrial mmWave Radar sensor (IWR6843-AOPEVM), which classifies gestures using a neural network running in the on-board R4F core. The AM62X collects the output gestures and modifies the graphical interface accordingly. When the code is input correctly, it activates the camera to collect a picture for a temporary visitor badge, so the system has knowledge of who entered at what time.
The software stack in this demo features Qt for graphics and OpenCV for image processing and face detection.
The Smart building access with touchless control video (under the “Videos” heading) shows this demo, plus the ability to distinguish between known and unknown users with a 3rd party’s face-recognition software. A subsequent demo featuring this capability will be released at a later date. This demo only includes face-detection, meaning that it cannot distinguish between different people; this is accomplished using conventional methods offered by OpenCV.
5.2.1. Necessary Hardware
This demo requires several hardware components alongside the AM62 Starter Kit (SK-AM62) EVM:
Camera capable of taking 1280 x 720 images. This demo used a USB camera (Logitech C270).
mmWave Radar EVM (IWR6843-AOPEVM)
(optional) mmWave Booster Pack board (MMWAVEICBOOST)
USB-micro to USB-A cable for serial connection
Monitor capable of 1920 x 1080 resolution with HDMI input
A host machine running Linux (preferably an Ubuntu LTS distribution, 18.04 or newer).
1 USB-micro to USB-A cable for serial connection to EVMs
Note: A USB-A splitter, such as this one, is necessary unless the camera or serial cable for mmWave radar is USB-C. The AM62X-SK board only has one USB-A port.
5.2.2. System Setup
To set up the AM62X-SK, follow the guides in Evaluating Linux until the network is accessible from a Linux PC host.
5.2.2.1. Host Machine SDK Setup
To build applications for the AM62, set up the Processor SDK Linux on a Linux
PC host. Download a setup the SDK installation script from the
AM62 SDK downloads page.
Ensure the version of this matches the WIC image flashed to the SD card. Note
that the SDK includes the same WIC images under the filesystem directory.
Once complete, open a terminal and navigate to the installation directory. To
build an application for SK-AM62, set up the environment by running:
cd [SDK_PATH]/arago
source ./environment-setup
5.2.2.2. mmWave Radar Setup
This demo leverages an existing TI Reference Design on mmWave Radar gesture recognition. The demo’s binary must be flashed onto the IWR6843AOPEVM using Uniflash.
Download the mmWave Industrial Toolbox from Resource Explorer onto the host machine. Follow instructions on the Multiple Gesture and Motion Detection Demo to load this firmware onto your mmWave AOP sensor. Use the binary located within the downloaded Industrial Toolbox indicated by those instructions. There are different binaries for AOP and ODS EVMs; the AOP version must be used here.
Once the board is flashed and the boot pins are set back into functional mode, continue to the next step.
5.2.3. Building the Application on Linux PC Host
The project repo on git.ti.com contains the source code for this demo. Clone this repo onto the host machine with git:
git clone https://git.ti.com/cgit/apps/edgeai-building-access-refdesign
After source-ing the environment, the current input line in the terminal
will be preceded by [linux-devkit].
5.2.3.1. Workaround for SDK version 08.03.00.19
If the SDK version is 08.03.00.19, then the mmwavegesture_hmi.pro file needs to be modified to point to a separate path containing the /usr directory that will be on the root filesystem of the AM62X. The sysroot is out of sync with the generated filesystem, and will otherwise cause linker errors for OpenCV.
Navigate to the SDK installation’s
binfolderExecute
setup-targetfs-nfs.sh. Note where this creates the filesystem (which is identical to what the WIC image put onto the SD card)Copy this path, and add to the mmwavegesture_hmi.pro file to replace the value for
usr_path = /path/to/sysroot/or/rootfs/usr/with the path to your own
5.2.3.2. Making the Demo Binary
Make the demo binary within the root directory of the cloned repo:
qmake -config release
make
5.2.4. Running the Demo
The next steps are to connect additional hardware components, start the demo, and briefly explain its usage.
5.2.4.1. Connecting and Positioning Components
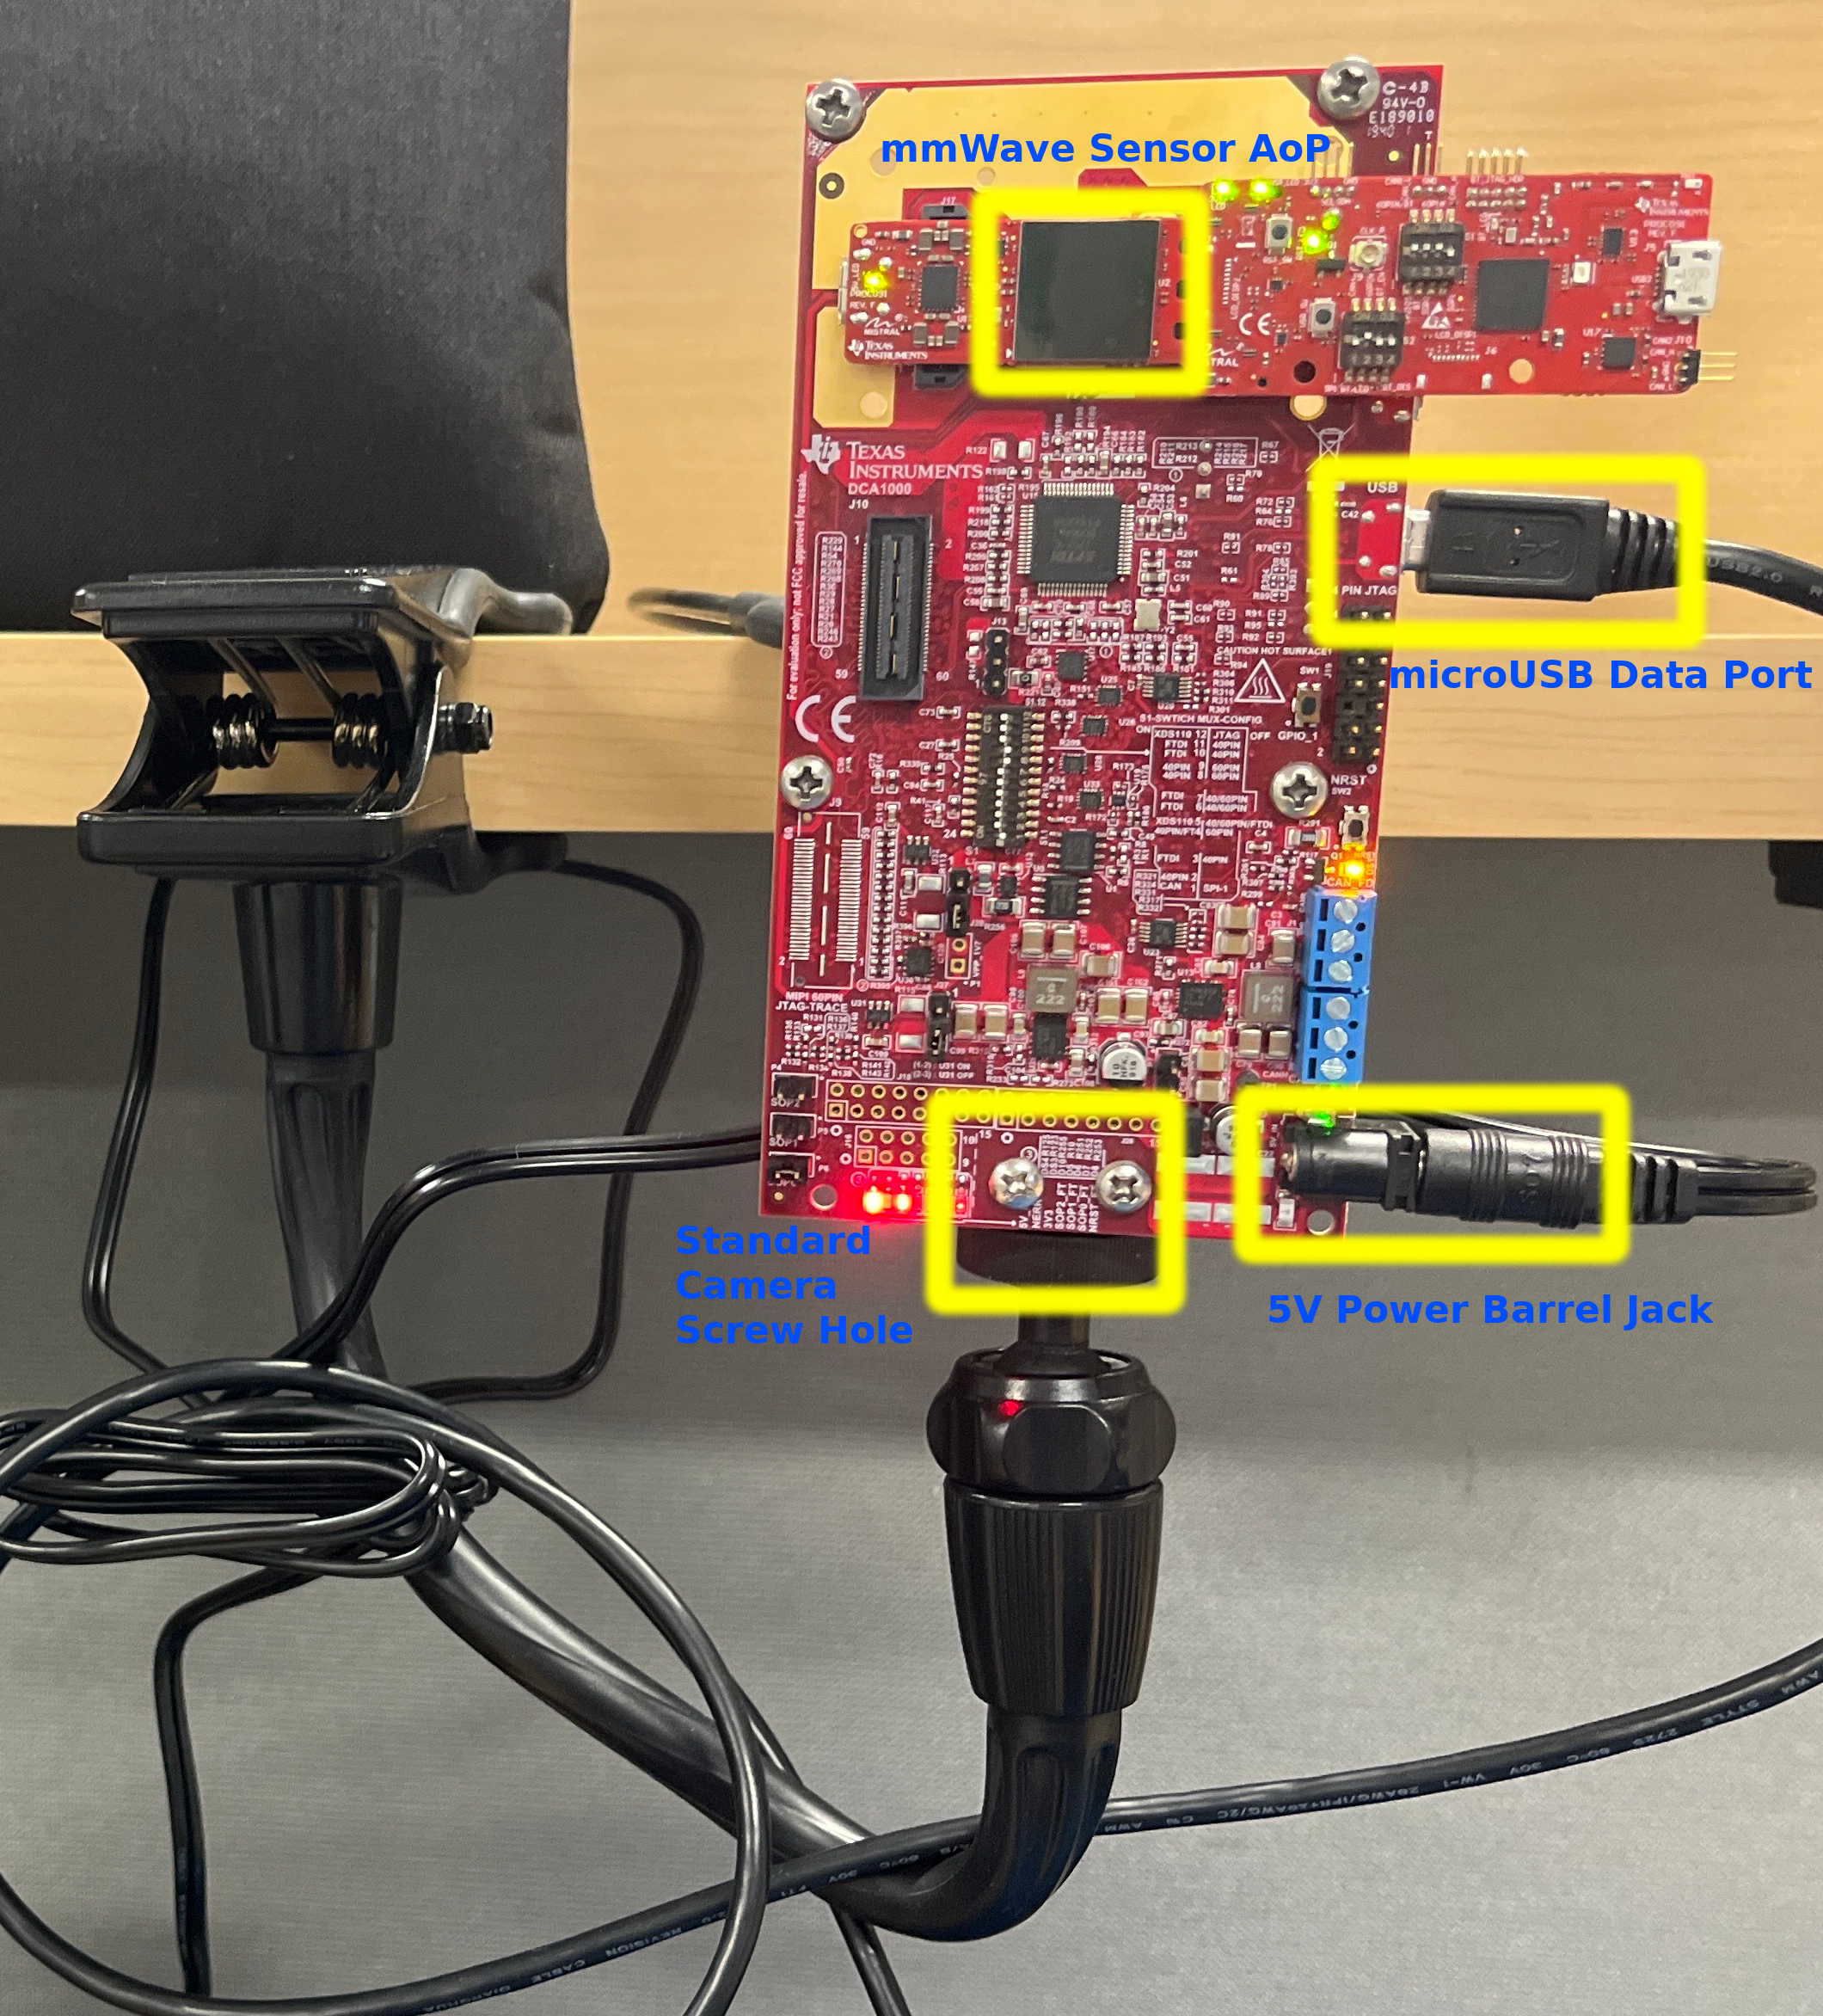
First connect the EVM as shown. Power, serial, HDMI, and ethernet should already be connected. The USB camera and serial-USB cable (to the mmWave sensor) should be plugged in while the EVM is running.
The E2 EVM only has 1 USB-A port, an adapter or hub should be used to allow more
USB-A connections. Monitor dmesg to see the kernel reacting to new devices
being plugged in.

The camera should be mounted near eye level. Face detection is most effective when looking at the camera head-on at a neutral angle.
The mmWave sensor should be set up near elbow level. In the image shown below, the IWR6843AOPEVM is attached to a MMWAVEICBOOST board. This is optional, but provides slightly better performance since it was present during all training of the gesture-recognition neural network. The AOPEVM and the IC Boost board should each come with a mounting hole that matches a standard camera mounting screw. A clamping mount is shown in the iamge.
5.2.4.2. Starting the Demo
To run the demo, copy it over to the AM62X SK board. The assets/ and ui/ directories should also be copied over, as they contain important resources files for Qt. It is recommended to tarball the entire repo directory, transfer, and untarball.
tar -cf edgeai_buildingaccess_demo.tar /path/to/demo/repo/*Transfer tarball to AM62 (copy to SD card or scp over network)
tar -xf edgeai_buildingaccess_demo.tar
The demo will assume that the video feed is available through /dev/video0 and the mmWave Radar through /dev/ttyACM1. If the mmWave Radar is not using a MMWAVEICBOOST booster board, then the device name will likely be different - typically /dev/ttyUSB1.
Run the demo in one of two ways from the root directory of the untarballed and built repo:
Use the default configuration
./run_demo.sh, which also ensures Weston window compositor is offUse a custom configuration
./build/release/mmwavegesture_hmi -platform
eglfs -s /dev/MMWAVE_DEVICE_NAME
-platform eglfscan be omitted if the window manager is left running, although the application is designed to run full-screen-s /dev/MMWAVE_DEVICE_NAMEis the name of the serial port for the data port coming off the mmWave sensor. This is typically the second port enumerated-i ip:portcan optionally be used to control a door light that listens at the corresponding ip and port for a TCP server. 3 RGB values (consecutive 1-byte values) to control the light. This was used at the 2022 Embedded World demonstration.
5.2.4.3. Demo Usage
This open source version of the building access demo has four phases: wakeup, unlock, create ID card, and entry.
When the demo first boots, then screen will be black to emulate the device being in a low-power idle state. Making any swiping gesture in front of the mmWave Radar sensor will wake up the demo. The screen should look similar to the one below:
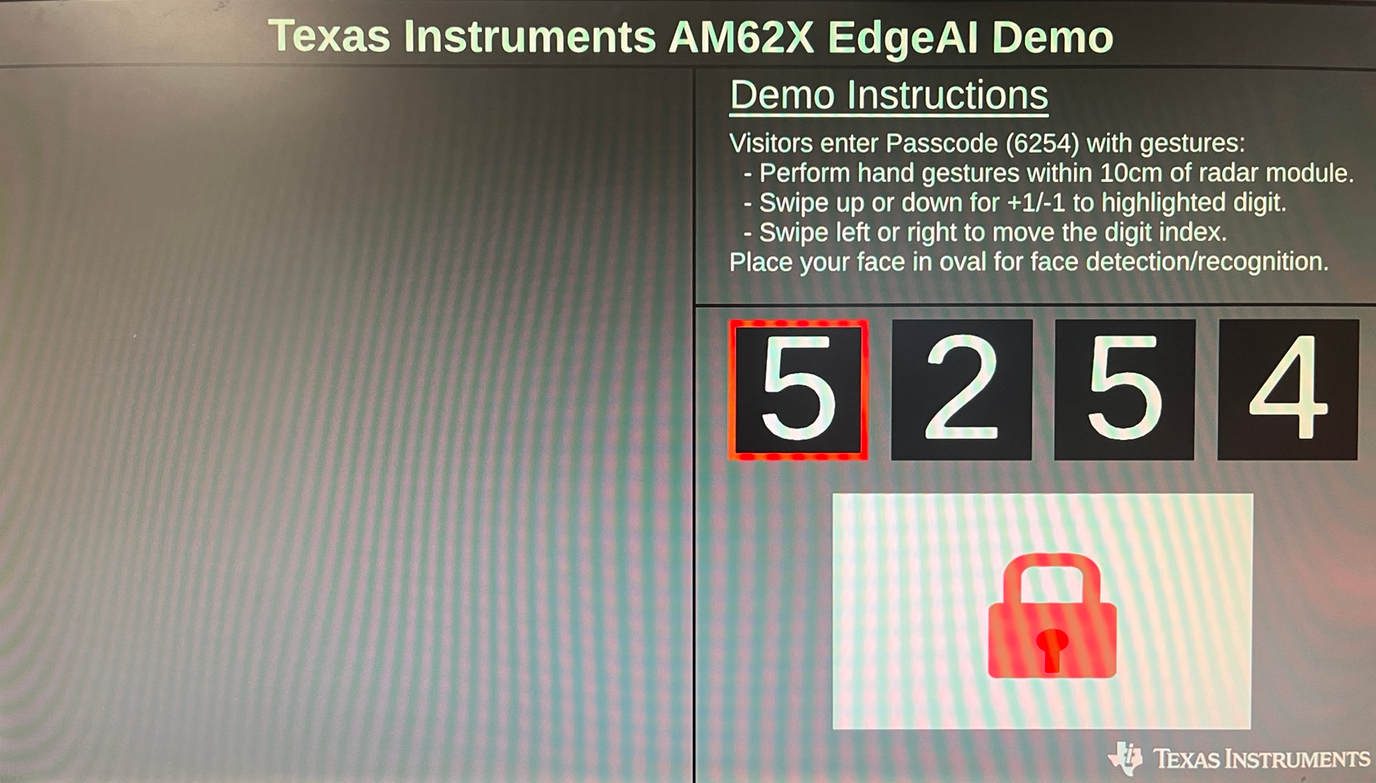
At this point, the system is waiting for the user to put in a lock code. The directions on the screen describe how to do so with swiping gestures in front of the mmWave AOP EVM (the large black component on the EVM is the radar module).
Performing the gestures within 10cm (4 inches) is strongly recommended, although they can be detected up to 40cm (~1.25 ft) away.
The neural network detecting gestures on the mmWave sensor’s R4F core may respond differently than expected for new users, so try performing gestures in different ways (e.g. swiping faster/slower, moving closer, closing the hand into a fist) if it is not recognizing gestures accurately.
This demo is using directional gestures, so changing the orientation of the AOPEVM will mean the wrong gestures are detected.
Once the code is input, the lock should show that it is unlocking. If it does not react, try the manual unlock gesture (“shine”), which is like miming the act of throwing sand.
In the next phase, the camera feed will display in the left portion of the screen and perform face-detection. When a face is detected, it will highlight it with a white box around the user’s face. Once the camera has been on for 5 seconds, it will use the next face-image it finds as the picture for an ID card, so get in position and smile! It will show you the image like below:
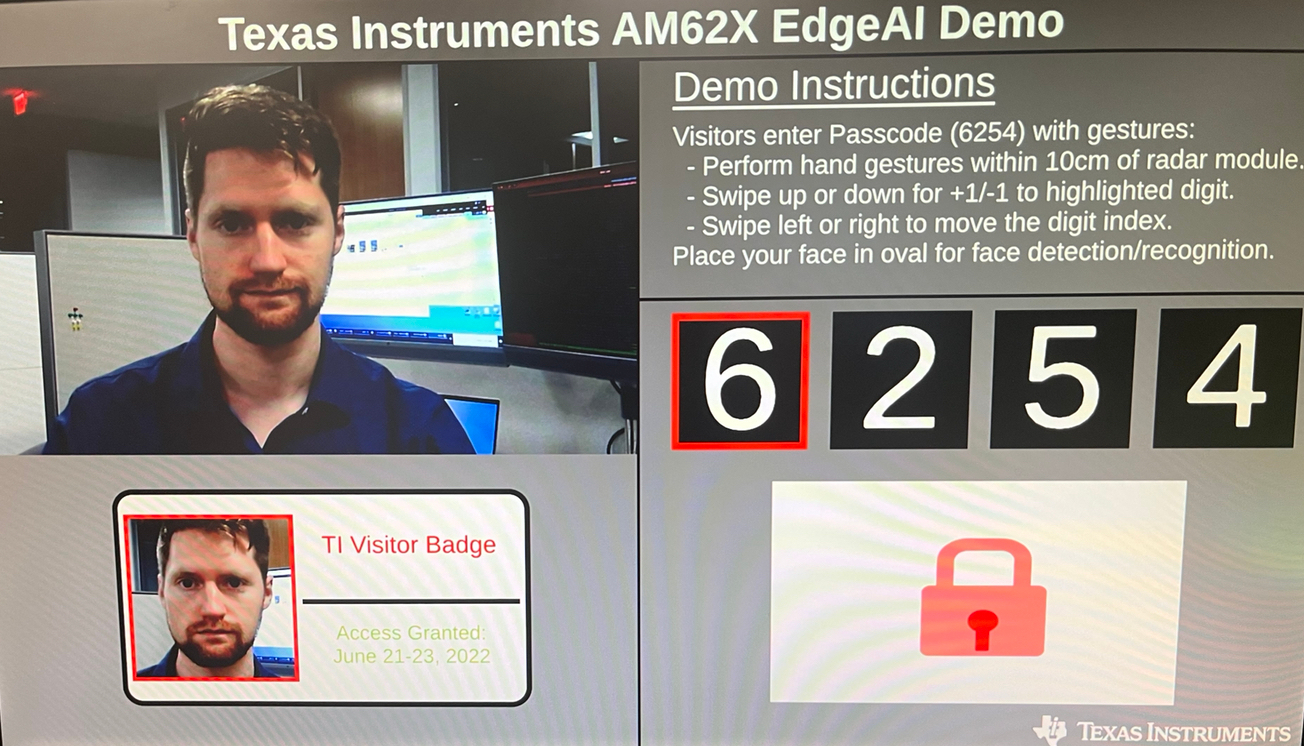
The building is now “unlocked”! The new visitor is given 15 seconds before it relocks and resets to the lock screen.
After around a minute of inactivity at any phase of the demo, it will go back into its idle state (a black screen).