2.9.2. Camera
Video can be captured on the AM62x using either a USB UVC camera or a MIPI CSI-2 compliant camera. The camera driver is based on the Video for Linux 2 (V4L2) API. Examples are given below to show video capturing by a USB camera as well as a CSI-2 camera.
2.9.2.1. USB UVC Camera
Plug in a USB UVC compliant camera and boot the EVM to Linux.
Use the v4l2-ctl command to verify the camera is detected:
# v4l2-ctl --list-devices
Video Capture 4 (usb-xhci-hcd.1.auto-1.1):
        /dev/video0
        /dev/video1
        /dev/media0
GStreamer can be used to capture the video. The captured video can be simultaneously sent to the HDMI display if a display is connected. If the HMI demo or Matrix GUI is running and using the HDMI display, it is necessary to restart Weston:
# /etc/init.d/weston restart
# gst-launch-1.0 v4l2src device="/dev/video0" ! video/x-raw , width=640, height=480 ! waylandsink
The captured video can also be stored to a file and played out on the host PC. Instead of using Wayland as the GStreamer sink, a file can be used, for example:
# gst-launch-1.0 v4l2src num-buffers=50 device="/dev/video0" ! video/x-raw, width=640, height=480 ! filesink location=cam-cap.yuv
Then the captured file can be played out on the host PC using an application such as mplayer:
$ mplayer -demuxer rawvideo -rawvideo w=640:h=480:format=yuy2 cam-cap.yuv
2.9.2.2. CSI-2 Camera
AM62x supports MIPI CSI-2 compliant cameras. The AM62x SK EVM has a 2-lane CSI-2 camera connector that is compatible with the Raspberry Pi A & B Camera.
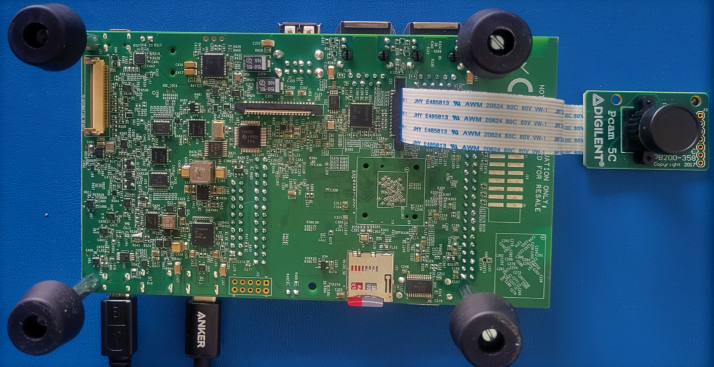
Connect a CSI-2 Camera to the EVM
The CSI-2 camera connector is located at the bottom side of the EVM. A CSI-2 camera can be connected to the EVM as shown below:
Apply Device Tree Overlay
Since any camera sensor can be connected to the EVM, the base dtb in the Processor SDK does not include the device tree node for any particular camera sensor. Therefore, the device tree node for a particular sensor should be added in as an overlay. The Processor SDK contains a device tree overlay for the OV5640 camera sensor, as shown below (note the .dtbo file):
# ls /boot -l
total 26000
lrwxrwxrwx 1 root root       26 May  2 20:04 Image -> Image-5.10.109-g45b6d4fdf6
-rw-r--r-- 1 root root 19409408 May  2 20:03 Image-5.10.109-g45b6d4fdf6
-rw-r--r-- 1 root root     2033 May  2 20:03 k3-am625-sk-csi2-ov5640.dtbo
-rw-r--r-- 1 root root    41017 May  2 20:03 k3-am625-sk.dtb
The device tree overlay can be applied in one of the following two ways:
Edit /run/media/mmcblk1p1/uEnv.txt by adding the following line at the end and reboot the EVM:
name_overlays=k3-am625-sk-csi2-ov5640.dtbo
Add the following environment variable at U-Boot prompt:
=>setenv name_overlays k3-am625-sk-csi2-ov5640.dtbo
=>saveenv
=>boot
Verify the Camera Is Detected
Boot the EVM to Linux and use the v4l2-ctl --list-devices command to verify the camera is detected.
The command should return something similar to below:
# v4l2-ctl --list-devices
j721e-csi2rx (platform:30102000.ticsi2rx):
        /dev/video0
        /dev/video1
        /dev/video2
        /dev/video3
        /dev/media0
The above command displays 4 video nodes (/dev/videoX). Each of these video nodes corresponds to a logical stream of data. For the OV5640 camera sensor, only the first node is valid.
Capture Video
The same commands used for capturing video via a USB camera, shown earlier, can be used for CSI-2 cameras as well. For example, the following command captures video and displays it through an HDMI display:
# /etc/init.d/weston restart (this is needed if another application is using the HDMI display)
# gst-launch-1.0 v4l2src device="/dev/video0" ! video/x-raw , width=640, height=480 ! waylandsink