Note
As of 2021, this document follows the Appropriate Language nomenclature directive from Bluetooth SIG. The SDK project names, APIs and code are not yet ported and use the old nomenclature. For details on how to correlate between the two, please open the PDF document Appropriate Language Mapping Tables.
Introduction
This module will cover the fundamentals of Bluetooth low energy (BLE) security including pairing, bonding & privacy. We will discuss why you might want to add these features in your application and cover basic principles.
The lab activities will walk you through pairing & bonding with Project Zero and how to enable privacy features. After completing this lab, you will be able to pair and bond to a mobile device and resolve the peer's identity address.
This lab can be adapted to work on several TI BLE dev kits, see device support below. This lab should take about 4 hours to complete.
It is recommended to read the TI BLE5-Stack User's Guide alongside this lab for details and further information. Some references will also be made to this document. See the Recommended Reading section for details.
Prerequisites
Hardware
For this lab, you need two Bluetooth-enabled development boards. Supported devices are:
- SimpleLink™ CC26x2R LaunchPad™
- SimpleLink™ CC1352R LaunchPad™
- SimpleLink™ CC1352P LaunchPad™
- SimpleLink™ CC2652RB LaunchPad™
Other SimpleLink Academy Labs
- Completion of Bluetooth Low Energy 5 Fundamentals
- Completion of Scanning and Advertising
- Completion of Connections
Software
- CCS 10.3 or IAR 8.50.1 installed with support for CC13xx/CC26xx devices.
- SimpleLink™ CC13x2 and CC26x2 SDK 5.10
For testing, a Bluetooth client application is required:
- BTool (located in the
tools\ble5stackdirectory of the SimpleLink™ SDK installation) OR - A Bluetooth Client mobile app - instructions will use the below mobile apps:
- Android: BLE Scanner by Bluepixel Technology LLP - available on the Google Play store
- iOS: LightBlue Explorer - Bluetooth Low Energy by Punch Through - available on the App Store
Recommended reading
- GAP Bond Manager and LE Secure Connections chapter of TI BLE5-Stack User's Guide
- Privacy chapter of TI BLE5-Stack User's Guide
- Bluetooth Core Specification v5.2
- [Vol 1] Part A, Section 5.4 – LE Security
Security Overview
Definitions
- BDA: Bluetooth device address
- Bonding: Storage of keys generated during the pairing process needed to resolve peer addresses or re-store encryption on subsequent connections.
- Identity Address: An address associated with an RPA that does not change over time. An IRK is required to resolve an RPA to its Identity Address.
- Identity Resolving Key (IRK): Key used for Address Resolution (resolves an RPA).
- Long-Term Key (LTK): Used for long term encryption in both LE Legacy and LE secure connections.
- Man-In-The-Middle-attacks (MITM-attacks): When an attacker acts as a middle man between two devices, intercepting and possibly altering the data sent between them.
- Nonce: An arbitrary number used just once.
- Out-Of-Band (OOB): A pairing method using a secure separate channel for the exchange of a TK.
- Pairing: process to create an encrypted link, this should not be confused with forming or establishing a BLE connection between two devices.
- Privacy: Ability to use new device addresses generated on a regular basis for the purpose of obscuring your identity address from untrusted devices.
- Resolvable Private Address (RPA): Bluetooth Device Address that changes periodically.
- Short-Term Key (STK): Used in LE Legacy pairing for initial encryption.
- Temporary Key (TK): A temporary key used only in the pairing phase.
Pairing
Passive Eavesdropping Protection
In Bluetooth low energy, information that is shared over the air can be seen by nearby devices other than the intended recipient. Although this interception of packets cannot be avoided, encryption can be used to prevent over the air messages from being understood by unknown devices. In order to use encryption, the devices involved must agree on the encryption keys used.
Pairing is the procedure used to create an encrypted link with a peer device in order to prevent passive eavesdropping. In Bluetooth low energy, there are 2 main types of pairing: LE Legacy and LE Secure Connections. LE Legacy pairing was added in Bluetooth Core Specification v4.0. LE Secure Connections Pairing was added in Bluetooth Core Specification v4.2. If two devices are paired using LE Legacy pairing and either Just Works or Passkey entry as association models, the connection is not protected from passive eavesdropping. However, if the LE Legacy pairing is not captured by a listener, the encryption will be secure.
Man-in-the-Middle (MITM) Attacks
Another attack Bluetooth low energy devices can be vulnerable to is a Man-in-the-Middle (MITM) attack (also called active eavesdropping). A MITM attack occurs when a malicious device connects to two unsuspecting devices and intercepts messages sent between the devices. The attacking device can inject its own data before passing the message along, making the two devices think they are communicating securely with each other while the attacker controls the communication. The Out-of-Band (OOB), Passkey Entry, and Numeric Comparison pairing methods provide protection against MITM attacks. But for LE Legacy Pairing the two association models Just Works and Passkey Entry do not provide any passive eavesdropping protection.
LE Legacy vs LE Secure Connections Pairing
LE Legacy Pairing provides little to no protection against passive eavesdropping during the pairing process except when the Out of Band (OOB) association model is used. However it ensures privacy between sessions as the Short term key (STK) is pseudo-random, meaning that if someone finds out the STK, they will not be able to decrypt the data in previous sessions.
In Bluetooth Core Specification v4.2, LE Secure Connections Pairing was introduced. This pairing procedure uses Elliptic Curve Diffie-Hellman cryptography together with the security mechanisms found in LE Legacy pairing. This provides protection against passive eavesdropping. The LE Secure Connections feature also added the Numeric Comparison association model. By default, the TI BLE-Stack will request a Secure Connections pairing but will accept a LE Legacy pairing if necessary. The TI BLE-Stack can also be configured to accept exclusively LE Legacy or LE Secure Connections pairings. See TI BLE5-Stack User's Guide (GAP Bond Manager and LE Secure Connections) for more details.
Pairing Phase 1: Pairing Feature Exchange
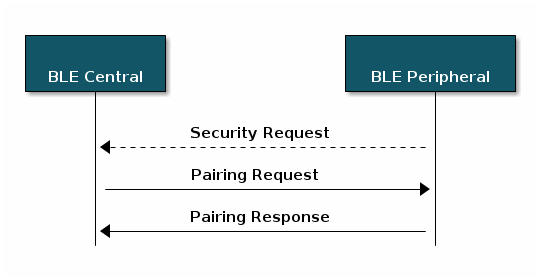
The pairing process begins when the Central device sends a Pairing Request
command to the Peripheral, or when a peripheral sends a Security request.
Details
The Central device can choose whether or not to initiate pairing after
receiving a Security Request. Not all mobile devices support the Security
Request command so it is always best to check with the Android and iOS
development guidelines before relying on the Security Request command to
initiate pairing or encryption.
 |
|---|
| Pairing Phase 1: Pairing Feature Exchange |
A Pairing Request command contains information about the types of pairing
supported by the Central device. The Peripheral will respond with a
Pairing Response command containing the security features it supports. The
combination of supported features will determine what pairing association
models are used to generate the encryption keys in Pairing Phase 2.
 |
|---|
| Pairing Request Command Format |
 |
|---|
| Pairing Response Command Format |
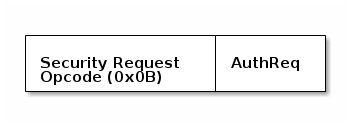 |
|---|
| Peripheral Security Request Command Format |
| Association Models | Conditions for Use |
|---|---|
| Just Works | This model is used when there is no Out of Band (OOB) data available and neither device has input capabilities. |
| Passkey Entry | This model is used when there is no OOB data available, at least one device has the I/O capability to enter a passkey, and the other device has the capability to display a passkey. |
| Out of Band | If OOB data is available on both devices, this model will be chosen. |
The models here are ranked by perceived level of security. Just works is the least secure and OOB is the most secure. The most secure model supported by both devices will be chosen. For full Association Model requirements, refer to Table 2.7 & Table 2.8 in the Bluetooth Core Specification v5.1 [Vol 3] Part H, Section 2.3.5.1.
In this module, we will cover Just Works and Passkey Entry pairing. The other two models cannot be easily demonstrated with mobile devices.
Pairing Phase 2
During the second phase of pairing, keys are generated and shared in order to encrypt the connection. After the Pairing Response has been received by the Central device, pairing confirm values are exchanged. Each device generates a random number (LP_RAND_I and LP_RAND_R –Legacy Pairing initiator and responding random numbers, respectively), which goes into the confirm value-generating function together with the Temporary Key (TK). Confirm values are generated in accordance with the Bluetooth Core Specification. The LE Legacy Confirm Value Generation Function is described in [Vol 3] Part H, Section 2.2.3.
After the Central receives the Pairing Confirm command from the Peripheral
device, the Central will send a Pairing Random command to the Peripheral
device with the random number that was used to calculate the Pairing Confirm
value in the previous step. The Peripheral will respond with the random number
it used for its confirm value. The two devices will check the random number
against the confirm values previously exchanged and, if the values match, the
pairing will continue. This will verify that they both are using the same TK.
If the check fails, a Pairing Failed command will be sent. Pairing Failed
commands contain the reason that the pairing failed and
can be extremely useful for debugging.
If the Pairing Random exchange succeeds, the link will be encrypted by the
Central using the Short Term Key (STK). The calculation of the STK uses the
Temporary Key (TK) along with the Random Values, and thus the STK is not shared
over the air. The process to calculate the STK is described in [Vol 3] Part H,
Section 2.2.4 of the Bluetooth Core Specification v5.1.
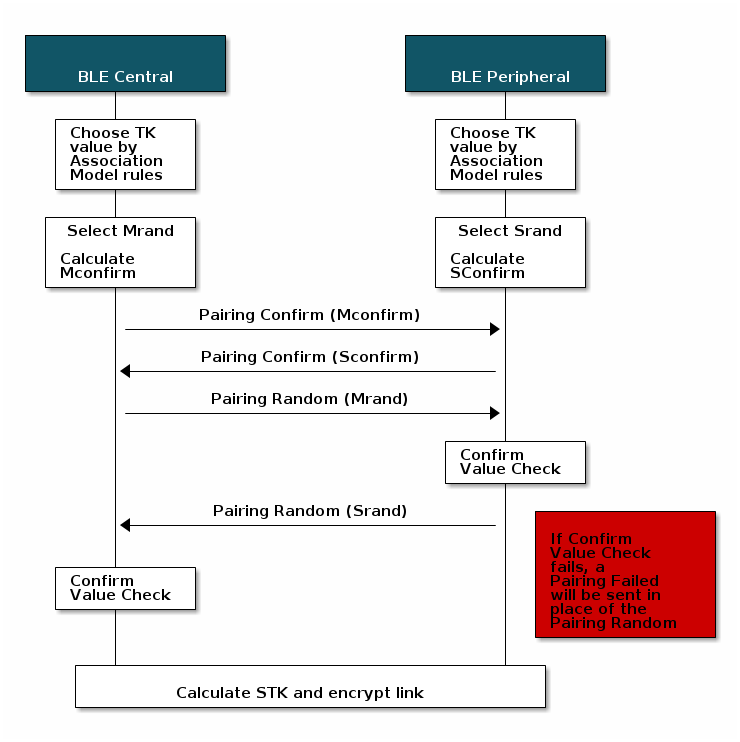 |
|---|
| LE Legacy Pairing Phase 2: Short Term Key Generation |
Now that we have looked a little more closely at the pairing process, we will review the association models and their strengths and weaknesses.
Just Works
This method sets the TK to zero. As we know, the input of the function computing the STK is the TK and the Random values. Since the TK is set to zero and the Random values are exchanged unencrypted, calculating the STK is easily accomplished for an attacker, thus enabling passive eavesdropping. Likewise, this method does not offer any way of authenticating the devices that are taking part in the connection, which means that it is possible for an attacker to initiate active eavesdropping (MITM attack). However, given that no one is listening during the pairing process, the random number contributing to the STK ensures that this method is secure.
Passkey entry
The TK is now a 6-digit number, a passkey, that is passed between the devices by the user. An example of this would be if one device displays a randomly generated code, and the user types it in to the other device. The same principle as in Just works applies here as well; if no one is listening in to the pairing process, the method is secure. But if someone listens when the TK is transmitted, the method is compromised. The reason that this method is considered more secure than the seemingly similar Just Works, is because it ensures authenticity and thus thwarts MITM attacks. Only the user is able to see the passkey, and thus we know that the first transmission with the right passkey will belong to the correct device.
Out of Band (OOB)
This method uses another wireless technology to transmit the TK. If the OOB channel is secure from MITM attacks, then we can safely assume that the BLE connection is safe from it as well. At the same time, as long as the OOB channel is secure from eavesdropping, the BLE connection will also be secure from eavesdropping. This method is considered to be the most secure by far, but this requires a completely secure OOB channel. A popular choice is the NFC protocol, as a connection is only made if the two devices are physically close together. An attackers device would thus be visible quite literally. Using NFC also allows for using a very large TK, and thus enhancing security greatly.
Pairing Phase 1: Pairing Feature Exchange
The pairing process begins when the Central device sends a Pairing Request
command to the Peripheral. Alternatively, a Peripheral can send the
Security
 Request
command to request the Central device begin the
pairing process. The Central device can choose whether or not to send a
Pairing Request after receiving a Security Request. Not all mobile
devices support the Security Request command so it is always best to
check with the Android and iOS development guidelines before relying on the
Security Request command to initiate pairing or encryption.
|
|---|
| Pairing Phase 1: Pairing Feature Exchange |
A Pairing Request command contains information about the types of pairing
supported by the Central device. The Peripheral will respond with a
Pairing Response command containing the security features it supports. The
combination of supported features will determine what pairing association
models are used to generate the encryption keys in Pairing Phase 2.
|
|---|
| Pairing Request Command Format |
|
|---|
| Pairing Response Command Format |
|
|---|
| Peripheral Security Request Command Format |
| Association Models | Conditions for Use |
|---|---|
| Just Works | This model is used when there is no Out of Band (OOB) data available and neither device has input capabilities. |
| Passkey Entry | This model is used when there is no OOB data available, at least one device has the I/O capability to enter a passkey, and the other device has the capability to display a passkey. |
| Numeric Comparison | This model is used if both devices support Secure Connections, can display a yes or no message and have some input capability. |
| Out of Band | If OOB data is available on either device, this model will be chosen. |
The models here are ranked by perceived level of security. Just works is the least secure and OOB is the most secure. The most secure model supported by both devices will be chosen. For full Association Model requirements, refer to Table 2.7 & Table 2.8 in the Bluetooth Core Specification v 5.1 [Vol 3] Part H, Section 2.3.5.1.
In this module, we will cover Just Works and Passkey Entry pairing. The other two models cannot be easily demonstrated with mobile devices.
Pairing Phase 2
During the second phase of pairing, keys are generated and shared in order to encrypt the connection. The types of keys that are generated are dependent on whether LE Legacy or LE Secure Connections pairing is used. In LE secure connections a single Long Term Key (LTK) is used, instead of a Temporary Key (TK) and Short Term Key (STK) used in LE Legacy connections. This LTK is generated using Elliptic Curve Diffie Hellman (ECDH) public key cryptography which offers significantly stronger security compared to the LE Legacy connections.
LE Secure Connections Pairing Phase 2
If LE Secure Connections pairing is used, the devices will exchange their Public
Keys next. The Public Keys are part of an ECDH public-private key pair. The
public keys are exchanged using the Pairing Public Key command. After the
public keys are exchanged, each side will compute the Diffie-Hellman Key (DH
key) using the Public Key of the peer device and the Private Key of the local
device.
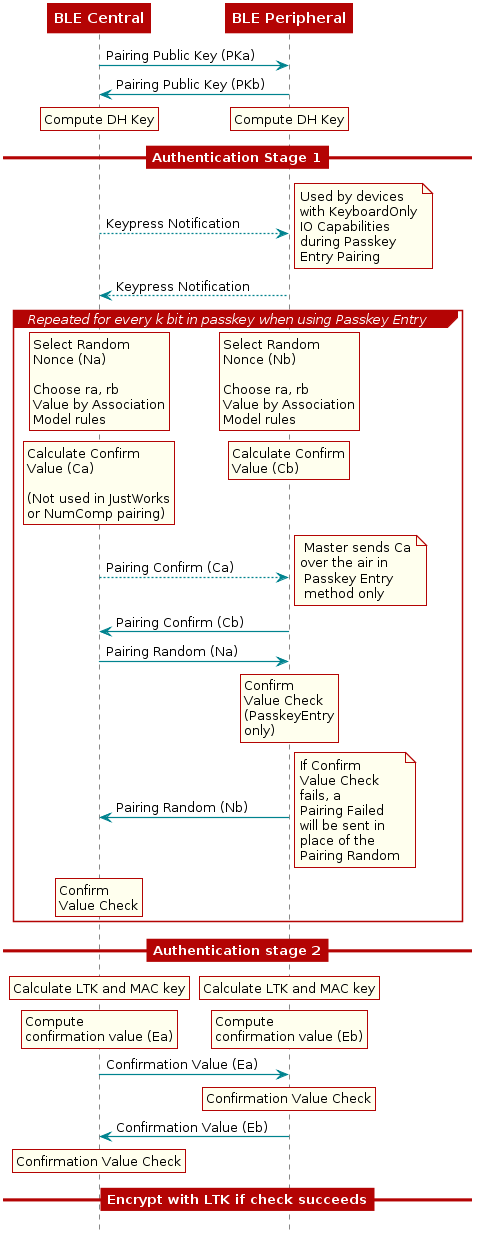 |
|---|
| Pairing Phase 2: Secure Connections Key Generation |
Next, the devices each calculate a cryptographic nonce (an arbitrary number used
just once). These nonces are then combined with values determined through the
association rules to create confirm values. Next, these confirm values are
exchanged. Confirm values are generated in accordance to the Bluetooth Core
Specification and sent using the Pairing Confirm command. The LE Secure
Connections Confirm Value Generation Function is described in greater detail in
[Vol 3] Part H, Section 2.2.6 of the Bluetooth Core Specification v5.1.
After the Central receives the Pairing Confirm command from the Peripheral
device, the Central will send a Pairing Random command to the Peripheral device
with the random number that was used to calculate the Pairing Confirm value in
the previous step. The Peripheral will respond with the random number it used for
its confirm value. The two devices will check the random number against the
confirm values previously exchanged and, if the values match, the pairing will
continue. If the check fails, a Pairing Failed command will be sent. Pairing
Failed commands contain the reason that the pairing failed and can be useful
when debugging.
The next step in LE Secure Connections Pairing is the Diffie-Hellman Key Check. The Key Check values are generated using the LE Secure Connections Check Value Generation Functions described in [Vol 3] Part H, Section 2.2.8 of the Bluetooth Core Specification v5.1. Each device contains a key from the first step which is a combination of their private key and a public key. When they exchange these keys, no passive listener will be able to resolve either of the private keys, and thus not be able to resolve the Diffie-Hellman key which is a combination of the private and public keys.
Finally the Long Term Key (LTK) will be generated in order to encrypt the link. The LTK Generation is performed using the LE Secure Connection Key Generation function which also computes the Message Authentication Code (MAC) Key. The LTK is not shared over the air in Secure Connections.
Now that we have looked a little more closely at the technicalities surrounding the pairing process, we will review the different association models.
Just works
Here, the values for ra and rb are set to zero. The confirm value is calculated using the public key of device A and the public key of device B together with each individual random nonce. For an attacker, all of these values would be known. The key distinction from LE Legacy pairing, is that the connection is not encrypted only using values that an attacker can sniff out. In the last stage of the pairing process, the Diffie-Hellman key, which by design is impossible to know for a passive eavesdropper, is used to generate the LTK used for encryption. This means that this method is substantially more secure against passive eavesdropping than the same method in LE Legacy connections. However, there are no mechanisms for authentication in this method, and therefore it is vulnerable to MITM attacks.
Passkey Entry
This time, the confirmation value is calculated using the public keys of the devices together with the Random Nonce of each device and the 6-digit passkey entered by the user. The confirmation value is calculated bit by bit for every bit of the passkey, and transfered consecutively to the other device for checking. This method provides the authentication that Just Works passkey entry lacks, making it resilient to MITM attacks.
Numeric Comparison
This method follows the same procedure as Just Works numeric comparison, but adds an extra step at the end to fix the vulnerability to MITM attacks. Once the confirmation values match on both the devices, both devices will independently calculate a 6-digit confirmation value using both of the random nonce values. They both display this value to the user, so the user can authenticate the connection. This fixes the vulnerability to MITM attacks.
Out of band (OOB)
Here the public keys, nonces and confirmation values are all exchanged via a different technology than BLE. A popular choice is NFC, as it requires the two devices to be physically close to work. As with LE Legacy pairing, OOB pairing only provides protection from passive eavesdropping and MITM if the OOB channel is secure.
Bonding
Bonding is the process of storing the keys that were generated during the pairing process for the purpose of quickly restoring encryption in a future connection. Bonding information is stored in a bond record in non-volatile flash, and it can be restored when the devices connect again.
Privacy
Anti-Tracking
Bluetooth devices are identified by their Bluetooth device address (BDA). This address is necessary for interacting with other Bluetooth devices and is appended in many of the packets the device sends out. However, since this address can be seen by any other nearby Bluetooth device, it could be used to collect information about a given device over time. In order to prevent this tracking, BLE devices can enable privacy features. This is done by generating a new address at a given interval instead of using a fixed address. This hides the Identity Address from untrusted peers.
Bluetooth Address Types
Bluetooth address types as defined by the Bluetooth Core Specification Version
5.1 are given below. In the BLE-Stack, these are defined in gap.h with the
defines given in parenthesis.
- Public Address - Use the Identity Address. (The BDA never changes.) (ADDRMODE_PUBLIC)
- Random Static Address - Generate a random address per power cycle. The address cannot be regenerated at any other time. Can be used as an Identity Address. (ADDRMODE_RANDOM)
- Resolvable Private Address (RPA) - Generate a random address with a given time interval. Generated using Identity Resolving Key (IRK) which can also be used by trusted peers (bonded devices) to resolve the Random Address to the Identity Address. A device with a Resolvable Private Address must also have an Identity Address.(ADDRMODE_RP_WITH_PUBLIC_ID)
- Non-resolvable Private Address - Generate a random address with a given time interval. Generated randomly. Cannot be resolved to an Identity Address. (ADDRMODE_RP_WITH_RANDOM_ID)
Generating & Resolving Private Addresses
In order to generate Resolvable Private Addresses, a device will use its Identity Resolving Key (IRK) as an input to the Bluetooth defined Random Address Hash function. The output of this function is used as part of the Resolvable Private Address (RPA). A peer without the IRK will be able to determine that the device is using a Resolvable Private Address, but will be unable to determine the identity address of the device.
Task 1 – Enable Just Works Pairing
Before beginning, import Project Zero into your workspace. For a refresher on how to import, build and flash Project Zero, please see the Bluetooth Low Energy 5 Fundamentals lab. As a best practice, you should build Project Zero and verify functionality before making any changes.
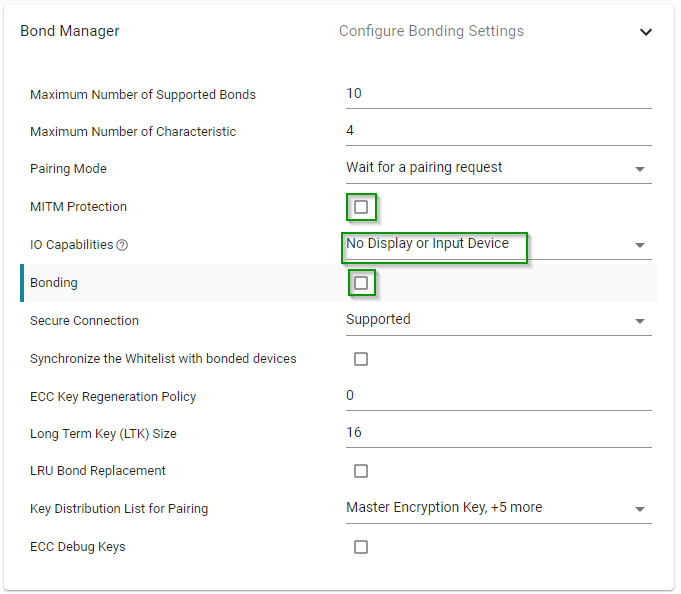
To configure Pairing, open the SysConfig file → BLE → Bond Manager
1. To start, enforce Just Works pairing by unchecking the MITM Protection box, and set IO Capabilities to No Display or Input Device. We will also uncheck Bonding for now.
2. Build and flash your LaunchPad with your modified Project Zero then follow the instructions below for your selected peer.
1. Import the Host Test project in CCS from the ble5stack example folder in the SDK.
2 Right-click on the host_test project, select Properties and browse to Build → ARM Compiler → Predefined Symbols. Above the box Pre-define NAME (-D), click the Add... icon and type the symbol GAP_BOND_MGR. Repeat for the Stackwrapper project.
3. Build the Stack Wrapper project and flash the host_test project.
4. Open BTool and open the COM Port associated with your Host Test device. If you are new to BTool, review the basic usage in the Bluetooth Low Energy 5 Fundamentals lab.
After the initial Host Test setup is done, we will configure the GAP Bond Manager parameters to enable Just Works Pairing.
5. Click the Advanced Commands tab and expand the GAP section. Scroll down the list until you find the GAPBondMgr_SetParameter command. Click on the command to display the parameters below.
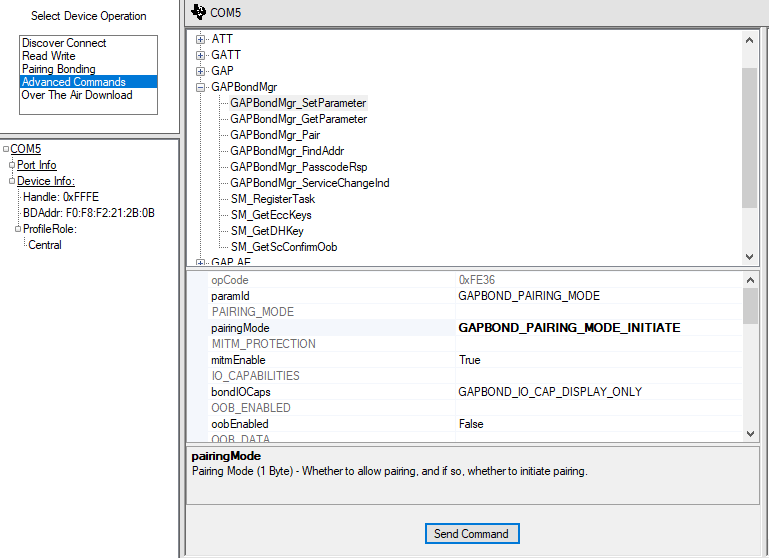
6. In the paramID field, select GAPBOND_PAIRING MODE. In the pairingMode field, select GAPBOND_PAIRING_MODE_INITIATE. Using this mode will allow our Central device to send a Pairing Request when a connection has been formed. Hit the "Send Command" button to set this parameter in the GAP Bond Manager.
7. In the paramID field, select GAPBOND_IO_CAPABILITIES. Next, select GAPBOND_IO_CAP_NO_INPUT_NO_OUTPUT in the bondIOCaps field. This will set the IO Capabilities we want to send in our pairing request. Hit the "Send Command" button to set this parameter in the GAP Bond Manager.
8. In the Discover/Connect tab, scan for devices. When the GAP_DeviceDiscoveryDone event is received, look through the list for a device matching the Project Zero address.
9. In the Establish Link Peripheral BDA list, select your Project Zero device and click "Establish". Once a connection is formed, the devices will begin pairing. When the link is encrypted, you will receive a GAP_AuthenticationComplete event with a status of Success in BTool and the Project Zero PuTTY window will display "Pairing success".
10. In BTool, close the Host Test COM Port by selecting Device – Close Device.
1. Using your iOS device, find the LightBlue Explorer app (or any Bluetooth Client application you prefer) & open it.
2. The app should begin scanning for BLE devices automatically but you can refresh the list by pulling down.
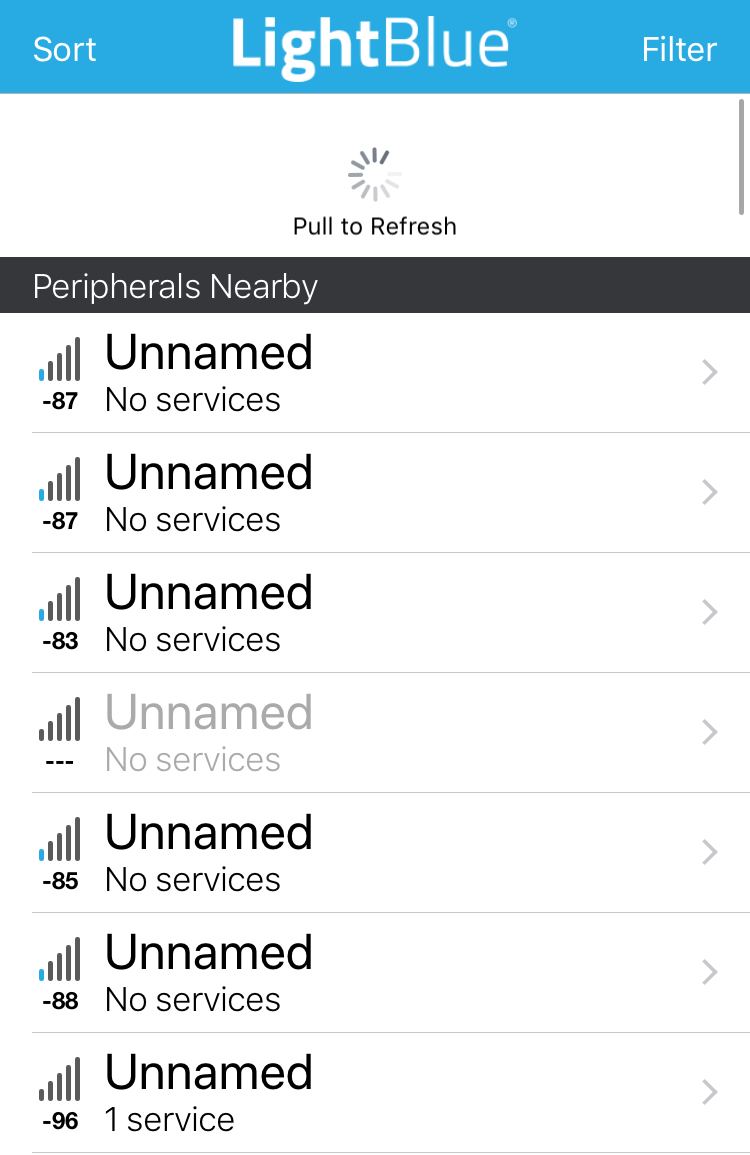
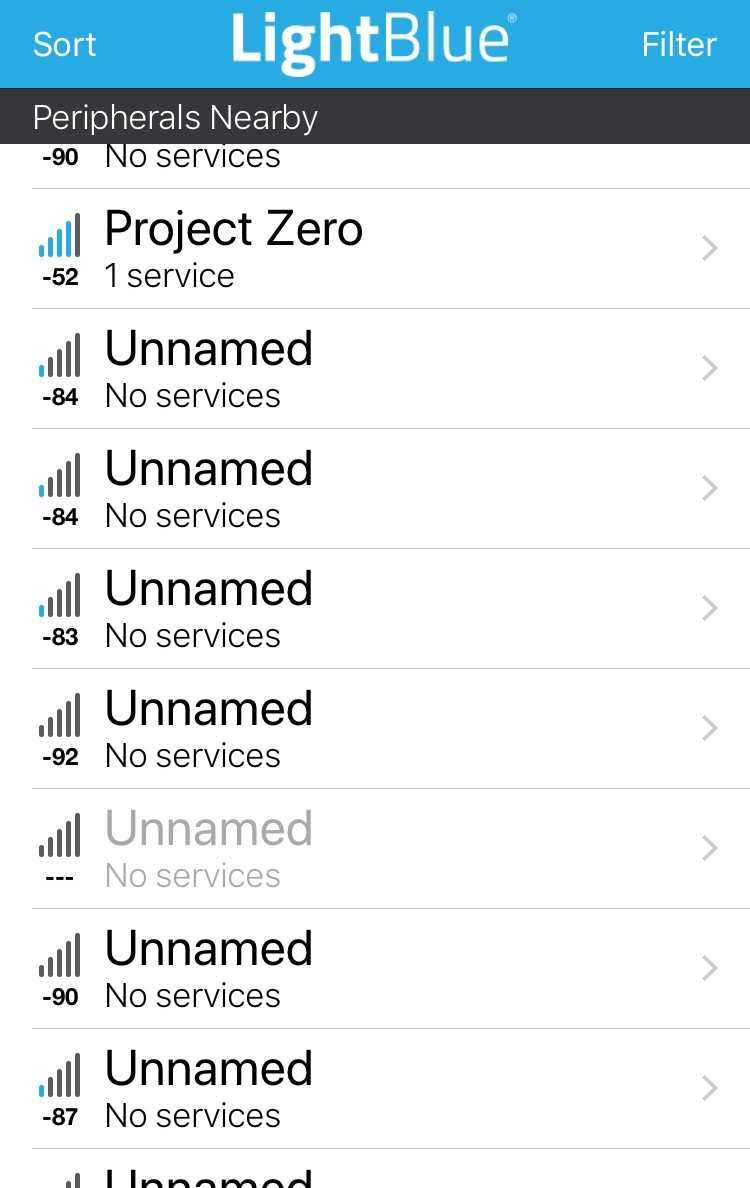
3. You should see Project Zero advertising as "Project Zero". Connect to the device by clicking on the name.
4. After connecting, your serial window will look something like this:

Great! We've connected. However, this behavior seems identical to the unmodified behavior of Project Zero. So what gives?
iOS devices do not send pairing requests automatically and encryption cannot be requested from the mobile app.
Does this mean iOS devices do not support encryption? No, but it takes a special prompt to get the iOS device to initiate a pairing request. According to the Apple Bluetooth Accessory Design Guidelines for Apple Products in order to prompt the Apple device to send a pairing request:
"the Peripheral should reject [a] ATT request using the Insufficient Authentication error code, as appropriate."
We will go through this exercise in the next task.
1. Start BLE Scanner
Using your Android device, find the BLE Scanner app and open it.
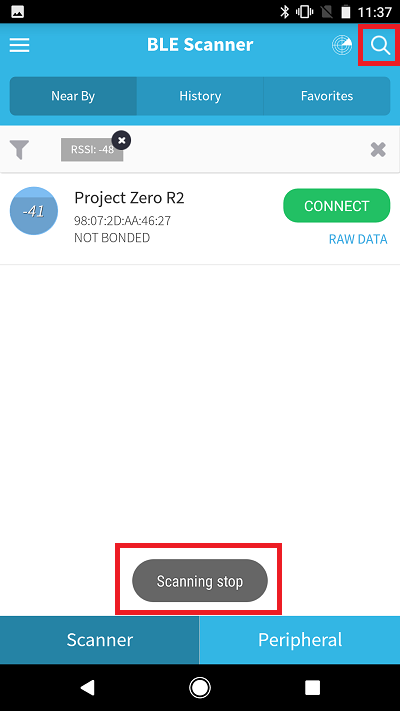
2. Scan for BLE devices
The app should begin scanning for BLE devices automatically but you can toggle scanning on and off by clicking on the magnifying glass in the top right corner of the app. A "Scanning stop" message will appear.
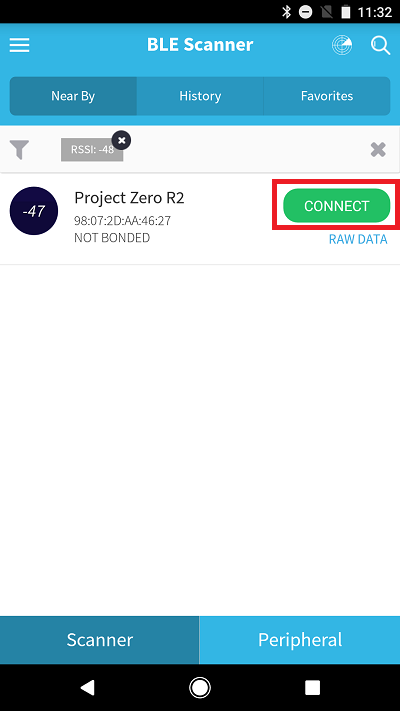
3. Connect to Project Zero
You should see Project Zero advertising as "Project Zero". Connect to the device by clicking "Connect".
After connecting, your serial window will look something like this:
Great! We've connected. However, this behavior seems identical to the unmodified behavior of Project Zero. So what gives?
Android Bluetooth behavior varies depending on device and application used.
Some devices allow you to pair directly from the app, some require you to initiate pairing through the Bluetooth settings. Refer to Android development guidelines when you are designing your embedded experience.
Using the Peripheral Security Request procedure may work with some Android devices
and not others. To achieve the best interoperability, it is advised to use an
characteristic permissions to prompt the Android device to send a Pairing
Request.
We will go through this exercise in the next task.
Task 2 – Add Encrypted Characteristic
There may be some characteristics whose values we are unwilling to share with a peer device over an unencrypted link. In order to protect this data, we will require peers to establish an encrypted link before allowing GATT Reads and Writes to the String Characteristic in the Data Service. This can be implemented with the GATT Characteristic permits.
1. Open data_service.c (located in the Profiles folder in the project)
2. Find the String Characteristic Value in the attribute table and change
GATT_PERMIT_READ | GATT_PERMIT_WRITE to
GATT_PERMIT_ENCRYPT_READ | GATT_PERMIT_ENCRYPT_WRITE. You can read more about
permissions in TI BLE5-Stack User's Guide (BLE5-STACK → Generic Attribute
Profile (GATT)).
// String Characteristic Value
{
    { ATT_UUID_SIZE, ds_StringUUID },
    GATT_PERMIT_ENCRYPT_READ | GATT_PERMIT_ENCRYPT_WRITE,
    0,
    ds_StringVal
},
data_service.c :: Data_ServiceAttrTbl – Set String Characteristic Value permits to encrypted.
3. Rebuild and flash Project Zero.
1. Reopen the connection to your Host Test device in BTool.
2. Without performing any additional setup, scan and connect to Project Zero. This time, the GAP_AuthenticationComplete event does not follow the GAP_EstablishLink event.
3. Perform a GATT Discovery by right-clicking on the Handle in Connection Info and selecting Discover UUIDs.
4. After receiving the ATT_FindInfoRsp event with a status of 0x1A (The Procedure is Completed), scroll through the GATT Table at the bottom of BTool and find the String Char.
5. Read the value of the characteristic by clicking in the Value field for the String Char. An error message stating you have insufficient authentication to read this characteristic will occur.
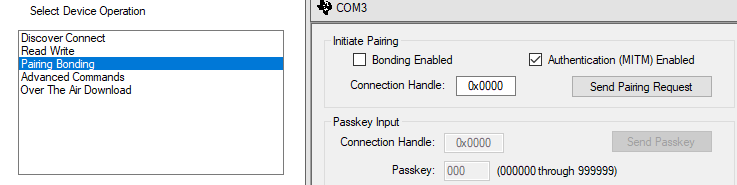
6. Click the Pairing/Bonding tab. Make sure bonding and MITM are not enabled, then click Send Pairing Request.
7. Single-click on the String Char value field. This time, the message "This is a pretty long string, isn't it!" will display in the value field.
8. In BTool, close the Host Test COM Port by selecting Device – Close Device.
1. Connect to Project Zero using LightBlue Explorer.
2. Find the Characteristic with the Data Service String Characteristic UUID (0xF0001131-0451-4000-B000...). (For a refresher on this, see Bluetooth Low Energy 5 Fundamentals lab.)
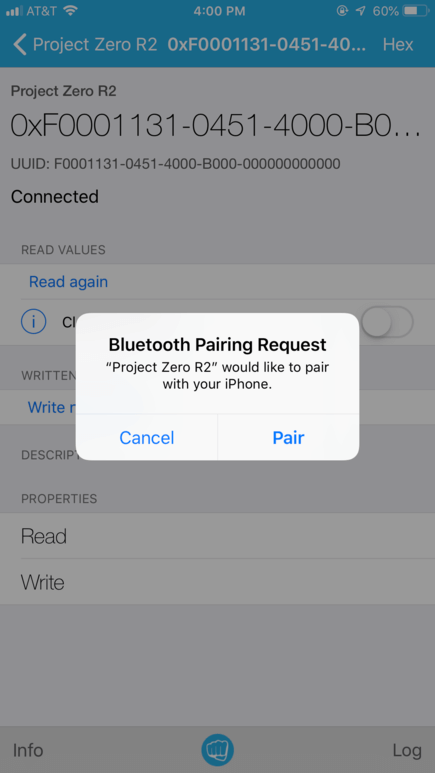
3. Click on the Characteristic with the Data Service String Characteristic UUID.
4. Now a window asking you to pair the devices will pop up. Accept the pairing prompt by clicking "Pair". When the pairing process has completed, the Project Zero terminal window will display "Pairing success".
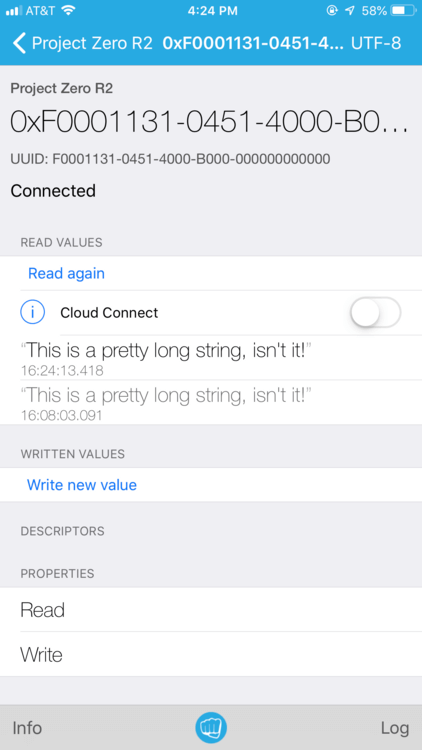
5. Click "Read Again". This time, a value will display under "Cloud Connect". Click "Hex" in the top right corner of the app. Now you can switch between display formats. Select UTF-8 to see the value as a string.
1. Connect to Project Zero using BLE Scanner
2. Find the Characteristic with the Data Service String Characteristic UUID. (For a refresher on this, see Bluetooth Low Energy 5 Fundamentals)
3. Click on the circled R next to the Data Service String Characteristic UUID to read the value of the newly encrypted characteristic.
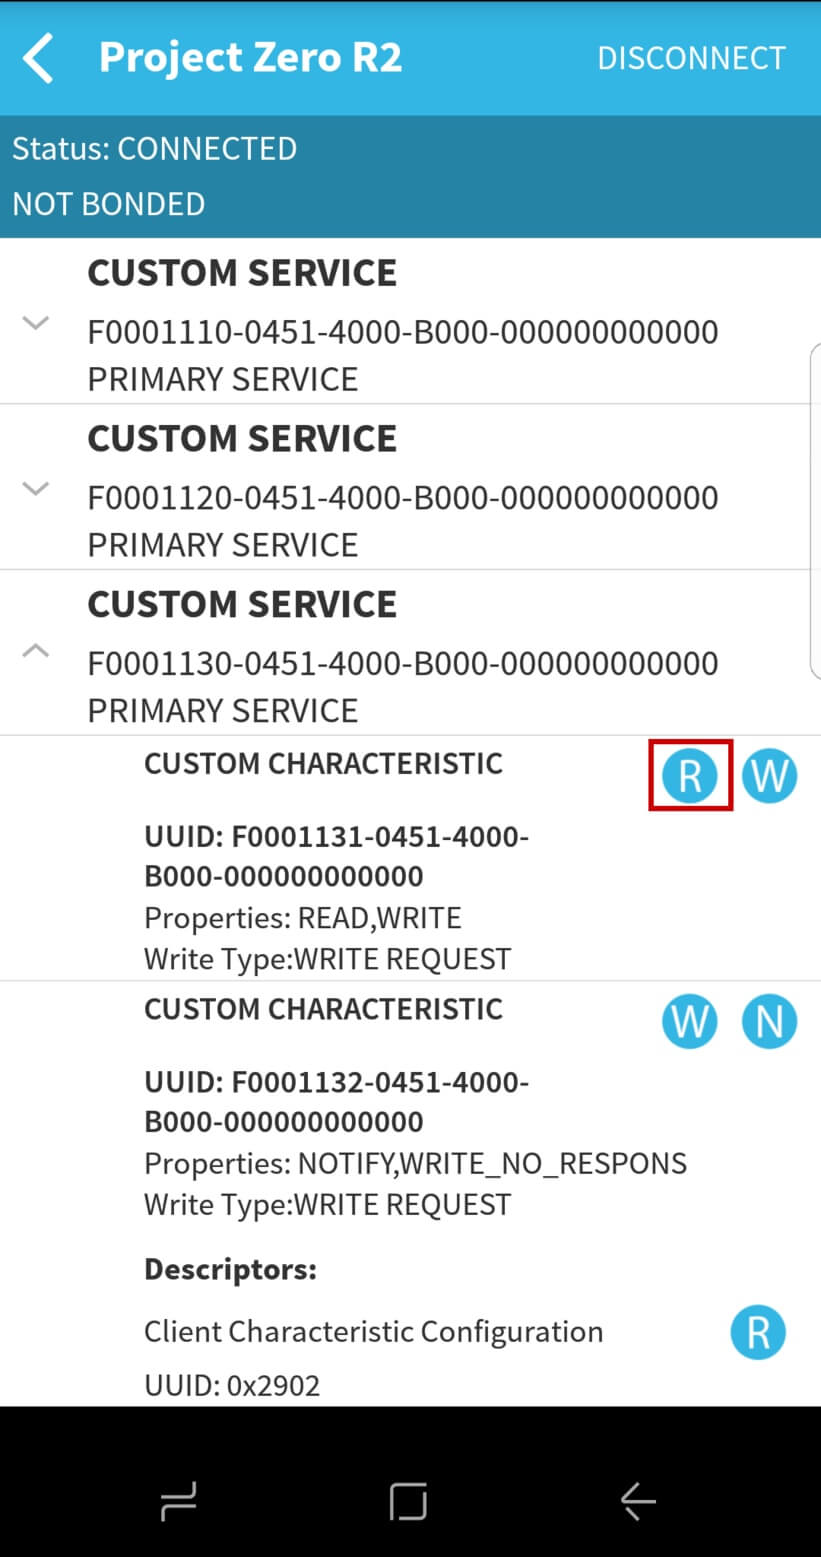
The following message should appear in your terminal window:

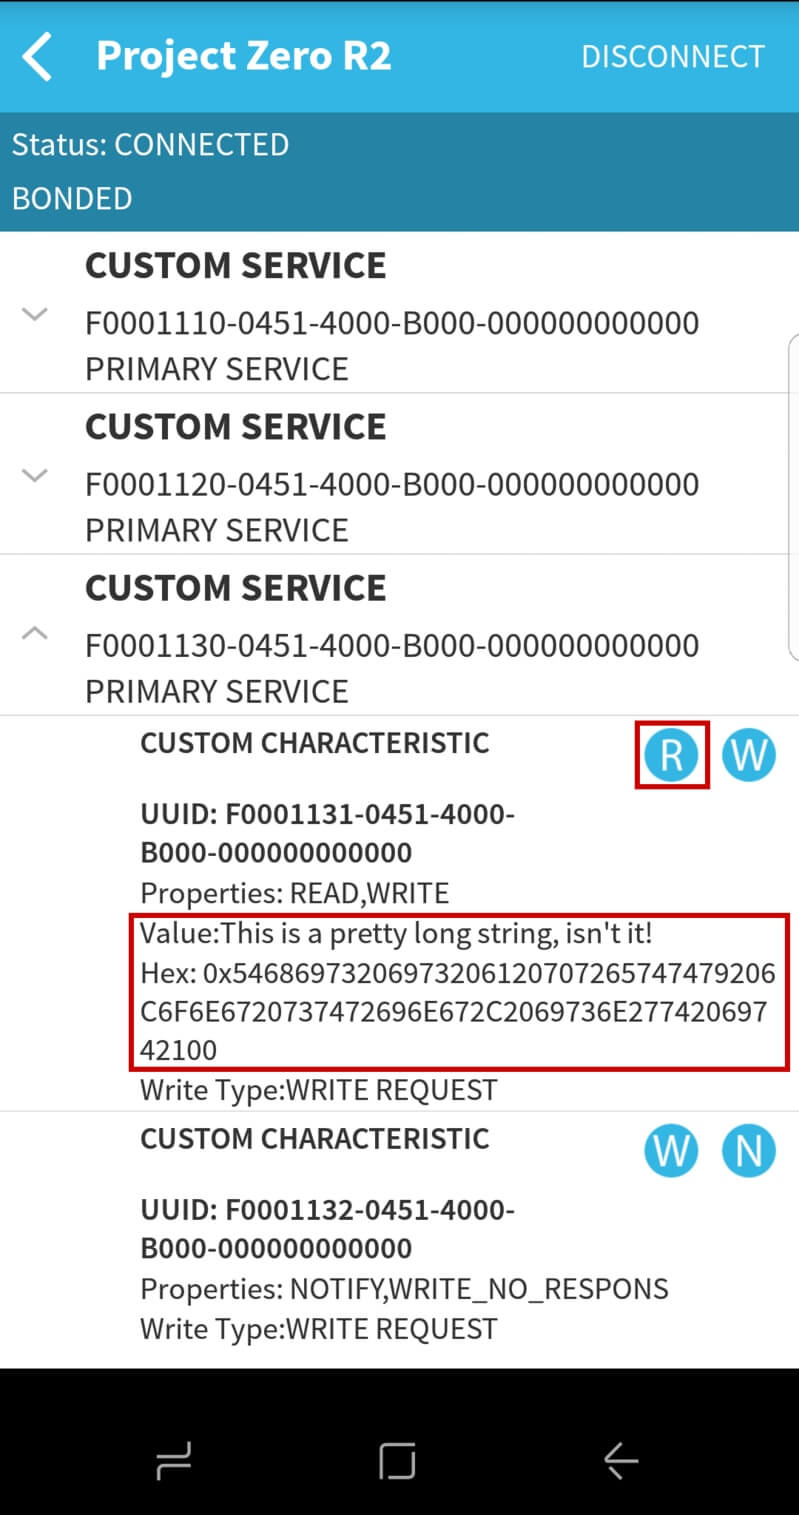
4. Now that we have an encrypted link, try reading the characteristic value again by pressing on the R button again. Now the value of the String Characteristic should display in BLE Scanner:
Task 3 – Enable Passkey Entry Pairing
Now that we have gone through a basic pairing exercise and have an encrypted characteristic, we can move on to something more secure. If you want to have an authenticated link, you must add protection against MITM attacks. To do this, we will ask users to enter a passkey before accessing our protected characteristic to make sure we are pairing the right devices.
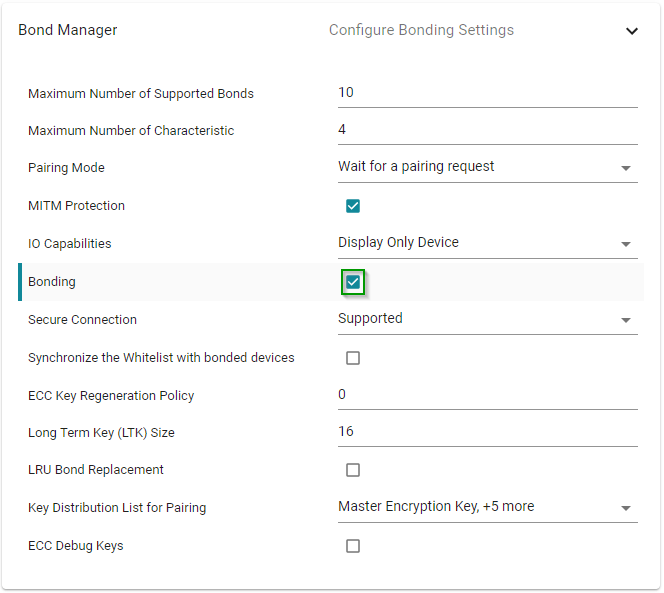
1. Open SysConfig → BLE → Bond Manager and select Display Only Device under IO Capabilities. Then enable MITM Protection. Please note that enabling MITM Protection is only available when the device has certain IO capabilities.
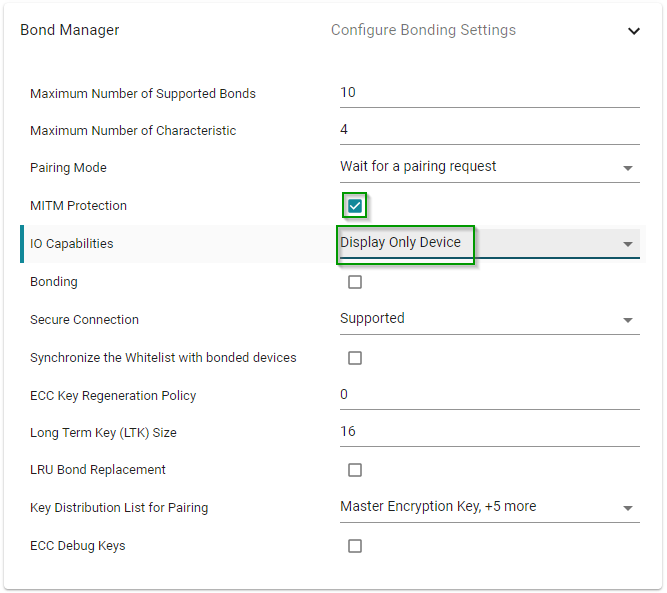
This Bond Manager configuration will result in the Passkey Entry association model when pairing with a smart phone. However, having a hard coded passkey does not offer true MITM protection if the passkey is reused. Therefore, we will randomize the passkey.
In project_zero.c, look up ProjectZero_processPasscode(). Here, we will add the
following code that will randomize the passkey. Feel free to override ProjectZero_processPasscode() with the one provided below or copy the changes manually.
For a full diagram of how pairing and secure connections works in the BLE Stack, go to the TI BLE5-Stack User's Guide and navigate to Developing a Bluetooth Low Energy Application → The Stack → GAP Bond Manager and LE Secure Connections section.
/*********************************************************************
 * @fn      ProjectZero_processPasscode
 *
 * @brief   Process the Passcode request.
 *
 * @param   pReq - pointer to passcode req
 */
 static void ProjectZero_processPasscode(pzPasscodeReq_t *pReq)
 {
     uint32_t passcode = 0;
     passcode = Util_GetTRNG();
     passcode %= 1000000;
     Log_info2("BondMgr Requested passcode. We are %s passcode %06d",
               (uintptr_t)(pReq->uiInputs?"Sending":"Displaying"),
               passcode);
     // Send passcode response.
     GAPBondMgr_PasscodeRsp(pReq->connHandle, SUCCESS, passcode);
 }
project_zero.c :: ProjectZero_processPasscode() – used to randomize the passkey
2. Rebuild and flash Project Zero.
1. Click the Advanced Commands tab and expand the GAP section. Scroll down the list until you find the GAPBondMgr_SetParameter command. Click on the command to display the parameters below.
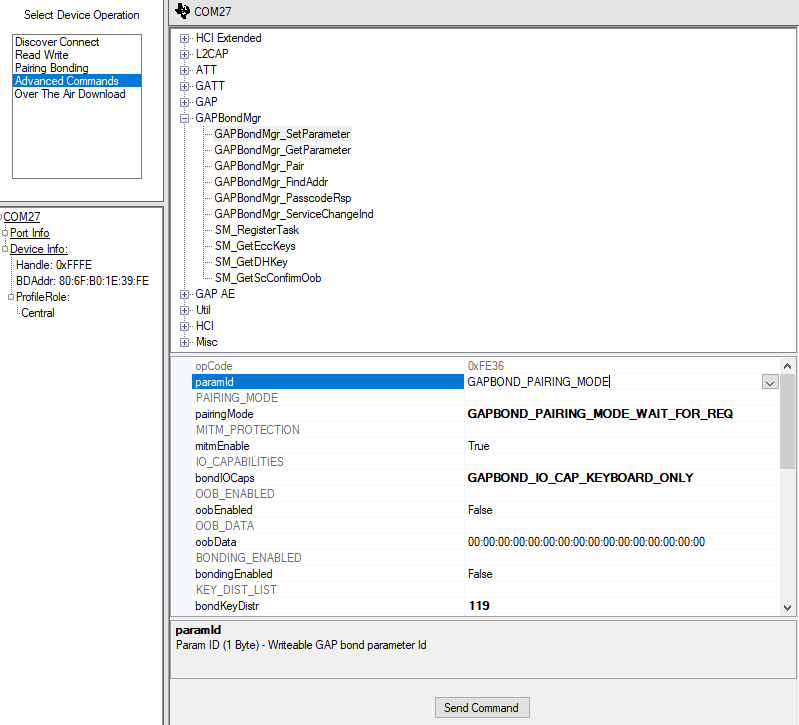
2. In the paramID field, select GAPBOND_IO_CAPABILITIES. In the bondIOCaps field, select GAPBOND_IO_CAP_KEYBOARD_ONLY. Hit the "Send Command" button to set this parameter in the GAP Bond Manager.
2. In the paramID field, select GAPBOND_PAIRING_MODE. In the pairingMode field, select GAPBOND_PAIRING_MODE_WAIT_FOR_REQ. Hit the "Send Command" button to set this parameter in the GAP Bond Manager.
3. Use BTool to discover and connect to Project Zero.
4. In the Pairing/Bonding tab, select "Authentication Enabled", and initiate pairing. Hit the "Send Pairing Request" button to trigger a pairing request.
In the serial monitor of Project zero, the password will be shown.

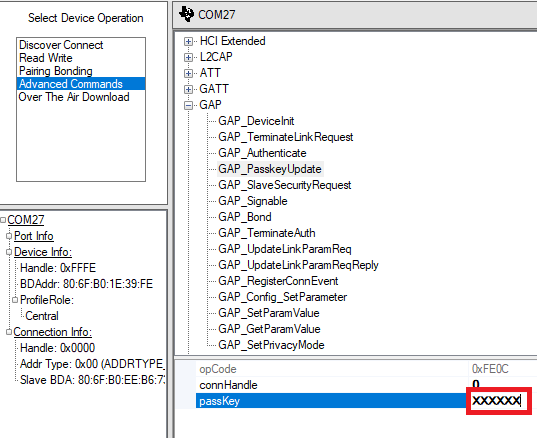
Now insert this password into the Passkey field in Btool, and Send Passkey. If the Passkey field does not show up you can send the GAP_PasskeyUpdate manually as shown below:
The serial monitor will then show "Pairing success" to indicate a successfully encrypted connection.

1. Connect to Project Zero using LightBlue Explorer.
2. Find the Characteristic with the Data Service String Characteristic UUID. (F0001131-0451-4000-B000-00...)
3. Click on the Characteristic with the Data Service String Characteristic UUID.
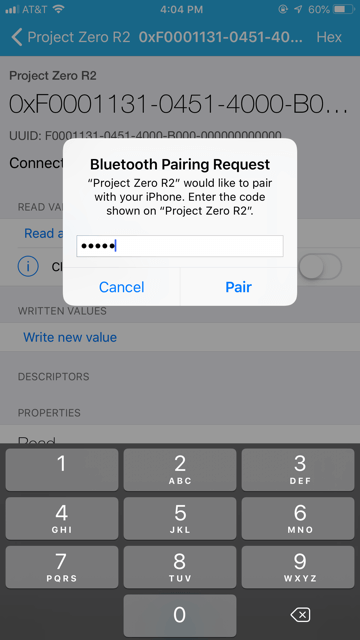
4. Now a window asking you to pair the devices will pop up. This time, a passkey entry field will appear. Check the ProjectZero terminal window for the random passcode. Accept the pairing prompt by typing the code in the passkey box. When the pairing process has completed, the Project Zero terminal window will display "Pairing success".
5. Click "Read Again". This time, a value will display under "Cloud Connect". Click "Hex" in the top right corner of the app. Now you can switch between display formats. Select UTF-8 to see the value as a string.
1. Connect to Project Zero using BLE Scanner
2. Read the Encrypted Data Service String Characteristic as done in Task 2.
3. Now a window asking you to pair the devices will pop up. This time, a passkey entry field will appear. Check the ProjectZero terminal window for the random passcode. Accept the pairing prompt by typing the code in the passkey box as presented in the Project Zero terminal window.


4. When the pairing process has completed, the Project Zero terminal window will display "Pairing success" and you will be able to read your Encrypted Characteristic as in Task 2.
Task 4 – Enable Bonding
For this exercise, we will continue to use Passkey Entry pairing. Enabling bonding will allow us to bypass the pairing process in future connections. The Controller can use the stored keys supplied by the Host to start encryption.
1. Open SysConfig → BLE → Bond Manager and enable Bonding.
2. Rebuild and flash Project Zero.
1. Use BTool to discover and connect to Project Zero
2. In the Pairing/Bonding tab, select "Bonding Enabled", "Authentication Enabled", and initiate pairing. Connect to Project Zero device. Send the passcode appearing in the serial window of Project Zero.
3. After receiving the "Bond Save Success" message in your Project Zero terminal window, enable notifications on the Button Service by writing "01:00" to the Button0 Client Characteristic Configuration handle in BTool.
4. Verify that notifications are being sent by pressing the right button on the LaunchPad and observing the Value of the Button0 State characteristic. When the button is pressed, the value should be 01. When the button is released, the value should be 0.
5. Disconnect from Project Zero.
7. Reconnect to the Project Zero device. Now you should receive a "WriteAttrCB (CCCD): param: 1 connHandle: 0 - restoring bonded state" message in your Project Zero terminal window.
8. Press a Button - notification will be sent without having to re-enable.
1. Connect to Project Zero using LightBlue Explorer.
2. Follow steps in Task 3 to pair with Project Zero using the Passkey Entry method.
3. After receiving the "Pairing success" message, disconnect from Project Zero.
4. Reconnect to Project Zero. This time, the Project Zero terminal window will display "Encryption success".
5. Read the Encrypted Data Service String Characteristic. This time, the value will display without needing to re-enter the passkey.
1. Connect to Project Zero using BLE Scanner
2. Follow steps in Task 3 to pair with Project Zero using the Passkey Entry method.
3. After receiving the "Pairing success" message, disconnect from Project Zero.
4. Reconnect to Project Zero. This time, the Project Zero terminal window will display a new message: "Encryption success".
5. Read the Encrypted Data Service String Characteristic. This time, the value will display without needing to re-enter the passkey.
Task 5 – Using a Resolvable Private Address
The addresses we generally use in privacy discussions are Resolvable Private Addresses (RPAs) and Identity Addresses. A device using an RPA periodically changes the address it uses over the air. This happens at a specified time interval. The addresses it uses are generated with an Identity Resolving Key (IRK). This key associates the Resolvable Private Address to the Identity Address. (The Identity Address never changes.)
RPAs help inhibit tracking from untrusted peer devices. However, some devices may need the ability to recognize, and be recognized by, their peer devices even after their RPA has changed. Since RPAs are associated with an identity address, they can be resolved to that fixed address by a peer device who has the right key.
Note
Most BLE5 projects enable RPA's by default, so this Task may not be necessary in other BLE5 projects.
Below, we will work on configuring the device to use an RPA and learn how to work with it. To enable RPAs in Project Zero:
1. Open SysConfig → BLE → General Configuration and enable RPAs under Address Mode.
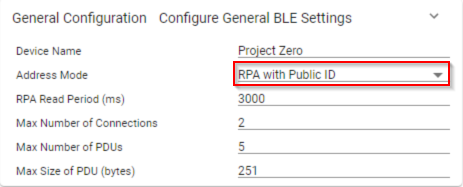
2. Rebuild and flash Project Zero.
You should now see RPAs enabled in the terminal window.

Optional: Change the RPA Interval
To change the timeout value between address changes, use GAP_SetParamValue() right below to set the GAP_PARAM_PRIVATE_ADDR_INT parameter. The value is in minutes:
//Set timeout value to 10 minutes
GAP_SetParamValue(GAP_PARAM_PRIVATE_ADDR_INT,10);
project_zero.c :: ProjectZero_init() – Modify address change interval
Congrats! You have created a Project Zero that cannot be tracked except by the phone you have bonded to. Look up device specific instructions to clear BLE bonding information from your phone if you wish to try this task again.
References
Bluetooth Core Specification Version 5.1
Apple Bluetooth Accessory Design Guidelines for Apple Products
This work is licensed under a Creative Commons Attribution-NonCommercial-NoDerivatives 4.0 International License.