Note
As of 2021, this document follows the Appropriate Language nomenclature directive from Bluetooth SIG. The SDK project names, APIs and code are not yet ported and use the old nomenclature. For details on how to correlate between the two, please open the PDF document Appropriate Language Mapping Tables.
Introduction
The purpose of this exercise is to introduce the user to the coexistence feature, and familiarize the user with how it is configured for a BLE device.
Task 0: Modify the Simple Peripheral Project
This task shows how to modify the BLE device description to display a different name when advertising.
Task 1: Coexistence Configuration
This task will describe how the coexistence feature is enabled and configured.
Task 2: Validate Configuration
This task will describe how the coexistence configuration can be validated.
Prerequisites
Hardware
For this lab, you need two Bluetooth-enabled development boards. Supported devices are:
- SimpleLink™ CC26x2R LaunchPad™
- SimpleLink™ CC1352R LaunchPad™
- SimpleLink™ CC1352P LaunchPad™
- SimpleLink™ CC2652RB LaunchPad™
Software
- CCS 10.3 or IAR 8.50.9 installed with support for CC13xx/CC26xx devices.
- SimpleLink™ CC13x2 and CC26X2 SDK 5.20
For testing, a Bluetooth client application is required:
- BTool (located in the
tools\ble5stackdirectory of the SimpleLink™ SDK installation) OR - Bluetooth mobile apps:
- Android: TI SimpleLink Starter - available on the Google Play store
- iOS: TI SimpleLink Starter - available on the App Store
Recommended reading
- Coexistence Chapter of the TI BLE5-Stack User's Guide
Getting started – Desktop
To later verify the coexistence (Coex) configuration, we need to set up the LaunchPad as a BLE peripheral device. We will use Simple Peripheral for this purpose. You can find Simple Peripheral in the SDK alongside other BLE5-Stack example projects.
Import the Simple Peripheral project into CCS. If you want to check that your peripheral
device (board loaded with the Simple Peripheral code) is advertising, you can flash the device with the
default project settings and use your phone with the the SimpleLink Starter
app (link at the section Prerequisites above) or another BLE Client app. Then, try to detect it in the list of available devices.
Note
If you need help, follow the instructions
in the Getting Started section of the Bluetooth low energy Fundamentals SimpleLink
Academy module. This module describes the use of Project Zero, but the approach
will be the same for Simple Peripheral.
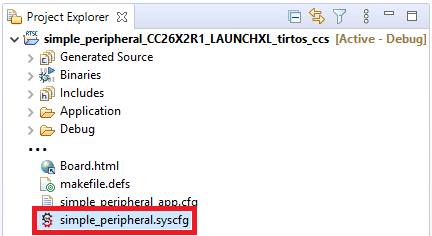
Task 0 – Modify the Simple Peripheral Project
When the Simple Peripheral project is imported into CCS, as described in Getting
Started, open the system configuration tool by double-clicking the
simple_peripheral.syscfg file.
The following describes how to change the name of the Simple Peripheral project, that is, how the advertisements are displayed in your BLE Client app. This will make it easier to verify the configuration later, and also verify that your setup is correct up until this point. If you are okay with the default settings of the Simple Peripheral project, skip to Task 1 now.
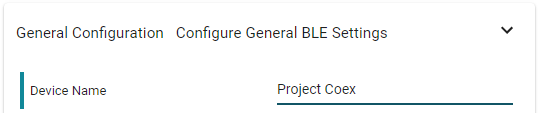
Select the BLE module in the left panel of the SysConfig tool. Change the device
name under General Configuration → Device Name. For this lab the device name
Project Coex is used.
When modifying the device name as in the above, you should also make sure the
advertisement data (at least when using Local Name) matches the device name.
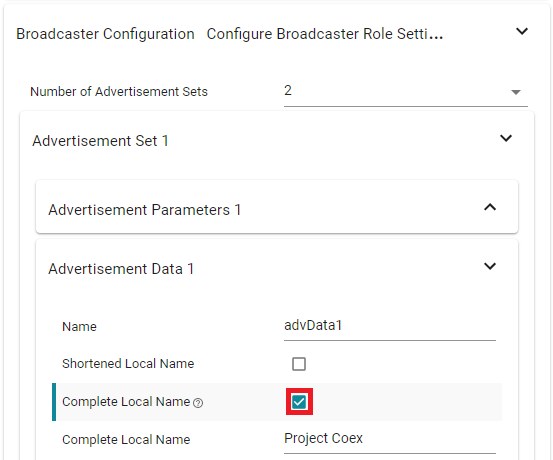
For this lab, to be sure of continuity, it is recommended to enable the use of
Complete Local Name for the advertisement data sets. For this, navigate to
Broadcaster Configuration → Advertisement Set [1,2] and under both Advertisement
Data and Scan Response Data you can enable the Complete Local Name option
and fill in the same name you chose for Device Name. In this lab we use
Project Coex.
With the above modifications saved, built and flashed to the device, you can scan the device with your preferred BLE Client application. You should see something similar to this:

Task 1 – Coexistence Configuration
If you are not familiar with wireless coexistence (Coex), or how the Coex feature
is implemented for the SimpleLink™ CC13x2_26x2 SDK, you should take a look
at the Coexistence section of the TI BLE5-Stack User's Guide.
To make sure you remember what you read about the feature, take a minute to verify what you know.
What is PTA?
What Coex role is supported for the BLE device?
What Coex modes does the BLE device support?
More than one answer is correct.
What is the idle level of an active low signal?
The option to enable coexistence can either be found by accessing the RF Driver module in the left panel directly, or by navigating in the BLE module → Radio → BLE Radio Configuration → Other Dependencies → Radio Frequency (RF) Driver. Enable coexistence, and take note of the default options.

Attention
When enabling RF Coexistence from the SysConfig RF driver (not under BLE), the define
USE_COEX should be added to the .opt file. This only applies, if attempting to enable
coex in a project that isn't Simple Peripheral or a project that doesn't utilize the
BLE module in SysConfig.
We are not going to change any of these default options, but notice that the Coex GRANT signal is defined with idle level High. This will be important later.
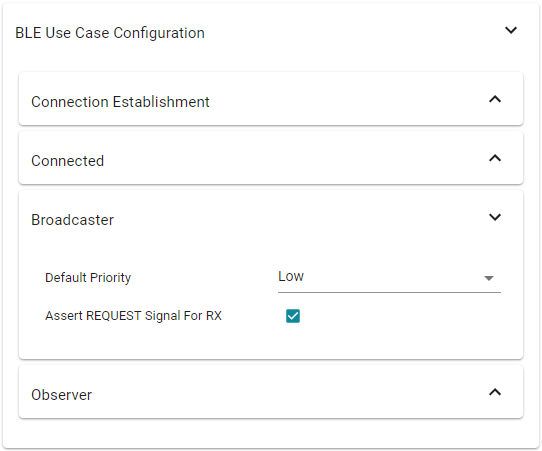
As for the option BLE Use Case Configuration, this provides the granularity to specify
custom behavior for the different BLE use cases; Connection establishment, Connected,
Broadcaster and Observer. For this lab it should stay as it is.
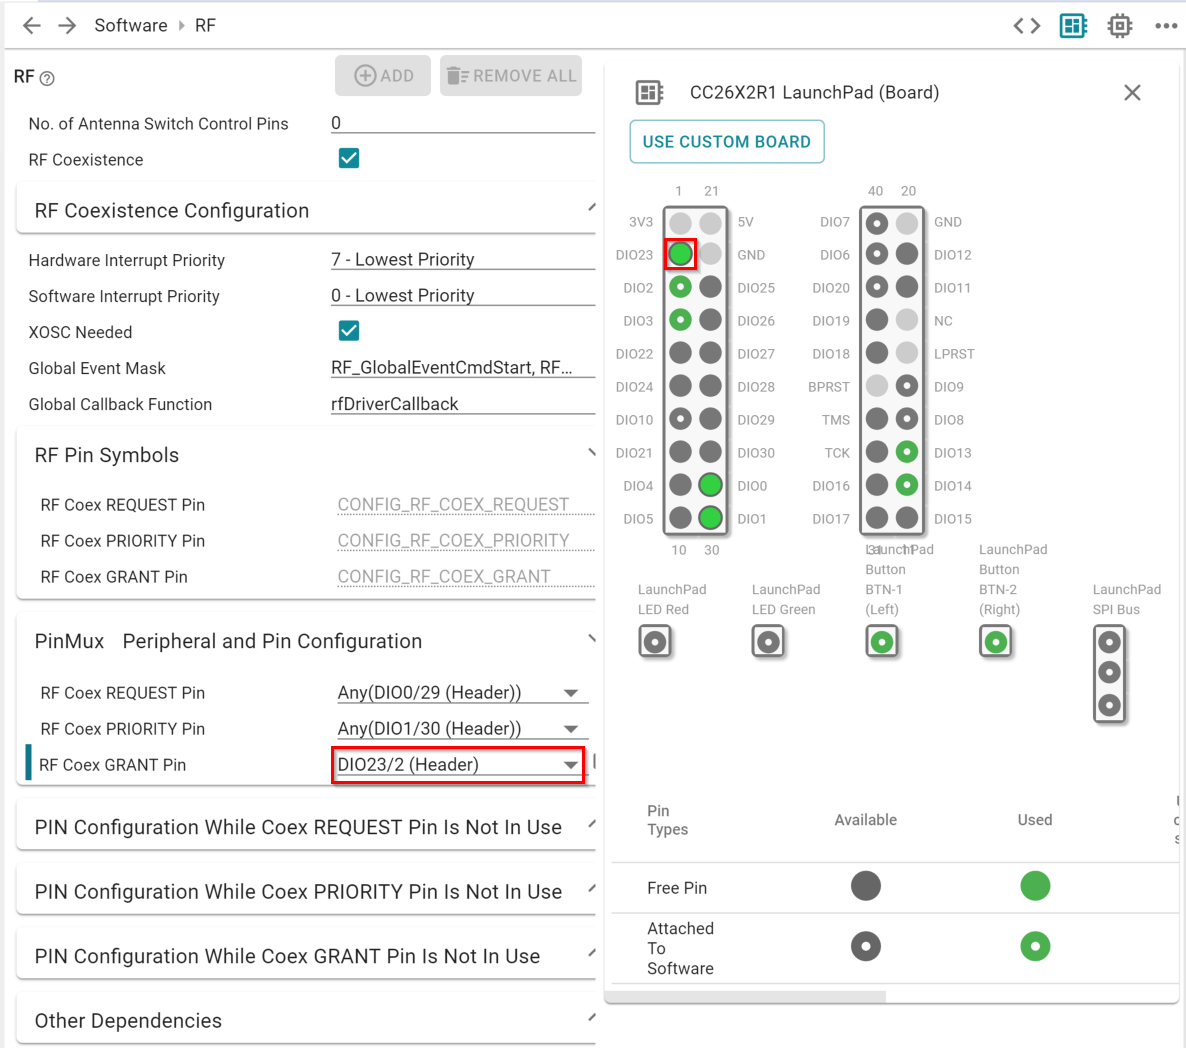
Because Coex Mode is set to 3-Wire, three pins are dedicated for the Coex
signaling. Which pins the REQUEST and PRIORITY signals are mapped to is not important
for this lab, but make sure the GRANT pin is next to GND. In this case, for the
CC26X2R, this will be DIO 23. To display the LaunchPad pin graphic, click on the
Show Board View button in the top right corner of the SysConfig window.
Remember to save the changes you have done to the simple_peripheral.syscfg,
build the project with the new changes, and flash the device.
Task 2 – Validate Configuration
The Coex configuration can be validated with the BLE Client scanner approach used
in Task 0. With the changes made in Task 1 built and flashed to the device, the
BLE Client scanner will show no evidence of the BLE device advertising anything.
That is, Project Coex (if you followed the steps of Task 0), is not visible in
any scan list.
As stated in the Coexistence Chapter of the TI BLE5-Stack User's Guide,
the BLE device is expecting an active GRANT signal to advertise. Without such a
confirmation signal, nothing will happen. This is because the BLE device is
configured for 3-Wire Coex, and the device pins are not wired to any Coex Central
device. Notice that if we configure the Coex mode to be 1-Wire REQUEST, the GRANT
signal would not be in use, and the BLE device would be free to advertise regardless
of any pin connection.
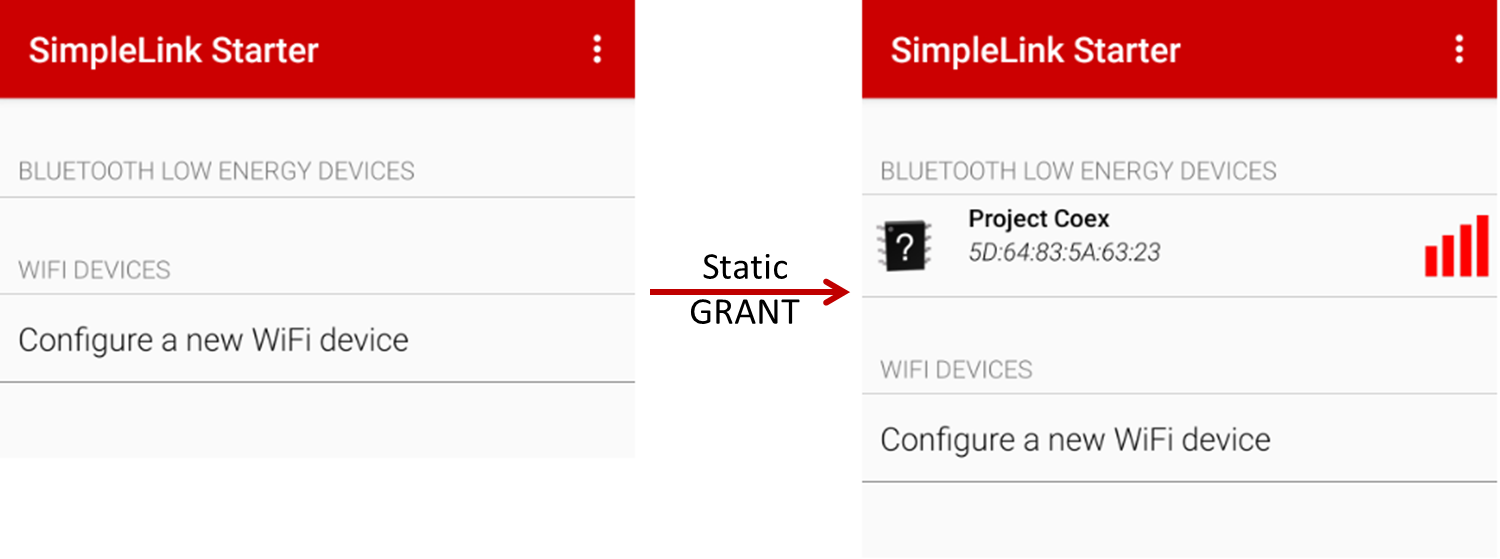
To validate the configuration, and overcome the issue with a missing Coex Central, we can hard-wire the GRANT pin to either the 3V3 or the GND header pin.
Which LaunchPad pin can act as a static active GRANT signal?
Hint: The GRANT signal, in this lab, is configured as active low (i.e. idle level high).
If you have configured the coexistence interface as specified in Task 1, the GRANT signal should be set to idle level high. This means that the GRANT pin can be connected to GND to provide the BLE device with a static active GRANT signal. When the GRANT signal is mapped to a pin next to the GND pin, one of the LaunchPad jumpers not in use (e.g. one of the LED jumpers) can be used to bridge the gap between the GRANT pin and the GND pin. See the illustration image below.
Attention
Make sure you disconnect the power to your device before you make any changes to physical connections of the device header pins.

By moving a jumper to hard-wire a static GRANT signal to the BLE device, you can again check your BLE Client application, and verify that the device is visible in the scan list.
Great!
You now know how to enable the coexistence feature for your BLE device!
Debugging
The coexistence feature relies on signal mapping to device pins. If you have a logic analyzer available, you can connect this to the Coex pins as you have mapped them in SysConfig (described in Task 1). With this you are able to validate your configuration, and analyze the signal behavior. The trace output from this will be similar to the timing diagram in the Coexistence Chapter of the TI BLE5-Stack User's Guide.
References
Bluetooth low energy Fundamentals
This work is licensed under a Creative Commons Attribution-NonCommercial-NoDerivatives 4.0 International License.