Introduction
This module guides you in developing Angle of Arrival (AoA) Bluetooth 5.1 compatible locators. In a localization system, the locators are the devices performing localization of the target devices.
It is assumed the reader has one or several Bluetooth 5.1 compatible AoA targets. The lab Bluetooth Low Energy Angle of Arrival (AoA) for target devices shows how to build such targets using TI devices. In addition, it is assumed that the reader has a basic knowledge of embedded C tool chains , general C and Python programming concepts.
Note
It should be understood that an actual end product implementation incorporating AoA direction finding locator capabilities requires advanced knowledge and further integration that would not ordinarily be required in a product using Bluetooth LE for communication purposes. Some of the challenges that may be required to address with AoA in their locator product include, but are not limited to, the following:
- Embedded or system-level algorithms to achieve desired localization performance/angular accuracy while mitigating the presence of undesired signals (e.g. multi-path reception) in various operating environments
- Antenna design to match the end product’s industrial design constraints and/or performance expectations
This lab shows how to leverage the code examples and tools provided within the SimpleLink™ CC13X2 / CC26X2 SDK to collect Bluetooth 5.1 compliant IQ data that can be used to calculate signal's Angle of Arrival (AoA).
Prerequisites
Hardware required
This module requires two SimpleLink™ CC26x2R LaunchPad™ and one antenna board.
Bluetooth 5.1 AoA requires the locator to perform antenna switching to collect data that can be used for AoA calculation. Antenna switching is performed by successively connecting different antennas to the device's radio. The antennas and the electronics allowing their successive connection is usually called antenna board. This lab can be completed with any antenna board, as long as the selection of the antenna connected to the device's radio is done by a set of GPIOs. This lab could even be completed without antenna board. In that case you will still be able to collect IQ data but will note be able to calculate AoA due to there is no phase difference on the receiving signal.
Recommended reading
These chapters in the TI BLE5-Stack User's Guide
- TI BLE5-Stack Quick Start
- The CC13x2 or CC26x2 SDK Platform
- Application
- BLE5-Stack (especially the sections dedicated to periodic advertising)
- RTLS Toolbox
Software for desktop development
- SimpleLink CC13X2-26X2 SDK 5.20 and those listed under the Dependencies section of the CC13x2-26x2 SDK Release Notes
- A working Python 3.7 environment with the packages required by the RTLS Node Manager
If you are missing one of these, please read the next section. Otherwise, you can directly start the Task 1.
Install required Software
Install the CC13X2 / CC26X2 SDK
The following steps will install the SDK and all its dependencies.
- Download the SimpleLink™ CC13X2 / CC26X2 SDK
- Run the SimpleLink CC13X2 / CC26X2 SDK installer.
The SDK with TI-RTOS included is installed at <SIMPLELINK_CC13X2_26X2_SDK_INSTALL_DIR>
which defaults to C:\ti\simplelink_cc13x2_26x2_sdk_x_xx_xx_xx.
Install Python 3.7
The following steps will install Python 3.7 and all the packages required by the RTLS Node Manager.
- Install Python 3.7 from the Python Download page.
- Setup the Python environment as described in the README.md in <SimpleLink CC13X2 / CC26X2 SDK> → tools → ble5stack → rtls_agent folder.
- If a bash environment doesn't exist on your system, install Git bash
Task 0 – Goals setting
Let's take a moment to understand what we need to do.
The goal is to enable a device to be located using Bluetooth 5.1 Angle of Arrival (AoA). This device will then be called target. For this lab, the locator - i.e. the device locating the target - will be considered as already implemented.
Bluetooth 5.1 AoA requests the target to send out packet with an appended Constant Tone Extension (CTE). The constant tone extension is a section of consecutive 1's without whitening. In the Bluetooth Core Specification Version 5.1, both connection packets and periodic advertising packets can contain a constant tone extension (CTE) after the CRC. When CTEs are appended to connection packets, we talk about connection AoA. When CTEs are appended to periodic advertising packets, we talk about connectionless AoA.
In this lab, we will enable the locator to collect IQ data for both connection and connectionless AoA.
Task 1 – Prepare the locator
A CC26x2R LaunchPad™ is used as locator. In general, using an antenna board requires to configure the launchpad to use an external antenna. The required steps to do so are described in the Step 1. If you have already properly configured the launchpad or if you do not need to use external antenna, you can directly go to the Step 2.
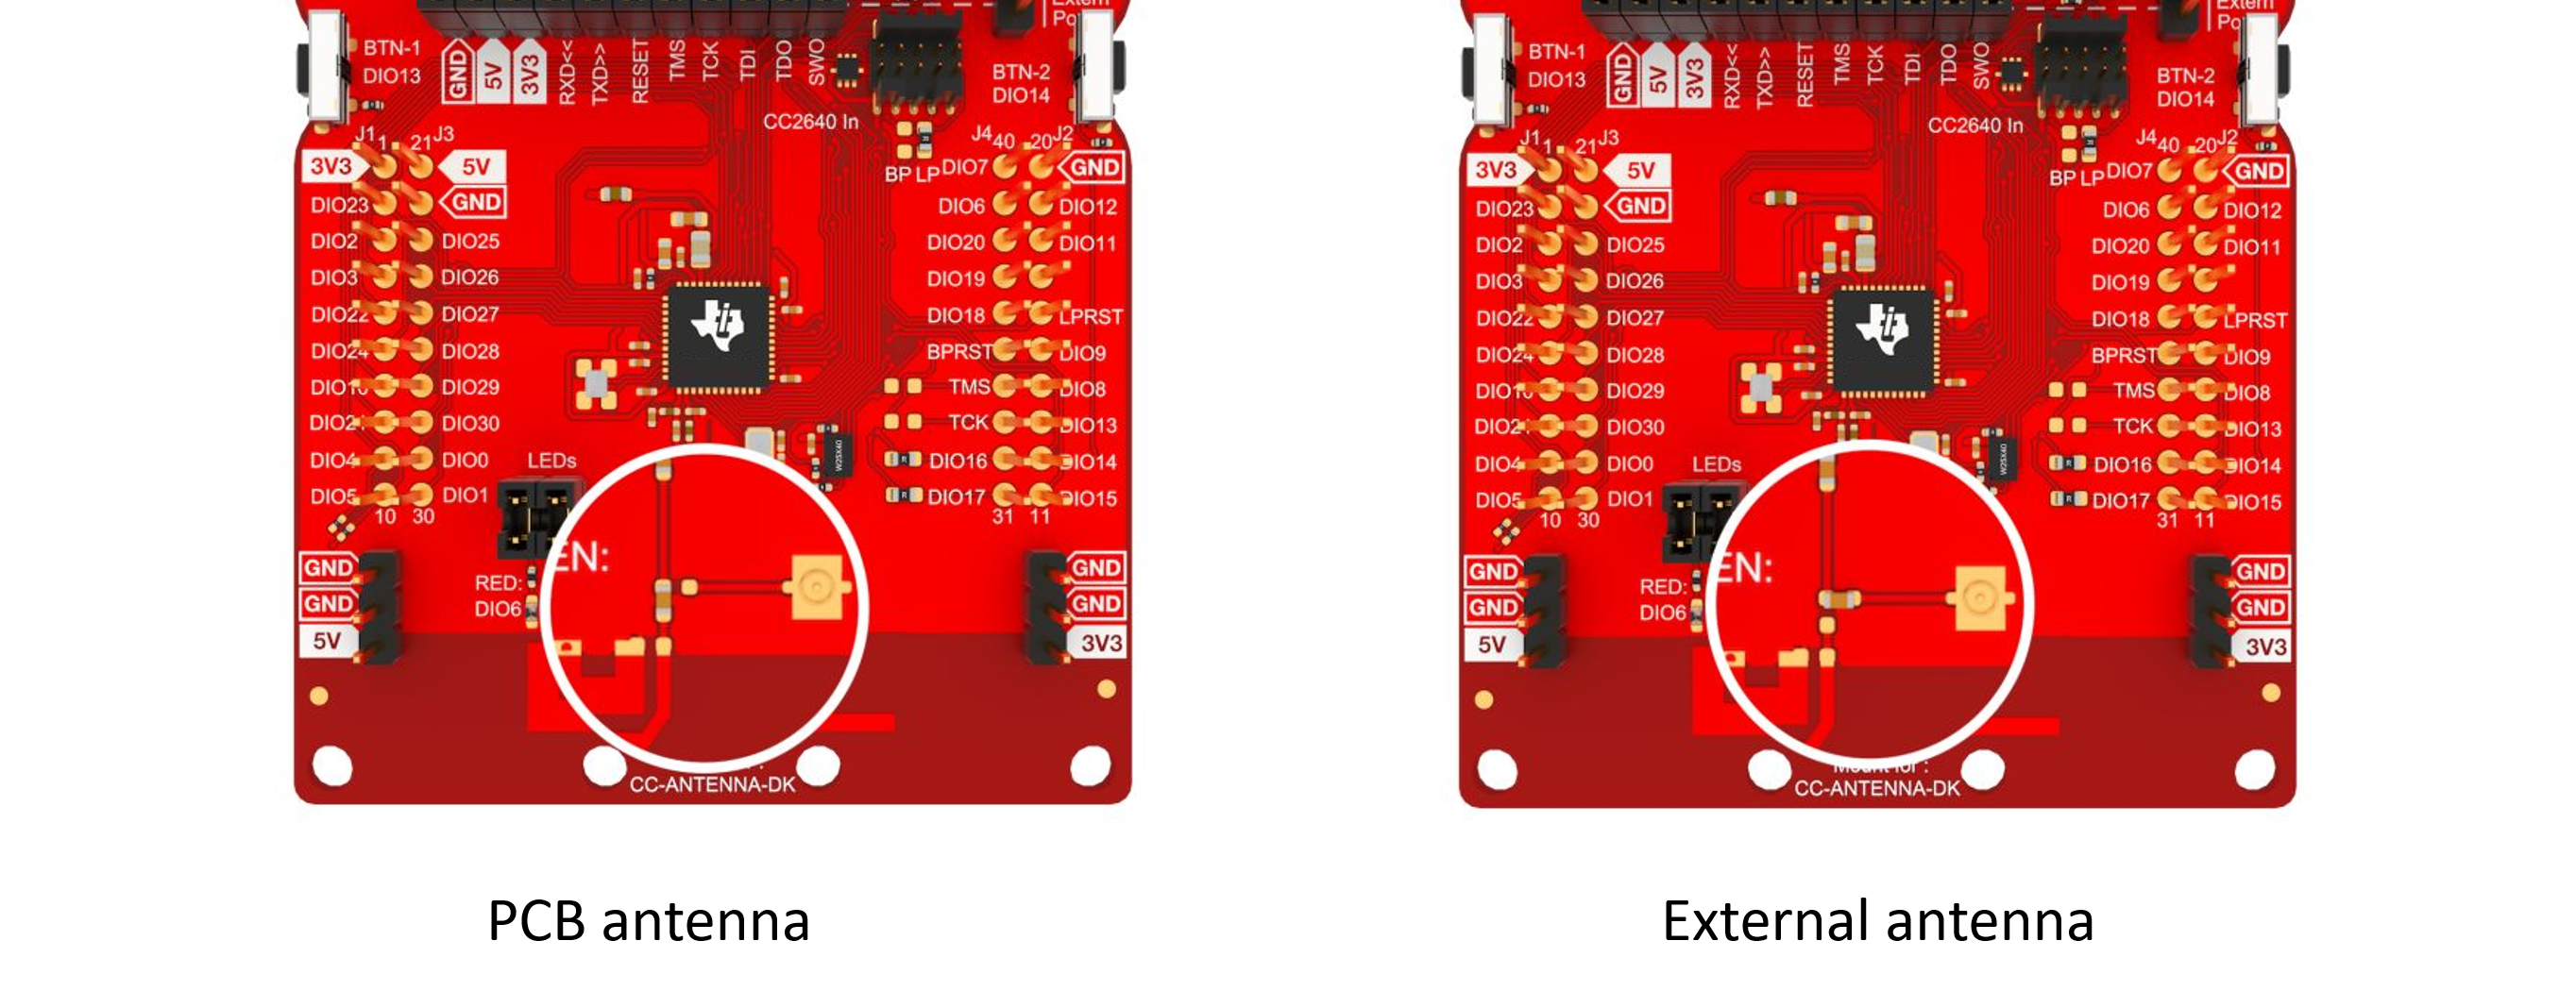
Step 1 – Setup the CC26x2R LaunchPad to use external antenna
- Flip the capacitor as shown on the image below:
Use a JSC cable from the LaunchPad JSC connector to the antenna board JSC connector.
Connect the GND, +3.3V, +5V and GPIOs of the antenna board to the corresponding signals on the LaunchPad.
Step 2 – Prepare the rtls_coordinator project
The rtls_coordinator project available in <SimpleLink CC13X2 / CC26X2 SDK>
→ examples → rtos → CC26X2R1_LAUNCHXL → ble5stack →
rtls_coordinator can be directly leveraged.
- Open CCS.
- Import the
rtls_coordinatorproject. - Build the project
Step 3 – Configure the rtls_coordinator project for your antenna board
Before going further, let's verify the GPIO configuration of the BLEStack matches the antenna board used.
1 – In CCS, in the rtls_coordinator project, open the file
iCallBLE → ble_user_config.c
In ble_user_config.c, the following code is used to control
the antennas.
// Antenna board configurations (example for a 12-antenna board)
// Maximum number of antennas
#define ANTENNA_TABLE_SIZE 12
// BitMask of all the relevant GPIOs which needed for the antennas
#define ANTENNA_IO_MASK  BV(27)|BV(28)|BV(29)|BV(30)

// Antenna GPIO configuration (should be adapted to the antenna board design)
antennaIOEntry_t antennaTbl[ANTENNA_TABLE_SIZE] = {
                                   0,                        // antenna 0 GPIO configuration (all GPIOs in ANTENNA_IO_MASK are LOW)
                                   BV(28),                   // antenna 1
                                   BV(29),                   // antenna 2
                                   BV(28) | BV(29),          // antenna 3
                                   BV(30),                   // antenna 4
                                   BV(28) | BV(30),          // antenna 5
                                   BV(27),                   // antenna 6
                                   BV(27) | BV(28),          // antenna 7
                                   BV(27) | BV(29),          // antenna 8
                                   BV(27) | BV(28) | BV(29), // antenna 9
                                   BV(27) | BV(30),          // antenna 10
                                   BV(27) | BV(28) | BV(30)  // antenna 11
};
In the code snippet, the rtls_coordinator considers
it has 12 antennas (see ANTENNA_TABLE_SIZE) at its disposal that can be
controlled using the GPIOs 27, 28, 29 and 30 (see the mask ANTENNA_IO_MASK).
In addition, the antennaTbl gives the following truth table:
| GPIO 27 | GPIO 28 | GPIO 29 | GPIO 30 | Antenna selected |
|---|---|---|---|---|
| 0 | 0 | 0 | 0 | antenna 0 (antenna used for all RF operations) |
| 0 | 1 | 0 | 0 | antenna 1 |
| 0 | 0 | 1 | 0 | antenna 2 |
| 0 | 1 | 1 | 0 | antenna 3 |
| 0 | 0 | 0 | 1 | antenna 4 |
| 0 | 1 | 0 | 1 | antenna 5 |
| 1 | 0 | 0 | 0 | antenna 6 |
| 1 | 1 | 0 | 0 | antenna 7 |
| 1 | 0 | 1 | 0 | antenna 8 |
| 1 | 1 | 1 | 0 | antenna 9 |
| 1 | 0 | 0 | 1 | antenna 10 |
| 1 | 1 | 0 | 1 | antenna 11 |
2 –. Modify the value of ANTENNA_TABLE_SIZE, ANTENNA_IO_MASK and
antennaTbl based on the antenna board you are using.
If you run this lab without using an antenna board you can keep
the default configuration.
Step 3 – Flash the locator with the rtls_coordinator example
- (If not already done) Build the
rtls_coordinatorproject. - Flash the project on the CC26x2R LaunchPad™.
- Reset the device (by pressing the reset button on the launchpad)
You're done! By default, the rtls_coordinator project supports both connection and
connectionless AoA.
- when in a connection, the
rtls_coordinatorcan require the other device to append a CTE to the connection packets. - the
rtls_coordinatorcan synchronize with periodic advertisements
In both cases, when the rtls_coordinator receives a packet with an appended
CTE, it will perform antenna switching and extract IQ data from it.
The data collected will then be report to the host computer.
Time to power up the target!
In the upcomming task, the locator needs a target to locate. If the target is not yet ready, please review the lab Bluetooth Low Energy Angle of Arrival (AoA) for target devices
Task 2 – Run the non-visual demo
For this task, we use the python scripts provided in the SimpleLink CC13X2-26X2 SDK to sample the CTEs sent by the target and collect IQ data.
Details for connection AoA are provided in Option 1. Details for connectionless AoA are provided in Option 2. Both steps are independant. Please follow the steps for the type of AoA used by the target. If you are using the out of the box examples, both connection and connectionless AoA are enabled. So you can successively experiment both options.)
How to find the COM port used by the rtls_coordinator?
- Un-plug all the launchpads attached to the computer expect the
one flashed with the
rtls_coordinatorexample. - Open the Device Manager
- Review the menu "Ports COM & LPT" to find the COM port used
by the Application/User UART.

Option 1 – For connection AoA
- Open the file <SimpleLink CC13X2 / CC26X2 SDK> → tools → ble5stack → rtls_agent → examples → rtls_connected.py with a text editor.
Modify the COM port used for the
rtls_coordinatorcoordinator_comport="COM27",- Save the changes and close the file.
Open a terminal. Move to the directory <SimpleLink CC13X2 / CC26X2 SDK> → tools → ble5stack → rtls_agent → examples.
cd <rtls_agent folder>/examplesRun the python script named
rtls_connected.pyc:\Python37\python.exe rtls_connected.py
The script will let the rtls_coordinator and the target form
a connection. Once the connection formed, the rtls_coordinator asks the
target to append a CTE to some connection packets. If the CTE is
properly appended, the rtls_coordinator reports IQ data (extracted from the
CTE).
In the console, the python script displays messages telling you some IQ data is available.
[08:03:2021 10:02:54:421870] : Added new set of IQ into C:\ti\simplelink_cc13x2_26x2_sdk_5_20_00_52\tools\b   le5stack\rtls_agent\examples\rtls_connected_log\rtls_raw_iq_samples_806fb01e55f7_0_loop1.csv
[08:03:2021 10:02:54:786872] : Added new set of IQ into C:\ti\simplelink_cc13x2_26x2_sdk_5_20_00_52\tools\b   le5stack\rtls_agent\examples\rtls_connected_log\rtls_raw_iq_samples_806fb01e55f7_0_loop1.csv
The Python script creates a log file and a .csv file containing the IQ data. By default, these files are stored in <SimpleLink CC13X2 / CC26X2 SDK> → tools → ble5stack → rtls_agent → examples → rtls_connected_log and are named after the date and time the script get executed.
Here how the .csv file should looks like
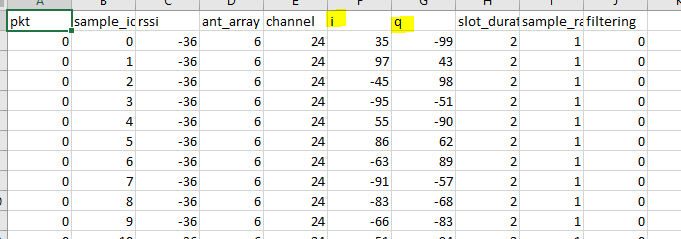
Here are a line in the log file showing the
rtls_coordinatorreports some IQ data[2021-08-03 10:02:53,798] root - INFO - COORDINATOR : 80:6F:B0:1E:55:F7 --> {'type': 'Event', 'command': 'RTLS_CMD_AOA_RESULT_RAW', 'payload': {'connHandle': 0, 'rssi': -36, 'antenna': 1, 'channel': 24, 'offset': 0, 'samplesLength': 45, 'samples': [{'i': 35, 'q': -99}, {'i': 97, 'q': 43}, {'i': -45, 'q': 98}, {'i': -95, 'q': -51}, {'i': 55, 'q': -90}, {'i': 86, 'q': 62}, {'i': -63, 'q': 89}, {'i': -91, 'q': -57}, {'i': -83, 'q': -68}, {'i': -66, 'q': -83}, {'i': -51, 'q': -94}, {'i': -31, 'q': -103}, {'i': -30, 'q': -102}, {'i': -11, 'q': -108}, {'i': 8, 'q': -106}, {'i': 17, 'q': -106}, {'i': 38, 'q': -98}, {'i': 53, 'q': -91}, {'i': 64, 'q': -87}, {'i': 66, 'q': -83}, {'i': 81, 'q': -71}, {'i': 93, 'q': -50}, {'i': 97, 'q': -41}, {'i': 104, 'q': -25}, {'i': 107, 'q': -8}, {'i': 107, 'q': 5}, {'i': 104, 'q': 18}, {'i': 97, 'q': 47}, {'i': 94, 'q': 53}, {'i': 80, 'q': 71}, {'i': 77, 'q': 74}, {'i': 66, 'q': 86}]}}
Option 2 – For connectionles AoA
- Open the file <SimpleLink CC13X2 / CC26X2 SDK> → tools → ble5stack → rtls_agent → examples → rtls_connectionless.py with a text editor.
Modify the COM port used for the
rtls_coordinatorcoordinator_comport="COM27",- Save the changes and close the file.
Open a terminal. Move to the directory <SimpleLink CC13X2 / CC26X2 SDK> → tools → ble5stack → rtls_agent → examples.
cd <rtls_agent folder>/examplesRun the python script named
rtls_connectionless.pyc:\Python37\python.exe rtls_connectionless.py
The script will let the rtls_coordinator synchronize with the periodic
advertisements sent by the rtls_responder. Once the synchronization
established the rtls_coordinator samples the CTE appended to the
periodic advertisement packets and report the IQ data.
In the console, the python script displays messages telling you some IQ data is available.
[08:03:2021 09:57:17:289245] : Added new set of IQ into C:\ti\simplelink_cc13x2_26x2_sdk_5_20_00_52\tools\ble5stack\rtls_agent\examples\rtls_connectionless_log\rtls_raw_iq_samples_806fb01e55f7_0_loop1.csv
[08:03:2021 09:57:17:524198] : Added new set of IQ into C:\ti\simplelink_cc13x2_26x2_sdk_5_20_00_52\tools\ble5stack\rtls_agent\examples\rtls_connectionless_log\rtls_raw_iq_samples_806fb01e55f7_0_loop1.csv
The Python script creates a log file and a .csv file containing the IQ data. By default, these files are stored in <SimpleLink CC13X2 / CC26X2 SDK> → tools → ble5stack → rtls_agent → examples → rtls_connectionless_log and are named after the date and time the script get executed.
Here how the .csv file should looks like
Here are a line in the log file showing the
rtls_coordinatorreports some IQ data[2021-08-03 09:57:17,134] root - INFO - COORDINATOR : 80:6F:B0:1E:55:F7 --> {'type': 'Event', 'command': 'RTLS_CMD_CL_AOA_RESULT_RAW', 'payload': {'syncHandle': 0, 'rssi': -35, 'antenna': 1, 'channel': 17, 'offset': 0, 'samplesLength': 45, 'samples': [{'i': 122, 'q': -17}, {'i': 19, 'q': 119}, {'i': -119, 'q': 5}, {'i': 11, 'q': -120}, {'i': 121, 'q': 22}, {'i': -26, 'q': 117}, {'i': -113, 'q': -37}, {'i': 46, 'q': -111}, {'i': 59, 'q': -102}, {'i': 93, 'q': -75}, {'i': 106, 'q': -54}, {'i': 120, 'q': -10}, {'i': 118, 'q': 20}, {'i': 106, 'q': 56}, {'i': 85, 'q': 84}, {'i': 62, 'q': 103}, {'i': 25, 'q': 118}, {'i': 2, 'q': 122}, {'i': -42, 'q': 115}, {'i': -60, 'q': 104}, {'i': -96, 'q': 73}, {'i': -114, 'q': 41}, {'i': -121, 'q': 6}, {'i': -115, 'q': -30}, {'i': -103, 'q': -60}, {'i': -87, 'q': -84}, {'i': -64, 'q': -100}, {'i': -32, 'q': -112}, {'i': 4, 'q': -116}, {'i': 43, 'q': -109}, {'i': 63, 'q': -100}, {'i': 98, 'q': -65}]}}
You have collected your first IQ data!
Well done! Let's now see how to modify the python script!
Task 3 – Change the antenna switching pattern
In this task we look into the scripts rtls_connected.py and
rtls_connectionless.py.
Guided tour
Let's start with the
main()function.The first lines of the function help script configuration.
Here is for connection AoA:
example = RtlsConnectedExample(
    coordinator_comport="COM27",  # "/dev/cu.usbmodemL1100KKT1",
    passive_comports=[],  # ['COM19']
    responder_bd_addrs=[],  # ['80:6F:B0:1E:39:02', '80:6F:B0:1E:38:C3']
    scan_time=10,
    connection_interval=100,
    angle_of_arrival=True,
    angle_of_arrival_params={
        'enable_filter': True,
        'slot_duration': 2,
        'sample_rate': 1,
        'sample_size': 1,
        'cte_length': 20,
        'cte_interval': 2
    },
    data_collection_duration=30,
    data_collection_iteration=1,
    post_analyze_func=post_analyze_of_IQ_data
)
Here is for connectionless AoA:
example = RtlsConnectionlessExample(
    coordinator_comport="COM27",
    responder_bd_addrs=[],  # ['80:6F:B0:1E:39:02', '80:6F:B0:1E:38:C3']
    scan_time=10,
    sync_params={
        'sync_skip': 0
    },
    use_advertiser_list=True,
    start_periodic_advertise_report_on_sync=False,
    periodic_advertise_report=False,
    angle_of_arrival=True,
    angle_of_arrival_params={
        'enable_filter': True,
        'slot_duration': 2,
        'sample_rate': 1,
        'sample_size': 1,
    },
    data_collection_duration=30,
    data_collection_iteration=1,
    post_analyze_func=post_analyze_of_IQ_data
)
These allow to select:
- the COM port used to communicate with the
rtls_coordinator - the COM port used to communicate with the
rtls_passive(not used for connectionless AoA as this mode does not defines the passive role) - the addresses of the devices to connect/synchronize with. If left blank all the devices found will be connected/synchronized.
- the duration of the scanning phases (for connection/synchronization of the devices)
- the connection interval (connection AoA only / not used for connectionless AoA as no connection is formed)
- if IQ data collection for AoA should be enabled (cf. boolean
angle_of_arrival) - the parameters used AoA data collection
- enable_filter, if set to true only the samples collected during sampling slots are reported. Otherwise, all the samples (including the ones sampled during switching slots are reported)
- slot_duration, length of the sampling slots (1 or 2 us)
- sample_rate, sampling rate (1, 2, 3 or 4 MHz)
- sample_size, 1 or 2 bytes
- cte_length, length in 16us units of the CTEs requested by the central locator (connection AOA only)
- cte_interval, interval (in number of connection events) between two CTE requests (connection AOA only)
- the duration of the IQ data collection before analyze
- the number of data collections iterations to run
- the function to trigger once the data collection is done
- the COM port used to communicate with the
The rest of the main does the following:
- run devices initialization
- let the locator(s) connect/synchronize with the target
- run the data collection and the post analyze in a loop
- eventually close the connection/synchronization and exit
The comments in the code should help understanding:
# Perform initialization of RTLS Util, setup devices and reset them
# Parameters used: coordinator_comport, passive_comports
if example.initialize():

    # Perform Scan and Connect with required responders
    # Parameters used: responder_bd_addrs, scan_time, connection_interval
    if example.scan_and_connect():

        # Execute next action in loop
        # Parameters used: data_collection_iteration
        for example.current_iteration in range(example.data_collection_iteration):
            # Start RSSI vs Channel report (if enabled)
            # Parameters used: continues_connection_info
            example.start_continues_connection_info()

            # Start Angle of Arrival report (if enabled)
            # Parameters used: angle_of_arrival, angle_of_arrival_params
            example.start_angle_of_arrival()

            # Example start all inner threads for result collecting and sleep for data_collection_duration
            # Parameters used: data_collection_duration
            example.sleep()

            # Stop RSSI vs Channel report (if enabled)
            # Parameters used: continues_connection_info
            example.stop_continues_connection_info()

            # Stop Angle of Arrival report (if enabled) and analyze collected data using post_analyze_func
            # Parameters used: angle_of_arrival, post_analyze_func
            example.stop_angle_of_arrival()

        # Disconnect from all connected responders
        example.disconnect()

# Close all open inner threads of RTLS Util
example.done()
Here is for connectionless AoA:
# Perform initialization of RTLS Util, setup devices and reset them
# Parameters used: coordinator_comport, passive_comports
if example.initialize():

    # Perform Scan and Sync with required responders
    # Parameters used: responder_bd_addrs, scan_time, sync_params, use_advertiser_list, start_periodic_advertise_report_on_sync
    if example.scan_and_sync():

        # Execute next action in loop
        # Parameters used: data_collection_iteration
        for example.current_iteration in range(example.data_collection_iteration):
            # Start RSSI vs Channel, TX Power amd Data report (if enabled)
            # Parameters used: periodic_advertise_report
            example.start_periodic_advertise_report()

            # Start Angle of Arrival report (if enabled)
            # Parameters used: angle_of_arrival, angle_of_arrival_params
            example.start_angle_of_arrival()

            # Example start all inner threads for result collecting and sleep for data_collection_duration
            # Parameters used: data_collection_duration
            example.sleep()

            # Stop RSSI vs Channel, TX Power amd Data report (if enabled)
            # Parameters used: continues_connection_info
            example.stop_periodic_advertise_report()

            # Stop Angle of Arrival report (if enabled) and analyze collected data using post_analyze_func
            # Parameters used: angle_of_arrival, post_analyze_func
            example.stop_angle_of_arrival()

        # Disconnect from all synced responders
        example.disconnect()

# Close all open inner threads of RTLS Util
example.done()
The second piece of code that need your attention is the function
_angle_of_arrival. This function configures directly the way the IQ samples will be collected. It inherits some of the parameters from themainfunction.Here is for connection AoA:
aoa_params = { "aoa_run_mode": "AOA_MODE_RAW", "aoa_cc26x2": { "aoa_slot_durations": self.angle_of_arrival_params.get('slot_duration', 2), "aoa_sample_rate": self.angle_of_arrival_params.get('sample_rate', 1), "aoa_sample_size": self.angle_of_arrival_params.get('sample_size', 1), "aoa_sampling_control": int( '0x10' if self.angle_of_arrival_params.get('enable_filter', True) else '0x11', 16), "aoa_sampling_enable": 1, "aoa_pattern_len": 36, "aoa_ant_pattern": [0, 1, 2, 3, 4, 5, 0, 1, 2, 3, 4, 5, 0, 1, 2, 3, 4, 5, 6, 7, 8, 9, 10, 11, 6, 7, 8, 9, 10, 11, 6, 7, 8, 9, 10, 11] } }aoa_run_mode, keep it as it,AOA_MODE_RAWis the only mode availableaoa_sample_rate,aoa_sample_size,aoa_sampling_controlare set in themainfunctionaoa_sampling_enable, should be kept to 1 (if not IQ sampling is not enabled)aoa_slot_durations,aoa_pattern_lenis the length of the pattern set right afteraoa_ant_patternis the antenna switching pattern the locator will use. The antenna numbers corresponds to the antenna numbers we set before in theble_user_config.c.
Here is for connectionless AoA:
aoa_params = { "cl_aoa_role": "AOA_COORDINATOR", "cl_aoa_result_mode": "AOA_MODE_RAW", "cl_aoa_slot_durations": self.angle_of_arrival_params.get('slot_duration', 2), "cl_aoa_sample_rate": self.angle_of_arrival_params.get('sample_rate', 1), "cl_aoa_sample_size": self.angle_of_arrival_params.get('sample_size', 1), "cl_aoa_sampling_control": int( '0x10' if self.angle_of_arrival_params.get('enable_filter', True) else '0x11', 16), "max_sample_cte": 1, "cl_aoa_pattern_len": 36, "cl_aoa_ant_pattern": [0, 1, 2, 3, 4, 5, 0, 1, 2, 3, 4, 5, 0, 1, 2, 3, 4, 5, 6, 7, 8, 9, 10, 11, 6, 7, 8, 9, 10, 11, 6, 7, 8, 9, 10, 11] }cl_aoa_role, keep it as it,AOA_COORDINATORis the only role availablecl_aoa_result_mode, keep it as it,AOA_MODE_RAWis the only mode availablecl_aoa_slot_durations,cl_aoa_sample_rate,cl_aoa_sample_size,cl_aoa_sampling_controlare set in themainfunctionmax_sample_cte, is the maximum number of buffers to allocate to IQ data sampling on the embedded device.aoa_pattern_lenis the length of the pattern set right afteraoa_ant_patternis the antenna switching pattern the locator will use. The antenna numbers corresponds to the antenna numbers we set before in theble_user_config.c.
This is all for the guided tour! You can of course take time to review the rest of the code but keep in mind that there is no need to understand every detail of it to have fun with AoA!
Step 1 – Modify the switching pattern
The antenna switching pattern can be modified in the Python script. Select the Python script corresponding to the AoA mode you need and configure the locator to switch between antenna 0 and antenna 1.
The following modification should be made in the script `rtls_connected.py
in the function _angle_of_arrival:
aoa_params = {
    "aoa_run_mode": "AOA_MODE_RAW",
    "aoa_cc26x2": {
        "aoa_slot_durations": self.angle_of_arrival_params.get('slot_duration', 2),
        "aoa_sample_rate": self.angle_of_arrival_params.get('sample_rate', 1),
        "aoa_sample_size": self.angle_of_arrival_params.get('sample_size', 1),
        "aoa_sampling_control": int(
            '0x10' if self.angle_of_arrival_params.get('enable_filter', True) else '0x11', 16),
        "aoa_sampling_enable": 1,
        #"aoa_pattern_len": 36,
        #"aoa_ant_pattern": [0, 1, 2, 3, 4, 5, 0, 1, 2, 3, 4, 5, 0, 1, 2, 3, 4, 5, 6, 7, 8, 9, 10, 11, 6, 7,
        #                    8, 9, 10, 11, 6, 7, 8, 9, 10, 11]
        "aoa_pattern_len": 2,
        "aoa_ant_pattern": [0, 1]
    }
}
The antenna switching pattern contains only two elements. The pattern will be repeated by the device's radio as much as needed. So, yes, you could have kept a 36-element length pattern like [0, 1, 0, 1, ...] but it is not mandatory.
The following modification should be made in the script `rtls_connectionless.py
in the function _angle_of_arrival:
aoa_params = {
    "cl_aoa_role": "AOA_COORDINATOR",
    "cl_aoa_result_mode": "AOA_MODE_RAW",
    "cl_aoa_slot_durations": self.angle_of_arrival_params.get('slot_duration', 2),
    "cl_aoa_sample_rate": self.angle_of_arrival_params.get('sample_rate', 1),
    "cl_aoa_sample_size": self.angle_of_arrival_params.get('sample_size', 1),
    "cl_aoa_sampling_control": int(
        '0x10' if self.angle_of_arrival_params.get('enable_filter', True) else '0x11',
        16),
    "max_sample_cte": 1,
    #"cl_aoa_pattern_len": 36,
    #"cl_aoa_ant_pattern": [0, 1, 2, 3, 4, 5, 0, 1, 2, 3, 4, 5, 0, 1, 2, 3, 4, 5, 6, 7, 8, 9, 10, 11, 6, 7,
    #                       8, 9, 10, 11, 6, 7, 8, 9, 10, 11]
    "cl_aoa_pattern_len": 2,
    "cl_aoa_ant_pattern": [0, 1]
}
}
The antenna switching pattern contains only two elements. The pattern will be repeated by the device's radio as much as needed. So, yes, you could have kept a 36-element length pattern like [0, 1, 0, 1, ...] but it is not mandatory.
Step 2 – Verify the antenna switching pattern used by the locator
How would you do this?
- Modify and save the content of the python script you want
- Attach a logic analyzer to the GPIOs controlling antenna switching The GPIOs used have been selected before and depend on the antenna board you have selected. In our case DIOs 27, 28, 29 and 30 are used.
- (Rememeber to turn on the target.)
- Execute the python script while letting the logic analyzer attached to the device.
Here are the results:
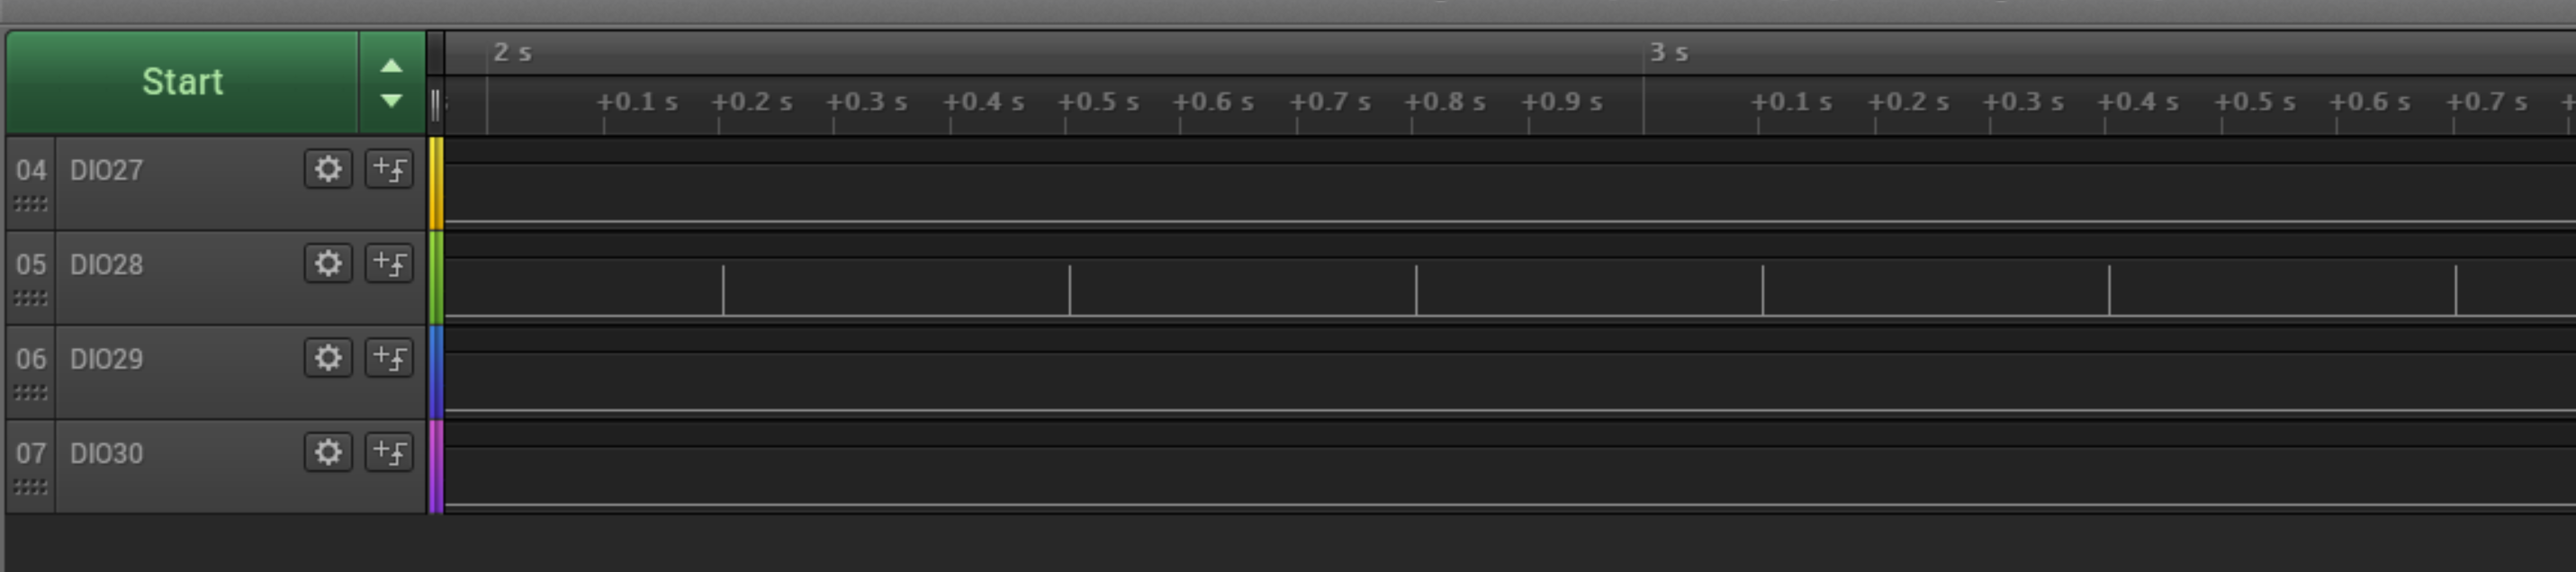
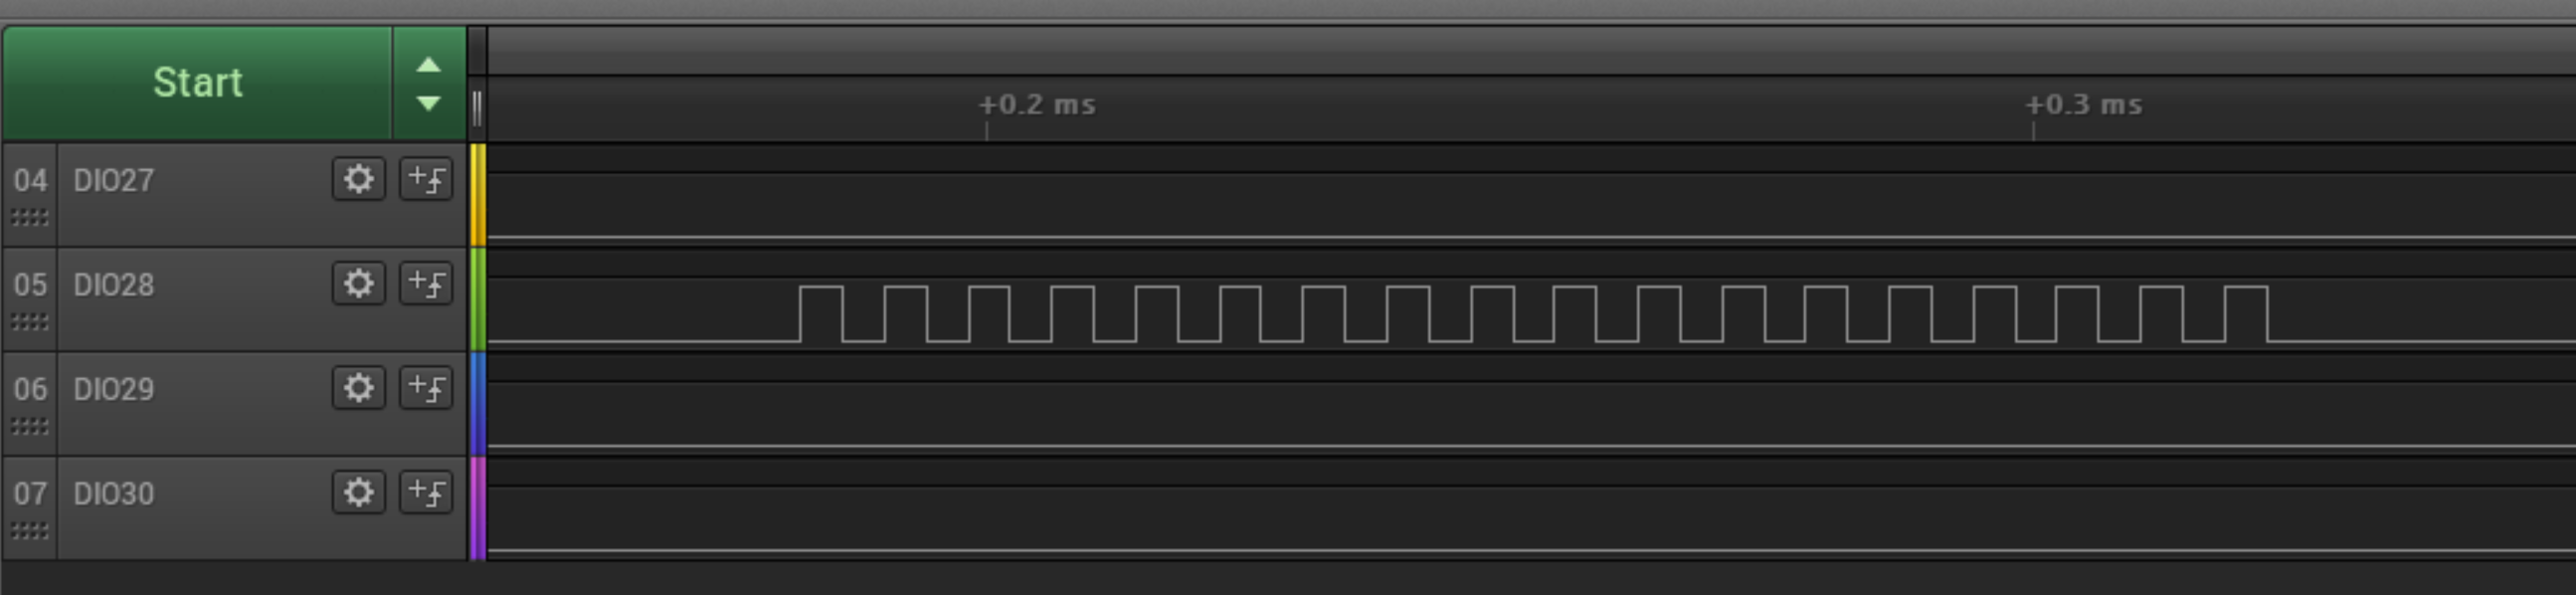
Analyze the results
- The antenna used changes every time we see some activity on GPIOs 27, 28, 29 and 30
- The reception of the CTEs corresponds to the moment where antennas switch
- In between the reception of the CTEs no antenna switching occurs (GPIOs 27, 28, 29 and 30 remain at 0). Based on our configuration (see the truth table), this corresponds to antenna 0.
- During the antenna switching we see the GPIO 28 toggles. Based on the truth table this corresponds to switching between antenna 0 and antenna 1.
Task 4 – Access the IQ data collected
Using the file explorer
The Python script creates a .csv file containing the IQ data. By default, these files are stored in <SimpleLink CC13X2 / CC26X2 SDK> → tools → ble5stack → rtls_agent → examples → rtls_connected_log (for connection AoA) or in <SimpleLink CC13X2 / CC26X2 SDK> → tools → ble5stack → rtls_agent → examples → rtls_connectionless_log (for connection AoA). The files are named after
- the date and time the script gets executed
- the MAC address the target
- the ID of the locator
- the loop ID the data get received
For example, this file 08_03_2021_09_57_46_rtls_raw_iq_samples_806fb01e55f7_0_loop1.csv
contains the data collected on August 3rd at 09:57 AM. The address used by the
target was 80:6f:b0:1e:55:f7. The data collected by specified locator during the first loop.
Using the python scripts
The IQ data collected can be accessed within the function post_analyze_of_IQ_data.
The parameter csv_file contains the path to the .csv mentioned just before.
IQ data quality
The IQ data collected may suffer from the interferences in the environment. These are caused by multipath propagation and concurrent traffic. For early development stages, we recommend to get rid of these by working in an anechoic chamber (if you do not have an anechoic chamber at your disposal, you can work with conducted signals).
The whole system is complex. Many different elements have to work together (several Bluetooth LE devices, the antenna board, the antennas themselves, the host PC, the algorithm to display the IQ data, etc.). The best way to debug such systems is to validate each sub-part. Here are a few ideas to help troubleshooting IQ data collection.
Validate the antennas and the antenna board.
First of all, you should ensure that all the antennas available on the antenna board can successfully be used to establish and maintain a Bluetooth LE connection. To do so, you could flash the
simple_peripheralexample on the device and use your phone to establish a Bluetooth connection. Repeat the operation for all the antennas and make sure the RSSI remain almost the same.Validate the IQ data sampling without antenna switching.
When no antenna switching occurs, the IQ data should looks like a pure sine. If it is not the case for you, it means the system does not use all the IQ data collected. It may also means something is wrong with the signal collected. For example, the signal is too strong (this may occurs for conducted transmission if the attenuation is too weak) or jammed because of multipath propagation an/or concurrent trafic.
Validate the antenna switching occurs as expected.
Antenna switching can be validated as shown previously.
Validate the proper IQ samples are used
In the code snippet presented under Guided Tour, the locator device(s) have been set to filter out the IQ reports. This was done by setting
enable_filtertotrue. This means only the samples collected during the sampling slots are transferred to the host-PC. If a different set-up is chosen, please refer to the RTLS Toolbox chapter in the User's Guide of the device to read more about the IQ data that should be kept or discarded.
What to do with the IQ data?
Here where the lab ends and where the fun begins!
This lab allowed you to collect IQ data as described by the Bluetooth specifications. This data can be used to calculate the angle of arrival of the signal. The algorithms to implement depend on the use case, the antenna design, the accuracy expected, etc.
This work is licensed under a Creative Commons Attribution-NonCommercial-NoDerivatives 4.0 International License.