Introduction
This workshop is an introduction to the Bluetooth® Low Energy (LE) part of the SimpleLink™ CC13xx and CC26xx Software Development Kit (SDK). The 4 tasks in this lab session are targeted to be completed within a 2-hour time frame. An intermediate level of knowledge of the C programming language and some experience with embedded software development is needed to be able to complete the tasks.
This lab session uses the LAUNCHXL-CC26X2R1, a SimpleLink multi-standard CC26X2R wireless MCU LaunchPad™ development kit to demonstrate the tasks in this module. The first task shows how to download a project to the device and run it, and the subsequent tasks will explore the wireless Bluetooth LE interface and make some small changes to the Bluetooth LE application.
For the latter tasks, either a Bluetooth LE enabled cell-phone or a LaunchPad
development kit running the TI host_test Sample Application is required. The
advantage of using host_test is that the TI tools, such as BTool, can be
used.
Kit and SDK compatibility
Multiple of the CC13xx and CC26xx development kits support Bluetooth LE operation. See the Hardware Requirement for details. In this lab we will use the CC26x2R Launchpad as an example, but the same applies for all.
It is recommended to read the TI BLE5-Stack User's Guide alongside this lab for details and further information. Some references will also be made to this document.
Prerequisites
Hardware
For this lab, you need one or two Bluetooth-enabled development boards. Supported devices are:
- SimpleLink™ CC26x2R LaunchPad™
- SimpleLink™ CC2652RSIP LaunchPad™
- SimpleLink™ CC2652RB LaunchPad™
- SimpleLink™ CC1352R LaunchPad™
- SimpleLink™ CC1352P LaunchPad™
- SimpleLink™ CC2652R7 LaunchPad™
- SimpleLink™ CC1352P7 LaunchPad™
- SimpleLink™ CC2651P3 LaunchPad™
- SimpleLink™ CC2651R3SIPA LaunchPad™
For testing:
- Additional SimpleLink LaunchPad to run
host_testOR - Mobile device for testing
Software
- CCS 12.1 or IAR 8.50.9 installed with support for CC13xx/CC26xx devices.
- SimpleLink™ CC13XX and CC26XX SDK 6.40
For testing, a Bluetooth client application is required:
- BTool (located in the
tools\ble5stackdirectory of the SimpleLink™ SDK installation) OR - Bluetooth mobile apps:
- Android: TI SimpleLink Starter - available on the Google Play store
- iOS: TI SimpleLink Starter - available on the App Store
Recommended reading
- TI BLE5-Stack Quick Start
- The CC13xx or CC26xx SDK Platform Chapter of the TI BLE5-Stack User's Guide
Getting started – Desktop
Install the Software
Open Resource Explorer via View → Resource Explorer and find the SDK you want to install.
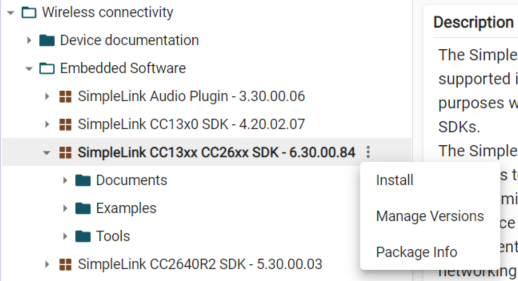
On the right side, you will see 3 dots. Click this to open the drop-down menu. Then, click Download to install the SDK and all its dependencies.
Download the offline installer from the SDK links above under
PrerequisitesRun the SimpleLink CC13XX-CC26XX SDK installer:
simplelink_cc13xx_cc26xx_sdk_x_xx_xx_xx.exe. These instructions assume you have installed to the default directory:C:\ti\
In this case you don't need to install anything on your PC. You can navigate to the project within TI-Rex and import it into CCS Cloud.
Then click the Cloud Import button on the top right hand corner:

When prompted, select the target device to import. In this lab, we will select
CC2652R1F.
Note that this will not install BTool on your computer.
This gives you:
- The SimpleLink CC13XX-CC26XX SDK at
C:\ti\simplelink_cc13xx_cc26xx_sdk_x_xx_xx_xx - BTool accessible via the
\tools\ble5stack\btooldirectory of the SimpleLink CC13XX-CC26XX SDK install directory.
Task 1 – Run ProjectZero Project
The first task is to simply run the Project Zero example project on the LaunchPad and verify that the project runs as intended.
Over the Air Download and the BIM project
Please note that this project is configured for updates over the air (OAD) by default. This means that you can upload a new version or a totally different project to the LaunchPad from your mobile phone.
It also means that the project is compiled and linked in such a way that you
MUST have the bim_offchip project present in the internal
flash of the device first for the project to work correctly. More on this
later.
Boot Image Manager
Customer Configuration (CCFG)
This configuration section is used to tell the device how to behave after boot, such as where the reset vector is, what the clock sources are, etc.
The Boot Image Manager (BIM) project is placed at the last sector of the
internal Flash along with the CCFG section and is responsible for loading new
images (if any) from the external flash, and to launch the internal image. In
our case the internal image is Project Zero.
If BIM is not present, debugging and starting Project Zero from the IDE will normally work, because the IDE overrides the boot configuration and jumps straight to where it thinks the project start address is. After a reset however, the device will not know what to do unless BIM is already present.
Note that when working on an OAD enabled project, you only need to download BIM once.
Import Projects in CCS Desktop
Open Code Composer Studio and import the Project Zero app and stack library projects:
- Open TI Resource Explorer (View → Resource Explorer) or go to https://dev.ti.com/tirex/#/
In the navigation panel on the left side, expand to find Project Zero in the SimpleLink CC13XX-CC26XX SDK.
- Wireless connectivity → Embedded Software → SimpleLink CC13XX-CC26XX SDK - v:x.xx.xx.xx → Examples → Development Tools → CC26x2R LaunchPad → BLE5-Stack → project_zero → TI-RTOS7 → TI Clang Compiler → project_zero
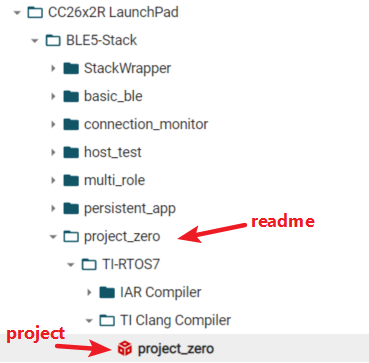
Click the project folder marked above. Import the project into your workspace by clicking the Import button in the top right of the Resource Explorer view.
- Using CCS Desktop, the button shows as:

- Using CCS Cloud, the button shows as:

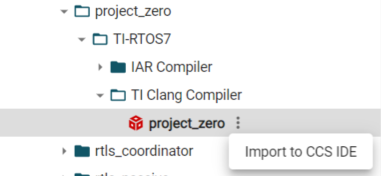
- Alternatively, you can hover the mouse over the right of the project name until three vertical dots show up. Clicking
on the dots exposes a context menu that allows importing the project.
- Using CCS Desktop, the button shows as:
The projects will appear in your Project Explorer window as shown below.

You may need to import the BIM project separately. In this case, import it from the following path:
- Wireless connectivity → Embedded Software → SimpleLink CC13XX-CC26XX SDK - v:x.xx.xx.xx → Examples → Development Tools → CC26x2R LaunchPad → bim → bim_offchip → No RTOS → TI Clang Compiler → bim_offchip
Connect the LaunchPad
Start by making sure your kit is assembled, turned on, and connected to the PC via the USB cable.
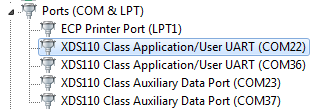
When the Launchpad is connected, the Windows Device Manager (Start → Control Panel → Device Manager, or Win+X, M on Windows 10) will show you the following devices connected:

The Application/User UART serial port is used for application output in this
example.
Connect a Terminal Program
To see the serial output from the kit it is necessary to use a terminal emulator. Start this up now. There are several options:
- PuTTY
- Tera Term
- RealTerm
- Windows PowerShell
- Or even just going to the command prompt and typing for example
type COM4:.- Type
help modeto learn how to set the port parameters.
- Type
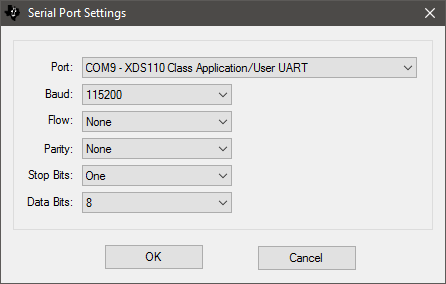
- Start your terminal program
- Choose 115200 baud as the speed, 8 bit data, 1 stop bit, no parity, no flow control.
- Open the serial port
Build the Projects and Flash the Device
bim_offchip_CC26X2R1_LAUNCHXL_nortos_ticlang
- Build the BIM project by right-clicking on it and selecting
Build Project.- Alternatively build all the projects by pressing Ctrl + B.
- Program the project by right clicking on it and selecting Debug As → Code Composer Debug Session
- When the IDE is halted at the
bim_mainfunction, terminate debugging session by clicking Ctrl + F2 or the square red stop icon.
Debugger Update
The first time you program your device, you may be prompted by CCS to update the XDS debugger on the LaunchPad. You will need to do this in order to be able to program the device with CCS. Make sure you only run the update once at a time.
project_zero_app_CC26X2R1_LAUNCHXL_tirtos7_ticlang
- Build the
project_zero_app_CC26X2R1_LAUNCHXL_tirtos7_ticlangproject by right-clicking on it and selecting Build Project. - Download and run the project by either
- Right clicking on it and selecting Debug As → Code Composer Debug Session, or
- Pressing F11 when the project is marked as active (see image above)
- Clicking the green bug icon in the toolbar
- When the project is downloaded and halted at
main(), press F8 or the Play/Pause button to start executing the code.
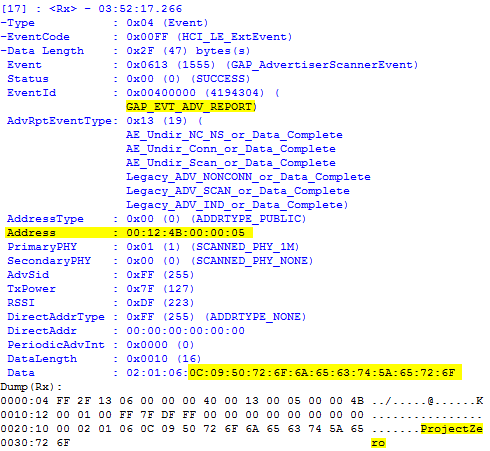
After the application runs you should observe something like the following in your terminal application:

This shows the user application initializing the three services LED, Button and Data, and set initial values for the characteristics in those services. Finally, callbacks are received from the stack that the device is ready and has started advertising its presence.
Take a note of your device address for later use.
Task 2 – Connect and Navigate Exposed Services
In order to interact with the Bluetooth Low Energy device you will need to use something to act as a Central device towards it.
There are many mobile applications that can serve this purpose. We will show instructions using the TI SimpleLink Starter applications available for both iOS and Android.
In addition to these mobile apps, Texas Instruments provides a couple of PC tools for this, which in turn communicate over a serial port with special firmware loaded onto a separate device. The serial commands conform to the HCI standard as defined by the Bluetooth SIG, and allows control of the Host layers such as GATT, GAP and Security Manager in addition to the bare-metal Link Layer commands required by the HCI specification.
Tools like BTool use this interface to connect to and interact with other Bluetooth LE devices.
Select your preferred method of connecting to Project Zero by expanding the boxes below.
First, you will program a second board with the host_test project. The host_test
project allows a user to call most of the GAP, GATT and ATT functions of the
BLE5-Stack via a serial interface.
Program HostTest onto a Launchpad
Here you have two options:
Import and Build host_test from the ble5stack examples folder (located in
[sdk]examples/rtos /[board]/ble5stack/host_test/Download UniFlash for your platform and program in the prebuilt hexfile in
[sdk]examples/rtos
/[board]/ble5stack/hexfiles/host_test_app.hex
Start BTool
BTool is a PC Tool that uses the HCI Vendor Specific commands to act as a
Bluetooth LE device. BTool can be found in the tools\ble5stack\btool
folder of your SimpleLink CC13XX-CC26XX SDK installation. It is recommended to
run BTool by clicking Run_BTool.bat.
When BTool opens it will prompt you to select the Serial Port your host_test
device is connected to as show in the picture below.
If you have several COM ports, use Windows Device Manager to figure out which
one is connected to the Application/User COM port of the kit with host_test
running. This is described above.
Scan for Bluetooth LE devices
After the device has finished initializing, the tabbed sections on the left
side of the GUI can be used to perform Bluetooth LE functions. We will use these
actions to scan for and connect to our Project Zero device.
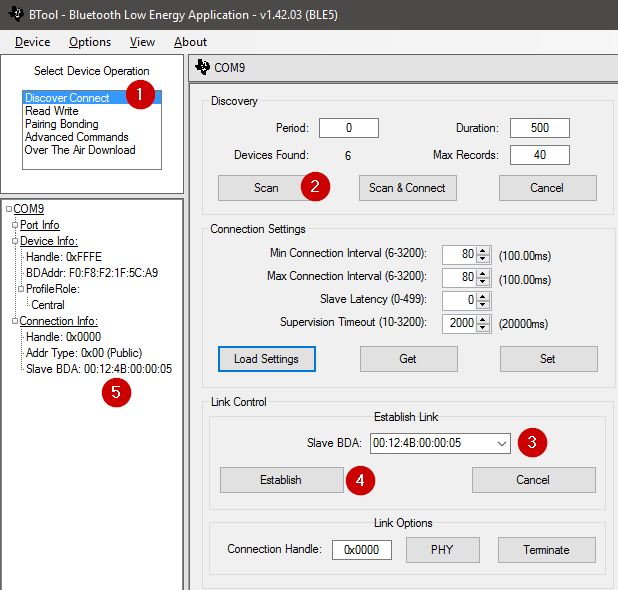
1) Choose the Discover Connect tab
2) Select Scan from the middle panel. The log will keep you updated about the devices that are
found.
LocalName, marked in yellow.
3) In the Slave BDA drop-down menu, select the address of your device (from the terminal output earlier)
4) Click Establish to connect
5) After you have connected, you will see an entry for the connected Peripheral.
After connecting, your serial window will look something like this:
Note the Peer address is the address of the kit you used as the Central device.
You will also notice a new Connection Info section on the left side of the BTool window:
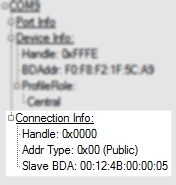
**Navigate the Attribute table
Now that we are connected, we will want to perform a discovery to find all the
characteristics and services on our Project Zero device so that we can interact
with those attributes. A UUID tells the peer device how the value of an
attribute should be interpreted. You can learn more about attributes and UUIDs
in the Custom Profile
SimpleLink Academy module.
- Right-click on Handle under Connection Info.
- Select Discover UUIDs
You will notice that the section under the log is populated with information about the services and characteristics available on the device.
What you see in BTool under the log after the discovery is complete is a visualization of what is accessible to any connected GATT Client device via the Bluetooth Attribute Protocol.
The only things reported over the air are Handle, which is a dynamic
short-form way of addressing an attribute and Type which tells you how to
interpret the Value, which is also available. Together, these three values
comprise an Attribute.
Each row in the image below is an Attribute. You will notice that some lines
are different colors. The reason for the difference colors is that the Type
imposes a hierarchy in the GATT protocol like this (simplified):
- reddish color – 0x2800 – Service declaration – Value is the Service UUID.
- yellowish color – 0x2803 – Characteristic declaration – Value describes characteristic value attribute
- white – 0xXXXX(-XXX...) – Characteristic value attribute – Value is actual data; all else is metadata.
- white – 0x29xx – Characteristic descriptors – Value is info about characteristic value attribute.
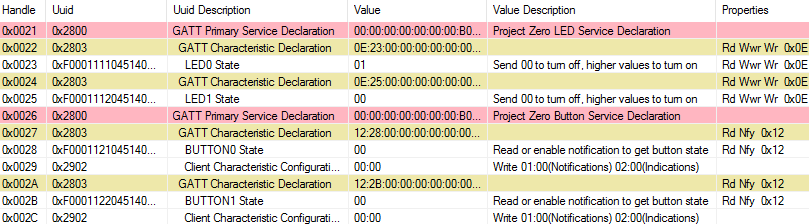
Fig – GATT Table of Project Zero after reading all values (via right click menu), including characteristic properties/permissions.
Interact
You may notice that some of the attributes do not have an associated value. In order to populate that field for all attributes, you must manually read the values.
- Right-click on Handle under Connection Info.
- Select Read Values
Alternatively, you can single-click on a field in the Value column to read the value for a single item.
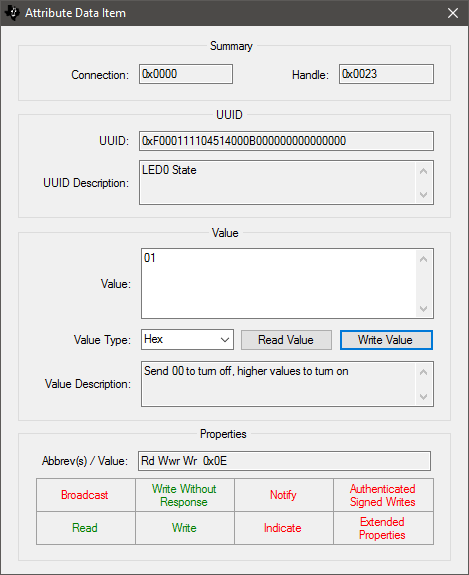
Now that our GATT table is populated, we can start to interact with our Project Zero device. The comments in the Value Description field instruct you on what actions are allowed.
To write to a characteristic, double-click on the Value field and a new window appears. By editing the Value and selecting Write Value, you can send a Write Request.
For example, to turn on LED0 double click on the Value field that corresponds to
LED0 State. Writing one byte with a value higher than 00 will turn on the red
LED on the Project Zero LaunchPad.
You can similarly interact with the Button and Data services.
Start SimpleLink Starter
Using your iOS device, find the SimpleLink Starter app and open it.
Scan for Bluetooth LE devices
The app should begin scanning for Bluetooh LE devices automatically but you can refresh the list by pulling down. Please note if you are using dark mode you may not be able to see the list of devices. If this happens, turn off dark mode.
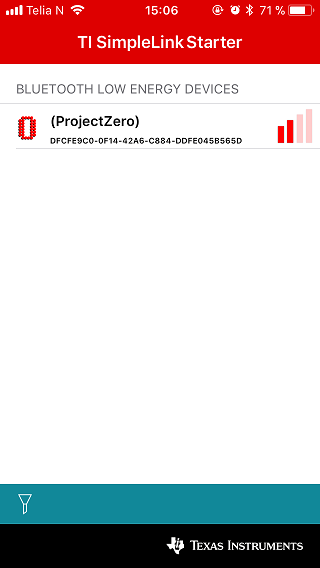
You should see Project Zero advertising as "ProjectZero". Connect to the device by clicking on the name and select Sensor View to get to the GUI interface.
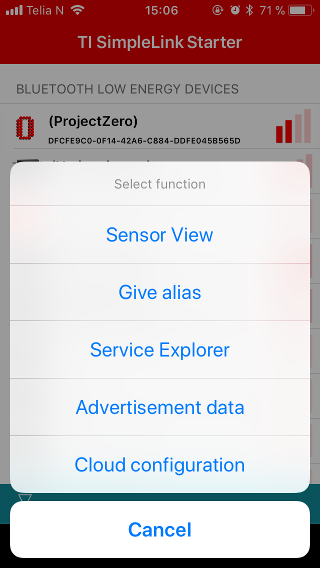
Fig – Select Sensor View in this first step. Later you will use
Service Explorer.
After connecting, your serial window will look something like this:
Note the Peer address is the address of your mobile device.
Use the GUI
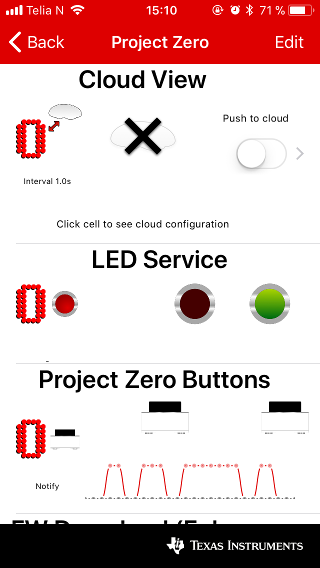
SimpleLink Starter is able to recognize the UUIDs for the services that
Project Zero is implementing, such as LED and Buttons, and displays GUI
widgets to interact with these services.
Navigate the Attribute table
GUI is fun, but we can also explore the Bluetooth LE services on a lower level.
To do that, go back from the GUI screen and long-press on ProjectZero to get a
menu.
Select Service Explorer in this menu.
Jumping directly into the deep end of the pool, what you are looking at is a visualization of what is accessible to any connected GATT Client device via the Bluetooth Attribute Protocol.
The only things reported over the air are Handle, which is a dynamic
short-form way of addressing an attribute and Type which tells you how to
interpret the Value, which is also available. Together, these three values
comprise an Attribute.
SimpleLink Starter uses the Attribute information and displays it in a more usable way.
SimpleLink Starter uses the Type that is sent to arrange the Attributes in a hierarchy
of characteristics and services as shown below:

Fig – SimpleLink Starter list of GATT Services present in ProjectZero
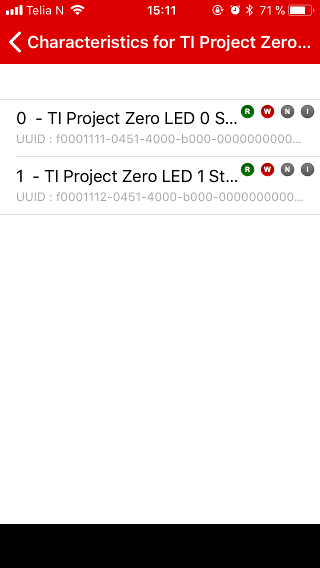
Fig – List of characteristics in the LED Service. Notice the permissible actions are highlighted. Here Read/Write.
See the Custom Identifier list for Project Zero below for how to interpret the custom UUDs
Interact
To interact with a characteristic using SimpleLink Starter, click on the Characteristic UUID. Depending on which characteristic you clicked on, you will see something similar to below:
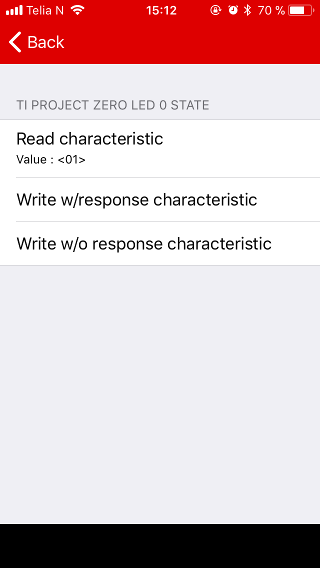
The characteristic shown above has Write properties. To write a new value to a characteristic with Write properties, click one of the "Write" items. In the new window, edit the value using the keyboard given as shown.
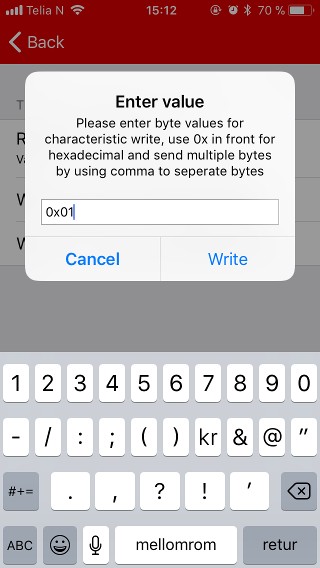
When you are finished, click "Write" and you will be taken back to the Characteristic view. A new value will be shown in the "Read characteristic" section as seen below:
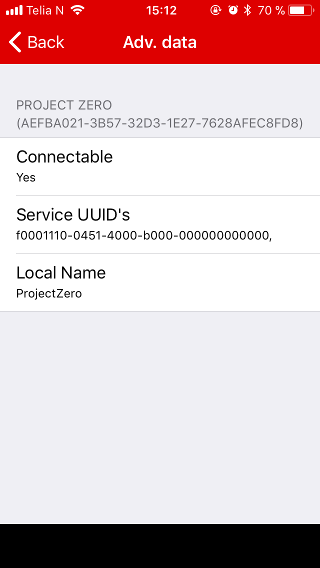
Advertisement Data
Via the action menu you can also review the data that the device sends out while it's waiting to be connected to.
In this case it's the Local Name and one of the services it has to offer.
Start SimpleLink Starter
Using your Android device, find the SimpleLink Starter app and open it. Please note that on Android devices enabling Location Tracking is required to use Bluetooth. If you get a pop-up asking you to enable it, please go into your device settings and enable location tracking.
Scan for Bluetooth LE devices
The app should begin scanning for Bluetooth LE devices automatically but you can force a refresh by pulling down on the device list.

You should see Project Zero advertising as "Project Zero". Connect to the device by clicking on it.
After connecting, your serial window will look something like this:
Note the Peer address is the address of your mobile device.
Interact
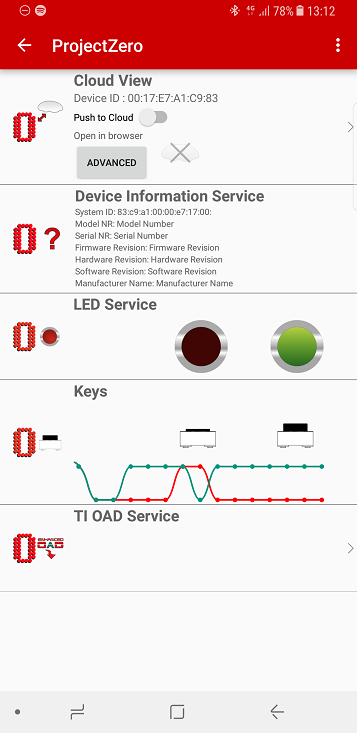
The SimpleLink Starter application recognized the Project Zero services (described below), and displays GUI widgets to interact. Tap on one of the LEDs to change the state. It also automatically enables notifications on the button states, and this is reflected in the button graph.
Custom Identifier list (UUIDs) for Project Zero
In case the tool you use to view the Attribute Table on the device running Project Zero does not have the meta-data to interpret the UUIDs to show you descriptions and mnemonics, use this list to identify each service and characteristic:
Keep in mind that some tools will show Value and Type fields in the
byte-order received over the air, which means for UUIDs that F0001110-0451-4000-B000-000000000000
becomes 00:00:00:00:00:00:00:B0:00:40:51:04:10:11:00:F0.
| UUID | Which ATT Field | Description | Usage |
|---|---|---|---|
F0001110-0451-4000-B000-000000000000 |
Value | LED Service | Service declaration |
F0001111-0451-4000-B000-000000000000 |
Type/Value | LED0 State | Read state or write 01 or 00. |
F0001112-0451-4000-B000-000000000000 |
Type/Value | LED1 State | Read state or write 01 or 00. |
F0001120-0451-4000-B000-000000000000 |
Value | Button Service | Service declaration |
F0001121-0451-4000-B000-000000000000 |
Type/Value | BUTTON0 State | Read state or subscribe to notifications |
F0001122-0451-4000-B000-000000000000 |
Type/Value | BUTTON1 State | Read state or subscribe to notifications |
F0001130-0451-4000-B000-000000000000 |
Value | Data Service | Service declaration |
F0001131-0451-4000-B000-000000000000 |
Type/Value | String char | Read/Write a long string |
F0001132-0451-4000-B000-000000000000 |
Type/Value | Stream char | Send or receive WriteNoRsp/Notification |
Table – The UUIDs identifying ProjectZero services and characteristics.
For service and characteristic declarations you will find the UUID in the ATT-Value field, and for characteristic value the UUID is in the ATT-Type field.
| ATT Type/UUID | GATT Type/UUID | Where to find the GATT UUID |
|---|---|---|
| 0x2800 | Service declaration | ATT Value field is GATT Service UUID |
| 0x2803 | Characteristic declaration | ATT Value field, byte 3 onwards contains the UUID of the characteristic value |
| <UUID> | Characteristic value | ATT Type is the UUID of the GATT characteristic value |
Table – Where to find GATT UUIDs in the ATT Table. See the Custom Profile lab for more in-depth details
Quiz-time
Use this GATT table from the Connecting using BTool section to answer the following questions (You can enlarge the GATT table by clicking on it).
What is the ATT Handle of the LED 1 Characteristic Declaration in the GATT
Table pictured above?
Where can you find a GATT Service UUID?
What does the Value of a Characteristic Declaration tell you? Multiple correct answers.
How many Attributes does the LED Service consist of in total?
Profiles and Discovery
When a device connects to your device, it has no idea what you have to offer in terms of Services and Characteristics it can interact with.
Emulation tools like BTool will discover and display everything available for
you to manipulate, but typically for most applications there will be a Profile.
This is a document that describes what interactions can be done via Bluetooth
Low Energy, which services are needed to accomplish various objectives, and how
value reads and writes must be formatted and sequenced for this to be done.
For example, a Heart Rate Monitor device would typically implement the Heart
Rate Profile(HRP), which in turn specifies it must have the Heart Rate
Service(HRM) which must behave in a certain way when read from and written
to.
If you didn't know already, GATT imposes a meta-layer on top of ATT. Meaning that an Attribute is an ATT thing, whereas a Service is a GATT thing that uses Attributes.
Using an emulation tool, it is up to you to figure out which attributes should
be written or read in accordance with a Profile and manually act like a GATT
enabled application would have done.
Services and Characteristics are discovered after a connection is established
and before GATT interaction can start. This is done because the handle of an
attribute is what's used over the air on the ATT level to read/write, but
handles are dynamically assigned. The only thing a remote device knows before it
connects is the UUID of the services and characteristics it wants to use on the
peer.
Health Thermometer example
For example, you are a Health Thermometer Collector device and want to connect
to and use a health thermometer that follows the Bluetooth SIG adopted Profile
for Health Thermometer [PDF].
By reading the Bluetooth SIG specification for this service, you know that the UUID of the Health Thermometer Service is 0x1809, and the UUID of the Temperature Measurement Characteristic is 0x2A1C.
The list of UUID's is found on the Bluetooth SIG Assigned Numbers
page, which is linked as a Reference inside the specification document. Hint:
Checkout the 16-bit UUIDs page.
You can then discover the handles for these via defined procedures in order to configure/read/write.
Task 3 – Get Notified
If you are using a mobile device
This task is demonstrated using BTool because it provides the most thorough GATT Table. Instructions on enabling notifications on your mobile device are provided at the end of this task but you are strongly encouraged to go through the BTool instructions for a better understanding of Bluetooth notifications.
You have connected. You have read and written values to control a Bluetooth device and turned on and off LEDs. How about getting some data back from a sensor on your device, like the state of the buttons?
Reading things that change
Read the value of, let's say, BUTTON0 State. How is the value you read
correlated with the actual state of the button? How often would you have to read
the value out to make a reliable doorbell for example?
In this task you will learn how instead of polling the value you are
interested in, which could waste a lot of energy, you can configure the device
to transmit Notifications to you when the value changes.
When you are connected to a Peripheral device conforming to the
Project Zero Profile, this is possible to
do for the button states because of three things:
- The
propertiesfor each BUTTONx State Characteristic includes theGATT_PROP_NOTIFYflag. - The BUTTONx State Characteristics include a
Client Characteristic Configuration DescriptororCCCDattribute. Writing to this allows aGATT Clientto enable or disableNotifications. - The application cares about the value of the
CCCD Attributeand also tries to send aNotificationwhen the state of theCharacteristic Valuechanges.
If we have a look at the Button Service in BTool things may become clearer:

In the figure above, the Access Properties of each Characteristic Declaration
can be seen in the right column. This is also signified by the "12" in leading byte
of the Characteristic Declaration Value. You will also notice there is a
Client Characteristic Configuration attribute that the LED service did not have.
Characteristic Properties
Considering the value 0x12 for the BUTTONx State properties as seen above.
If you look at the list of properties in the code block below, what are the
properties of the Button characteristic value attributes? Several properties
are ORed together.
What are the access properties of the Button State characteristics?
Access Properties
Each characteristic has properties, which are made known in its declaration via a bit-map. The list below is an excerpt from the definitions in the SimpleLink CC13XX-CC26XX SDK.
/** @defgroup GATT_PROP_BITMAPS_DEFINES GATT Characteristic Properties Bit Fields
 * @{
 */
#define GATT_PROP_BCAST         0x01 //!< Permits broadcasts of the Characteristic Value
#define GATT_PROP_READ          0x02 //!< Permits reads of the Characteristic Value
#define GATT_PROP_WRITE_NO_RSP  0x04 //!< Permits writes of the Characteristic Value without response
#define GATT_PROP_WRITE         0x08 //!< Permits writes of the Characteristic Value with response
#define GATT_PROP_NOTIFY        0x10 //!< Permits notifications of a Characteristic Value without acknowledgement
#define GATT_PROP_INDICATE      0x20 //!< Permits indications of a Characteristic Value with acknowledgement
#define GATT_PROP_AUTHEN        0x40 //!< Permits signed writes to the Characteristic Value
#define GATT_PROP_EXTENDED      0x80 //!< Additional characteristic properties are defined in the Characteristic Extended Properties Descriptor
/** @} End GATT_PROP_BITMAPS_DEFINES */
Snippet from gattservapp.h
Client Characteristic Configuration
The behavior and usage of attributes with the type 0x2902 is defined by the
Bluetooth Core Specification. Luckily, it's not very complicated.
The Value of the attribute is a 16-bit wide field. Writing 01:00, which can
be translated to 0x0001, will tell the device that it's allowed to send
Notifications of value changes to you. If you write 00:00 you disable
transmissions. If you write 02:00 you allow Indications instead. That is not
permitted for the button characteristics.
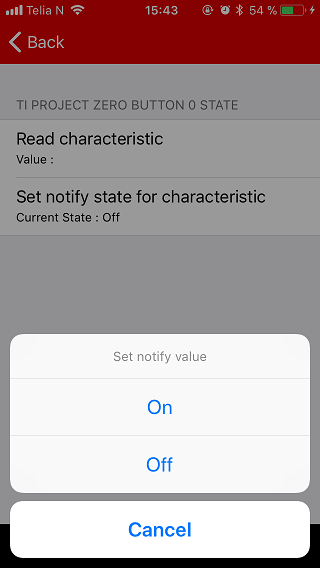
Notifications are enabled a little bit differently in the mobile devices.
For SimpleLink Starter, click on the Project Zero device. Then select the Service Explorer view. Next, find the Button Service and select it. Finally, you are in the characteristics view. Here, select a characteristic (Button 0 State is shown below), and then click "Set notify state".
Quiz!
Looking at this table from Task 3 – Get Notified, what is the Handle of the CCCD attribute for BUTTON1 State characteristic?
What is the client configuration of each Button state? Two correct answers.
Action!
- Enable notifications for both BUTTON0 and BUTTON1.
- Try to press the buttons.
- Observe serial output and the value apparent in the GUI. Can you follow the sequence of events in the code?
Task 4 – Customize the Application
This task teaches you to customize how the device appears to the outside, to make it more personal.
There are three main ways you can set your mark on the device:
- The
GAP_ADVTYPE_LOCALNAME_(SHORT|COMPLETE)field in either AdvData or Scan Response. - The
Device NameCharacteristic in theGeneric Access Service, and - Various strings in the
Device Information Service
The GAP_ADVTYPE_LOCALNAME is the field that is displayed by most end-equipment
when scanning for Bluetooth devices, and it's that field we'll change now. After
a connection is established, and the Service Discovery is complete, many types
of end-equipment will then use the value from Device Name for display.
Read the Device Name
Using BTool or your Bluetooth LE Central device of choice, find the service
called Generic Access Service (UUID 0x2800), expand it if necessary to find
Device Name (UUID 0x2A00), and then read this value, if not done already.
Change the Advertisement data
The two variables advertData and scanRspData contain the data the device
will transmit while advertising its existence. This data is available to any
interested parties so they can see the device and connect to it.
Change LOCAL_NAME
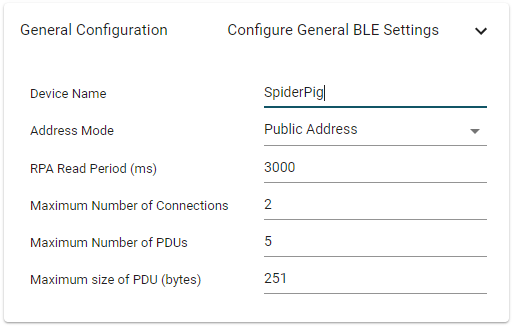
Open SysConfig (project_zero.syscfg) and on the left-side pane, go to
RF STACKS → BLE →. Once there, in the center pane find General
Configuration → Device Name and give the device a new name.
To make the new name show up in the device advertisement we need to change it in the advertisement data as well. In SysConfig, open Broadcaster Configuration → Advertisement Set 1 → Advertisement Data 1. Here you can change the GAP_ADTYPE_LOCAL_NAME_COMPLETE of the device.
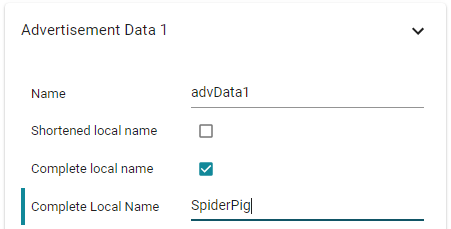
You will have to change the Complete Local Name of the Scan Response Data section too as shown below.

When you have done this, right-click on the Project Zero project and select
Build Project. When this is completed, download to the target, run the changed
code and observe that when you scan for Bluetooth Devices, the name has changed.
The change will also show up in the serial output.
Note that some mobile devices tend to cache previously known device names and may not update yours. In order to see your new device name, look up how to clear the Bluetooth cache on your mobile device. Often it's a matter of disabling Bluetooth in the system menu and re-enabling it.
That's it!
Very well done!
References
This work is licensed under a Creative Commons Attribution-NonCommercial-NoDerivatives 4.0 International License.