Introduction
This workshop is a detailed description of how to use the TI SimpleLink Starter mobile application to provision a Bluetooth® Mesh end node and setup your network. This lab will focus on provisioning nodes using the mobile application to configure them to receive Generic On/Off messages. All tasks in this lab session are targeted to be completed within a 2-4 hour time frame. An intermediate level of knowledge of the C programming language and some experience with embedded software development is needed to be able to complete the tasks.
This lab session uses the SimpleLink™ CC26X2R1 wireless MCU LaunchPad development kit to demonstrate the tasks in this module. The first task shows how to download the simple_mesh_node project to the LaunchPad kit and run it. The subsequent tasks in this lab will walk through binding application keys, subscribing to a group address and finally, sending a Generic On/Off message.
Kit and SDK compatibility
Multiple of the CC13x2 and CC26x2 development kits support Bluetooth Low Energy operation. See the Hardware Requirement for details. In this lab we will use the CC26x2R Launchpad as an example.
Prerequisites
Hardware
For this lab, you need a minimum of two or more Bluetooth-enabled development boards. Supported development boards for Bluetooth Mesh are:
- SimpleLink™ CC26x2R LaunchPad™
- SimpleLink™ CC1352P LaunchPad™
- SimpleLink™ CC2652RSIP LaunchPad™
- SimpleLink™ CC1352P7 LaunchPad™
- SimpleLink™ CC2652R7 LaunchPad™
Software
- CCS 12.1 or IAR 8.50.9 installed with support for CC13xx/CC26xx devices.
- SimpleLink™ CC13xx and CC26xx SDK 6.40
- TI SimpleLink Starter on iOS or TI SimpleLink Starter on Android
Recommended reading
- TI Bluetooth Mesh Fundamentals SimpleLink™ Academy Lab
- README.html file located at:
simplelink_cc13xx_cc26xx_sdk_x_xx_xx_xx\examples\rtos\LAUNCHPAD\ble5stack\simple_mesh_node, whereLAUNCHPADis the device used (see Hardware section above) - TI BLE5-Stack Quick Start
- Bluetooth Mesh Chapter of the TI BLE5-Stack User's Guide
- TI Bluetooth Mesh Software Product Brief
- Zephyr Mesh Provisioning
- Bluetooth Mesh Specification
Background
This section will cover how a mesh network is created and how a mesh node is configured.
Mesh Provisioning Basics
The Bluetooth Mesh Specification states that a provisioner is required to create a mesh network. A provisioner is a device that manages the mesh network and performs actions such as generating security keys and assigning unique addresses to nodes as they join the network. A device that is not part of a mesh network is called an Unprovisioned device.
Provisioning Bearers
Two provisioning "bearers" are currently supported, as defined by the Bluetooth Mesh Specification.
PB-ADV : the Advertisement Bearer
When an unprovisioned device supports PB-ADV, it supports provisioning through advertisement messages sent over the primary advertising channels. These advertisements are called Generic Provisioning PDUs and are non-connectable and non-scannable, undirected. To read more about this bearer, refer to Section 5.2.1 PB-ADV in the Bluetooth Mesh Specification.
PB-GATT : the GATT Bearer
When an unprovisioned device supports PB-GATT, it supports provisioning through the GATT bearer. The Proxy Protocol is used to send Proxy PDUs to the unprovisioned device.
Each mesh node will expose a Mesh Provisioning Service with a Data In and Data Out characteristic. The provisioner will then connect to the unprovision device over a typical Bluetooth LE connection and begin the Proxy Protocol by using the exposed characteristics for communication.
At a high level, this process consists of:
- The unprovisioned node starts sending unprovisioned beacons.
- The provisioner scans to find the unprovisioned node.
- The provisioner sends a Provisioning Invite to the unprovisioned node.
- The unprovisioned node sends its Provisioning Capabilities to the provisioner.
- Public keys are exchanged and the unprovisioned device is authenticated.
- The provisioner provides the unprovisioned device with its Provisioning Data
- Provisioning is complete.
For a complete description of the above process, see Section 5.4.2 Provisioning Behavior in the Bluetooth Mesh Specification.
In this lab, we will use our smartphone with the TI SimpleLink Starter mobile application to configure our network via the GATT bearer.
Getting started – Desktop
At the end of this module you will have:
- SimpleLink™ CC13XX-CC26XX SDK installed
- A basic knowledge of how a mesh network is formed
- A basic knowledge of how a mesh node is configured by a provisioner to send messages
Install the Software
If not already done, download the SimpleLink™ CC13XX-CC26XX SDK shown in the section Prerequisites above.
Run the SimpleLink™ SDK installer. This gives you the SDK with TI-RTOS included at the default location:
C:\ti\simplelink_cc13xx_cc26xx_sdk_x_xx_xx_xx
If not already done, install the iOS TI SimpleLink Starter: available on the App Store or on Google Play
Task 1 - Setup the simple_mesh_node project
Configure the node using SysConfig
Open CCS.
Import the simple_mesh_node example from:
simplelink_cc13xx_cc26xx_sdk_x_xx_xx_xx\examples\rtos\CC26X2R1_LAUNCHXL\ble5stack\simple_mesh_node
Open the project's
simple_mesh_node.syscfgfile and configure it to suit your application needs. For more information, see the BLE Mesh SysConfig Features section within the Bluetooth Mesh Chapter of the TI BLE5-Stack User's Guide.
This lab will use an unmodified simple_mesh_node project with default SysConfig settings: i.e. Relay+Proxy Node
Build the Projects and Flash the Device
simple_mesh_node_CC26X2R1_LAUNCHXL_tirtos_ccs
- Build the
simple_mesh_node_CC26X2R1_LAUNCHXL_tirtos_ccsproject by right-clicking on it and selecting Build Project. - Download and run the project by either:
- Right clicking on it and selecting Debug As → Code Composer Debug Session, or
- Pressing F11 when the project is marked as active (see image above)
- Clicking the green bug icon in the toolbar
- When the project is downloaded and halted at
main(), press F8 or the Play/Pause button to start executing the code.
Use the two-button menu to initialize the device
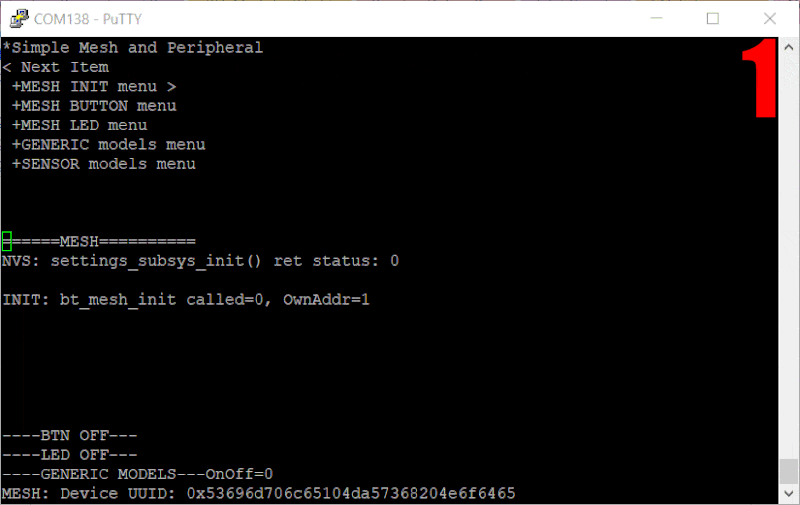
Let's use the two-button menu to configure the device. Here, we will assign the node with a unique device UUID and begin sending our unprovisioned beacons.
Navigate to MESH INIT menu.
Select MESH set UUID prior to provisioning.
Next select any one of the UUIDs in the list provided.
Select MeshInit unprovisioned beacon.
The following figure shows the serial terminal output when the two-button menu is used to perform the steps above. As the two-button menu can change each SDK release, there may be minor differences in the output shown below.
Setup more nodes for the network
Repeat the above steps to generate a new hex file. Remember to assign a different UUID to each node you set up in this lab. For this lab, we will set up 2 mesh nodes.
Task 2 - Provision with the SimpleLink Starter Mobile App
After completing Task 1, both simple_mesh_nodes should be sending unprovisioned beacons. In this task, we will provision our simple_mesh_nodes to the network.
The following screenshots are shown using the iOS version of the SimpleLink Starter Mobile app. There may be minor differences with regards to the User Interface when using the Android version. The steps outlined below can still be followed similarly using the Android version.
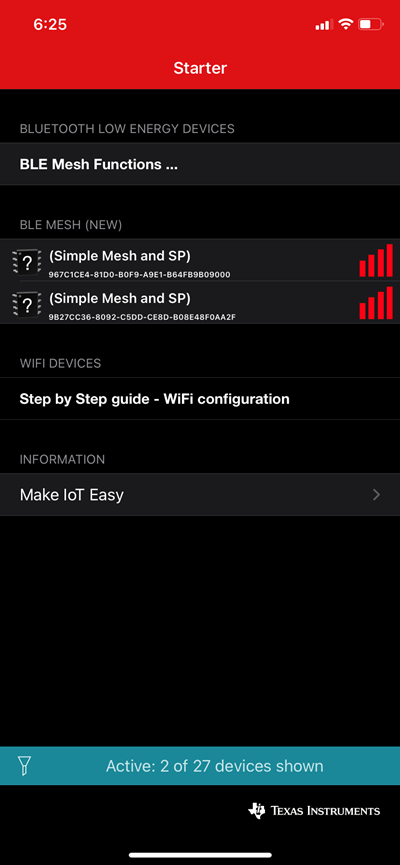
Open the SimpleLink Starter mobile application. You should already see two nodes advertising in the first screen as shown below.
Navigate to the BLE Mesh Functions ... menu by clicking on the icon above. This will take you to the main Bluetooth mesh menu.
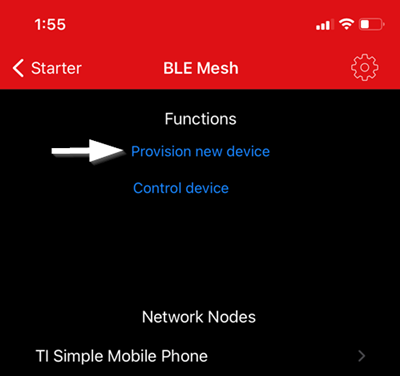
Select the Provision new device function to begin scanning for unprovisioned beacons.
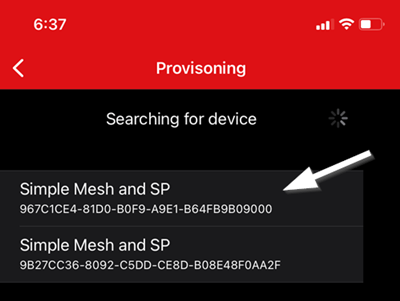
Select one of the SimpleMeshNodes to provision by tapping on one in the list. After doing so, you will see the following screen.
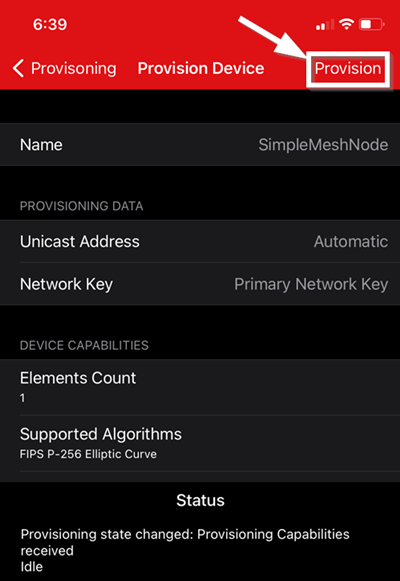
Next, select the Provision icon in the top right to begin provisioning the mesh node.
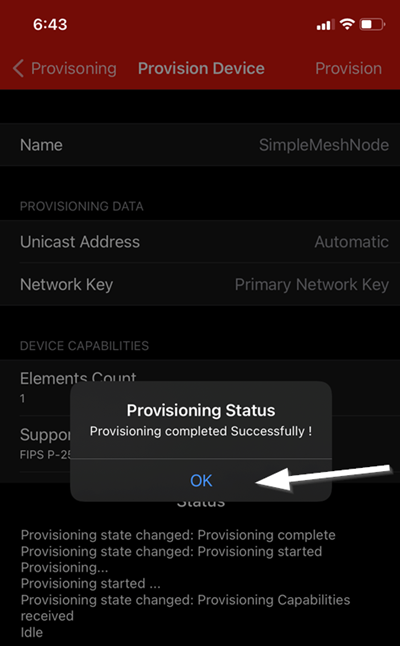
Once provisioning is complete, will see the above prompt. Feel free to hit OK at this point. This will bring you back to the home screen.
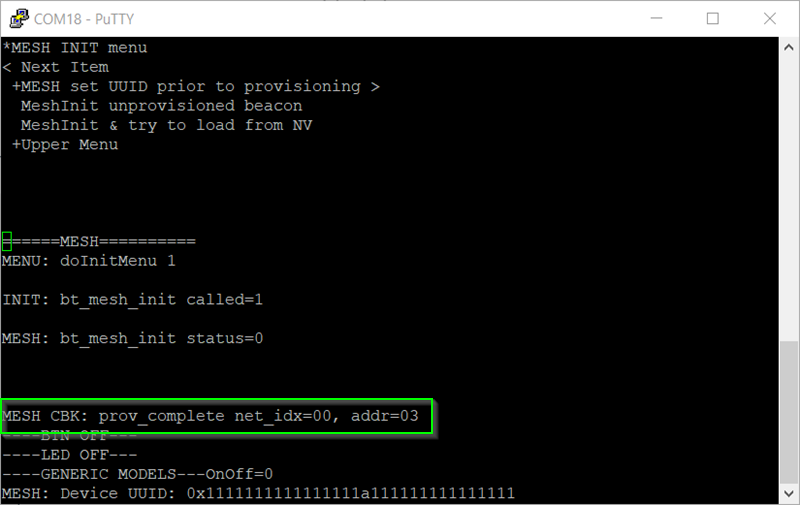
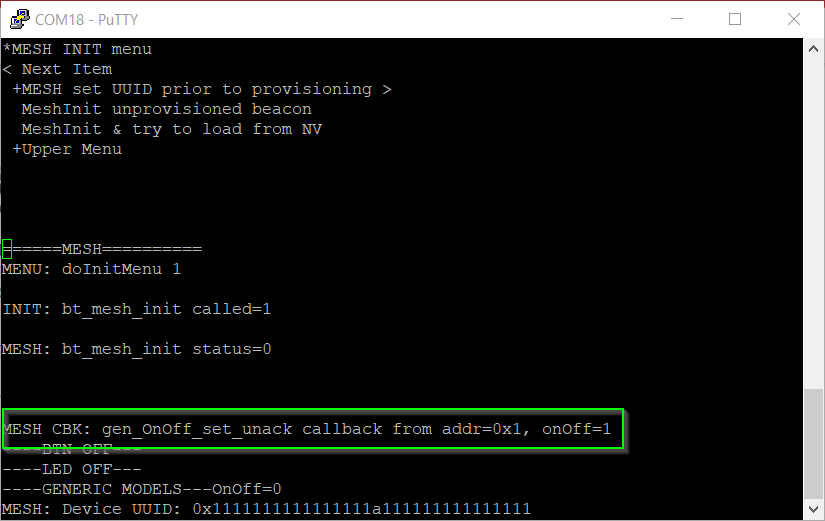
That's it! You've successfully provisioned your device to the network. Navigate to the UART terminal for the connected CC26X2R1_LAUNCHXL to confirm provisioning is complete. You will see this in the MESH CBK status line, shown below.
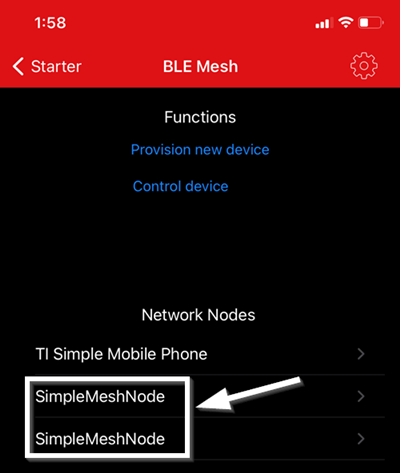
You will also see the nodes added to our provisioner under Network Nodes as shown below:
Task 3 - Configure the mesh node using SimpleLink Starter
Now that the nodes are provisioned to the mesh network, let's configure them to both receive a Generic On/Off message. Repeat the following task for the 2 nodes in our network.
Task 3A - Add an application key to the network
First, we will need to add an application key to our network. Bluetooth™ mesh implements mandatory security at both the network and application layers of the protocol. This means a separate application key to send encrypted messages across nodes in a network. To do this, we will bind these application keys to models.
Info
TI's SimpleLink Starter mobile application currently supports sending messages to Generic OnOff Server and Client models only.
Navigate to the home screen for BLE Mesh. Once there, select the Settings icon in the top-right hand corner.
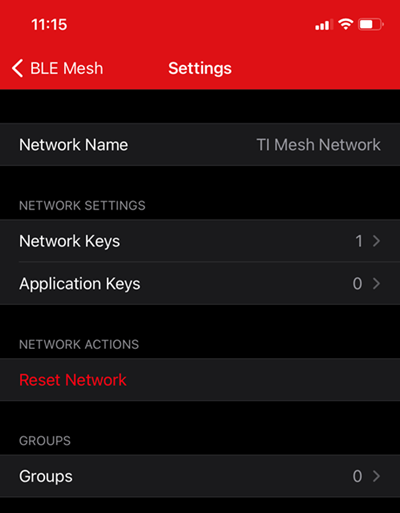
In the settings menu, you can: a. Add application keys b. Reset the network (this removes all provisioned nodes, and resets the app to its initial state) c. Add groups (don't worry, we'll revisit this item later)
Select the Application Keys button.
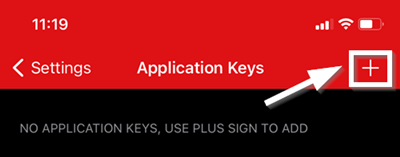
Once in the Application Keys screen, click the + icon in the top right to add a new application key. The items are automatically populated for your convenience.
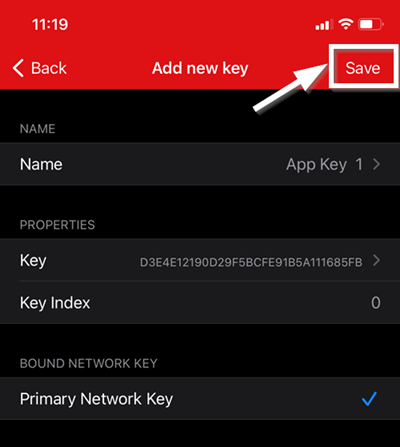
Finally, hit the Save icon in the top right to save "App Key 1". You should see it in the Application Keys menu.
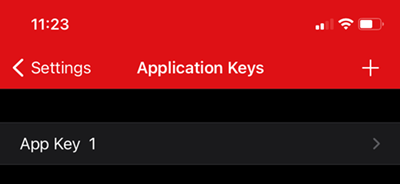
Congrats! We've added an application key to be used in the next steps.
Task 3B - Add application keys to mesh nodes
Before binding the application key to models, we need to add the key to the node.
Navigate back to the BLE Mesh home menu. Under Network Nodes, select one of the SimpleMeshNode devices.
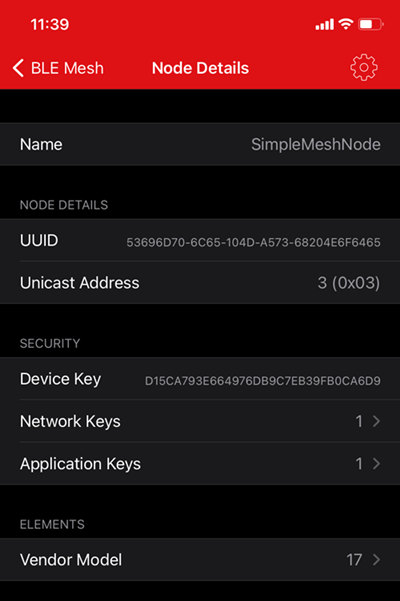
Here, you can see the device UUID, its assigned Unicast Address, security keys, and the device composition data under ELEMENTS.
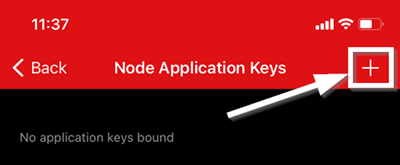
Select the Application Keys under SECURITY, which will take you to the Node Application Keys menu.
Select the + icon, and then add App Key 1 to the node by selecting it.
Task 3C - Bind the application key to the Generic OnOff Server model
Now that the Application Key is added, we can bind this key to the Generic OnOff Server model, defined by the Bluetooth SIG.
In the Node Details menu, click on the Vendor Model button to view the device composition data.
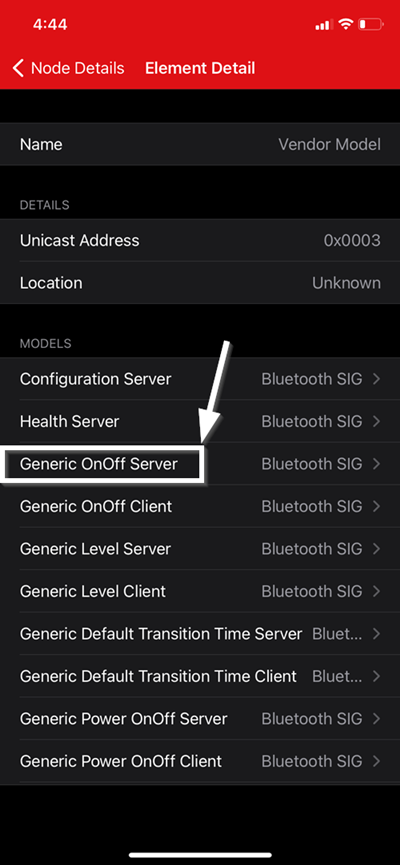
Here we see the device composition data. You can click on any model to discover its Model ID and Company/Vendor Model ID.
Navigate to the Generic OnOff Server model by clicking on it.
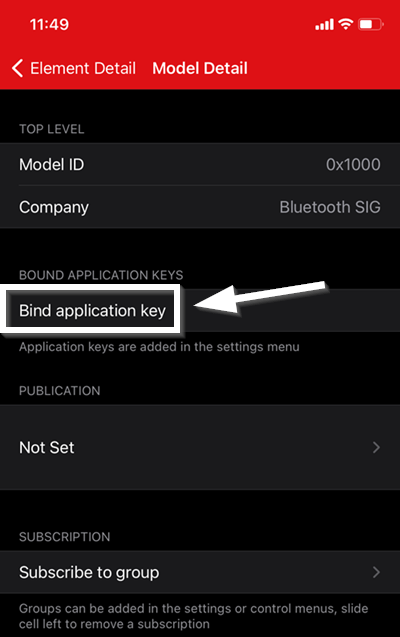
In the Model Detail menu, you have the option to bind application keys, set a fixed publication address, and subscribe to groups.
Select the Bind application key button. In the next screen, tap App Key 1 to bind the key to this model.
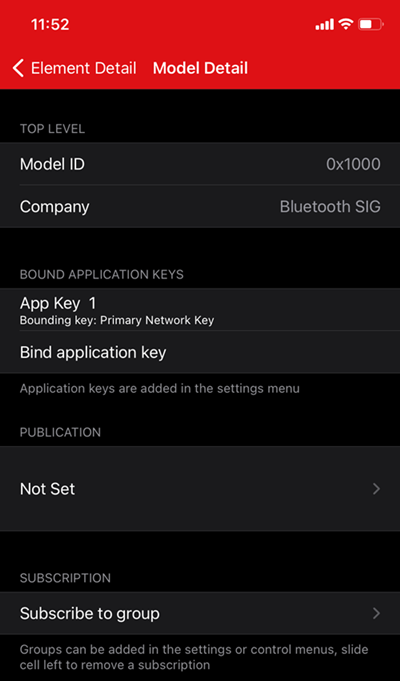
Task 3D - Add and subscribe a group to the Generic OnOff Server model
This sub-task is left for you to complete! Leave the Group address at 0xc000 for this part.
- Hit the back arrow in the top-left and navigate back to the BLE Mesh home screen, as shown in Task 2.
- Hit the Settings icon in the top right to find the Settings Menu, as in Task 3A.
- In the settings menu, hit the Groups icon.
- Select the + icon to add a group. Feel free to name this whatever you'd like. For this task, leave the group address at 0xc000.
- After this, navigate back to the SimpleMeshNode menu and find the Generic OnOff Server model, similar to the instructions in 3C.
- Finally, select the Subscribe to group button and select Group 1.
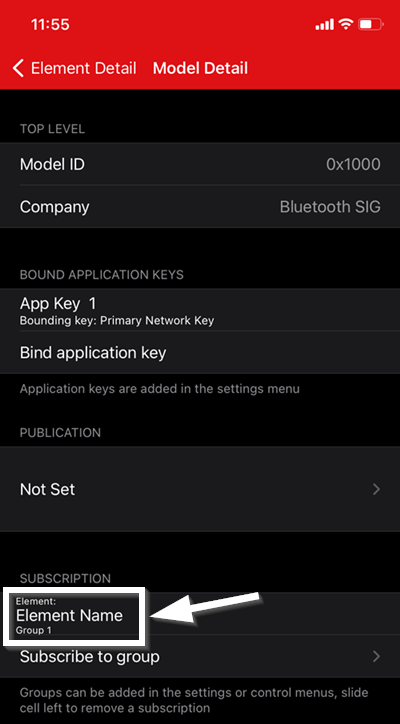
That's it! If done correctly, the Model Detail should look like this:
Task 4 - Message a group using SimpleLink Starter
At this point, we are ready to send a Generic On/Off message to the nodes that have subscribed to the group address 0xC000.
To do this, navigate to the main BLE Mesh menu.
- Select the Control device option.
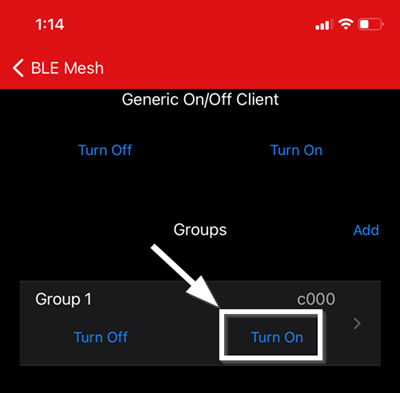
In this menu, select the Turn On option underneath the Groups menu.
If done correctly, each mesh node will trigger a MESH CBK. The onOff variable will change accordingly, as shown below.
Congratulations! You have successfully provisioned your mesh network using the SimpleLink Starter mobile application. You've also configured each node to receive Generic OnOff messages after subscribing them to a Group address.
References and Resources
Bluetooth Mesh Models Technical Overview
TI Bluetooth Mesh Software Product Brief
This work is licensed under a Creative Commons Attribution-NonCommercial-NoDerivatives 4.0 International License.