Introduction
This module guides you in developing Angle of Arrival (AoA) Bluetooth 5.1 compatible targets. In a localization system, the targets are the devices being located by the locators.
It is assumed that the reader has a basic knowledge of embedded C tool chains and general C and Python programming concepts. Knowledge of the localization techniques is a plus but is not mandatory.
This lab will show how to leverage the code examples and tools provided within the SimpleLink CC13XX-CC26XX SDK to develop and test your Bluetooth 5.1 AoA target.
Prerequisites
Hardware required
This module requires two SimpleLink™ CC26x2R LaunchPad™.
Recommended reading
These chapters in the TI BLE5-Stack User's Guide
- TI BLE5-Stack Quick Start
- The CC13XX or CC26XX SDK Platform
- Application
- BLE5-Stack (especially the sections dedicated to periodic advertising)
- RTLS Toolbox
Software for desktop development
- SimpleLink CC13XX-CC26XX SDK and those listed under the Dependencies section of the CC13XX-CC26XX SDK Release Notes
- A working Python 3.7 environment with the packages required by the RTLS Node Manager
If you are missing one of these, please read the next section. Otherwise, you can directly start the Task 1.
Install required Software
Install the CC13XX / CC26XX SDK
The following steps will install the SDK and all its dependencies.
- Download the SimpleLink CC13XX-CC26XX SDK
- Run the SimpleLink CC13XX / CC26XX SDK installer.
The SDK with TI-RTOS included is installed at <SIMPLELINK_CC13XX_CC26XX_SDK_INSTALL_DIR>
which defaults to C:\ti\simplelink_cc13xx_cc26xx_sdk_x_xx_xx_xx.
Install Python 3.7
The following steps will install Python 3.7 and all the packages required by the RTLS Node Manager.
- Install Python 3.7 from the Python Download page.
- Setup the Python environment as described in the README.md in <SimpleLink CC13XX / CC26XX SDK> → tools → ble5stack → rtls_agent folder.
- If a bash environment doesn't exist on your system, install Git bash
Task 0 – Goals setting
Let's take a moment to understand what we need to do.
The goal is to enable a device to be located using Bluetooth 5.1 Angle of Arrival (AoA). This device will then be called target. For this lab, the locator - i.e. the device locating the target - will be considered as already implemented.
Bluetooth 5.1 AoA requests the target to send out packet with an appended Constant Tone Extension (CTE). The constant tone extension is a section of consecutive 1's without whitening. In the Bluetooth Core Specification Version 5.1, both connection packets and periodic advertising packets can contain a constant tone extension (CTE) after the CRC. When CTEs are appended to connection packets, we talk about connection AoA. When CTEs are appended to periodic advertising packets, we talk about connectionless AoA.
In this lab, we will enable the target to be localizable both using connection and connectionless AoA. It means we will enable the target to append CTEs to connection packets and to periodic advertising packets.
Task 1 – Load the rtls_responder example
The rtls_responder project available in <SimpleLink CC13XX / CC26XX SDK>
→ examples → rtos → CC26X2R1_LAUNCHXL → ble5stack →
rtls_responder can be directly leveraged.
- Open CCS.
- Import the
rtls_responderproject. - Build the project.
- Flash the project on the CC26x2R LaunchPad™.
You're done! The target is now configured to be localizable both in connection and connectionless mode.
- when in a connection, the target can answer the requests of the central device (acting as a locator) requiring to append a CTE to the connection packets.
- the target is sending out periodic advertisements with appended CTE. If a device (locator) synchronize with these it will then be able to locate the target.
Task 2 – Test the target
In this task we will verify if the target appends CTEs to the proper Bluetooth LE packets.
- For connection AoA, we should verify if the CTEs are appended to the connection packets after the central device (i.e. locator) requests it.
- For connectionless AoA, we should verify if the target sends out periodic advertisements with appended CTEs.
To run these tests, we are going to leverage tools provided within the
CC13XX / CC26XX SDK, especially the RTLS python scripts. These scripts require
to attach a device flashed with the rtls_coordinator example to the
computer to run properly - the way to do this is described in Step 1.
Step 2 describes how to run the python scripts. Step 3 shows how to
interpret the results.
Step 1 – Setup the rtls_coordinator
The rtls_coordinator project available in <SimpleLink CC13XX / CC26XX SDK>
→ examples → rtos → CC26X2R1_LAUNCHXL → ble5stack →
rtls_coordinator can be directly leveraged.
Remark
For these tests we only want to verify if the CTEs are sent by the target.
We will not attempt to calculate an angle based on these.
As a result, there is no need to have several antennas attached to the
rtls_coordinator - even if it would not hurt.
→ In other words, for these tests, the rtls_coordinator should be flashed on
an unmodified CC26x2R LaunchPad™.
- Open CCS.
- Import the
rtls_coordinatorproject. - Build the project.
- Flash the project on the second CC26x2R LaunchPad™.
- Reset the device (by pressing the reset button on the launchpad)
By default, the rtls_coordinator project supports both connection and
connectionless AoA.
Step 2 – Run the python scripts
How to find the COM port used by the rtls_coordinator?
- Un-plug all the launchpads attached to the computer expect the
one flashed with the
rtls_coordinatorexample. - Open the Device Manager
- Review the menu "Ports COM & LPT" to find the COM port used
by the Application/User UART.

For connection AoA
- Open the file <SimpleLink CC13XX / CC26XX SDK> → tools → ble5stack → rtls_agent → examples → rtls_connected.py with a text editor.
Modify the COM port used for the
rtls_coordinatorcoordinator_comport="COM27",- Save the changes and close the file.
Open a terminal. Move to the directory <SimpleLink CC13XX / CC26XX SDK> → tools → ble5stack → rtls_agent → examples.
cd <rtls_agent folder>/examplesRun the python script named
rtls_connected.pyc:\Python37\python.exe rtls_connected.py
The script will let the rtls_coordinator and the rtls_responder form
a connection. Once the connection formed, the rtls_coordinator asks the
rtls_responder to append a CTE to some connection packets. If the CTE is
properly appended, the rtls_coordinator reports IQ data (extracted from the
CTE). Here are ways to verify if the rtls_coordinator reports IQ data (i.e. if
the rtls_responder properly appends a CTE to the connection packets).
In the console, the python script displays messages telling you some IQ data is available.
[10:27:2022 10:02:54:421870] : Added new set of IQ into C:\ti\simplelink_cc13xx_cc26xx_sdk_x_xx_xx_xx\tools\b   le5stack\rtls_agent\examples\rtls_connected_log\rtls_raw_iq_samples_806fb01e55f7_0_loop1.csv
[10:27:2022 10:02:54:786872] : Added new set of IQ into C:\ti\simplelink_cc13xx_cc26xx_sdk_x_xx_xx_xx\tools\b   le5stack\rtls_agent\examples\rtls_connected_log\rtls_raw_iq_samples_806fb01e55f7_0_loop1.csv
The Python script creates a log file and a .csv file containing the IQ data. By default, these files are stored in <SimpleLink CC13XX / CC26XX SDK> → tools → ble5stack → rtls_agent → examples → rtls_connected_log and are named after the date and time the script get executed.
Here how the .csv file should looks like
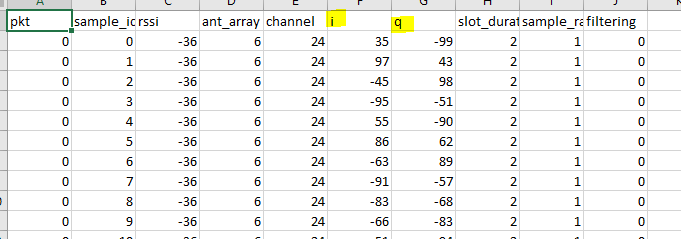
Here are a line in the log file showing the
rtls_coordinatorreports some IQ data[2022-10-27 10:02:53,798] root - INFO - COORDINATOR : 80:6F:B0:1E:55:F7 --> {'type': 'Event', 'command': 'RTLS_CMD_AOA_RESULT_RAW', 'payload': {'connHandle': 0, 'rssi': -36, 'antenna': 1, 'channel': 24, 'offset': 0, 'samplesLength': 45, 'samples': [{'i': 35, 'q': -99}, {'i': 97, 'q': 43}, {'i': -45, 'q': 98}, {'i': -95, 'q': -51}, {'i': 55, 'q': -90}, {'i': 86, 'q': 62}, {'i': -63, 'q': 89}, {'i': -91, 'q': -57}, {'i': -83, 'q': -68}, {'i': -66, 'q': -83}, {'i': -51, 'q': -94}, {'i': -31, 'q': -103}, {'i': -30, 'q': -102}, {'i': -11, 'q': -108}, {'i': 8, 'q': -106}, {'i': 17, 'q': -106}, {'i': 38, 'q': -98}, {'i': 53, 'q': -91}, {'i': 64, 'q': -87}, {'i': 66, 'q': -83}, {'i': 81, 'q': -71}, {'i': 93, 'q': -50}, {'i': 97, 'q': -41}, {'i': 104, 'q': -25}, {'i': 107, 'q': -8}, {'i': 107, 'q': 5}, {'i': 104, 'q': 18}, {'i': 97, 'q': 47}, {'i': 94, 'q': 53}, {'i': 80, 'q': 71}, {'i': 77, 'q': 74}, {'i': 66, 'q': 86}]}}
For connectionles AoA
- Open the file <SimpleLink CC13XX / CC26XX SDK> → tools → ble5stack → rtls_agent → examples → rtls_connectionless.py with a text editor.
Modify the COM port used for the
rtls_coordinatorcoordinator_comport="COM27",- Save the changes and close the file.
Open a terminal. Move to the directory <SimpleLink CC13XX / CC26XX SDK> → tools → ble5stack → rtls_agent → examples.
cd <rtls_agent folder>/examplesRun the python script named
rtls_connectionless.pyc:\Python37\python.exe rtls_connectionless.py
The script will let the rtls_coordinator synchronize with the periodic
advertisements sent by the rtls_responder. Once the synchronization
established the rtls_coordinator samples the CTE appended to the
periodic advertisement packets and report the IQ data.
No IQ data is reported if the rtls_responder does not send out
periodic advertisement or if these are not appended with a CTE.
Here are ways to verify if the rtls_coordinator reports IQ data.
In the console, the python script displays messages telling you some IQ data is available.
[10:27:2022 09:57:17:289245] : Added new set of IQ into C:\ti\simplelink_cc13xx_cc26xx_sdk_x_xx_xx_xx\tools\ble5stack\rtls_agent\examples\rtls_connectionless_log\rtls_raw_iq_samples_806fb01e55f7_0_loop1.csv
[10:27:2022 09:57:17:524198] : Added new set of IQ into C:\ti\simplelink_cc13xx_cc26xx_sdk_x_xx_xx_xx\tools\ble5stack\rtls_agent\examples\rtls_connectionless_log\rtls_raw_iq_samples_806fb01e55f7_0_loop1.csv
The Python script creates a log file and a .csv file containing the IQ data. By default, these files are stored in <SimpleLink CC13XX / CC26XX SDK> → tools → ble5stack → rtls_agent → examples → rtls_connectionless_log and are named after the date and time the script get executed.
Here how the .csv file should looks like
Here are a line in the log file showing the
rtls_coordinatorreports some IQ data[2022-10-27 09:57:17,134] root - INFO - COORDINATOR : 80:6F:B0:1E:55:F7 --> {'type': 'Event', 'command': 'RTLS_CMD_CL_AOA_RESULT_RAW', 'payload': {'syncHandle': 0, 'rssi': -35, 'antenna': 1, 'channel': 17, 'offset': 0, 'samplesLength': 45, 'samples': [{'i': 122, 'q': -17}, {'i': 19, 'q': 119}, {'i': -119, 'q': 5}, {'i': 11, 'q': -120}, {'i': 121, 'q': 22}, {'i': -26, 'q': 117}, {'i': -113, 'q': -37}, {'i': 46, 'q': -111}, {'i': 59, 'q': -102}, {'i': 93, 'q': -75}, {'i': 106, 'q': -54}, {'i': 120, 'q': -10}, {'i': 118, 'q': 20}, {'i': 106, 'q': 56}, {'i': 85, 'q': 84}, {'i': 62, 'q': 103}, {'i': 25, 'q': 118}, {'i': 2, 'q': 122}, {'i': -42, 'q': 115}, {'i': -60, 'q': 104}, {'i': -96, 'q': 73}, {'i': -114, 'q': 41}, {'i': -121, 'q': 6}, {'i': -115, 'q': -30}, {'i': -103, 'q': -60}, {'i': -87, 'q': -84}, {'i': -64, 'q': -100}, {'i': -32, 'q': -112}, {'i': 4, 'q': -116}, {'i': 43, 'q': -109}, {'i': 63, 'q': -100}, {'i': 98, 'q': -65}]}}
Is that all?
Yes! Here we have verified the CTEs are sent when expected. The quality of the CTEs (frequency, stability, etc.) has been verified through the RF-PHY tests of the Bluetooth certification (see here and here). If you follow TI's guidelines for Hardware Configuration and PCB Design this should not be a concern for you.
Task 3 – Use the LPSTK-CC1352R as target
Note
This task is not mandatory. You can skip it if you prefer continuing using the CC26x2R LaunchPad™.
The steps below are for CCS IDE with CCS compiler.
In your SDK, copy-paste the folder
<SDK>\examples\rtos\CC26X2R1_LAUNCHXL\ble5stack\rtls_responderto<SDK>\examples\rtos\CC1352R1_LAUNCHXL\ble5stack\rtls_responder.In the file
<SDK>\examples\rtos\CC1352R1_LAUNCHXL\ble5stack\rtls_responder\Tools\Defines\rtls_responder_app.opt, replace "-DDeviceFamily_CCCC26X2" by "-DDeviceFamily_CC13X2".In
<SDK>\examples\rtos\CC1352R1_LAUNCHXL\ble5stack\rtls_responder\tirtos7\ticlangrename the filertls_responder_CC26X2R1_LAUNCHXL_tirtos7_ticlang.projectspecintortls_responder_CC1352R1_LAUNCHXL_tirtos7_ticlang.projectspecModify the file rtls_responder_CC1352R1_LAUNCHXL_tirtos7_ticlang.projectspec. The goal is to replace all the references to CC26x2 files by references to CC13x2 files
- Find all the occurrences of "CC26X2R1_LAUNCHXL", replace by "CC1352R1_LAUNCHXL"
- Find all the occurrences of "/cc26x2r1/", replace by "/cc13x2r1/"
- Find all the occurrences of "_cc26x2.a", replace by "_cc13x2.a"
- Find "-DDeviceFamily_CC26X2", replace by "-DDeviceFamily_CC13X2"
Open CCS.
Import the
rtls_responderproject from<SDK>\examples\rtos\CC1352R1_LAUNCHXL\ble5stack\rtls_responder. Select the project using TICLANG compiler.Open the file rtls_responder.syscfg (using SysConfig)
In SysConfig, open the "device view".
Click on the button "Switch". A new window will appear. Select the board you are using (LPSTK-CC1352R Sensors).

Confirm your choice and let SysConfig running.
Review the eventual errors raised by SysConfig
Here the error is due to an error in the device selection (here again it should be "LPSTK-CC1352R1"). Modify this!
When all the errors are cleared, save and close the file.
Build the project. The project should build without any warning or error.
Now, connect your LPSTK-CC1352R and flash the device. More guidance on the way to do this is provided here.
The folowing hex file can be flashed on the LPSTK-CC1352R. rtls_responder_CC1352R1_LAUNCHXL_SDK_5_30_tirtos_ccs.hex. Right click on the file > Save Link As
You can use FLASH-PROGRAMMER-2 to flash it on the device.
Note: This hex file has not been fully tested and should not be used in production.
Task 4 – Disable unwanted AoA mode
So far, both connection and connectionless AoA are enabled. In general, both are not required so it might be interesting to disable one or the other.
Disable connection-AoA
Option 1
Connection AoA can be disabled by not joining any connection
(i.e. by not enabling any connectable advertisement).
By default, the handle advHandleLegacy is used for the
connectable advertisement.
- In CCS, in the rtls_responder project, open the file rtls_responder.c.
- Comment out all the occurences of
GapAdv_enable(advHandleLegacy. - Save, build the code and flash the device.
The solution suggested here is the one requiring the less work, but
maybe not the one leading to the most optimized code.
If the advertisement corresponding to the advHandleLegacy
is never used, all the code refering to it could be commented out.
Option 2
Connection AoA can be disabled by not appending CTE to the connection packets even if the other device requires it. Here how to proceed.
- In CCS, in the rtls_responder project, open the file rtls_responder.c.
- Find the line
RTLSSrv_setConnCteResponseEnableCmd(pPkt->connectionHandle, TRUE);This line enables the BLE stack to append a CTE to the connection packets when the connected device requires it. - Replace the line by
RTLSSrv_setConnCteResponseEnableCmd(pPkt->connectionHandle, FALSE); - Save, build the code and flash the device.
Disable connectionless AoA
Connectionless AoA can be completely disabled by not sending out the periodic
advertisements.
This can be done by removing the line -DUSE_PERIODIC_ADV in the file
rtls_responder_app.opt. Here are the detailed steps:
- In CCS, in the rtls_responder project, open the file Tools → Defines → rtls_responder_app.opt
- In this file, find and remove the line
-DUSE_PERIODIC_ADV - Save and close the file.
- Right click on the project and click "Rebuild All"
- Once done, re-flash the device.
Bonus – To go further...
Change the channel map (connectionless AoA)
For connectionless AoA, CTE are appended to periodic advertising sent on the secondary channel (0-37). Channel map modification can help to avoid transmission on the busiest channels. It can also help estimation algorithms fine tuning.
The function HCI_LE_SetHostChanClassificationCmd is used to do so.
Note
Per specifications, the minimum of used channels shall be 2.
      static chanMap_t chanMap;

      chanMap.chanMap[0] = 0x03; // Channels 0 and 1
      chanMap.chanMap[1] = 0x00;
      chanMap.chanMap[2] = 0x00;
      chanMap.chanMap[3] = 0x00;
      chanMap.chanMap[4] = 0x00;
      HCI_LE_SetHostChanClassificationCmd(chanMap.chanMap);
That's all folks!
You earned a coffee ☕.
Now go off and make something awesome with Angle Of Arrival!
This work is licensed under a Creative Commons Attribution-NonCommercial-NoDerivatives 4.0 International License.