Meet the CC3235x LaunchPad Development Kit (CC3235S-LAUNCHXL and CC3235SF-LAUNCHXL)
The CC3235x LaunchPad enables you to develop connected applications that demand low-power consumption with the added flexibility of cloud integration and advanced security features. It features the CC3235 as part of the SimpleLink Wi-Fi family that is the industry’s first Internet-on-a-chip™ solution offering Wi-Fi® certified™ IC’s and modules for easy connectivity to the cloud.
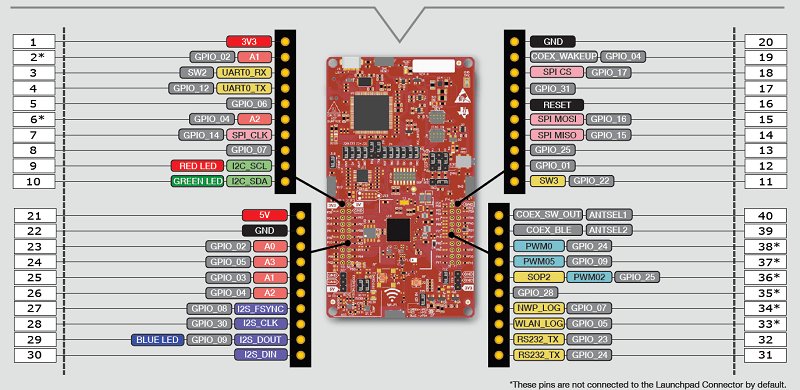
Many pins of the CC3235 device are fanned out for easy access. These pins make it easy to plug in 20-pin and 40-pin BoosterPacks that add additional functionality like industrial sensors, wireless technologies, and more.
Your LaunchPad's features
- Featured MCU: CC3235 Wi-Fi System-on-Chip (SoC)
- Connectivity: Wi-Fi
- CPU Speed: 80 MHz ARM Cortex-M4
- Non-volatile Memory: 1 MB integrated XIP flash (CC3235SF only) and external 4 MB serial flash
- RAM: 256 KB
- New Features: 5 GHz, BLE Coexistence, FIPS 140-2 Level 1 Certification
Learn more about the CC3235 Wi-Fi SoC at ti.com/simplelinkwifi
Board Overview
For easy development, the CC3235x LaunchPad features temperature and accelerometer sensors, programmable user buttons, three LEDs for custom applications, and onboard XDS110-based JTAG emulation for debugging.
Learn more about how to use the CC3235x LaunchPad in the Your LaunchPad Pinout section below!
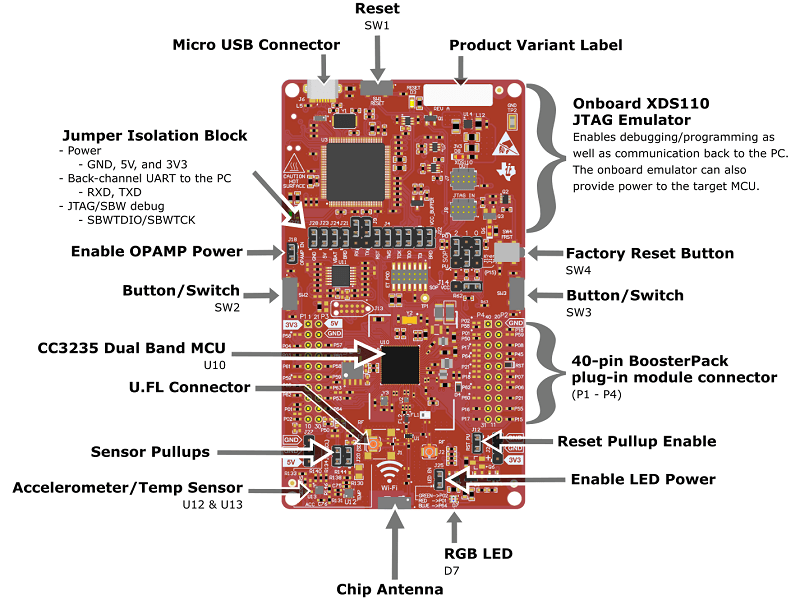
Your LaunchPad comes pre-configured with the jumpers required to boot the CC3235 in flash and functional mode (see the SOP pins section below). Additional jumpers are used to connect the on-board 4-wire JTAG debugger, power the LaunchPad, and connect the sensors, LEDs, and op-amps. For more information on LaunchPad jumpers and options, see the CC3235 LaunchPad Hardware User's Guide.
Device Overview
A Tale of Two Processors
The SimpleLink Wi-Fi CC3235x System-on-Chip (SoC) is a single chip with two separate execution environments: an application dedicated ARM Cortex-M4 micrcontroller (MCU) and a network processor (NWP) with integrated Wi-Fi and internet protocol stacks. The network processor executes from a built-in ROM and cannot be programmed by the user. The application MCU controls the NWP via commands sent over SPI using the SimpleLink host driver.
The physically separated environments free up the ARM Cortex-M4 to perform application tasks while all Wi-Fi activity is offloaded to the NWP. The separation also promotes security by limiting the impact of network-based attacks on the execution of the application MCU.
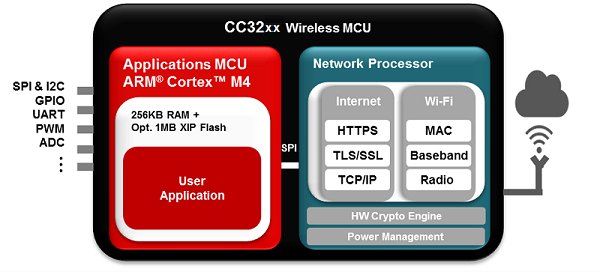
This means there are independent power management options for the Network Processor and the application MCU. For more information on power modes, please see the CC3135, CC3235 Power Management Application Report.
What is the service pack?
The service pack is a file that contains fixes and new features for the network processor firmware that is already in ROM. The latest service pack includes patches from all previous service packs.
It is very important to always have the latest released service pack flashed to the device. Service packs are released in each quarterly SDK in the tools/cc32xx_tools/servicepack-cc3x20 folder.
What is the external serial flash?
The external serial flash is required by the network processor for storing network and device configurations, passwords, and other files (certificates, keys, webpages, etc.) managed only by the network processor. The application can use this serial flash to store additional files.
The application MCU cannot access the file system directly; it must do so with APIs through the NWP. By managing the file system through the NWP, additional features are possible such as creating a secure file and setting permissions for access control to help protect sensitive information like private keys.
The serial flash also stores the application binary that is loaded by the bootloader to the RAM or XIP flash where it is executed by the application MCU. This application binary is flashed as part of an image with the ImageCreator tool. For more information on the flash programming process, see SysConfig ImageCreator Basics.
An important point to note is that if you debug the device with the JTAG, the application binary is not loaded onto the serial flash and the image is not retained upon reboot. For more information on the bootloader, see the What does the bootloader do for me? section below.
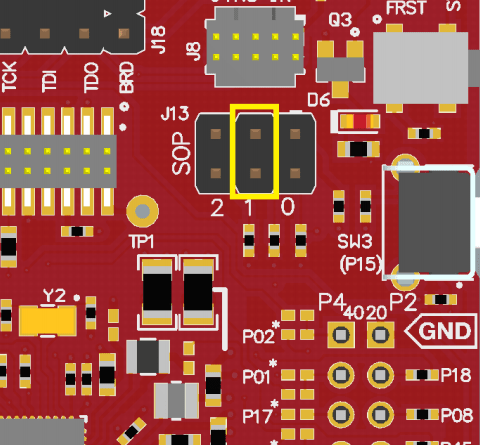
Sense-on-Power (SOP) Pins
The CC3235x device implements a sense-on-power scheme to determine the device operation mode upon power up. The encoding of these pins determines the boot flow and the default mapping for some of the pins (UART, JTAG, etc.) The SOP pins are connected to jumper J13 on the CC3235x LaunchPad, which is shipped in flash and functional mode (010) as shown in the table below.
| SOP pins | Function |
|---|---|
| 000 | Functional devleopment mode with 4-pin JTAG (TDI, TMS, TCK, TDO) |
| 001 | Functional development mode with 2-pin SWD (TMS, TCK) |
| 010 | Default: Flash and functional development mode with 4-pin JTAG |
| 011 | Restore factory default images when device reset is toggled |
| 100 | Flash programming |
What does the bootloader do for me?
The CC32xx devices have a ROM bootloader that executes upon device power up. The bootloader loads the application binary from the external serial flash into the on-chip memory where it is executed.
For the CC3235S and CC3235SF devices, the bootloader is responsible for verifying the application image as part of a secure boot process. On the CC3235S, the bootloader decrypts the application binary and performs an authenticity check prior to loading it to the RAM. The authenticity is determined based on a digitial signature derived from a chain of trust with a root CA from the trusted root-certificate catalog.
The CC3235SF device is similar to the CC3235S upon first boot, except the application binary is loaded into the XIP flash. At the end of the first boot, the bootloader also generates a hash of the application binary and stores it in the secure file system on the external serial flash. On subsequent boots, the bootloader performs an expedited boot of the CC3235SF image because it is maintained in non-volatile memory. The bootloader compares the hash of the application binary in the XIP flash to the image stored on the file system before executing.
Security features
For more information on the SimpleLink Wi-Fi security features, please see the Built-In Security Features App Note. For more information on certificates, please see the SimpleLink Wi-Fi Certificates Handling user's guide.
Technical Device Comparison
| Device | Memory | 5 GHz | BLE CoEx | SimpleLink SDK | Security | Sockets | Internet protocols |
|---|---|---|---|---|---|---|---|
| Wi-Fi SoC with integrated application MCU | |||||||
| CC3235SF | 1 MB XIP Flash & 256 KB RAM | Yes | Yes | Yes | Secure Boot, Secure File System, Network Security | 16 TCP/UDP/ TLS/SSL | IPv6, IPv4 |
| CC3235S | 256 KB RAM | Yes | Yes | Yes | Secure Boot, Secure File System, Network Security | 16 TCP/UDP/ TLS/SSL | IPv6, IPv4 |
| CC3230SF | 1 MB XIP Flash & 256 KB RAM | No | Yes | Yes | Secure Boot, Secure File System, Network Security | 16 TCP/UDP/ TLS/SSL | IPv6, IPv4 |
| CC3230S | 256 KB RAM | No | Yes | Yes | Secure Boot, Secure File System, Network Security | 16 TCP/UDP/ TLS/SSL | IPv6, IPv4 |
| CC3220SF | 1 MB XIP Flash & 256 KB RAM | No | No | Yes | Secure Boot, Secure File System, Network Security | 16 TCP/UDP, 6 TLS/SSL | IPv6, IPv4 |
| CC3220S | 256 KB RAM | No | No | Yes | Secure Boot, Secure File System, Network Security | 16 TCP/UDP, 6 TLS/SSL | IPv6, IPv4 |
| CC3220R | 256 KB RAM | No | No | Yes | Network Security | 16 TCP/UDP, 6 TLS/SSL | IPv6, IPv4 |
| CC3200 | 256 KB RAM | No | No | No | Network Security | 8 TCP/UDP, 2 TLS/SSL | IPv4 |
| Network Processor only | |||||||
| CC3135 | - | Yes | Yes | Yes | Secure File System, Network Security | 16 TCP/UDP/ TLS/SSL | IPv6, IPv4 |
| CC3130 | - | No | Yes | Yes | Secure File System, Network Security | 16 TCP/UDP/ TLS/SSL | IPv6, IPv4 |
| CC3120 | - | No | No | Yes | Secure File System, Network Security | 16 TCP/UDP, 6 TLS/SSL | IPv6, IPv4 |
| CC3100 | - | No | No | No | Network Security | 8 TCP/UDP, 2 TLS/SSL | IPv4 |
For more details on our product portfolio, check out SimpleLink Wi-Fi on TI.com.
Your LaunchPad's Out of Box Experience demo
Your LaunchPad was programmed at the factory with demo functionality built in. In this demo, the following features are highlighted:
- Easy connection to the CC3235 LaunchPad using the SimpleLink Wi-Fi Starter Pro mobile application. Users can use Access Point (AP) provisioning or SmartConfig™ provisioning for fast connection. Once the device is provisioned and connected to an access point in station mode, the profile is stored on the local file system so that any reset to the CC3235 automatically makes it connect to the access point.
- Over-the-air update, demonstrating an update of a full image. OTA service enables in-system update of the MCU application, service pack, and other vendor files. Update procedure executed in a full system integrity fashion, that is, failure in upgrading any of the image components would lead to rolling back to the previous valid version.
- Easy access to the CC3235 device demonstrates configuring and reading onboard sensors.
Task 1: Flashing the Out of Box Project
The CC3235x LaunchPad comes with all the required content flashed to run the Out of Box Experience!
If the device has never been used and just came out of the box, the user can skip to the next task.
To enable flash programming on the CC3235 LaunchPad, ensure that the SOP jumper is set to 010 as indicated in the image below.
To import the Out of Box project into Code Composer Studio, go to Project → Import CCS Projects.... Select your installed CC32xx SDK as the search directory. Browse for
simplelink_cc32xx_sdk_x_xx_xx_xx\examples\rtos\<LaunchPad>\demos\out_of_box\<RTOS>\ccs.You can also import examples directly from TI Resource Explorer: go to View → Resource Explorer and look for the CC32xx SDK.
Plug in your LaunchPad and build the project.
Press the Flash button to launch the ImageCreator tool within CCS. This will load the image containing the application binary, servicepack, user files, and device configurations onto the LaunchPad.

After flashing is completed, press the reset button on the LaunchPad to run the application.
Task 2: Download and Configure the Mobile App
The SimpleLink Wi-Fi Starter Pro application will be used to communicate network information to the CC3235 device and to detect SimpleLink Wi-Fi family devices connected to the network. Follow these steps to download and setup the Wi-Fi Starter Pro app.
Download the SimpleLink Wi-Fi Starter Pro Mobile application for your Android or iOS device: https://www.ti.com/tool/wifistarterpro
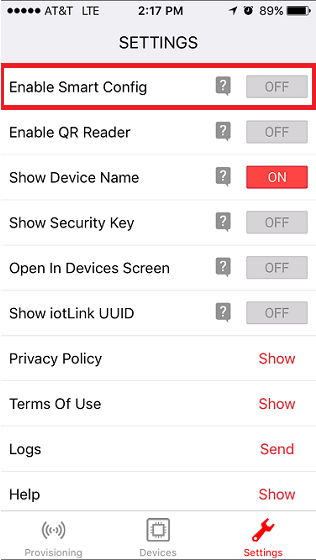
Open the app and navigate to the Settings tab.
After installing the mobile app, AP Provisioning should be enabled by default. To check that AP Provisioning is enabled, set Enable SmartConfig to OFF.
Task 3: Download a Serial Terminal Application
Many SDK examples come with support for printing debug information or operation status over UART. Some examples also require user input through the UART, so TI advises installing a serial terminal application. Tera Term is used for demonstration here, but any other terminal application may be used.
Install Tera Term (or any other serial terminal application) as per instructions.
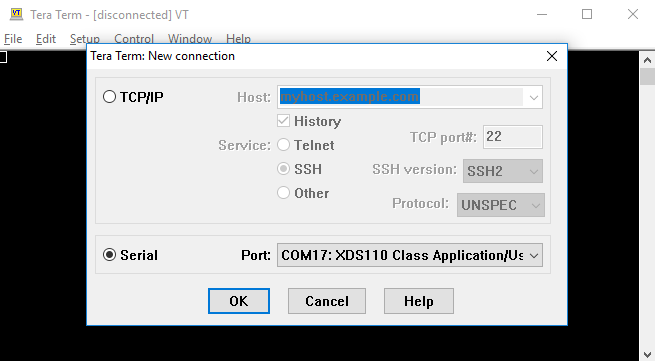
Run the application and go to File → New Connection, select Serial, and select the Port shown as XDS110 Class Application/User UART.
Go to Setup → Serial port and configure the settings as shown.
UART Configuration
Baud rate: 115200
Data: 8 bit
Parity: None
Stop: 1 bit
Flow control: None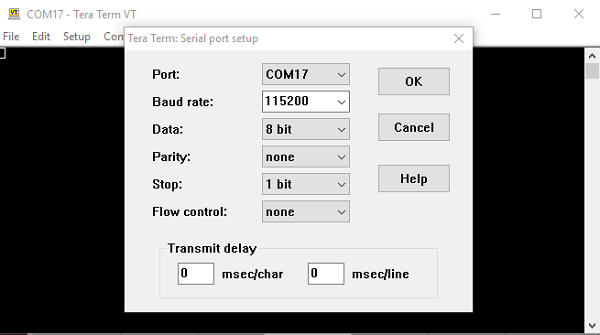
Task 4: Connect to the CC3235 in AP Mode
There are two ways to run the local network demo on the CC3235. In this task, we will connect to the CC3235 while it is in AP mode and then run the demo from your browser. Later in task 7, we will run the demo using the Wi-Fi Starter Pro mobile app.
First, we will configure the CC3235 in Access Point (AP) mode and then connect to it from our phone or computer. Setting the CC3235 as an AP is very convenient for when there is either no other available AP to connect to, or if a mobile app is not available to use for provisioning.
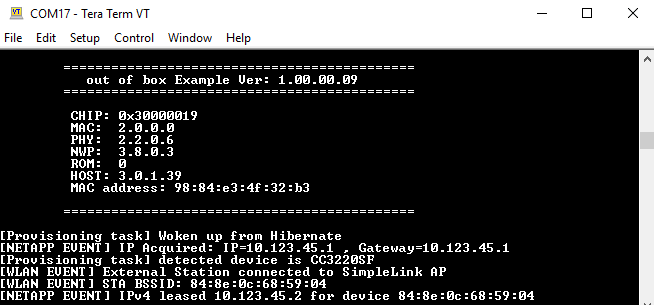
Set the CC3235 as an AP by pressing the SW2 switch on the CC3235 LaunchPad. The terminal will indicate that the device is switching to AP mode, along with a message displaying the IPv4 address of the CC3235 server.
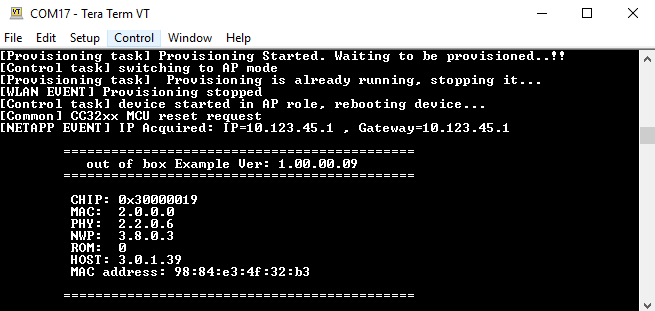
Now that the CC3235 is set as an AP, we can connect to it. The CC3235 network name will be 'mysimplelink-xxyyzz' where xxyyzz is the 3 least-significant bytes of the unique MAC address of the CC3235. The MAC address is displayed on the terminal upon initialization of the device.
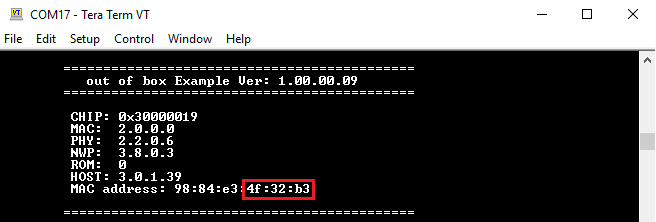
Upon a station successfully connecting to the CC3235, the terminal will display a success message, along with the MAC address and the IP address of the connected station.
Task 5: Run the local network demo
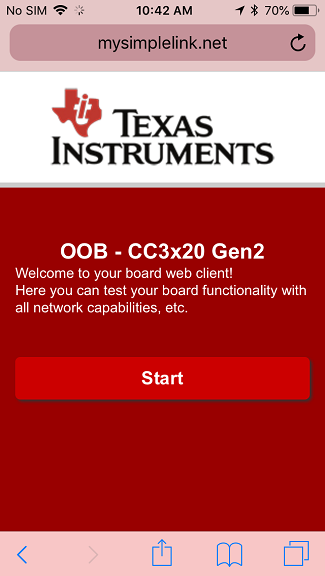
After the user is connected to the CC3235 in AP mode, the user can browse to the website hosted by the CC3235 by navigating to the URL http://mysimplelink.net from any browser.
Unable to access http://mysimplelink.net?
If you are using a mobile device, ensure that you have 'Mobile Data' turned off on your device. Not doing so will prevent you from connecting to the website hosted by the device.
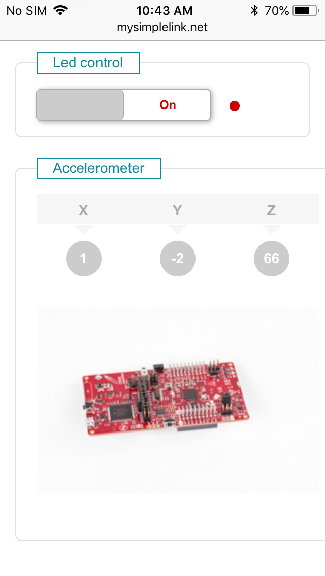
If you have successfully connected to the CC3235 onboard website, you will see the welcome message on the webpage, as shown in the image below. Click Start to proceed to the demo page.
On this screen, the user can see the device information, as well as control and get the state of the CC3235 onboard sensors. These sensors include the red LED (D10) and the accelerometer. In the Device info section, you can verify that the information here matches the device information that was displayed on your terminal upon startup.
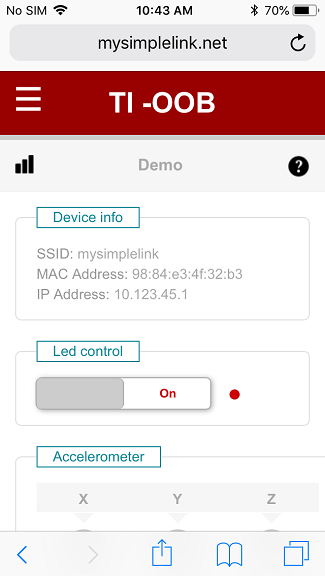
The 'Led control' section on the web page allows you to view the and change the state of the red LED. Click on the On/Off switch to change the state of the LED, and watch the red LED on the CC3235 LaunchPad turn on or off accordingly.
The 'Accelerometer' section on the web page shows live updates of the accelerometer readings, along with the equivalent 2D image of the CC3235 LaunchPad. Move the CC3235 board, and watch the accelerometer readings and the image on the web page update live. The update rate is once every 200ms.
Congratulations!
You have successfully connected to the CC3235 in AP mode and ran the local network demo!
Task 6: Provision the CC3235
Now we will provision the CC3235 and run the local demo with the Wi-Fi Starter Pro mobile app.
The process of providing the CC3235 with the network information of an Access Point (AP) is called provisioning. We will use the Wi-Fi Starter Pro app for AP provisioning in order to provide the CC3235 with the SSID and network password of the AP we want it to connect to.
Provisioning the CC3235
Visit the SimpleLink Academy Wi-Fi Provisioning Lab for more in-depth explanations and tutorials of the other provisioning methods.
Manually reset the CC3235 LaunchPad by pressing the Reset switch at the top of the board. This is to set the board back to Provisioning Mode.
Note
Configuring the CC3235 in AP mode is not persistent, which means a manual reset of the board will result in the CC3235 returning to its default configuration of Station mode. In Station mode, the CC3235 will try to connect to a stored profile - if this is unsuccessful, the CC3235 then begins provisioning mode. The only time that the AP mode configuration is persistent is upon automated reset of the CC3235, which occurs as part of the OTA update procedure.
Ensure your Starter Pro mobile app is configured to enable AP Provisioning. Go back and follow the steps in Task 2 if you have not done this yet.
Go to the Wi-Fi Settings on your mobile device, and connect your mobile device to your CC3235 device. This will have a network name of "mysimplelink-xxyyzz", where xxyyzz stands for the 3 least significant bytes of the unique MAC address of the CC3235.
Go to the Provisioning tab of the mobile app. You should see the Device to configure tab auto-populate with the name of the CC3235 device. If it does not, click on "Search for your device" to prompt the mobile app to connect to the CC3235.
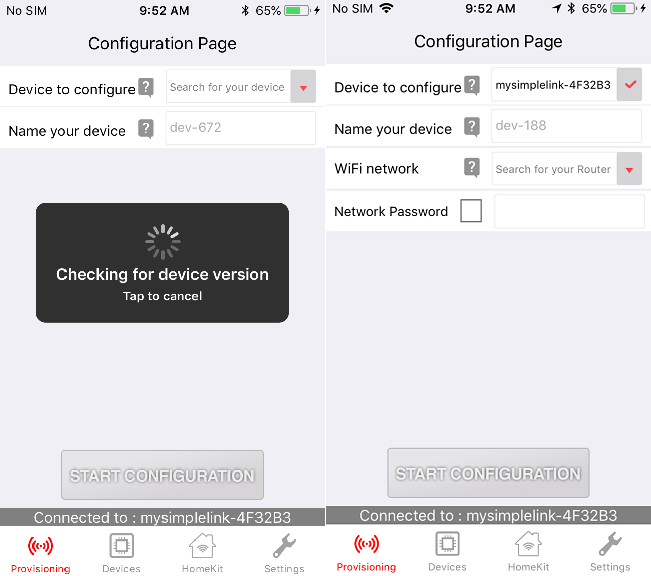
Click on the WiFi network box and select your router from the list. If your router is not listed, you can type in the SSID of the router in the textbox at the bottom of the list. If your network requires a password, then enter the password in the Network Password field. If it is an open network and does not require a password, you can leave this field blank. Optionally, give your device a name in the Name your device field. Your configuration page should now look similar to the screenshot below:
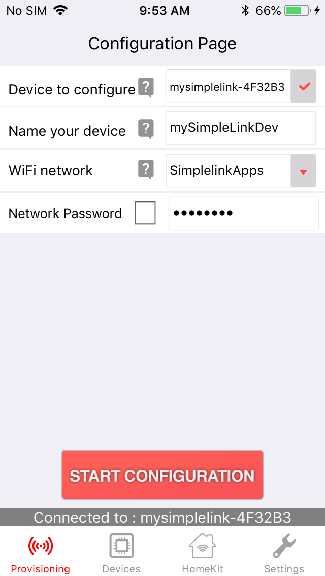
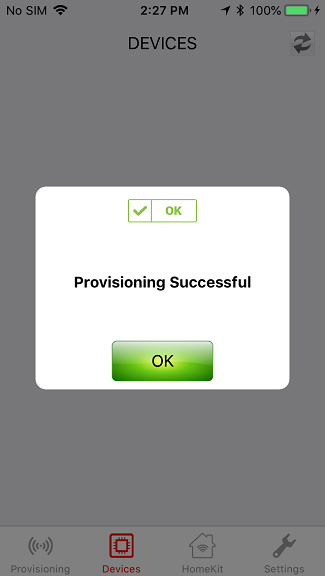
Press Start Configuration to begin AP provisioning. You can verify successful provisioning by checking the terminal output or the mobile app notification.
Task 7: Run the local network demo with the mobile app
An additional way to run the Out of Box demo is within the Wi-Fi Starter Pro mobile app. After the CC3235 has been provisioned, the CC3235 automatically connects to the AP and the mobile application is bound to your CC3235.
In the Starter Pro mobile app, go to the Devices tab and check to see that your CC3235 device is listed. You may need to hit the Refresh icon to update the app.

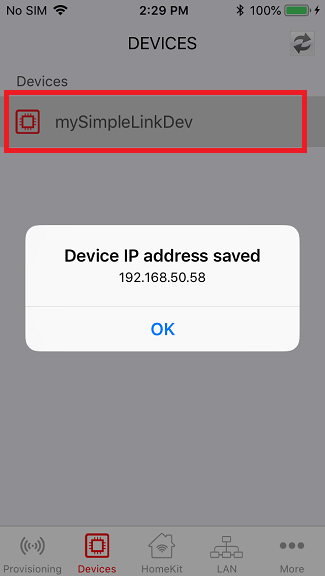
After provisioning, the app should update to display the LAN and OTA tabs at the bottom. These tabs may be hidden under the 'More' tab. If these tabs do not appear, then the mobile application needs to be binded to the CC3235. Do this by navigating to the Devices tab, selecting your device, and then pressing and holding it until you get a message indicating "Device IP address saved".
Navigate to the LAN tab in the mobile app to view the local network demo. You'll notice that the functionality is similar to the browser-version of the demo, although the mobile app does not display the live 2D image of the LaunchPad.
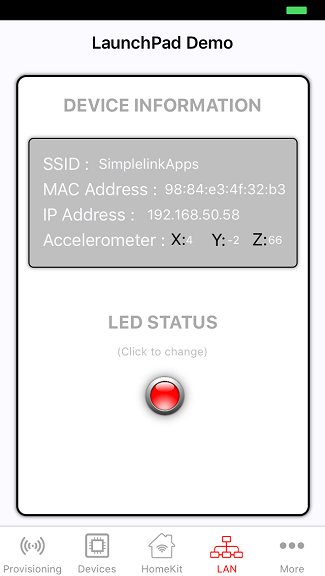
Click the button under LED STATUS to view the red LED (D10) on the LaunchPad turn on and off. Move the CC3235 to see the Accelerometer data update. The update rate is once a second.
Task 8: Local OTA Update
Over-the-Air (OTA) update provides an efficient way of wirelessly updating the software on your embedded device.
Local OTA is done from a local mobile device that has the OTA image for download. The mobile device connects to the CC3235, uploads the image, and then the CC3235 starts the firmware update. On the other hand, Cloud OTA is when the OTA image is located on a cloud server, and the CC3235 downloads the image from that server and then performs the firmware update. The CC3235 supports both Cloud OTA and Local OTA, but in this lab we will be demonstrating Local OTA.
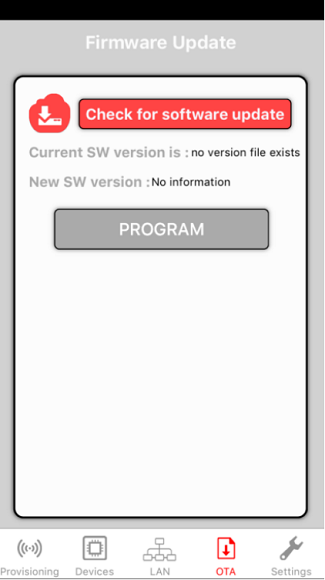
Ensure your mobile device is connected to the CC3235 and that it has been provisioned. The OTA tab should be available at the bottom of the Starter Pro mobile app. Refer back to Task 6 and Task 7 for reference.
Go to the OTA tab in Starter Pro. The Current SW version should indicate that no version file exists on the device. The New SW version indicates that the mobile app has not downloaded any files from the cloud server.
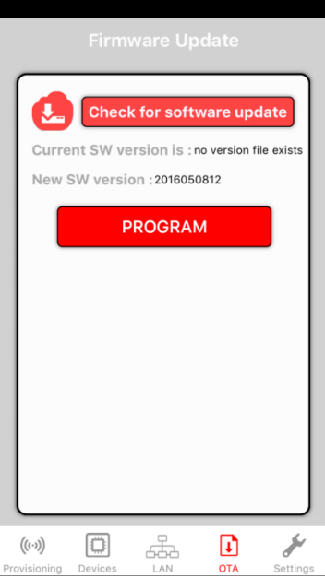
Click the Check for software update button. This will trigger the mobile app to download a new software version from a cloud server. The New SW version should update when the download is complete.
Alternatively, users may press and hold the Download icon next to the Check for software update button. This gives the user the option to fill in a URL to a software image.
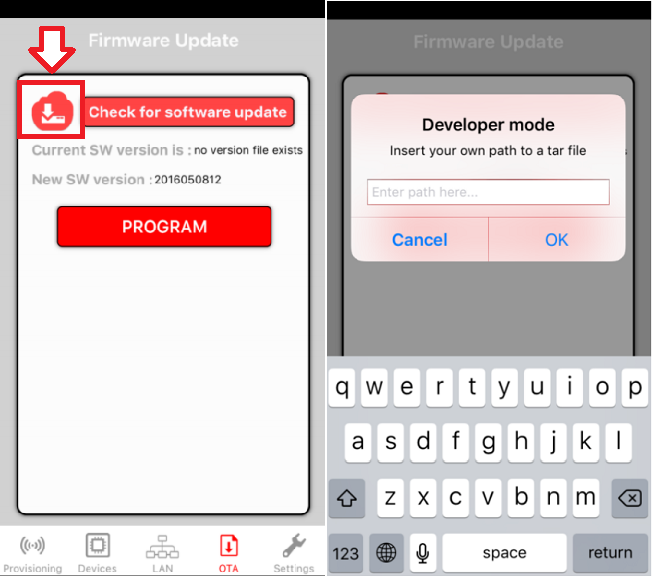
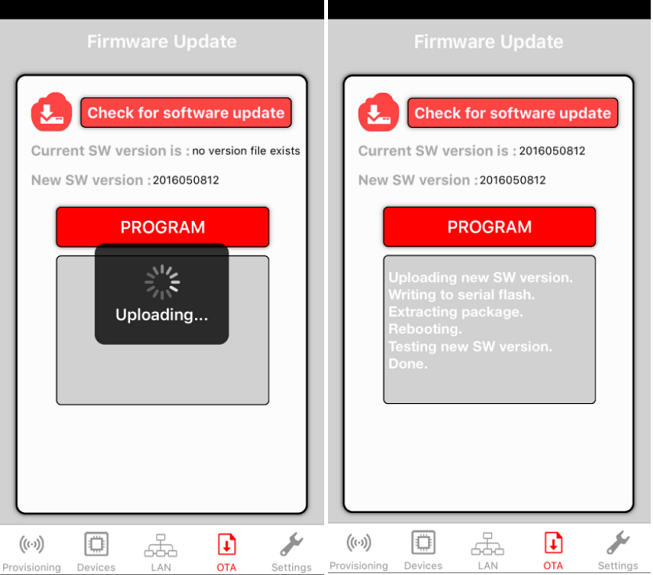
After the software image has been downloaded, start the software update by clicking the PROGRAM button. Upon a successful download, the app will display a "Upload finished!" message and the Curent SW Version will update.
Your LaunchPad Pinout
All LaunchPad kits adhere to the BoosterPack pinout standard (documented here). You can see the documentation for this specific LaunchPad in the CC3235 LaunchPad Hardware User's Guide
Your LaunchPad Resources
- CC3235 LaunchPad Hardware User's Guide
- Datasheet
- Network Processor Programmer's Guide
- Technical Reference Manual
- Power Management Application Note
- Built-in Security Features Application Note
- Wi-Fi Certificates Handling User's Guide
- SysConfig ImageCreator Basics
- BLE Coexistence Application Note
SimpleLink Academy overview page for your LaunchPad
For additional CC3235 technical documents, please see the product pages: https://www.ti.com/product/CC3235S/technicaldocuments or https://www.ti.com/product/CC3235SF/technicaldocuments
Start Developing on your LaunchPad
Get started with the SimpleLink CC32xx SDK
Get started with the SimpleLink CC32xx SDK - a complete software development kit for your device. Within the SDK, you will find code examples, drivers, middleware, documentation, migration guides & more.
Checkout SimpleLink Academy
- SimpleLink Academy is a comprehensive collection of trainings & exercises to get you up and running with the SimpleLink SDK.
- Visit the SimpleLink Academy overview page to see recommended content for this LaunchPad.
Checkout the SimpleLink CC32xx SDK Documentation Overview
This work is licensed under a Creative Commons Attribution-NonCommercial-NoDerivatives 4.0 International License.