Introduction
This workshop will cover basic cryptographic concepts, some of the cryptographic utilities supported by the SimpleLink™ Wi-Fi® CC32xx device, and a basic demonstration of how they can be used.
When thinking about security, we focus on three main components:
- Confidentiality - Meaning access to the information is limited (prevents unauthorized "reading" of information)
- Integrity - Meaning information is trustworthy and accurate (detects unauthorized "writing" of information)
- Availability - Meaning the information is available when needed
Cryptography is the study and practice of techniques used to establish these three components of security. The SimpleLink Wi-Fi CC32xx has built-in mechanisms, known as cryptographic utilites, that can be used by a developer to implement cryptography in an embedded system.
This workshop will start with an overview of some basic cryptography terminology and assumptions, then walk through multiple exercises using the CC32xx cryptographic utilites:
- Use the CC32xx hardware accelerators to calculate SHA1, HMAC-SHA1, and HMAC-SHA256
- Generate and verify ECDSA with the device unique key-pair
Prerequisites
Completed material
Software
- Code Composer Studio v10.3 or newer
- SimpleLink Wi-Fi CC32xx Wireless MCUs support installed
- Make sure that CCS is using the latest updates: Help → Check for Updates
- CC32xx SDK v5.20 or newer
- Terminal emulator program such as TeraTerm or PuTTY
Hardware
- 1x CC32xx LaunchPad
- CC3235S LaunchPad (LAUNCHXL-CC3235S)
- CC3235SF LaunchPad (LAUNCHXL-CC3235SF)
- CC3220S LaunchPad (CC3220S-LAUNCHXL)
- CC3220SF LaunchPad (CC3220SF-LAUNCHXL)
- 1x Micro-USB cable (included with LaunchPad)
Cryptography Overview
Terminology
There are many terms used when discussing cryptography that are important to know. Some of the basic terms that will be used throughout this lab are described below:
- Plaintext is readable (unencrypted) text or data
- A cipher or cryptosystem is used to encrypt plaintext
- The result of the encryption is ciphertext
- We decrypt ciphertext to recover the plaintext
- A key is used to configure a cryptosytem
- A symmetric key cryptosystem uses the same key to encrypt and decrypt
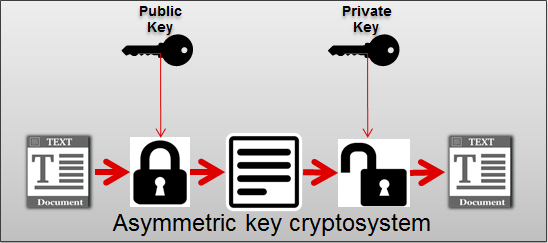
An asymmetric key cryptosystem uses a public key to encrpyt and a private key to decrypt

The Cryptosystem Assumption
The basic assumptions made about any good cryptosystem is that the system is completely known to the attacker and only the key is a secret. This means that we assume the cryptographic algorithms are not a secret. Experience has shown that secret algorithms never remain secret and tend to be weak when they are exposed.
Hash Functions
A hash function is a function that can be used to "compress" data of an arbitrary size to data of a fixed size. The input of a hash function is often referred to as a message and the output is known as a hash value or digest. Cryptographic hash functions must comply with the following requirements:
- Be deterministic (i.e. the same message always results in the same hash)
- Be quick for any given message
- Make it infeasible to generate a message from its hash value (except by trying all possible messages)
- Make small changes to a message result in large changes to the hash value, such that the new hash value appears uncorrelated with the original hash value
- Make it infeasable to find two different messages with the same hash value
Authentication
Authentication is the process or act of making sure a given entity is who you believe it to be. There are multiple ways to perform authentication based around different authentication factors. Common authentication factors include:
- Something you have (e.g. a key)
- Something you know (e.g. knowledge question)
- Something you are (e.g. fingerprint)
In the Internet of Things (IoT) world, the first factor is often the most relevant.
Hash-based Message Authentication Code (HMAC)
A hash-based message authentication code is a code for a message that is generated by applying a cryptographic hash function to the message and then encrypting the resulting digest with a symmetric cryptographic key. The HMAC can be used for verifying both the integrity of the data in the message and the authentication of the message. The strength of the HMAC is based on the underlying hash function.
Digital Signatures
A digital signature is a value that can be used to verify the integrity and authenticity of data, as well as provide non-repudiation. Digital signatures are based on asymmetric cryptosystems and generated for a message as follows:
- The signer calculates the hash of the "message" (digest)
- The signer encrypts the digest with his private key
The encrypted digest serves as the digital signature and is delivered along with the "message" to a recipient. The recipient then uses the following steps to verify the message:
- Calculate the digest of the received "message"
- Obtain the public key of the signer
- Decrypt the signature using the public key of the signer
- Check if the digest values match
If the decrypted digest and the calculated digest message match, the recipient can assume the message is authentic, has its integrity intact, and was signed by the signer. The diagram below is a simple representation of how a digital signature is used. In the diagram, the Hash block represents the hash function and the RSA block stands for the well-known Rivest-Shamir-Adleman public-key cryptosystem.

Quiz
Can an HMAC function as a digital signature?
An HMAC cannot function as a digital signature because it does not allow for non-repudiation. In this case, non-repudiation refers to the inability to deny the origin of the data. The origin of an HMAC can not be associated with a unique party because the key used to generate the HMAC is symmetric and known to multiple parties.
Task 1: Modifying Network Terminal
Now that we have reviewed some basic cryptography terminology, hash functions, hash-based message authentication, and digital signatures we will do some exercises with the CC32xx that show how it can perform these cryptographic functions. In this workshop, we will use the Network Terminal example from the CC32xx SDK as the basis for our exercises. The network terminal is a convenient starting point because it provides a framework for receiving commands through a serial terminal (e.g. Tera Term) and triggering simple routines.
- In CCS, open the TI Resource Explorer (View → Resource Explorer)
Expand the folders as shown to select the
network_terminalexample, then click the Import to IDE icon at the top-right- Be sure you select your desired project "flavor" (CC3235S-LAUNCHXL, CC3220SF-LAUNCHXL, TI-RTOS, Free-RTOS, CCS, GCC, etc.)
The following image shows the TI-RTOS / CCS example for this lab:
network_terminal_CC3220SF_LAUNCHXL_tirtos_ccs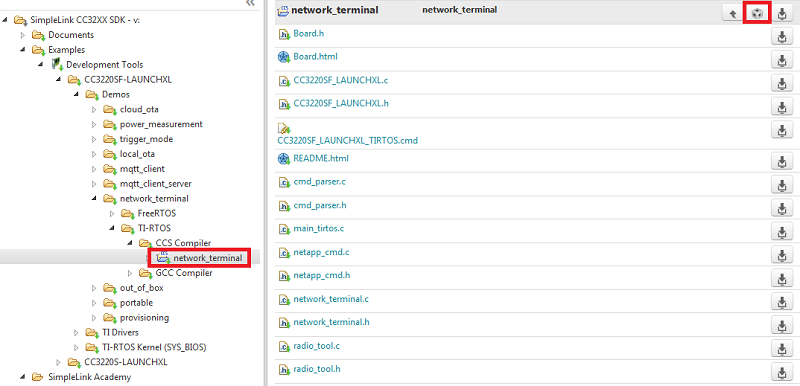
Add
cmd_stub.c,cmd_stub.h,crypto_utils.c, andcrypto_utils.hto the Network Terminal project. Thecmd_stubsource provides the framework for adding a new command that can be launched from the terminal. Theese files include the string that identifies the command, the callback function to be run in response to the command, and a simple function for printing how the command should be used. Thecrypto_utilssource includes example functions that can be used and/or modified in the following exercises.Important
The functions provided in the
crypto_utilsfiles are just example functions. They are not part of a standard driver for the CC32xx devices. The user must implement these functions on their own for their application.Add
#include <cmd_stub.h>to the beginning of the network_terminal.cModify the command list
gCmdList[]at the top of thenetwork_terminal.cfile to include our new Test commandtst.cmdAction_t gCmdList[] = { /* command */ /* Command callback */ /* Print Usage */ /* Show help */ { helpStr, cmdHelpCallback, printHelpUsage }, /* Scan */ { scanStr, cmdScanCallback, printScanUsage }, /* Set Scan Policy */ { setPolicyStr, cmdSetPolicyCallback, printSetPolicyUsage }, /* Connect */ { wlanConnectStr, cmdWlanConnectCallback, printWlanConnectUsage }, /* Disconnect */ { wlanDisconnectStr, cmdWlanDisconnectCallback, printWlanDisconnectUsage }, /* Add Profile */ { AddProfileStr, cmdAddProfilecallback, printAddProfileUsage }, /* Get Profile */ { GetProfileStr, cmdGetProfilecallback, printGetProfileUsage }, /* Ap start */ { ap_start_str, cmdWlanStartApCallback, printWlanStartApUsage }, /* Ap stop */ { ap_stop_str, cmdWlanStopApCallback, printWlanStopApUsage }, /* Connected Stations */ {ConnectedStationsStr, cmdConnectedStationsCallback, printConnectedStationsUsage}, /* Ping */ { pingStr, cmdPingCallback, printPingUsage }, /* Send */ { sendStr, cmdSendCallback, printSendUsage }, /* Recv */ { recvStr, cmdRecvCallback, printRecvUsage }, /* Create Filter */ { createFilterStr, cmdCreateFilterCallback, printCreateFilterUsage }, /* Enable Filter */ { enableFilterStr, cmdEnableFilterCallback, printEnableFilterUsage }, /* Disable Filter */ { disableFilterStr, cmdDisableFilterCallback,printDisableFilterUsage }, /* Delete Filter */ { deleteFilterStr, cmdDeleteFilterCallback, printDeleteFilterUsage }, /* WoWlan Enable */ { enableWoWLANStr, cmdEnableWoWLANCallback, printEnableWoWLANUsage }, /* mDNS Advertise */ { mDNSAdvertiseStr, mDNSAdvertiseCallback, printmDNSAdvertiseUsage }, /* mDNS Query */ { mDNSQueryStr, mDNSQueryCallback, printmDNSQueryUsage }, /* Transceiver mode */ { radiotool_Str, cmdTranceiverModecallback, printTranceiverModeUsage }, /* P2P start */ { p2pStartcmdStr, cmdP2PModecallback, printP2PStartUsage }, /* P2P stop */ { p2pStopcmdStr, cmdP2PStopcallback, printP2PStopUsage }, /* Soft roaming enable */ { SoftRoamingEnablecmdStr, cmdSoftRoamingEnablecallback, printSoftRoamingEnableUsage }, /* Soft roaming disable */ { SoftRoamingDisablecmdStr, cmdSoftRoamingDisablecallback, printSoftRoamingDisableUsage }, /* Ant selection Enable */ { AntSelectionEnablecmdStr, cmdAntSelectionEnablecallback, printAntSelectionEnableUsage }, /* Ant selection Disable*/ { AntSelectionDisablecmdStr, cmdAntSelectionDisablecallback, printAntSelectionDisableUsage }, /* Coex Enable */ { CoexEnablecmdStr, cmdCoexEnablecallback, printCoexEnableUsage }, /* Coex Disable */ { CoexDisablecmdStr, cmdCoexDisablecallback, printCoexDisableUsage }, /* Set Country Code */ { SetCountryCodeStr, cmdCountrycodecallback, printCountrycodeeUsage }, /* Clear term */ { clearStr, cmdClearcallback, printClearUsage }, /* Test Command */ { testCmdStr, cmdTestCallback, printTestCmdUsage } };network_terminal.c :: gCmdList[]
Build the project by selecting Build Project from the project menu or right-clicking the name of the project. It may take a couple minutes to build.
Open a UART terminal on your device's COM port. We want to use the XDS110 Class Application/User UART port with the following parameters:
UART Configuration
Baud rate: 115200
Data: 8 bit
Parity: None
Stop: 1 bit
Flow control: NoneIf you are using CCS, start debugging the application (click the green arrow in the top menu to start executing the code).
- When the command list appears you should see the
tstcommand. Run the command to make sure that the callback function gets called correctly. You should seeTODO: Make something happen!!output in the terminal.
Task 2: Calculate SHA1, HMAC-SHA1, and HMAC-SHA256
Using our framework for adding commands to the Network Terminal, we will now practice using the CC32xx hardware accelerators to run a basic hash function and generate two different types of HMACs on a string.
Exercise 2.1
In this first exercise, we will calculate SHA1 on a short string. Replace the
UART_PRINT("TODO: Make something happen!!\n\r")statement in the test command callback function with the appropriate code to calculate the SHA1 digest of a string. Take a look at the functions already incrypto_utils.cto help you!uint8_t *myString = "testString";cmd_stub.c - Variables
 int32_t cmdTestCallback(void *arg)
 {
     int32_t ret = 0;
     uint8_t result[250];

     ret = ParseCmd(arg);
     /*...*/

     ret = calcSha(myString, 10, result);    // calcSha() included in crypto_utils.c
     return ret;
 }
cmd_stub.c :: cmdTestCallback()
 user:tst
 calcSha()
         Completed
         SourceBuffer:
         74 65 73 74 53 74 72 69 6e 67

         Digest:
         95 62 65 65 7d 0b 63 7e f6 5b
         9b 59 f9 f8 58 ee cf 55 ed 6a
 user:
Terminal Output
Now that you have successfully calculated the SHA1 value, verify the result using an online SHA1 calculator. For example http://www.sha1-online.com/ or an equivalent online calculator. You should get the same result as in step 1.
Warning
Different online caluclators may assume a different format for the data you input (Text, Base64, HEX). Make sure you format your data appropriately for the caluclator to get the same result as shown on the Network Terminal.
Try adding one character to the string. For example, the string could be changed to "testString1". Compare to the original result and notice how the output changes drastically.
Exercise 2.2:
Modify the test command callback to now calculate the HMAC-SHA1 on the string from Exercise 1 by creating a key and calling the appropriate function from
crypto_utils.c. Compare the result to step 1 of Exercise 1.Key Length
The CC32xx assumes a key length of 64 bytes (512 bits) for these operations. Make sure your key is set to the appropriate length or your result will not be correct.
 uint8_t *myString  = "testString";
 uint8_t *myKey     = "1234567812345678123456781234567812345678123456781234567812345678";
cmd_stub.c - Variables
 int32_t cmdTestCallback(void *arg)
 {
     int32_t ret = 0;
     uint8_t result[250];

     ret = ParseCmd(arg);

     /*...*/
     ret = calcHmacSha(myString, 10, myKey, result);
     return ret;
 }
cmd_stub.c :: cmdTestCallback()
 user:tst
 calcHmacSha()
     SourceBuffer:
     74 65 73 74 53 74 72 69 6e 67

     HmacShaBuffer:
     1f 74 ca 09 c3 a4 0c 26 51 61
     cf 1c 7e b4 c3 2d 30 92 40 bf
Terminal Output
Compare your HMAC-SHA1 calculation to an online calculator.
Exercise 2.3: Create HMAC-SHA256 on the same string
Modify the function from
crypto_utils.cused in Exercise 2 to get the HMAC-SHA256 on the string. Notice that the length of the digest changes based on the hash algorithm used.This exercise only requires a small change to the calcHmacSha() function already being used.
 int32_t calcHmacSha(uint8_t* buff , uint16_t buffLen , uint8_t* key , uint8_t* signBuff)
 {
     CryptoCC32XX_HmacParams hmacParams;
     int32_t                 status;

     UART_PRINT("\r\ncalcHmacSha()\r\n");

     // if cryptoHandle was not already created, try to create it
     if (NULL == cryptoHandle)
     {
         cryptoHandle = CryptoCC32XX_open(0, CryptoCC32XX_HMAC);
         if (NULL == cryptoHandle)
         {
             UART_PRINT("\r\n\tError - Failed to create crypto handle\r\n");
             return -1;
         }
     }

     CryptoCC32XX_HmacParams_init(&hmacParams);
     hmacParams.pKey = key;
     hmacParams.moreData = 0;
     status = CryptoCC32XX_sign(cryptoHandle, CryptoCC32XX_HMAC_SHA256, buff, buffLen, signBuff, &hmacParams);

     if (status < 0)
     {
         UART_PRINT("Fail to calculate HMAC-SHA on the buffer (%d)\r\n",status);

         return -1;
     }

     printBuffer("SourceBuffer",buff,buffLen);
     printBuffer("HmacShaBuffer",signBuff, CryptoCC32XX_SHA256_DIGEST_SIZE);

     return 0;
 }
crypto_utils.c :: calcHmacSha() edited
 user:tst
 calcHmacSha()
         SourceBuffer:
         74 65 73 74 53 74 72 69 6e 67

         HmacShaBuffer:
         65 26 05 fb c2 dd 71 87 b8 51
         3e 1b 64 4b 11 34 2d bd b3 3a
         e3 04 08 d1 7d c8 37 4d 5c 93
         3a d2
Terminal Output
Compare your HMAC-SHA256 calculation to an online calculator.
Task 3: Generate ECDSA with the Device Unique Key-Pair
In this final task, we will practice generating and verifying digital signatures using the CC32xx. The CC32xx is capable of storing and managing up to 8 ECC key-pairs that can be used for signing and verifying data buffers, including a hardware-based device-unique key-pair.
There are three types of supported key-pairs:
- The device-unique key-pair: A single 256-bit unique key of the device, embedded in hardware
- Temporary key-pair: Created upon request of the application using the internal TRNG engine
- Installed key-pair: Key-pair added to the file system and maintained by vendor
For all key pairs, the private key is not exposed to the host and can only be used indirectly when running signing and decrypt operations. The public key can be retreived by the host application.
The following exercises are based on the first type of key-pair, the device-unique key-pair.
Exercise 3.1:
First, modify the test command callback to use a
crypto_utils.cfunction for signing a short string using the device-unique key-pair.Elliptic-Curve Digital Siganture Algorithm (ECDSA)
The resulting signed buffer will be different for each user (and the example solutions below) due to the use of cryptographically secure random values in the ECDSA algorithm and the fact that each device key is unique. The size of the signature itself can also vary slightly depending on the random values used.
 int32_t cmdTestCallback(void *arg)
 {
     int32_t ret = 0;
     uint8_t result[250];
     uint16_t resultLen = 250;

     ret = ParseCmd(arg);

     /*...*/
     ret = ecdsaSignBuffer(myString, 10, result, &resultLen);

     return ret;
 }
cmd_stub.c :: cmdTestCallback()
 user:tst
 ecdsaSignBuffer()
         SourceBuffer:
         74 65 73 74 53 74 72 69 6e 67

         Completed       Signature:
         30 44 02 20 51 fe 6b 98 4f 45
         fb b6 e6 ec c5 b2 32 77 77 68
         e3 4f f6 45 56 55 42 82 98 e8
         28 e5 67 10 64 b1 02 20 55 dc
         84 f7 d1 d3 7b 4f de 5a 9a 80
         50 ac b3 65 e3 6e 29 51 3d ae
         9d 6d 30 61 2b 6b d1 a4 68 16
Terminal Output
Now, verify the signature with the original string.
 int32_t cmdTestCallback(void *arg)
 {
     int32_t ret = 0;
     uint8_t result[250];
     uint16_t resultLen = 250;

     ret = ParseCmd(arg);

     /*...*/
     ret = ecdsaSignBuffer(myString, 10, result, &resultLen);

     ret = ecdsaVerifyBuffer(myString, 10, result, resultLen);
     return ret;
 }
cryto_utils.c :: cmdTestCallback()
 user:tst
 ecdsaSignBuffer()
         SourceBuffer:
         74 65 73 74 53 74 72 69 6e 67

         Completed       Signature:
         30 45 02 20 41 3c 65 85 46 1e
         f6 6f 65 61 22 fa f0 ba 85 32
         b1 ab 69 ad 72 c6 1a 4f a4 5b
         df 8f 89 df da 80 02 21 00 e0
         ca bd b6 14 c2 d0 d2 6c 01 5d
         24 5b af 19 ca de 76 36 31 f4
         9b 63 dc 63 95 ac 0b aa 06 bd
         c7

 ecdsaVerifyBuffer()
         SourceBuffer:
         74 65 73 74 53 74 72 69 6e 67

         SignBuffer:
         30 45 02 20 41 3c 65 85 46 1e
         f6 6f 65 61 22 fa f0 ba 85 32
         b1 ab 69 ad 72 c6 1a 4f a4 5b
         df 8f 89 df da 80 02 21 00 e0
         ca bd b6 14 c2 d0 d2 6c 01 5d
         24 5b af 19 ca de 76 36 31 f4
         9b 63 dc 63 95 ac 0b aa 06 bd
         c7

         Completed - Verification Passed!!!
Terminal Output
Try to verify the signature again with a different string. You should see that the verification fails.
Change the signature and try to verify the original string. As in step 3 above, the verification should fail.
Exercise 3.2:
It is important to note that the CC32xx only has a fixed amount of memory reserved for storing message buffers when verifying a signature. To allow the device to verify the signature of a buffer of arbitrary length, the application can pre-compute the digest of the buffer and use the digest to verify the signature.
Try this out by modifying the test command callback to first calculate SHA1 on the string and then verify the signature using the pre-calculated digest.
    int32_t cmdTestCallback(void *arg)
    {
        int32_t ret = 0;
        uint8_t result[250];
        uint16_t resultLen = 250;
        uint8_t digest[50];

        ret = ParseCmd(arg);

        /*...*/
        ret = ecdsaSignBuffer(myString, 10, result, &resultLen);
        ret = calcSha(myString, 10, digest);
        ret = ecdsaVerifyDigest(digest, CryptoCC32XX_SHA1_DIGEST_SIZE, result, resultLen);

        return ret;
    }
cryto_utils.c :: cmdTestCallback()
    user:tst
    ecdsaSignBuffer()
            SourceBuffer:
            74 65 73 74 53 74 72 69 6e 67

            Completed       Signature:
            30 45 02 21 00 8e 78 53 79 7c
            53 ff 96 24 e3 d6 34 9f e1 31
            95 c9 0a 07 d3 59 da 48 51 e6
            4d 4d eb dc 3c 28 96 02 20 0c
            0d e8 de 46 9a c5 8b 48 a2 18
            8c 7d 5a c1 8d 47 18 82 b2 53
            a2 60 72 2f 1a 51 55 0a c3 22
            6e


    calcSha()
            Completed
            SourceBuffer:
            74 65 73 74 53 74 72 69 6e 67

            Digest:
            95 62 65 65 7d 0b 63 7e f6 5b
            9b 59 f9 f8 58 ee cf 55 ed 6a


    ecdsaVerifyDigest
            Digest:
            95 62 65 65 7d 0b 63 7e f6 5b
            9b 59 f9 f8 58 ee cf 55 ed 6a

            SignBuffer:
            30 45 02 21 00 8e 78 53 79 7c
            53 ff 96 24 e3 d6 34 9f e1 31
            95 c9 0a 07 d3 59 da 48 51 e6
            4d 4d eb dc 3c 28 96 02 20 0c
            0d e8 de 46 9a c5 8b 48 a2 18
            8c 7d 5a c1 8d 47 18 82 b2 53
            a2 60 72 2f 1a 51 55 0a c3 22
            6e

            Completed - Verification Passed!!!
Terminal Output
Further Reading
CC3x20, CC3x3x Solution Built-In Security Features: This guide describes the security features built-in to the CC31xx and CC32xx devices, including the Secure Key Storage and Hardware Crypto Engines.
CC3x20, CC3x3x NWP Programmer's Guide: This guide contains information on how to use the SimpleLink API for writing WLAN-enabled applications and using built-in security features.
UniFlash ImageCreator User's Guide: The Imaging tool manually stores files on the external serial flash. ImageCreator can be used to add vendor created key files to the file system to be used as Installed Key-Pairs.
Technical support
For any questions, please search on the TI SimpleLink Wi-Fi E2E Forum
This work is licensed under a Creative Commons Attribution-NonCommercial-NoDerivatives 4.0 International License.