Introduction
The Trusted Computing Group’s Device Identity Composition Engine (DICE) Architectures Work Group is developing new standards to enhance security and privacy without requiring complex, high-cost silicon features. As a result these standards are appropriate for use in wireless MCUs. DICE has introduced a standard implementation for identity-based device and software attestation. This attestation methodology is X.509 certificate-based and uses a Certificate Signing Request (CSR) to obtain the client certificate from a device vendor’s provisioning service at boot time.
SimpleLink Wi-Fi devices have always supported mechanisms for secure software booting and updates. The introduction of DICE now enables SimpleLink Wi-Fi CC323x device to support a standards-based implementation that includes remote software attestation as an additional capability. The initial implementations of DICE were developed by Microsoft and can be supported by Azure IoT Device Provisioning Service.
Software attestation: A mechanism for software to prove its identity. The goal of attestation is to prove to a remote party (such as a cloud service) that the device’s embedded software is intact and trustworthy and has not suffered a malware takeover.
Prerequisites
Recommended material
Software
- Code Composer Studio v10.1 or newer
- SimpleLink Wi-Fi CC32xx Wireless MCUs support installed
- Make sure that CCS is using the latest updates: Help → Check for Updates
- CC32xx SDK v4.10
- CC32xx Azure IoT Plugin v4.10
- UniFlash v6.0 or newer
- Terminal emulator program such as TeraTerm or PuTTY
- OpenSSL or other crytography software
Hardware
- 1x CC323x LaunchPad
- CC3235S LaunchPad (LAUNCHXL-CC3235S)
- CC3235SF LaunchPad (LAUNCHXL-CC3235SF)
- 1x Micro-USB cable (included with LaunchPad)
- 802.11b/g/n Wireless Access Point (AP) with internet access
Important
This workshop relies on a CC323x feature that was introduced with service pack verison 4.4.1.3_3.1.0.5_3.1.0.19. Be sure you have the latest SDK downloaded and the latest service pack flashed to your device for this workshop.
Using DICE with SimpleLink Wi-Fi
SimpleLink Wi-Fi implements the DICE Core and layer 0 functions (subsequently referred to here as the DICE software) in TI-controlled software that may be only modified via SimpleLink’s secure update process. This helps protect the DICE software from malware takeovers.
To support identity-based device and software attestation, the DICE software creates two keys and their associated certificates: the Device Identity (DeviceID) key and the Alias Key.
The DICE software initially creates a value known as the Compound Device Identity (CDI) based on a hash of the DICE core software and the unique key-pair which is embedded into the hardware of each SimpleLink device. The DICE software then uses the CDI to create an asymmetric key pair known as the Device ID that serves as a long term identifier for the device and never changes. The private key value of the Device ID is never disclosed outside of the DICE software and memory is wiped to make it impossible for the image subsequently loaded to obtain it.
Next, the DICE software derives a second key pair, called the Alias Key. The Alias Key depends on the identity of the next software layer – layer 1 – which in the case of most SimpleLink Wi-Fi applications will be the application firmware image. The DICE software performs a hash of this image to create the Firmware Identity (FWID) and then uses this and the DeviceID to create the Alias Key Pair. Unlike the Device ID, the Alias Key will likely change over the lifetime of a device as it must be regenerated every time the application firmware is updated. Both the public and private parts of the Alias Key are available for use by the application firmware.
To connect to a cloud vendor’s IoT server, the IoT device requires a client certificate that the server can use to authenticate the device. To obtain this, the DICE software generates a CSR in PKCS #10 format containing the Device ID Public Key. The device vendor must provide a CA service that fulfills the CSR request and returns a signed certificate to the device. When a SimpleLink Wi-Fi-based device receives the signed certificate, it can store it in its secure file system and initiate a connection to a provisioning service, such as the Azure IoT Device Provisioning Service, to join the IoT network. The CSR (and resulting) certificate also contains an extension field, known as the Composite Identity that encodes the Device ID and FWID, which provides attestation information so that the server can, if desired, check whether the device firmware is valid and up-to-date. A CSR-based approach provides IoT device vendors with an opportunity to simplify manufacturing flows by eliminating the need to use an HSM to manage directly programming program a (unique) certificate and its associated private key into every IoT device.
This SimpleLink Academy lab will walk you through creating the DICE CSR, getting it fulfilled using openSSL, and then securely storing it in the SimpleLink Secure Filesystem.
Task 0: Generate the device ID certificate
In this section, we will use the built-in DICE software to generate the Certificate Signing Request and sign the device ID certificate.
Open UniFlash ImageCreator and create a new project. We will want the device in Development mode for this lab.
UniFlash ImageCreator
If you are unfamiliar with the features in UniFlash ImageCreator such as adding a service pack or programming the device, please review the UniFlash ImageCreator Basics lab before continuing!

From the Simple view, be sure to add the latest servicepack from the SDK. This is important to enable the DICE feature.
Navigate to the Advanced view and go to System Setting -> Device -> Device Identity. We want to Enable DICE and fill in the details for the Certificate Sign Request. Use Unique device ID (UDID) as common name should be checked with DICE enabled.

Connect and Program the LaunchPad. This will flash the DICE configuration settings and trigger the generation of the CSR on the CC323x.
After programming is complete, Connect the LaunchPad again, go to Advanced view, and click the Tools button. Select Read CSR and save the file to a directory of your choice. We will use this directory for all command line tasks in this lab.

What is a CSR?
The certificate signing request is a message sent from an applicant to the certificate authority to request the creation of a digital certificate. As part of the CSR, the applicant must provide its public key plus a signature of some data (made with the private key) in order for the authority to verify that the applicant owns the public key. For more explanation of the CSR, see the Wi-Fi CSR lab or the Generating a Certificate chapter of the Wi-Fi Certificate Handling guide.
To sign the device ID certificate, we first need a root CA. For this lab, we will use OpenSSL to create a self-signed root CA. You can also use a root CA certificate and key provided by a certificate authority.
Open a command line with OpenSSL support in your chosen directory and run the following command to create the private key
rootca-private-key.pem:openssl ecparam -name prime256v1 -genkey -param_enc named_curve -out rootca-private-key.pemOpenSSL command
Create a new root CA certificate
rootca.pemand sign it with the private key.openssl req -new -x509 -key rootca-private-key.pem -out rootca.pemOpenSSL command
OpenSSL will prompt you to fill in your parameters for the certificate. By default, OpenSSL will configure the certificate to be valid for 365 days. You can change this by adding
-days <number>to the above command.
The CSR from the CC323x is in DER format, but we need to change it to PEM format to use with OpenSSL. Use the following command:
openssl req -in csr.der -inform DER -out csr.pem -outform PEMOpenSSL command
Create a file called
ca_configurations.cfgwith the following content. These are the x.509 extentions required by the DICE software.subjectKeyIdentifier=hash authorityKeyIdentifier=keyid:always,issuer:always basicConstraints = CA:trueca_configurations.cfg
Finally, use the CSR and root CA certificate and key to create the signed device ID certificate
cert.pem.openssl x509 -req -SHA256 -in csr.pem -CA rootca.pem -CAkey rootca-private-key.pem -CAcreateserial -set_serial 1000 -extfile ca_configurations.cfg -out cert.pemOpenSSL command
We will flash this certificate to the CC323x in a later task.
Task 1: Set up Device Provisioning Service on the Azure portal
CC32xx Azure IoT Plugin
If you are new to the Azure Plugin, check out the User's Guide to get started!
Create a Device Provisioning Service instance, create a IoT hub, and link them according to Azure's set up tutorial.
Add the root CA certificate (that we used to sign the device ID certificate) to the DPS instance. From the Settings pane on the left, go to Certificates and Add our
rootca.pem. You can use any name.
Verify ownership of the root CA certificate we uploaded. This is also known as proof-of-possession.
Proof-of-possession with OpenSSL
After generating a verification code, you can digitally sign the verification code using either Azure's tools or OpenSSL.
These commands will generate a new private key in order to create a CSR with Azure's verification code as the common name. Then, we will use this CSR and the root CA private key to prove we own the root CA certificate.
openssl genrsa -out verification.key 2048openssl req -new -key verification.key -out verification.csrThis command will prompt for certificate fields. Common Name must be the verification code copied from the Azure portal.
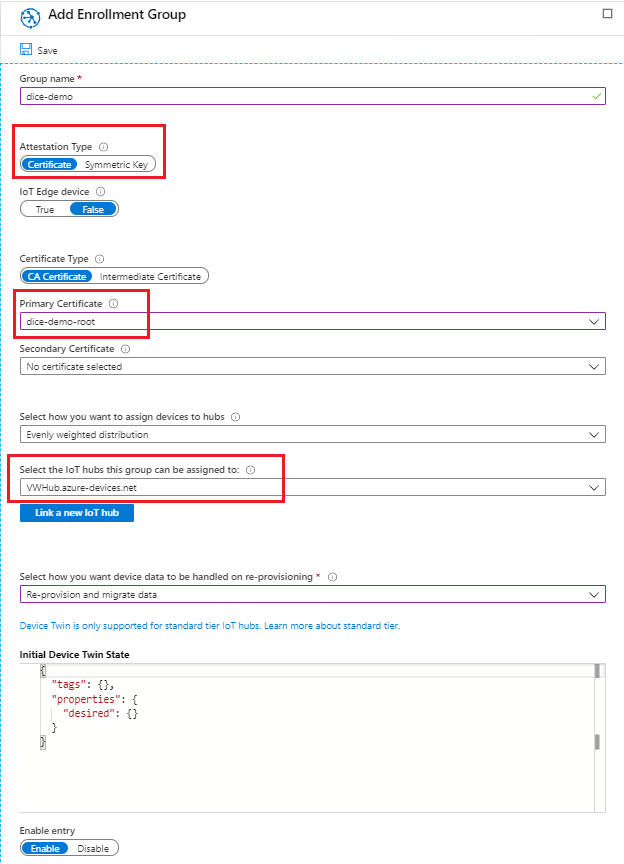
openssl x509 -req -in verification.csr -CA rootca.pem -CAkey rootca-private-key.pem -CAcreateserial -out verification.pem -sha256Our last step is to add the enrollment group. From the Settings pane, go to Manage enrollments and Add enrollment group. We will configure the group for X.509 based devices by selecting the Certificate attestation type and choosing our root CA as the Primary Certificate.
Task 2: Configure the prov_dev_client_ll_sample example
In CCS, import the
prov_dev_client_ll_sampleexample from the CC32xx Azure IoT Plugin.Open
wificonfig.hand set the SSID, security key, and security type for your Access Point.Open
prov_dev_client_ll_sample.cand find theid_scopedeclaration. In the Azure portal, go to the Overview of your DPS instance to find the ID Scope. Copy this ID scope and use it to update theid_scopestring in your code.

Open
prov_dev_client_ll_sample.hand find the definitions forX509_CERT,X509_KEY, andCOMMON_NAME.We will be using the alias certificate chain and alias key generated by the DICE software and stored in the device serial flash. Define
X509_CERTas"aliascert.pem"andX509_KEYas"/sys/tempkey02.der".The common name of the alias certificate contains the unique device ID (UDID) of the CC323x. One way to retrieve this is to find the common name of our device ID certificate using OpenSSL.
openssl x509 -noout -subject -in cert.pem
Copy the UDID and use it for the
COMMON_NAMEin the format"Alias_<udid>".
Right-click on the
prov_dev_client_ll_sampleproject, select Add Files, and opensource/third_party/azure-iot-pal-simplelink/pal/src/tlsio_sl.c. This file is part of the adaptation layer of the Azure IoT SDK, and we need to edit an error-checking parameter for this lab.Open
tlsio_sl.cin your project and find the if-statement at line 370 afterSlNetSock_startSec(). Replace this if-statement with the following code:if (status < 0) { if (status == -468) { Display_printf(display, 0, 0, "Warning: Unknown root CA. Cannot verify certificate catalog\n"); } else { LogError("SlNetSock_startSec failed to start session\n"); error = true; goto cleanup; } }tlsio_sl.c - SlNetSock_startSec() error checking
Error -468
Error -468 is
SL_ERROR_BSD_ESECUNKNOWNROOTCAwhich means the device cannot verify a root CA certificate against the trusted root certificate catalog flashed the device.In this lab, we are using a "dummy" root CA created with OpenSSL instead of a root CA from a real certificate authority, so we want this check to be a warning instead of a library error. For production applications, do not make this change and be sure to use a trusted certificate authority.
For details on the built-in security features of the CC323x, please see the Security Application Report.
At the top of
tlsio_sl.c, add the include file and handle required forDisplay_printf.#include <ti/display/Display.h> extern Display_Handle display;tlsio_sl.c
In order to build
tlsio_sl.c, we need to add two additional include paths. Go to Project Properties -> Build -> ARM Compiler -> Include Options. Add the following include paths:${COM_TI_SIMPLELINK_CC32XX_SDK_INSTALL_DIR}/source/ti/net/bsd${COM_TI_AZURE_CC32XX_INSTALL_DIR}/source/third_party/azure-iot-pal-simplelink/pal/inc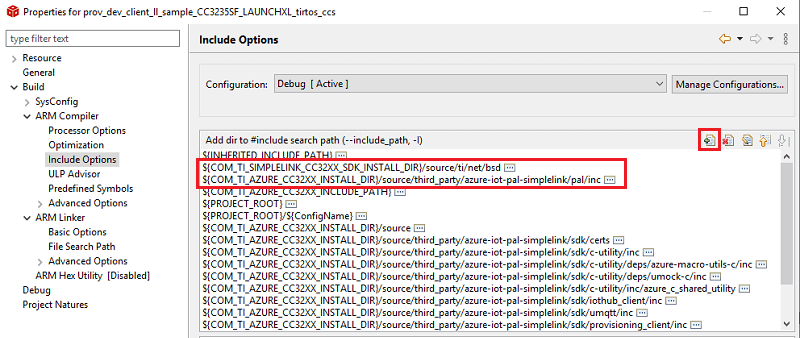
To build
tlsio_sl.c, we also need to link to a library that includes the symbols for the other logging features. Go to Project Properties -> Build -> ARM Linker -> File Search Path. Double-clickcommon_sl_prov_release.aand change it tocommon_sl_prov_debug.a. Apply and close.
Build the project.
Task 3: Flash MCU image and signed device ID certificate
Open the UniFlash ImageCreator project, go to the Simple view, and add the MCU Image. This will be the binary we just built:
<ccs_workspace>/prov_dev_client_ll_sample/Debug/prov_dev_client_ll_sample.bin.Connect and Program to the LaunchPad. The DICE software requires a MCU image must be flashed to the device in order for the alias certificate and key to be generated.
After programming, Connect the LaunchPad again, and go back to Tools from the Advanced view. Now we will write the signed device ID certificate to the serial flash.

Navigate to Online User Files to see the file system.
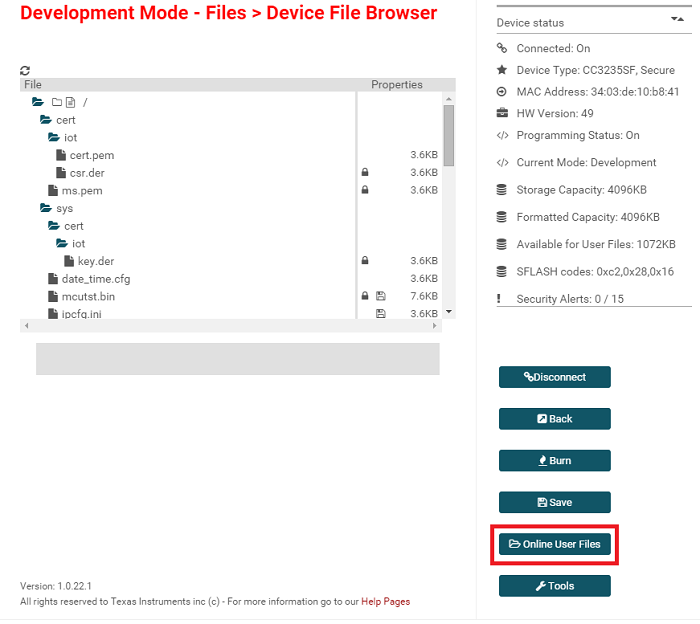
What are the files generated by the DICE software?
- csr.der: Certificate Signing Request
- cert.pem: signed device ID certificate
- key.der: device ID private key
- aliascert.pem: certificate chain of alias certificate and device ID certificate
- aliastempcert.der: alias certificate only
- tempkey02.der: alias private key
Note: The Online User Files tool is only available when the device is in development mode.
Task 4: Run the demo to enroll your device
Using a terminal emulator program, open a terminal with a serial connection on your LaunchPad's COM port. We want to use the XSD110 Class Application/User UART port with the following parameters:
UART Configuration
Baud rate: 115200
Data: 8 bit
Parity: None
Stop: 1 bit
Flow control: NonePress the Reset button on the top of your LaunchPad to run the flashed application. In the terminal, you will see:
- The device will initialize, get the current time, and connect to the AP
- Flash
/cert/ms.pemusing a file system API. This certificate is the root CA used for the initial connection to Azure IoT. It is part of the original plugin example. - Warn that the device is unable to verify the certificate catalog, as discussed in task 2, step 7.
- Register the device.
Send messages IoTHub.

To see the result in the Azure portal, go to your Iot Hub and Explorers -> IoT devices. You should see your new device.
Further Reading
CC3x20, CC3x3x Solution Built-In Security Features: This guide describes the security features built into the CC31xx and CC32xx devices, including Secure Key Storage and Hardware Crypto Engines.
CC3x20, CC3x3x Programmer's Guide: This guide contains information on how to use the SimpleLink API for writing WLAN-enabled applications and using built-in security features.
Technical support
For any questions, please search on the Wi-Fi E2E Forum
This work is licensed under a Creative Commons Attribution-NonCommercial-NoDerivatives 4.0 International License.