Introduction
This workshop demonstrates how to use the SimpleLink™ Wi-Fi® Over-The-Air (OTA) library. The library can be used to wirelessly load and install software updates from a cloud server. A software update may contain any combination of application code, firmware, and user files.
This workshop will start with an overview of the OTA mechanism and then walk through the bring up of two OTA examples:
- Using the OTA-enabled mqtt_client example to load and update a pre-built image
- Preparing an OTA update, uploading it to the cloud, and loading it with the Cloud OTA example.
At the end of this training, the audience should be able to:
- Understand the OTA process and the SimpleLink Wi-Fi solution
- Configure, build, and execute the SimpleLink
mqtt_clientapplication using the OTA_IF on the CC32xx LaunchPad - Create an OTA update image and upload it to a CDN (Content Delivery Network) Server
Important Notice for Customers Using Dropbox or GitHub for OTA Updates
The TI SimpleLink Wi-Fi SDK provides example code for the use of Dropbox or GitHub to perform Over the Air (OTA) updates. However, TI cannot guarantee the operation of these 3rd party services for long term use.
For more information on recent changes to DropBox affecting the OTA library, please see this notice. For more information on recent changes to GitHub affecting the OTA library, please see this notice.
Prerequisites
Software
- Code Composer Studio v11.2 or newer
- SimpleLink Wi-Fi CC32xx Wireless MCUs support installed
- Make sure that CCS is using the latest updates: Help → Check for Updates
- CC32xx SDK v6.10 or newer
- Terminal emulator program such as TeraTerm or PuTTY
Hardware
- 1x CC32xx LaunchPad
- CC3235S LaunchPad (LAUNCHXL-CC3235S)
- CC3235SF LaunchPad (LAUNCHXL-CC3235SF)
- CC3220S LaunchPad (CC3220S-LAUNCHXL)
- CC3220SF LaunchPad (CC3220SF-LAUNCHXL)
- 1x Micro-USB cable (included with LaunchPad)
- 802.11b/g/n Wireless Access Point (AP)
- Smartphone with Wi-Fi Starter Pro Mobile Application
OTA Overview
OTA Concept
- OTA (Over-The-Air) update is an efficient way of wirelessly distributing firmware updates or application upgrades.
- An OTA Update mechanism enables users to easily and securely update the software on their device using Wi-Fi. This involves two simple procedures:
- A vendor stores an OTA update on a CDN (Content Delivery Network) server.
- The endpoint devices with an OTA-enabled application load and install the new update.
- An OTA-enabled application must support all of the following actions:
- Polling the CDN (Content Delivery Network) server for new updates
- Downloading the new image
- Installing the image on the flash file system in a secured and fail-safe manner (the new image becomes a "candidate")
- Committing the image after it is validated (making it "operational")
- The SimpleLink OTA library offloads the above OTA actions and provides a simple API for the application.
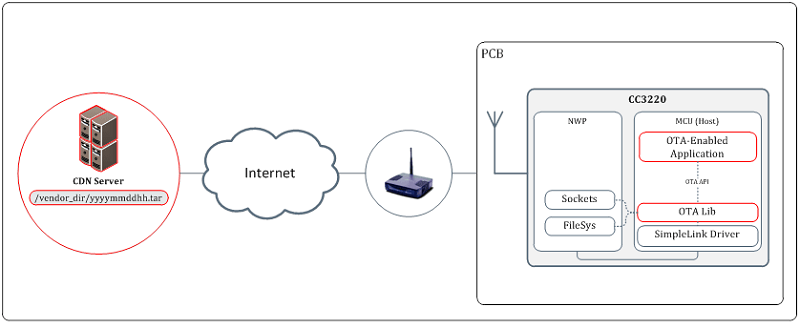
OTA System Diagram
API: Application Program Interface
CDN: Content Delivery Network
MCU: Microcontroller Unit
NWP: Network Processor
OTA: Over The Air
PCB: Printed Circuit Board
- CDN (Content Delivery Network): Globally distributed network of proxy servers deployed in multiple data centers. The goal of a CDN is to serve content to end-users with high availability and high performance. Examples would be Dropbox or GitHub.
- OTA library: Offloads the OTA actions (such as polling the server, downloading the updates and installing them in the local flash) while exposing a simple API.
- OTA-enabled Application: Triggers the OTA library and respond to OTA events. The application will take decisions whether to accept or decline an update (usually based on timestamp) and whether to commit or rollback the already installed image (based on a sanity check).
SimpleLink OTA Library (ota)
- The OTA library implements a simple HTTP client that connects to a CDN server (through
CdnVendorandOtaHttpClientmodules). - The HTTP client can be configured as:
- Non Secured (connects to CDN running HTTP Server)
- Secured (HTTPS server) using server authentication (by default)
- Domain Name verification (default) or without server authentication.
- The OTA library supports the following cloud CDN vendors:
- Github (demonstrated in the first demo)
- Dropbox (demonstrated in the second demo)
- Custom
- The library defines a structure for the OTA image in a TAR file. The ImageCreator tool can be used to create an OTA TAR file so that the OTA library will be able to parse the loaded content and install it on the local flash file system in a secure and fail-safe manner (through the
OtaArchiveandOtaJsonmodules) - The OTA library is provided as a static library project with full source code to enable user customizations.
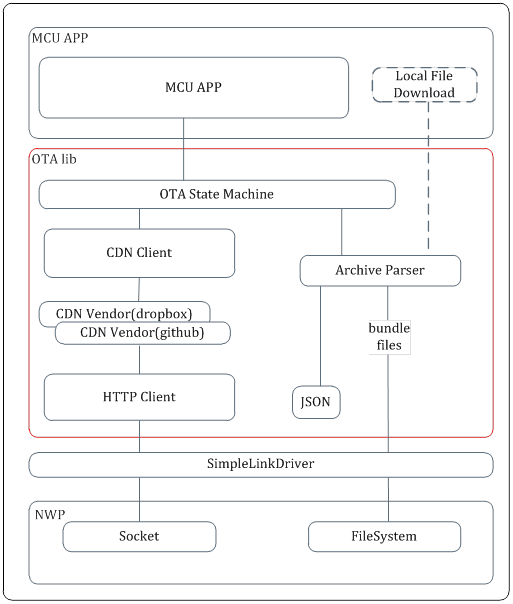
OTA Library Application Interface (OTA_IF)
OTA_IF module is an application wrapper on top of the OTA library. This module is included in the new mqtt_client example, within the application /ifmod/ folder.
The OTA_IF was designed to ease the integration of OTA to any existing application. It is designed for RTOS environment only (non-OS users can use the OTA library directly). The OTA_IF presents a simple interface for the main application to poll, download, and install an OTA update. See the mqtt_client application README for more information.
The OTA_IF currently supports 4 use cases:
Cloud OTA: Download from an CDN server (such as Github or Dropbox). This use case starts by connecting to the CDN server to get a download link (file server’s URL). Once the link is received, the download of the OTA (tar) image will be started automatically by sending HTTP Get Request to the file server. This method supports up to 2 callbacks to 2 different servers (primary and backup)
- API: OTA_IF_downloadImageByCloudVendor() (see
ifmod/ota_if.h) - Enabled With: CLOUD_OTA_SUPPORT (see
ota_settings.h)
- API: OTA_IF_downloadImageByCloudVendor() (see
Download from File Server: in this case the user will get the URL of the OTA (tar) image using other method and directly download the file (using HTTP Get Request).
- API: OTA_IF_downloadImageByFileURL() (see
ifmod/ota_if.h) - Enabled With: CLOUD_OTA_SUPPORT (see
ota_settings.h)
- API: OTA_IF_downloadImageByFileURL() (see
Local OTA: using the SimpleLink internal HTTP server to enable connection from a PC or a mobile device connected to the same local network. The PC/Mobile device will send the OTA (tar) image in a HTTP Post request.
- API: OTA_IF_uploadImage() (see
ifmod/ota_if.h) - Enabled With: LOCAL_OTA_SUPPORT (see
ota_settings.h)
- API: OTA_IF_uploadImage() (see
Internal Update: in this case the update starts when the OTA (tar) image is already located in the SimpleLink file-system. The OTA_IF will be used to read the image and install the content.
- API: OTA_IF_readImage() (see
ifmod/ota_if.h) - Enabled With: INTERNAL_UPDATE_SUPPORT (see
ota_settings.h)
- API: OTA_IF_readImage() (see
Loading A Pre-Built OTA Image
The following section will walk you through the steps needed to run the OTA_IF demo from the mqtt_client application on a CC32xx LaunchPad. This demonstration uses the OTA sample application to load and install a pre-built TAR image that is located on a Github or DropBox CDN server. These lab instructions will work for all supported RTOS and compiler variations.
Task 1: Configure the mqtt_client example for cloud OTA updates
Import the
mqtt_clientexample for your LaunchPad and desired RTOS and compiler.mqtt_client example in CC32xx SDK 5.30.00.08
In CC32xx SDK 5.30.00.08, the local and cloud OTA examples have been removed, and they are replaced by a preview version of the updated mqtt_client example using the OTA_IF module. OTA_IF was designed to ease the integration of OTA into any existing application.
The preview example can be downloaded here: https://git.ti.com/cgit/slwfat/sl_wifi_examples
For more details on this updated mqtt_client example, see the v5.30 release notes.
Configure the Wi-Fi connection settings. Open
wifi_settings.hand set your desired provisioning mode.Configure the OTA settings. For this lab, we will be demonstrating a cloud OTA update. In this demo, GitHub is the primary server and DropBox is the secondary (backup) server, so we need to enable support for both. Open
ota_settings.hand configure the following:- Define
CLOUD_OTA_SUPPORTas(1) - Define
OTA_VENDOR_GITHUB_SUPPORTandDROPBOX_VENDOR_GITHUB_SUPPORTas(1) - Uncomment the line
#define USE_TI_EXAMPLE Update the
GITHUB_USER_PATHandDROPBOX_USER_PATHfor your LaunchPad device type (e.g. CC3220S, CC3220SF, CC3235S, CC3235SF)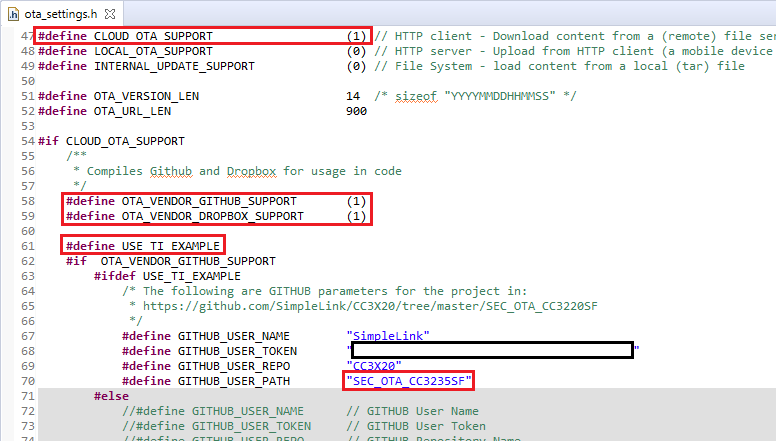
- Define
Configure the
mqtt_clientexample. Openmqtt_client_app.cand find the commented definitions forOTA_DEFAULT_METHOD. We want to configureStartCloudOTA.
Plug in your LaunchPad, build the project, and flash the application.
Task 2: Complete an OTA Update
Open a terminal emulation program and select the XDS110 Class Application/User UART port.
UART Configuration
Baud rate: 115200
Data: 8 bit
Parity: None
Stop: 1 bit
Flow control: NoneReset the LaunchPad to run the application. The example begins by starting the device in station mode and looks for an available network. If the device cannot find a known Access Point, it enters provisioning mode. For complete steps on provisioning, see the Wi-Fi Provisioning training.
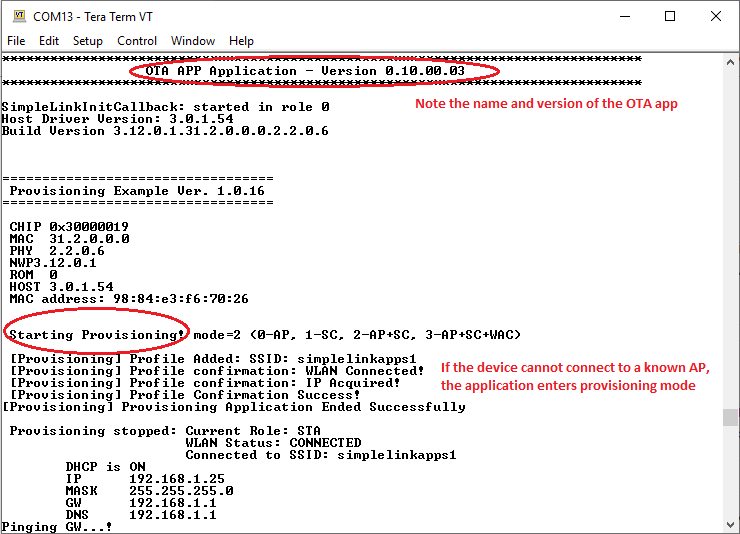
After the device is successfully provisioned, it will ping the gateway until it receives the OTA command.
Once the application has connected to the MQTT broker, press button SW2 on the LaunchPad to trigger the OTA process.
You should see OTA messages handling the CDN server connection, downloading content, parsing and installing it. The log below shows the flash programming messages, the platform reset, and the activation of the newly programmed image. The application commits the temporary image after a successful sanity check (such as connecting to the AP and pinging the gateway).
Results
The OTA TAR file name contains the timestamp (date and hour) of its creation. Only an update with a newer timestamp than the one currently stored in flash will be loaded and installed. The first OTA update after flashing with ImageCreator will always occur since the timestamp of previous OTA updates are saved in the filesystem that is formatted before flashing.
After the new image is verified (typically after successfully connecting to the AP), you can reset the LaunchPad and continue to see the updated application running. You can verify this by looking at the application name.
Preparing An OTA Image
The following section will discuss the steps needed to compile a MCU image and package it within an OTA update (TAR file), and upload the OTA TAR to a user account on a CDN server (DropBox).
Using Dropbox or GitHub for OTA Updates
The SimpleLink Wi-Fi SDK provides example code for the use of Dropbox or GitHub to perform Over the Air (OTA) updates. However, TI cannot guarantee the operation of these 3rd party services for long term use.
For more information on recent changes to DropBox affecting the OTA library, please see this notice.
Task 3: Configure the CDN Server
You will need a CDN account to store the OTA image file, and we will be using DropBox for this demo. Go to the App Center and Build an app.
Choose a Dropbox API with App folder access. You can choose any app name.
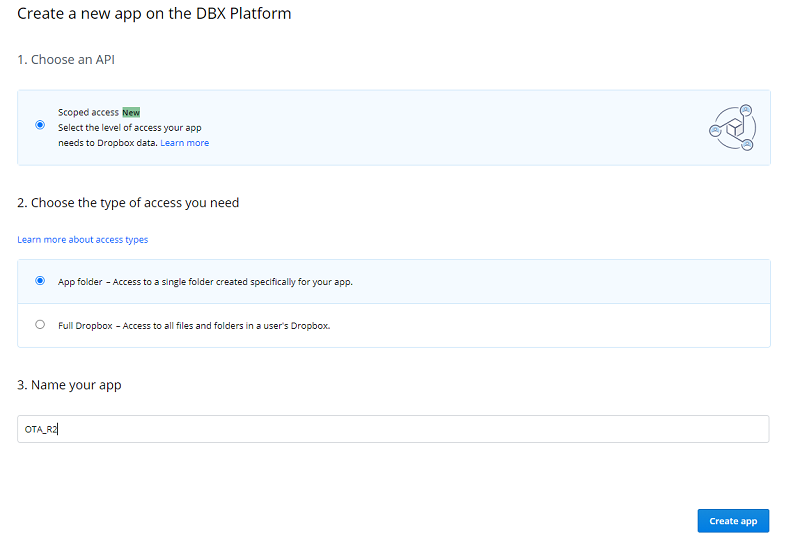
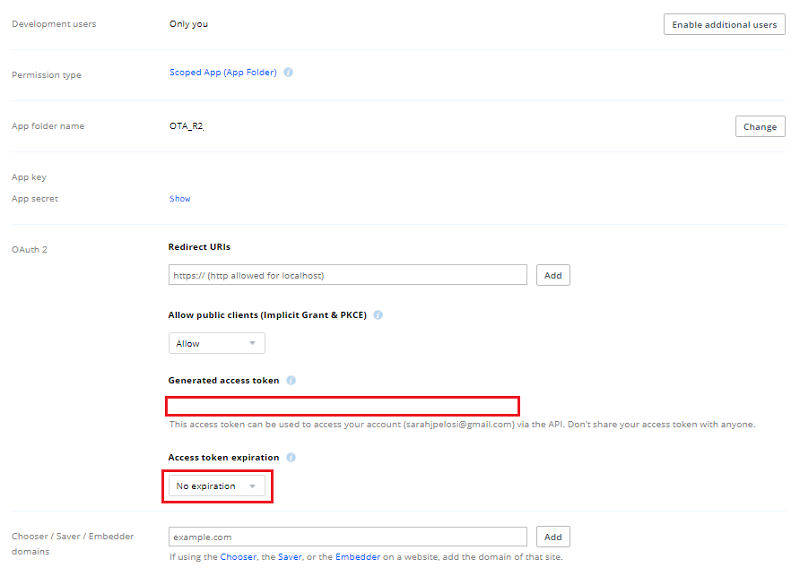
Configure permissions and generate an access token to use in the next task.
- In the Permissions tab, enable "file.metadata.read" and "file.content.read"
- Before generating the token, make sure the Access Token Expiration is set "No Expiration"
Generate the access token and save it.
Navigate to your Dropbox files Home → Apps → your newly created apps folder. In this folder, create a directory OTA_R2_MCU_FLASH. This is the directory where we will put the OTA image file (in the next task).
Task 4: Configure the example for the CDN server
In `ota_settings.h, update the CDN server parameters to your server and directory name.
- Comment out the
#define USE_TI_EXAMPLEfrom the first part of this lab. We want to use our own Dropbox credentials now. Define
DROPBOX_USER_TOKENandDROPBOX_USER_PATHusing the access token and directory from the last task.and switch the default primary and secondary servers for cloud OTA. We want to setOTA_DROPBOX_getDownloadLinkas the primary vendor.OTA_IF_downloadImageByCloudVendor(OTA_DROPBOX_getDownloadLink, OTA_GITHUB_getDownloadLink, 0);
Task 5: Generate the OTA Image
In
mqtt_client_app.c, update theAPPLICATION_NAMEdefinition to"MQTT client (OTA update)". We will only change the application name to help differentiate between the flashed application and the OTA update.Add the demo OTA public key certificate to your
userFilesfolder. For this demo, we will use the existingdummy_ota_vendor_cert.der. This is a development-only certificate available insimplelink_cc32xx_sdk_x_xx_xx_xx/tools/cc32xx_tools/ota-example-cert/. This certificate is used to authenticate the secure OTA image.Open
image.syscfgand go to OTA Settings. Check Create OTA and Secured.You will need to select a OTA Private Key File Name. This private key will be used to sign the image. For this exercise, use the development-only private key available in the SDK:
simplelink_cc32xx_sdk_x_xx_xx_xx\tools\cc32xx_tools\ota-example-cert\dummy_ota_vendor_key.der.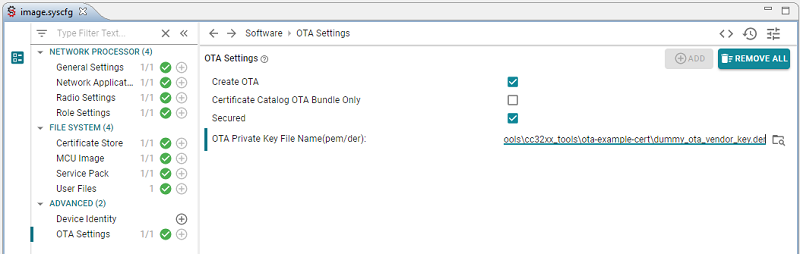
Alternatively, you can create your own private and public key that uses elliptic curve cryptography (ECDSA SECP256R1). This can be done using the following openssl commands:
Generate the private key
openssl ecparam -name prime256v1 -genkey -out ota_vendor_key.pemGenerate the public certifcate
openssl req -new -x509 -key ota_vendor_key.pem -out ota_vendor_cert.pem -days 730You may answer the Certificate Signing Request (CSR) questions or simply choose the defaults.
Plug in your LaunchPad and rebuild the 'mqtt_client` project.
Building the CCS project will launch the ImageCreator tool that will generate the image containing your application, servicepack, user files, and device configurations, sign the image, and generate a TAR file in a format defined by the OTA library. The timestamp for the image will be automatically generated as the TAR file name. By default, the TAR file will be available in the
MCU+Image/syscfg/sl_image/Outputfolder of your CCS project.Locate the TAR file you created (inside
MCU+Image/syscfg/sl_image/Output) and place it into the OTA_R2_MCU_FLASH directory in the CDN server (this is the DropBox directory from task 3, step 4).
Task 6: Complete the OTA update
Change the
APPLICATION_NAMEinmqtt_client_app.cback to"MQTT client". This is so we can easily view in the terminal logs if the image has updated successfully.Rebuild the project and then Flash.
Open a terminal emulation program such as TeraTerm and select the XDS110 Class Application/User UART port.
UART Configuration
Baud rate: 115200
Data: 8 bit
Parity: None
Stop: 1 bit
Flow control: NoneReset the LaunchPad and verify the successful execution on the terminal. After the new image is verified (typically after successfully connecting to the AP), you can reset the LaunchPad and continue to see the updated application running. You can verify this by looking at the application name.
Further Reading
After experiencing the OTA application, see the following resources for further assistance in development:
- CC3x20, CC3x3x Network Processor Programmer's Guide: This guide contains information on how to use the SimpleLink API for writing WLAN-enabled applications. Please refer to chapter 8 (File System) for important details on the OTA image bundle attributes.
- CC3x20, CC3x3x OTA Application Report: This document describes the OTA library for the SimpleLink Wireless MCUs, and explains how to prepare a new cloud-ready update to be downloaded by the OTA library.
- SimpleLink Wi-Fi Certificates Handling User's Guide: This guide provides an overview on generating, installing, and using certificates with the CC3x20 and CC3x3x devices.
Technical support
For any questions, please search on the Wi-Fi E2E Forum
This work is licensed under a Creative Commons Attribution-NonCommercial-NoDerivatives 4.0 International License.