Introduction
In this lab, we are going to add HTTP server functionality to the portable
project so users can read the temperature from a webpage hosted by the SimpleLink™ Wi-Fi® CC32xx device.
The portable project exists as a common example across all SimpleLink SDK
platforms, and we can include Wi-Fi functionality by adding libraries to this
basic example.
Prerequisites
Recommended Reading
- Device Overview in the LaunchPad Out of Box Experience *CC3x20, CC3x3x Network Processor Programmer's Guide Section 9: HTTP Server
Software
- Code Composer Studio v11.2 or newer
- SimpleLink Wi-Fi CC32xx Wireless MCUs support installed
- Make sure that CCS is using the latest updates: Help → Check for Updates
- CC32xx SDK v6.10 or newer
- Terminal emulator program such as TeraTerm or PuTTY
Hardware
- 1x CC32xx LaunchPad
- CC3235S LaunchPad (LAUNCHXL-CC3235S)
- CC3235SF LaunchPad (LAUNCHXL-CC3235SF)
- CC3220S LaunchPad (CC3220S-LAUNCHXL)
- CC3220SF LaunchPad (CC3220SF-LAUNCHXL)
- 1x Micro-USB cable (included with LaunchPad)
Task 1: Import the Portable example
Import the
portableproject to CCS Desktop from the CC32xx SDK. For this lab we will demonstrate with CC3220S and TI-RTOS (simplelink_cc32xx_sdk_x_xx_xx_xx\examples\rtos\CC3220S_LAUNCHXL\demos\portable\tirtos\ccs).We will be using this CC32xx project as a development starting point. This is a TI Drivers project that you can find in all of the SimpleLink SDKs, already configured for your MCU. Note that this project does not contain source or libraries for any connected technology.
Test out the portable example!
Flash the application and open a terminal to test the
portableexample functionality. It uses the on-board sensor to report temperature via the terminal. Please see theREADME.htmlin theportableproject for more details.We will also need to download some additional files for later in the lab. You can find these files from TI Resource Explorer from Wi-Fi HTTP Server files. You will find this folder in the same place as this SimpleLink Academy module.
These files include a source and header file for the HTTP server code and a source and header file that allows us to print to the terminal via UART. There is also a ZIP file which contains user files that we will discuss later in the lab.
Task 2: Configure the Portable example
Open
portable.syscfg. We need to add a SPI instance in SysConfig for the host driver to communicate between the application MCU and the network processor. Select the SPI driver from the left-hand menu and press Add.You will notice that we still have zero external SPI instances, but we have added global parameters and Include Network Processor. This is the internal SPI peripheral handled by the CC32xx host driver. You do not need to do anything further.
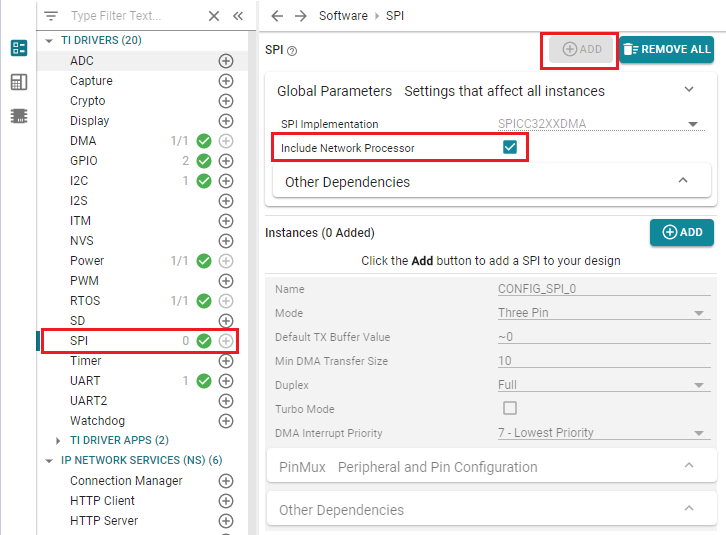
Why is there an internal SPI instance?
Check out the Device Overview in the CC3220 or CC3235 Out of Box Experience!
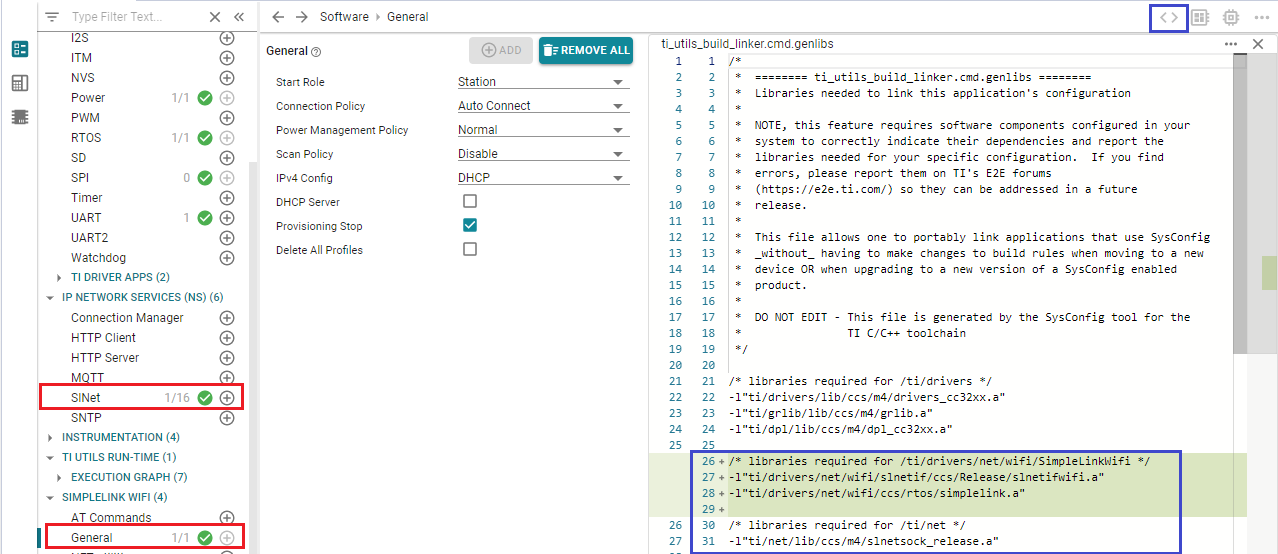
Next, we will use SysConfig to link the required libraries for SimpleLink Wi-Fi functionality. Select the SlNet module from the IP Network Services (NS) dropdown and press Add. Then, select the General module from the SimpleLink WiFi dropdown and press Add.
If you take a look at the SysConfig generated files preview (by selecting the icon in the top-right menu), you will see the following SDK libraries were added to the generated
.genlibsfile:- SimpleLink Wi-Fi Host Driver: host driver library for communication between application MCU and network processor (NWP)
- Network Interface (SlNetIf) Library: handles the Wi-Fi socket stack
Network Socket (SlNetSock) Library: SlNetSock provides a standard BSD API for TCP and UDP transport layers and a lower-level SlNetSock API for basic and extended usage on Wi-Fi and Ethernet
What is SysConfig? What is the Genlibs file?
To learn more about the SysConfig and its features, see the SysConfig Tool Basics lab.
- SimpleLink Wi-Fi Host Driver: host driver library for communication between application MCU and network processor (NWP)
We also need to add the Display driver to this example to view debug prints in a serial terminal emulator. Open
portable.sysconfigand add a Display module. We will use the default settings.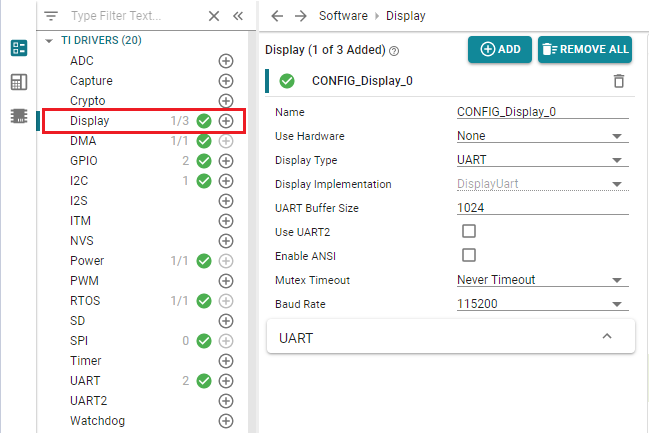
Add the provided
network_if.candnetwork_if.hfiles to yourportableproject. (We downloaded these files from TI Resource Explorer in task 1, step 2 of this training.)These files contain basic event handlers required by the Wi-Fi host driver as well as useful functions for setting up the Network Processor and connecting to an Access Point.
Add the provided
httpserver.candhttpserver.hfiles to yourportableproject. (We downloaded these files from TI Resource Explorer in task 1, step 2 of this training.)These files contain a shell for the HTTP server functionality. We are going to use these files to finish the implementation.
Task 3: Add the Wi-Fi event handlers
Open
network_if.cand take a look at the event handlers.What are event handlers?
Asynchronous events can be sent by the network processor to the host at any given time with an indication of specific states and specific data for each event. To listen to these events and determine the needed information, a handler must be implemented in the user application and registered under the user.h header file.
The user should customize these event handlers for their own application.
Take a look at the event handlers added for you:
SimpleLinkWlanEventHandler(): Handles all incoming WLAN events by updating our control block for use elsewhere in the application. An example of a WLAN event is a station (such as your mobile device) connecting to our Access Point (CC32xx LaunchPad).SimpleLinkFatalErrorEventHandler(): Alerts the user to a fatal error passed by the network processor.SimpleLinkNetAppEventHandler(): Handles network events such as IP acquired, IP leased, IP released, etc.SimpleLinkNetAppRequestEventHandler(): Handles all NetApp requests. Since this event handler is specific to our HTTP server implementation, this function can be found inhttpserver.c. It prepares incoming requests and passes them to the message queue we use in the HTTP server thread. This callback is required for the functionality of the HTTP server.No action needed for this task
You can move on to task 4 once you are familair with the event handlers.
Task 4: Customize the HTTP Server
More information on HTTP servers
If you are unfamiliar with the topic of HTTP servers, please see the Recommended Reading in the Prerequisites section above.
How to write the temperature GET callback to display the data from the temperature sensor
Go to the
TODOintempGetCallback()inhttpserver.c. We will have to implement the cases of displaying the temperature in Celsius or Fahrenheit.We will be using the enum
TempIdx(found inhttpserver.h) as our cases. You can read from the temperature sensor by using the functionstemperatureCandtemperatureF. An existing example of this is inconsole.c.case TempIdx_C: pthread_mutex_lock(&temperatureMutex); value = (int)temperatureC; pthread_mutex_unlock(&temperatureMutex); break; case TempIdx_F: pthread_mutex_lock(&temperatureMutex); value = (int)temperatureF; pthread_mutex_unlock(&temperatureMutex); break;httpserver.c :: tempGetCallBack()
How to write the light POST callback to control the on-board LED
- Go to the
TODOinlightPostCallback(). We will have to implement the cases of the red LED state. We will be using the enum
LedValues(found inhttpserver.h) as our cases.case LedValues_Off: ledState = CONFIG_GPIO_LED_OFF; break; case LedValues_On: ledState = CONFIG_GPIO_LED_ON; break;httpserver.c :: lightPostCallBack()
Light GET Callback
Additionally, there is also a light GET callback in httpserver.c, which is used
to check the status of the on-board LED when the webpage is loaded. This makes
sure the webpage is in sync with the server throughout the demo.
Update the HTTP requests
We need to update the
httpRequestobject to recognize the call requests from our HTML webpage. Find theTODOin the global variables section ofhttpserver.cand set up three indexes in the format:{i, SL_NETAPP_REQUEST_HTTP_X, "/<call>", {{NULL}}, NULL},- Index 0 will be our
HTTP_GETrequest for "/light" - Index 1 will be our
HTTP_POSTrequest for "/light" Index 2 will be our
HTTP_GETrequest for "/temp"{0, SL_NETAPP_REQUEST_HTTP_GET, "/light", {{NULL}}, NULL}, {1, SL_NETAPP_REQUEST_HTTP_POST, "/light", {{NULL}}, NULL}, {2, SL_NETAPP_REQUEST_HTTP_GET, "/temp", {{NULL}}, NULL},httpserver.c :: httpRequest
- Index 0 will be our
Now we will update the HTTP server database to define the HTTP request characteristics and callbacks. Find the
TODOin the functioninitHttpserverDB()ofhttpserver.c. Our HTTP request characteristic and value formats are:httpRequest[i].charValues[i].characteristic = "<characteristic>";
and
httpRequest[i].charValues[i].value[i] = "<value>";- The temp characteristics we are defining are
tempcandtempf - The light values we are defining are
onandofffor theredledcharacteristic Our HTTP request callback format is
httpRequest[i].serviceCallback = <callback>;. We will use our callbacks as implemented earlier:tempGetCallback,lightPostCallback, andlightGetCallbackhttpRequest[0].charValues[0].characteristic = "redled"; httpRequest[0].charValues[0].value[0] = "off"; httpRequest[0].charValues[0].value[1] = "on"; httpRequest[0].charValues[0].value[2] = "toggle"; httpRequest[0].serviceCallback = lightGetCallback; httpRequest[1].charValues[0].characteristic = "redled"; httpRequest[1].charValues[0].value[0] = "off"; httpRequest[1].charValues[0].value[1] = "on"; httpRequest[1].charValues[0].value[2] = "toggle"; httpRequest[1].serviceCallback = lightPostCallback; httpRequest[2].charValues[0].characteristic = "tempc"; httpRequest[2].charValues[1].characteristic = "tempf"; httpRequest[2].serviceCallback = tempGetCallback;httpserver.c :: initHttpserverDB()
- The temp characteristics we are defining are
Task 5: Start the HTTP Server
Scroll down to the bottom of
httpserver.cand take a look athttpserverThread(). This is the bulk of the HTTP server thread.httpserverThread()starts with initializing the SPI and Display TI drivers. The Wi-Fi host driver uses SPI, and the application uses the Display function to print debug messages out through the UART to your computer's terminal.- Next, we initialize te SlNetSock layer for the CC32xx and start the SimpleLink Wi-Fi thread,
sl_Task(). This thread handles the asynchronous events raised by the network processor as a result of NWP API calls. Network_IF_InitDriver(ROLE_AP)configures the device in AP mode andConfigureHttpServer()sets up the "internal" HTTP server on the NWP.- Next, we initialize the message queue used by the
NetAppRequestcallback as well as the database we updated earlier. - The main while loop of this thread receives messages from the queue, and then passes the requests to the appropriate HTTP handlers (get, put, post, delete).
Go to
temperature.c, and comment out theGPIO_writecalls in the functionssendAlert()andclearAlert().Stop! Do not skip step 2!
The current implementation of
portableuses the same LED we are controlling in this exercise and causes a conflict. If you do not comment out these lines, your LED may not work as expected.
Task 6: Add TI-RTOS threads
Our last software edit is to update the main_tirtos.c for Wi-Fi functionality.
This includes adding threads for our HTTP server and a SimpleLink Wi-Fi task
that is required to use the network processor API.
Below the includes, we can declare the
httpserverThread()the same way the temperature and console threads are declared and define the new stack sizes.extern void *httpserverThread(void *arg0); #define HTTP_STACK_SIZE (3072)main_tirtos.c
Next, we will comment out the creation of the
consoleThreadinmain(). This thread conflicts with our use of the UART terminal for displaying debug information. Remember, we are instead using the HTTP Server to host a webpage to provide us with the temperature readings./* Console thread */ // retc = pthread_create(&thread, &attrs, consoleThread, NULL); // if (retc != 0) { // /* pthread_create() failed */ // while (1); // }main_tirtos.c :: main()
Stop! Do not skip step 2!
The console thread attempts to open a conflicting UART terminal which may cause the example to hang while trying to run the console.
Finally, add the HTTP server thread in the
main()function. We will set this thread as priority 3 so it is slightly higher priority than the temperature thread./* HTTP Server thread */ priParam.sched_priority = 3; pthread_attr_setschedparam(&attrs, &priParam); retc |= pthread_attr_setstacksize(&attrs, HTTP_STACK_SIZE); retc = pthread_create(&thread, &attrs, httpserverThread, NULL); if (retc != 0) { /* pthread_create() failed */ while (1); }main_tirtos.c :: main()
Important: This snippet of code must be after the
pthread_attr_setschedparam(&attrs, &priParam)since we are usingattrsandpriParam, but before theBIOS_start().
Task 7: Build the project and program the device
Download
userFiles.zipfrom the TI Resource Explorer project folder (task 1, step 2) and unzip this file. This ZIP file includes a demo HTML pageportable.htmlplus supporting JS and CSS scripts.We will add these user files to the secure file system on the serial flash. The HTML page will be hosted by the NWP when the HTTP server is started.
Add the contents of the unzipped folder to the
userFilesfolder in your CCS project.Plug in your LaunchPad, then build the project to generate the device image (containing the compiled application, servicepack, user files, and device configuations), and select Flash from the top menu to load this image to the LaunchPad.
Task 8: Test the demo!
Open up a terminal on your device's COM port and reset the LaunchPad. We want to use the XSD110 Class Application/User UART port with the following parameters:
UART Configuration
Baud rate: 115200
Data: 8 bit
Parity: None
Stop: 1 bit
Flow control: NoneConnect to the AP broadcasted by your device. The name of this AP will be mysimplelink- followed by the last 6 digits of your MAC address.
Each SimpleLink Wi-Fi device has its own unique MAC address. The application code will print this MAC address to the terminal.
Open up a browser and type in the URL
mysimplelink.net/portable.htmlto test the demo.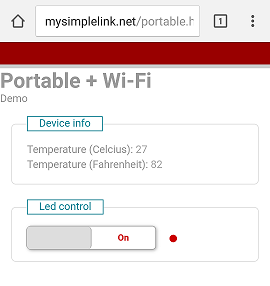
Want more?
Remember the
sendAlert()andclearAlert()we saw before in task 5? Try adding a new HTTP request and edit theportable.htmlto show a temperature alert!
Technical support
For any questions, please search on the TI SimpleLink Wi-Fi E2E Forum
This work is licensed under a Creative Commons Attribution-NonCommercial-NoDerivatives 4.0 International License.