SysConfig Migration
If you have an existing CC13xx or CC26xx software project and you want to start developing with SysConfig, follow the steps below. This guide assumes you have a stack project from the SimpleLink CC13xx or CC26xx 2.40 SDK or newer. If this is not the case, please look at the Stack Porting Guides to see how to update to SimpleLink CC13xx or CC26xx 2.40 SDK.
Note
If you are starting development with a fresh project, you don’t need to migrate from non-SysConfig to SysConfig-enabled project. In SimpleLink CC13xx/CC26xx SDK v. 2.40 and later, SysConfig-enabled projects are found in the syscfg_preview folder.
1. Add a .syscfg File to Your Project
In this guide, we will start with a BLE5-Stack project, then apply necessary changes to start using SysConfig.
You can use the standalone SysConfig tool to make this file. Please see the SysConfig Standalone Installer Download Page.
Choose the “Start a new Design” option. Choose your device, part and package. For the
productpath, add the following for your SDK:{SDK_INSTALL_DIR}\.metadata\product.json.Add an RF stack according to your existing project (BLE5-Stack). Add any TI Drivers configuration that your project requires. If applicable, add one or more Radio Configuration. You can find guidelines for configuring each of these in the Get started with SysConfig chapter.
Save the file and add it to your project.
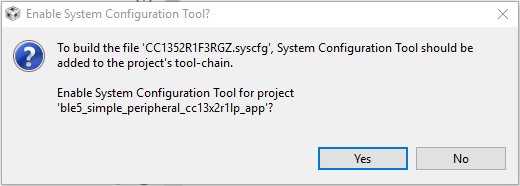
If you are using CCS, you can add the file by dragging it into your CCS workspace. When you add the file, the following dialog box will appear and allow you to add SysConfig to your project:
If you are using IAR, follow the steps in Using SysConfig with IAR Workbench before you
add the .syscfg file. The steps for adding the file are as follows:
Include the .syscfg file you want to use in the project (right click on the project → Add Files → Navigate to the .syscfg file and add it).
Create a custom build step: Right click on project → Options → Custom Build → Populate the following:
Option |
Populate with the following: |
File Name Extensions |
.syscfg |
Command Line |
$SYSCONFIG_ROOT$/nw/nw.exe $SYSCONFIG_ROOT$/dist/cli.js -o $PROJ_DIR$ -s “$ COM_TI_SIMPLELINK_CC13XX_CC26XX_SDK_INSTALL_DIR$/.metadata/product.json” –compiler iar $FILE_PATH$ |
Output files (one per line) |
SysConfig_Generated_Files.ipcf |
Run this tool before all other tools |
Checked |
2. Add SysConfig Options
If you are using CCS, open the Project Properties and do the following:
In System Configuration Tool → Basic Options → Name of the board file (-b, –board), set it to
/ti/boards/.meta/<BOARD_NAME>. (E.g., if you are using a CC1312R LaunchPad, set the name to/ti/boards/.meta/CC1312R1_LAUNCHXL). It is not necessary to set the name of the device.In System Configuration Tool → Basic Options → Root system config meta data file in a product or SDK (-s, –product), add
${COM_TI_SIMPLELINK_CC13XX_CC26XX_SDK_INSTALL_DIR}/.metadata/product.json.
3. Remove Board Files From Your Project
These are not needed as the board configuration is done in SysConfig. E.g. if
you are using a CC1352R LaunchPad, delete the Board.h,
CC1352R1_LAUNCHXL.h, and CC1352R1_LAUNCHXL.c from the project. If your
project contains board files ending with *_fxns.c or *.cmd, don’t
delete them.
You can see how to configure your board files and TI driver instances with
SysConfig in Configure The Board Files with SysConfig. If you’re not exactly sure what
peripherals are on your board and you have a TI development board, you can check
the .syscfg file from an existing syscfg project for your board. E.g.
if you’re using a CC26X2R LaunchPad board, you can check the .syscfg file
in one of the projects in ${COM_TI_SIMPLELINK_CC13XX_CC26XX_SDK_INSTALL_DIR}
/examples/rtos/CC26X2R1_LAUNCHXL.
4. Migrate build_config.opt
build_config.opt contains build configuration settings. These settings can
all be set by SysConfig. The associated settings are found in the main BLE view
in SysConfig.
When you have configured these parameters in SysConfig, delete the
build_config.opt file from your project.
When you have eventually built the project with SysConfig enabled, you will find
the SysConfig-built version of build_config.opt in the output folder of the
project.
5. Migrate project_name_app.opt
project_name_app.opt contain user-configurable pre-processor defines. The
file name is formed by the project name. For example, in the multi_role example
project this file is called multi_role_app.opt and
simple_peripheral_app.opt in the simple_peripheral example. These defines
will now be located in the SysConfig generated files ble_app_config.opt and
ble_config.h.
When you have configured these parameters in SysConfig, delete the
simple_peripheral_app.opt file from your project.
6. Changes in Application File
For this section, the example project Simple Peripheral will be used as an example.
Include ble_config.h in the application file
ble_config.h is where most of the parameters defined by SysConfig are stored.
Add the following to you application file (in this case simple_peripheral.c):
#include "ble_config.h"
Remove default application parameter defines
Most of these parameters are now configured in SysConfig.
For Simple Peripheral, the following parameter defines should be removed in the
CONSTANTS section of simple_peripheral.c:
 1    // Address mode of the local device
 2    // Note: When using the DEFAULT_ADDRESS_MODE as ADDRMODE_RANDOM or
 3    // ADDRMODE_RP_WITH_RANDOM_ID, GAP_DeviceInit() should be called with
 4    // it's last parameter set to a static random address
 5    // #define DEFAULT_ADDRESS_MODE                  ADDRMODE_RP_WITH_PUBLIC_ID
 6
 7    // General discoverable mode: advertise indefinitely
 8    // #define DEFAULT_DISCOVERABLE_MODE             GAP_ADTYPE_FLAGS_GENERAL
 9
10    // Minimum connection interval (units of 1.25ms, 80=100ms) for parameter update request
11    // #define DEFAULT_DESIRED_MIN_CONN_INTERVAL     80
12
13    // Maximum connection interval (units of 1.25ms, 104=130ms) for  parameter update request
14    // #define DEFAULT_DESIRED_MAX_CONN_INTERVAL     104
15
16    // Slave latency to use for parameter update request
17    // #define DEFAULT_DESIRED_SLAVE_LATENCY         0
18
19    // Supervision timeout value (units of 10ms, 300=3s) for parameter update request
20    // #define DEFAULT_DESIRED_CONN_TIMEOUT          300
21
22    // Pass parameter updates to the app for it to decide.
23    // #define DEFAULT_PARAM_UPDATE_REQ_DECISION     GAP_UPDATE_REQ_PASS_TO_APP
24
25    // How often to perform periodic event (in ms)
26    #define SP_PERIODIC_EVT_PERIOD               5000
27
28    // How often to read current current RPA (in ms)
29    // #define SP_READ_RPA_EVT_PERIOD               3000
30
31    // Delay (in ms) after connection establishment before sending a parameter update request
32    // #define SP_SEND_PARAM_UPDATE_DELAY           6000
If your application is setting the following parameters in any other way, make sure they are instead configured in SysConfig.
Remove the initialization of advertisement data and other local variables
Advertisement data is set in the Broadcaster Configuration section of SysConfig. (Only applicable for BLE Peripherals and BLE Broadcasters.)
For Simple Peripheral, the following lines of code should be removed from the
LOCAL VARIABLES section of simple_peripheral.c.
 1    /*********************************************************************
 2    * LOCAL VARIABLES
 3    */
 4
 5    // ....
 6
 7    // GAP GATT Attributes
 8    // static uint8_t attDeviceName[GAP_DEVICE_NAME_LEN] = "Simple Peripheral";
 9
10    // Auto connect Disabled/Enabled {0 - Disabled, 1- Group A , 2-Group B, ...}
11    uint8_t autoConnect = AUTOCONNECT_DISABLE;
12
13    // Advertisement data
14    // static uint8_t advertData[] =
15    // {
16    //   0x03,
17    //   GAP_ADTYPE_LOCAL_NAME_SHORT,
18    //   'S',
19    //   'P',
20    //   0x02,   // length of this data
21    //   GAP_ADTYPE_FLAGS,
22    //   DEFAULT_DISCOVERABLE_MODE | GAP_ADTYPE_FLAGS_BREDR_NOT_SUPPORTED,
23
24    // service UUID, to notify central devices what services are included
25    // in this peripheral
26    //   0x03,   // length of this data
27    //   GAP_ADTYPE_16BIT_MORE,      // some of the UUID's, but not all
28    //   LO_UINT16(SIMPLEPROFILE_SERV_UUID),
29    //   HI_UINT16(SIMPLEPROFILE_SERV_UUID)
30    // };
31
32    // Scan Response Data
33    // static uint8_t scanRspData[] =
34    // {
35      // complete name
36    //   17,   // length of this data
37    //   GAP_ADTYPE_LOCAL_NAME_COMPLETE,
38    //   'S',
39    //   'i',
40    //   'm',
41    //   'p',
42    //   'l',
43    //   'e',
44    //   'P',
45    //   'e',
46    //   'r',
47    //   'i',
48    //   'p',
49    //   'h',
50    //   'e',
51    //   'r',
52    //   'a',
53    //   'l',
54
55      // connection interval range
56    //   5,   // length of this data
57    //   GAP_ADTYPE_SLAVE_CONN_INTERVAL_RANGE,
58    //   LO_UINT16(DEFAULT_DESIRED_MIN_CONN_INTERVAL),   // 100ms
59    //   HI_UINT16(DEFAULT_DESIRED_MIN_CONN_INTERVAL),
60    //   LO_UINT16(DEFAULT_DESIRED_MAX_CONN_INTERVAL),   // 1s
61    //   HI_UINT16(DEFAULT_DESIRED_MAX_CONN_INTERVAL),
62
63      // Tx power level
64    //   2,   // length of this data
65    //   GAP_ADTYPE_POWER_LEVEL,
66    //   0       // 0dBm
67    // };
Remove advertisement sets parameter initializations
GapAdv_params_t advParamLegacy and GapAdv_params_t advParamLongRange are
not set in the SysConfig generated file ble_config.c. These must not be
initialized in the main application source file. (Only applicable to BLE
broadcasters (peripheral, broadcaster, multirole.)).
For example, in SimplePeripheral_init(), the following lines should be removed:
1// Temporary memory for advertising parameters for set #1. These will be copied
2// by the GapAdv module
3// GapAdv_params_t advParamLegacy = GAPADV_PARAMS_LEGACY_SCANN_CONN;
4...
5// Use long range params to create long range set #2
6// GapAdv_params_t advParamLongRange = GAPADV_PARAMS_AE_LONG_RANGE_CONN;
Replace GAP Bond Manager configuration block with SysConfig function
The GAP Bond manager parameters are now configured by SysConfig and generated in
the ble_config.c file along with the setBondManagerParameters() function
that initialize all the bond manager parameters. This function should to be
called from the application.
Also the defines that were removed from the CONSTANTS section of the
application are used throughout the application. If you don’t remove these code
lines you will get compiler errors.
For example, in SimplePeripheral_init(), The complete Bond Manager
configuration block should be replaced by the setBondManagerParameters()
function call:
 1/*********************************************************************
 2    * @fn      SimplePeripheral_init
 3    *
 4    * @brief   Called during initialization and contains application
 5    *          specific initialization (ie. hardware initialization/setup,
 6    *          table initialization, power up notification, etc), and
 7    *          profile initialization/setup.
 8    */
 9    static void SimplePeripheral_init(void)
10    {
11
12    // ...
13
14    // Setup the GAP Bond Manager. For more information see the GAP Bond Manager
15    // section in the User's Guide:
16    // http://software-dl.ti.com/lprf/ble5stack-latest/
17    {
18    // Don't send a pairing request after connecting; the peer device must
19    // initiate pairing
20    // uint8_t pairMode = GAPBOND_PAIRING_MODE_WAIT_FOR_REQ;
21    // Use authenticated pairing: require passcode.
22    // uint8_t mitm = TRUE;
23    // This device only has display capabilities. Therefore, it will display the
24    // passcode during pairing. However, since the default passcode is being
25    // used, there is no need to display anything.
26    // uint8_t ioCap = GAPBOND_IO_CAP_DISPLAY_ONLY;
27    // Request bonding (storing long-term keys for re-encryption upon subsequent
28    // connections without repairing)
29    // uint8_t bonding = TRUE;
30
31    // GAPBondMgr_SetParameter(GAPBOND_PAIRING_MODE, sizeof(uint8_t), &pairMode);
32    // GAPBondMgr_SetParameter(GAPBOND_MITM_PROTECTION, sizeof(uint8_t), &mitm);
33    // GAPBondMgr_SetParameter(GAPBOND_IO_CAPABILITIES, sizeof(uint8_t), &ioCap);
34    // GAPBondMgr_SetParameter(GAPBOND_BONDING_ENABLED, sizeof(uint8_t), &bonding);
35    }
36    setBondManagerParameters(); // Add this function call.
The GAPBondManager can be configured in the Bond Manager section of SysConfig.
Change the name of certain parameters
Some parameters have been moved from the application into SysConfig. Please make sure you are using the correct name of these parameters.
New Name |
Old Name |
SysConfig Section |
|---|---|---|
READ_RPA_PERIOD |
SP_READ_RPA_EVT_PERIOD SC_READ_RPA_PERIOD |
General Configuration |
SEND_PARAM_UPDATE_DELAY |
SP_SEND_PARAM_UPDATE_DELAY |
Peripheral Configuration |
DEFAULT_SCAN_INTERVAL |
SCAN_PARAM_DFLT_INTERVAL |
Observer Configuration |
DEFAULT_SCAN_WINDOW |
SCAN_PARAM_DFLT_INTERVAL |
Observer Configuration |