The Hardware Security Module (HSM)
The CC27xx includes an integrated hardware security module (HSM) which supports an isolated environment for cryptographic, key management, secure counters, and random number generation operations. The HSM allows developers to develop secure and future-proof IoT applications using energy efficient accelerators and RNG functions.
HSM Firmware
The HSM firmware is stored in a secured flash region (96Kb) that is verified by the HSM ROM before the HSM processor starts execution. This ensures that any firmware ran by the HSM has been properly signed by the TI RSA 3K private key. The SimpleLink CC27xx software development kit includes the encrypted and signed HSM firmware needed for the HSM operation and includes drivers for all HSM functions. Additionally, secure firmware update of the HSM fimrware image on-chip is supported by the system ROM bootcode and the HSM ROM.
The HSM firmware consumes at most 96KB of main flash. Because of this, the last 96kB of main flash will not be usable for application purposes and should be considered a reserved region. Additionally, system ROM will always write, erase, and read protect this reserved region. The HSM firmware contains a version and rollback ID which is used to facilitate anti-rollback protection. If a critical security vulnerability is found in a version of HSM firmware, TI will work to resolve the vulnerability and release a new HSM firmware version with an incremented rollback ID. Once this new firmware version has been programmed to the devices in the field, those devices will be unable to accept older versions of the HSM firmware.
Warning
If the device has undergone a chip erase, then anti-rollback protections are reset, allowing older, potentially vulnerable firmware images to be programmed. Developers may refer to the TRM for more information.
Note
The anti-rollback feature is non-configurable, and mandatory for the HSM.
HSM Feature Overview
Supported cryptograhpic algorithms are listed below:
Functions |
Supported Algorithms |
|---|---|
Key Agreement Schemes |
ECDH, ECDHE, ECJ-PAKE, DH, DHE |
Key Derivation Methods |
Random (DRBG), SHA2 HMAC PRF, AES CMAC PRF |
Signature Processing |
ECDSA, pureEdDSA, RSA PKCS #1 v1.5, RSA PSS |
Message Authentication Codes |
AES CBC-MAC, AES CMAC, HMAC with SHA2-224, SHA2-256, SHA2-384, and SHA2-512 |
Block Cipher Modes of Operation |
AES CCM, CCM-Star, GCM, ECB, CBC, CTR |
Hash Algorithms |
SHA2 224, 256, 384, 512 |
Random Number Generation |
NIST SP 800-90B Compliant TRNG, AES-CTR DRBG |
Supported Cryptographic key sizes and types include:
Advanced Encryption Standard (AES) key sizes of 128, 192, and 256 bits.
RSA key sizes up to 3072-bits (Sign and Verify supported), and up to 4096-bits (Verify only)
Diffie-Hellman key sizes of 2048-bits and 3072-bits
Ellipetic Curve Support
Short Weierstrass
NIST-P224, NIST-P256, NIST-P384, NIST-P521
Brainpool-256R1, Brainpool-384R1, Brainpool-512R1
Montgomery
Curve25519
Twisted Edwards form
Ed25519
Please refer to KeyStore and Platform Security Architecture (PSA) for more information key storage and PSA API support.
Programming the HSM
The HSM firmware is not flashed on the CC27xx out of the factory. In order to use the HSM, the developer must flash the device with the correct binary. This hsm binary can be found in <sdk root>/bin/hsm.
The HSM resides in flash between the addresses 0xE8000 - 0x1FFFFFF. This region is given special protection which includes write, erase, and read protections. Due to these protections, developers will be unable to use the debugger or any such application in order to read or modify the HSM firmware region.
To flash the HSM firmware, please follow the steps below for your preferred IDE. Additionally, the HSM may be flashed using Uniflash.
Note
This page is only applicable to the CC27xx family of devices. CC23xx does not have an HSM.
Warning
Although the HSM FW is write/erase/read protected during the runtime of a user application, the HSM firmware may still be erased during chip erase operations (See TRM for more details on device chip erase functionality).
Uniflash
Flash any application software to the device with a valid CCFG and SCFG. Any example that comes with the SimpleLink SDK will work, in addition to your own device application software.
Warning
Without a valid application image flashed to the device, the HSM flashing will fail.
Start a Uniflash session for the CC27xx, and go to Settings & Utilities Page.
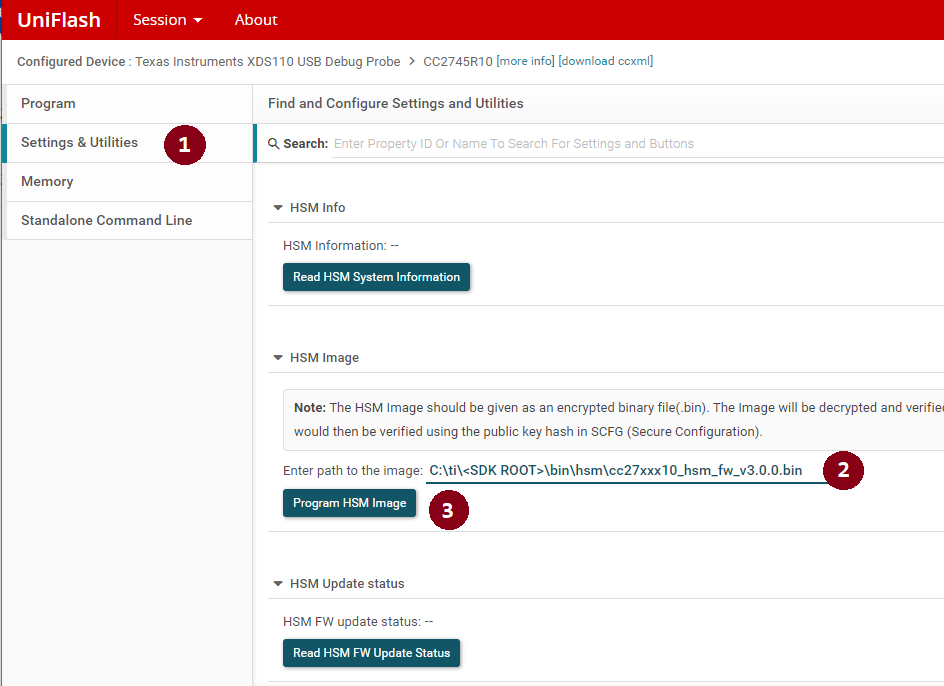
Figure 77. Programming the HSM.
Under the HSM Image section, enter the path to the HSM binary. This path may be located in <sdk root>/bin/hsm/*.bin.
Click the Program HSM Image.
After programming, click the Read HSM System Information to verify that the HSM binary has been successfully flashed.
Code Composer Studio
Flash any application software to the device with a valid CCFG and SCFG. Any example that comes with the SimpleLink SDK will work, in addition to your own device application software.
Warning
Without a valid application image flashed to the device, the HSM flashing will fail.
Once flashed, start a debug session.
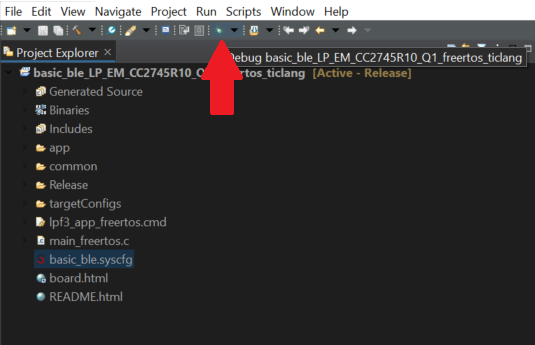
Figure 78. Starting a debug session in CCS.
Once the debug session has started, click on Tools –> On-Chip Flash.
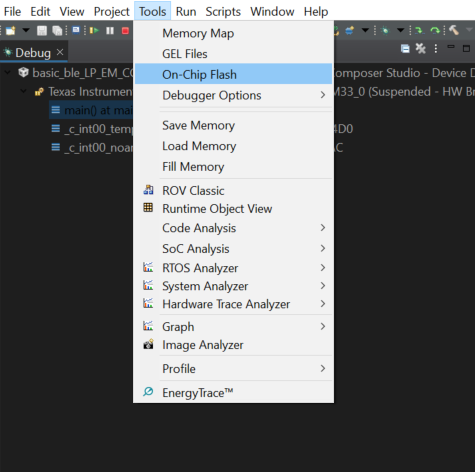
Figure 79. On-Chip Flash window.
- Program the HSM firmware. The firmware can be found in
<sdk root>/bin/hsm/*.bin.
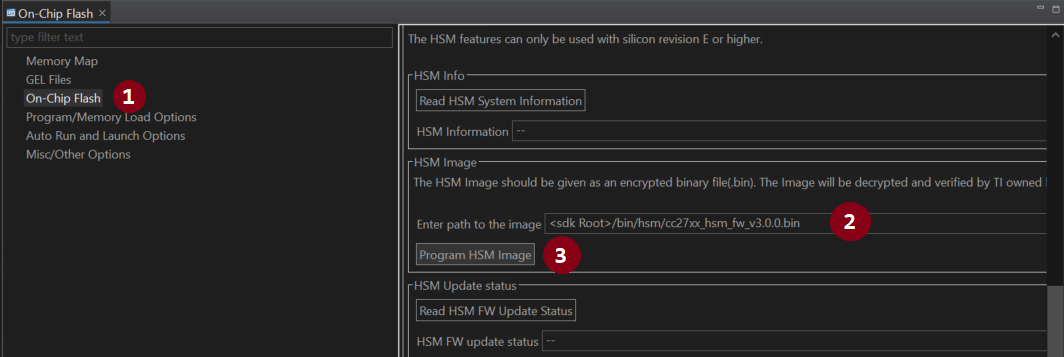
Figure 80. On-Chip Flash window.
IAR
Flash any application software to the device with a valid CCFG and SCFG. Any example that comes with the SimpleLink SDK will work, in addition to your own device application software.
Warning
Without a valid application image flashed to the device, the HSM flashing will fail.
Under the Project tab, go to Download –> Download file..
Follow the instructions in the pop-up window, and flash the HSM IAR firmware found in <sdk root>/bin/hsm/*_iar.hex.
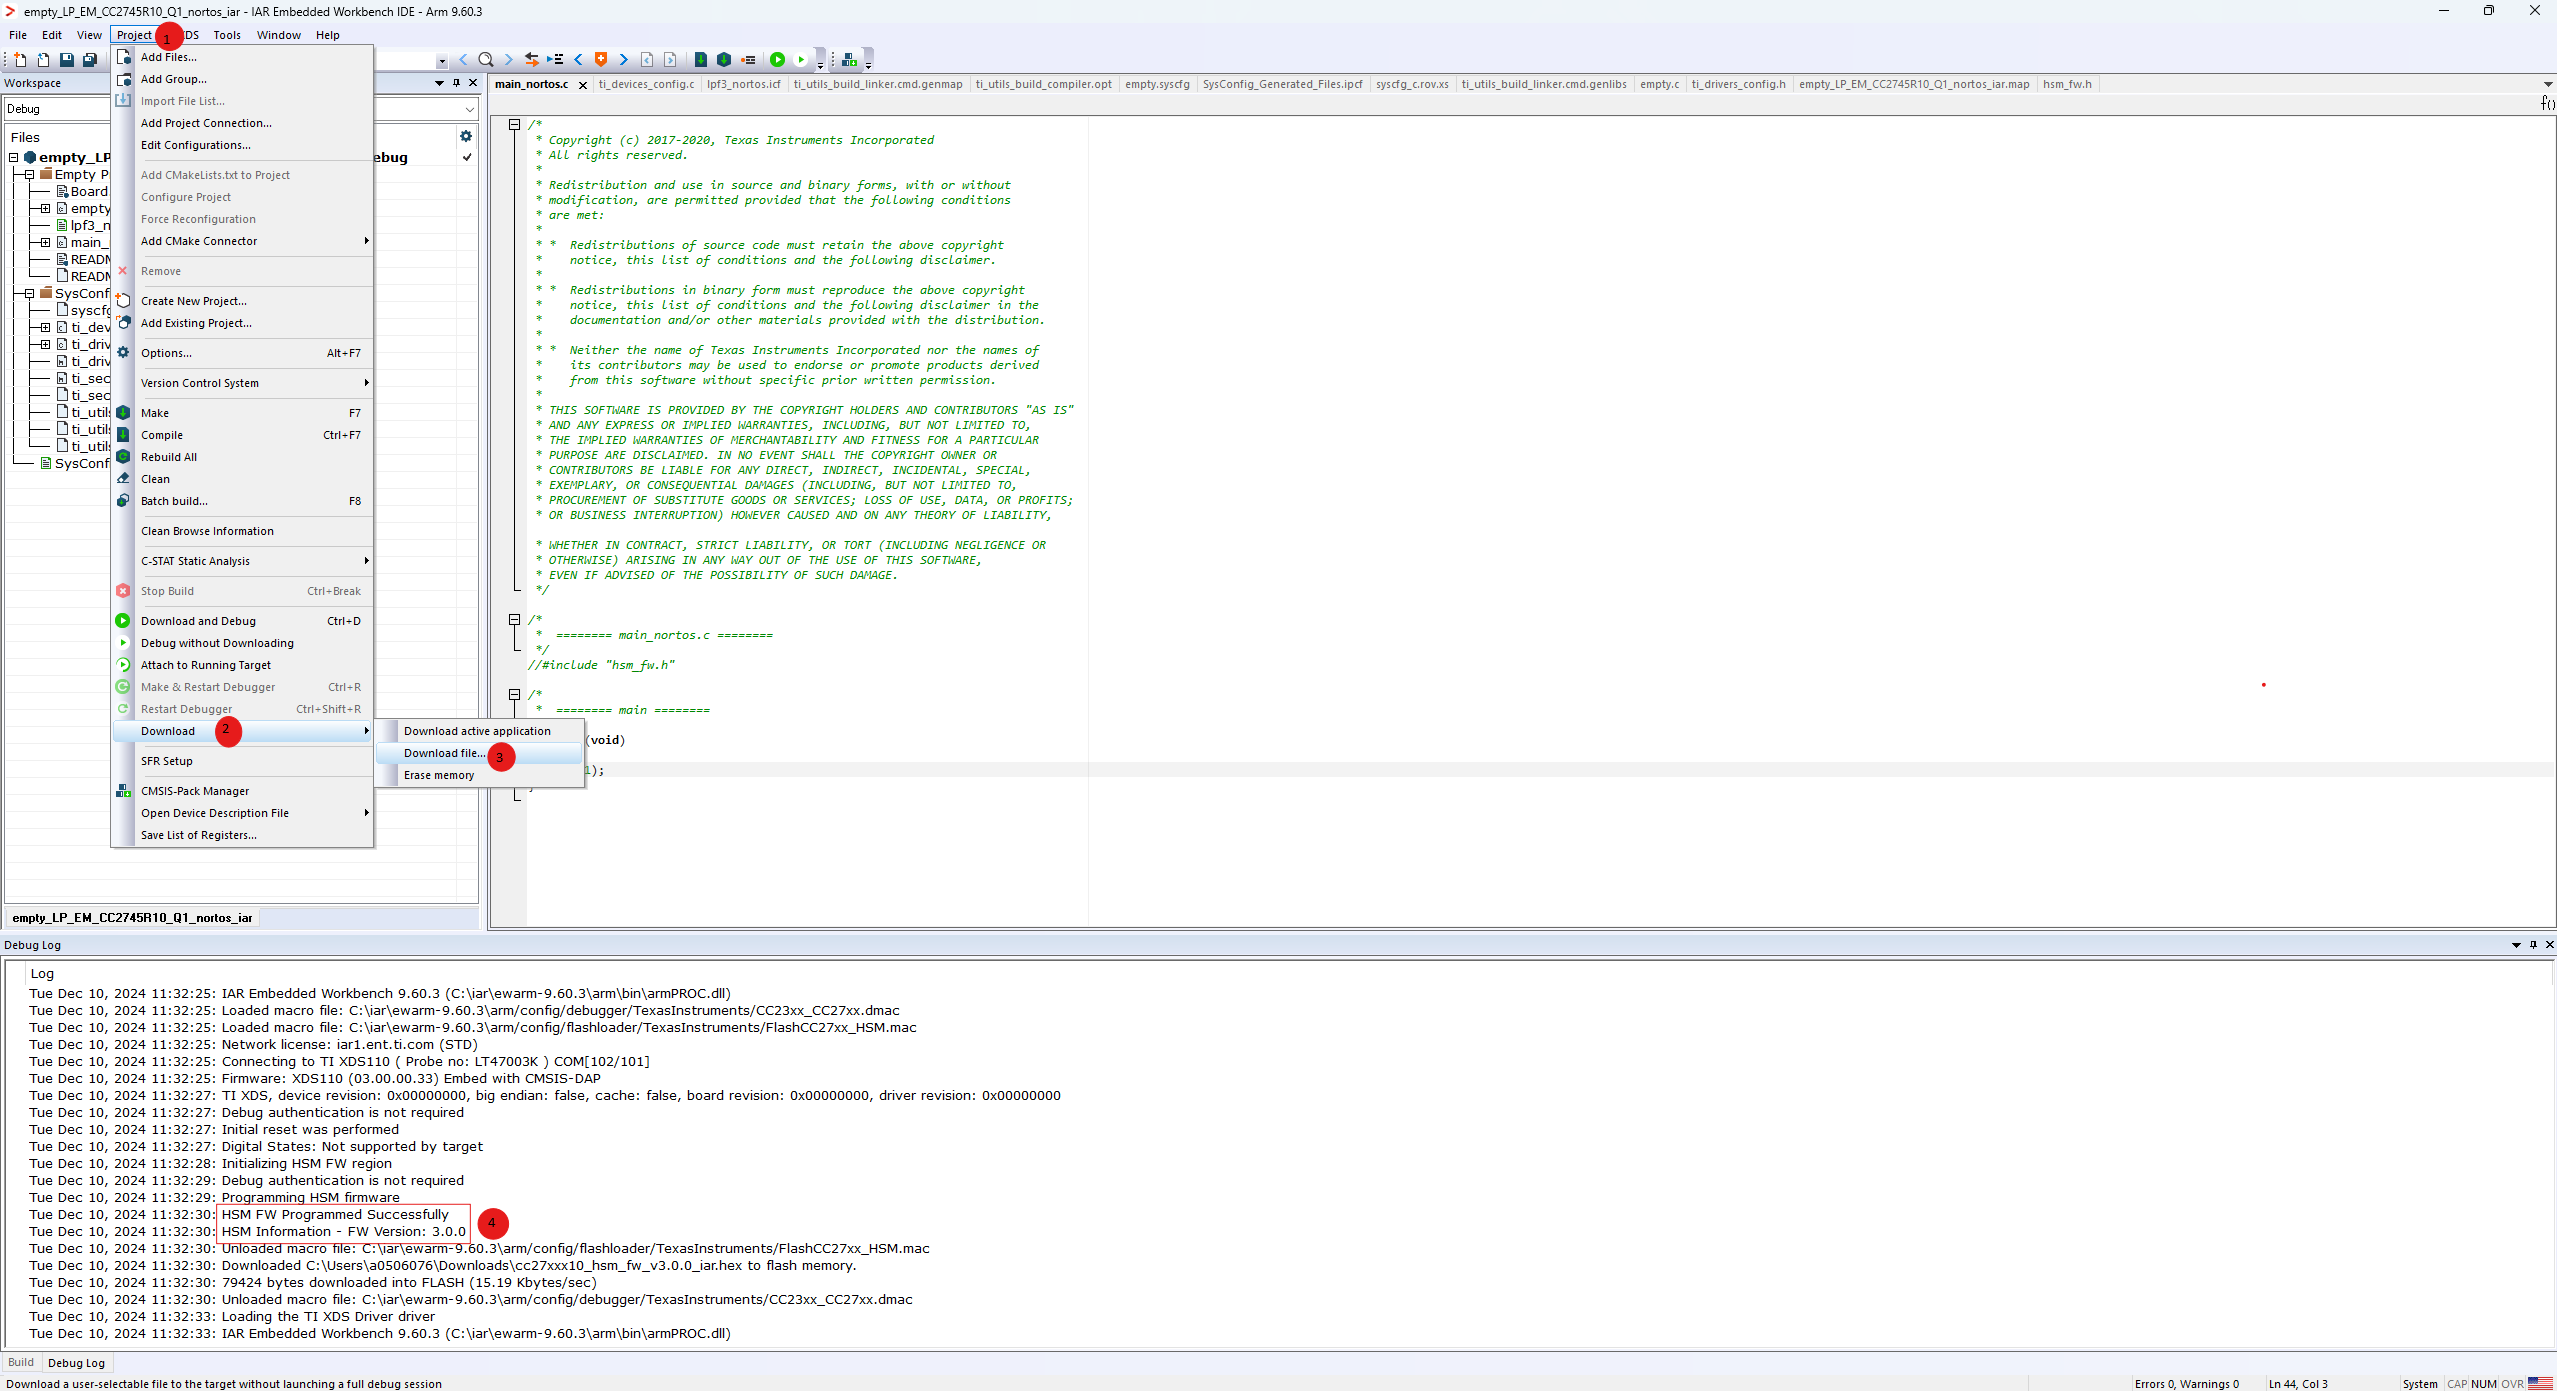
Figure 81. IAR programming.
HSM Functionality in Software
There are three different sets of APIs that may be utilized to leverage the HSM.
SimpleLink Cryptography Driver |TI_SECURE_DRIVERS_API|
HSM BareMetal Module
The following sections will provide example code to leverage the HSM using these APIs. For more detailed examples, please refer to the SDK examples repository and the TI drivers API documentation.
SimpleLink Crypto Driver
The SimpleLink crypto driver supports the full feature list for our cryptographic operations. The CC27xx family includes two different on-chip hardware accelerators that may be used to perform cryptograhpic operations (LAES and HSM). The SimpleLink driver layer extends support for both, and offers the developer the option to choose the engine of choice for AES operations.
The first on-chip hardware accelerator is a symmetric operations focused accelerator that performs only AES-128 operations called the LAES engine. The second on-chip hardware accelerator (HSM) offers a broader support for cryptograhpic operations including AES-128/192/256, SHA2 hashing, asymmetric operations, and random number generation.
The SimpleLink layer consists of different drivers performing algorithm-specific cryptographic operations.
Note
SHA2, ECDH, ECDSA, TRNG, and RNG drivers are an HSM only implementation.
SimpleLink Crypto Driver Usage
The following code utilizes the HSM if USE_HSM is defined; otherwise it will run LAES engine.
1#include <ti/drivers/AESCCM.h>
2#include <ti/drivers/cryptoutils/cryptokey/CryptoKeyPlaintext.h>
3
4#define USE_HSM
5
6AESCCM_Params params;
7AESCCM_Handle handle;
8CryptoKey cryptoKey;
9int_fast16_t encryptionResult;
10uint8_t nonce[] = "Thisisanonce";
11uint8_t aad[] = "This string will be authenticated but not encrypted.";
12uint8_t plaintext[] = "This string will be encrypted and authenticated.";
13uint8_t mac[16];
14uint8_t ciphertext[sizeof(plaintext)];
15uint8_t keyingMaterial[32] = {0x00, 0x01, 0x02, 0x03, 0x04, 0x05, 0x06, 0x07,
16 0x08, 0x09, 0x0A, 0x0B, 0x0C, 0x0D, 0x0E, 0x0F,
17 0x10, 0x11, 0x12, 0x13, 0x14, 0x15, 0x16, 0x17,
18 0x18, 0x19, 0x1A, 0x1B, 0x1C, 0x1D, 0x1E, 0x1F};
19AESCCM_Params_init(¶ms)
20params.returnBehavior = AESCCM_RETURN_BEHAVIOR_POLLING;
21handle = AESCCM_open(0, ¶ms);
22if (handle == NULL) {
23 /* If the handle is returned as NULL, this indicates that the HSM
24 * firmware has not been flashed.
25 */
26 // handle error
27}
28
29#ifdef USE_HSM
30/* This uses the HSM. */
31CryptoKeyPlaintextHSM_initKey(&cryptoKey, keyingMaterial, sizeof(keyingMaterial));
32#else
33/* This uses the LAES engine. */
34CryptoKeyPlaintext_initKey(&cryptoKey, keyingMaterial, sizeof(keyingMaterial));
35#endif
36
37AESCCM_OneStepOperation operation;
38AESCCM_OneStepOperation_init(&operation);
39operation.key = &cryptoKey;
40operation.aad = aad;
41operation.aadLength = sizeof(aad);
42operation.input = plaintext;
43operation.output = ciphertext;
44operation.inputLength = sizeof(plaintext);
45operation.nonce = nonce;
46operation.nonceLength = sizeof(nonce);
47operation.mac = mac;
48operation.macLength = sizeof(mac);
49encryptionResult = AESCCM_oneStepEncrypt(handle, &operation);
50if (encryptionResult != AESCCM_STATUS_SUCCESS) {
51 // handle error
52}
53AESCCM_close(handle);
Notice that the only difference between using the LAES and HSM is how the developer initializes the the cryptographic key. This can be visualized with the following diagram.
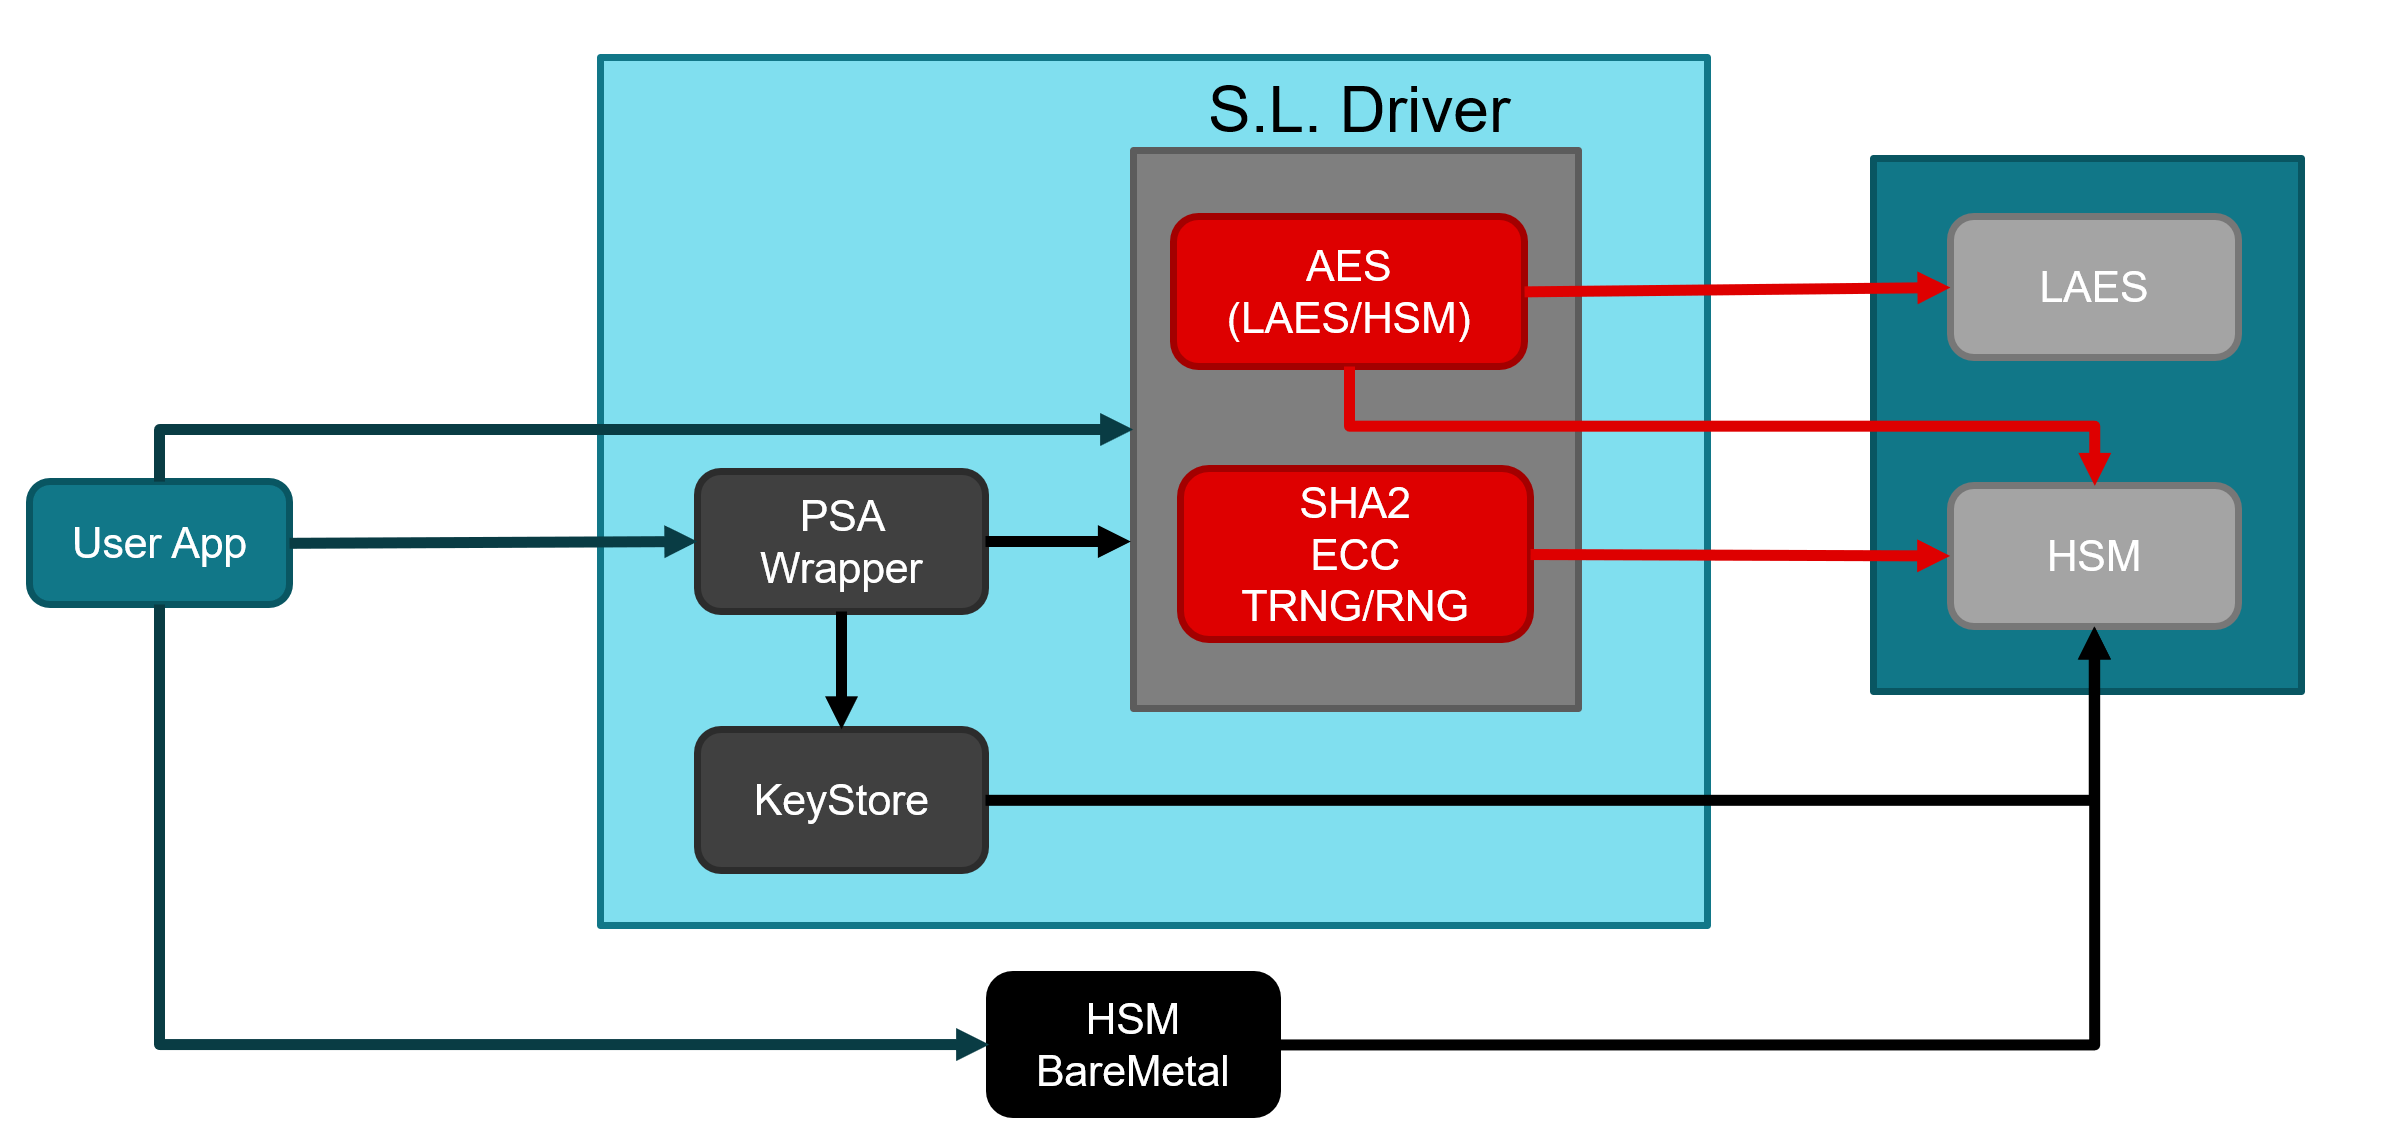
PSA Module
The PSA module is a wrapper around the SimpleLink cryptography drivers that conform to the PSA specification. This API serves to be portable across hardware that conforms to the PSA specification, and is the API that offers the most security. However, the security that it offers comes at the cost of higher memory usage and higher latency.
PSA Module Usage
The code below shows how to setup an ECC operation for signature verification.
  1#include <stdint.h>
  2
  3/* Driver Header files */
  4#include <third_party/psa_crypto/include/psa/crypto.h>
  5#include <ti/drivers/cryptoutils/hsm/HSMLPF3.h>
  6
  7/* Driver configuration */
  8#include "ti_drivers_config.h"
  9
 10#define KEY_BITS 256
 11#define KEY_TYPE PSA_KEY_TYPE_ECC_KEY_PAIR(PSA_ECC_FAMILY_SECP_R1)
 12#define KEY_ALG  PSA_ALG_ECDSA(PSA_ALG_SHA_256)
 13
 14const uint8_t message[6] = {0x01, 0x02, 0x03, 0x04, 0x05, 0x06};
 15
 16void *mainThread(void *arg0)
 17{
 18    psa_status_t status;
 19    int_fast16_t ret;
 20
 21    /** Initialize PSA **/
 22    status = psa_crypto_init();
 23    if (status != PSA_SUCCESS)
 24    {
 25        // Error handling.
 26        /* If this occurs, it indicates that the HSM has not been flashed. */
 27    }
 28
 29    /** Provision the hardware unique key **/
 30    ret = HSMLPF3_provisionHUK();
 31    if (ret != HSMLPF3_STATUS_SUCCESS)
 32    {
 33        // Error handling.
 34        /* If this occurs, it indicates that the HSM has not been flashed. */
 35    }
 36
 37    /**** ECDSA Key Generation ****/
 38    psa_key_id_t key_id;
 39
 40    /* To store generated public key */
 41    uint8_t public_key[PSA_KEY_EXPORT_ECC_PUBLIC_KEY_MAX_SIZE(KEY_BITS)];
 42    size_t public_key_length = 0;
 43
 44    psa_key_attributes_t attributes = PSA_KEY_ATTRIBUTES_INIT;
 45
 46    /* Since we want to sign messages, we need PSA_KEY_USAGE_SIGN_HASH */
 47    psa_set_key_usage_flags(&attributes, PSA_KEY_USAGE_SIGN_HASH);
 48
 49    /* We are using these keys for ECDSA, and the hashing algorithm used is SHA-256 */
 50    psa_set_key_algorithm(&attributes, KEY_ALG);
 51
 52    /* This is where we are setting out curve */
 53    psa_set_key_type(&attributes, KEY_TYPE);
 54
 55    /* This is the bit size of the hash algorithm we are using (SHA-256) */
 56    psa_set_key_bits(&attributes, KEY_BITS);
 57
 58    /* This will generate our key */
 59    status = psa_generate_key(&attributes, &key_id);
 60    if (status != PSA_SUCCESS)
 61    {
 62        // Error handling.
 63    }
 64
 65    /* Now we want to export our PUBLIC key */
 66    status = psa_export_public_key(key_id, public_key, sizeof(public_key), &public_key_length);
 67    if (status != PSA_SUCCESS)
 68    {
 69        // Error handling.
 70    }
 71    /**** ECDSA Key Generation Done ****/
 72
 73    /**** ECDSA Signing ****/
 74    /** Our buffer to hold the signature **/
 75    uint8_t signature[PSA_SIGN_OUTPUT_SIZE(KEY_TYPE, KEY_BITS, KEY_ALG)];
 76    size_t signature_length = 0;
 77
 78    status = psa_sign_message(key_id,
 79                              KEY_ALG,
 80                              message,
 81                              6,
 82                              signature,
 83                              PSA_SIGN_OUTPUT_SIZE(KEY_TYPE, KEY_BITS, KEY_ALG),
 84                              &signature_length);
 85
 86    if (status != PSA_SUCCESS)
 87    {
 88        // Error handling.
 89    }
 90    /**** ECDSA Signing Done ****/
 91
 92    /**** Import ECDSA Public Key ****/
 93    psa_key_id_t p_key_id = PSA_KEY_ID_USER_MIN + 1;
 94    psa_key_attributes_t p_attributes = PSA_KEY_ATTRIBUTES_INIT;
 95
 96    /* the public key is used to verify */
 97    psa_set_key_usage_flags(&p_attributes, PSA_KEY_USAGE_VERIFY_HASH);
 98
 99    /* We are using these keys for ECDSA, and the hashing algorithm used is SHA-256 */
100    psa_set_key_algorithm(&p_attributes, KEY_ALG);
101
102    /* This is where we are setting out curve */
103    psa_set_key_type(&p_attributes, PSA_KEY_TYPE_ECC_PUBLIC_KEY(PSA_ECC_FAMILY_SECP_R1));
104
105    /* Key bits of the curve type */
106    psa_set_key_bits(&p_attributes, KEY_BITS);
107
108    status = psa_import_key(&p_attributes, public_key, public_key_length, &p_key_id);
109    if (status != PSA_SUCCESS)
110    {
111        // Error handling.
112    }
113    /**** Import ECDSA Public Key Done ****/
114
115    /**** Verify message ****/
116    status = psa_verify_message(p_key_id,
117                              KEY_ALG,
118                              message,
119                              6,
120                              signature,
121                              signature_length);
122
123    if (status != PSA_SUCCESS)
124    {
125        // Error handling.
126    }
127    /**** Verify message done ****/
128
129    while(1);
130}
HSM BareMetal Module
The HSM BareMetal module offers a thin, simplified, and fast approach to leveraging the HSM hardware capabilities. It bypasses the software architecture linked with operations via the PSA API and the SimpleLink driver layers. The HSM BareMetal module offers the same cryptographic operations as the SimpleLink layer, except for segemented operations, and only supports synchronous polling mode. Furthermore, the developer must manage the keys.
HSM BareMetal Module Usage
First the HSMBareMetal.c, HSMBareMetal.h, HSMBareMetalUtility.h, and the HSMBareMetalUtility.c files must be added to the project. The files are located in the <sdk root>/ti/source/common/hsm. The developer will need to add these files to the root of their project. Close attention should be paid to the header files, since they contain additional information that may not be covered here.
#include "HSMBareMetal.h"

/* Struct to hold version information. */
HSMBareMetal_systemInfoVersionStruct version;
int_fast16_t status = HSMBAREMETAL_STATUS_ERROR;

/* HSM must be initialized before any HSM operations can occur. */
status = HSMBareMetal_init();
if (HSMBAREMETAL_STATUS_SUCCESS != status)
{
    /* Fail condition here */
    /* If this occurs, that means that the HSM firmware is not flashed on
     * on the chip, and must be re-flashed.
     */
    while(1);
}

/* Grab the firmware version. */
status = HSMBareMetal_getHSMFirmwareVersion(&version);
if (HSMBAREMETAL_STATUS_SUCCESS != status)
{
    /* Fail condition here */
    /* If this occurs, that means that the HSM firmware is not flashed on
     * on the chip, and must be re-flashed.
     */
    while(1);
}
Key Storage in the HSM
Keys stored in the HSM cannot be exported back to the application, and are only accessible inside the HSM. Keys that are stored in the HSM will be used for cryptographic operations internal to the HSM. This prevents private keys from being exposed to the application, and thus, to an attacker. be exposed to the application, and thus, to an attacker.
For more information regarding Key Storage, please refer to the KeyStore.