RPMsg IPC - MCU to MCU#
This module will demonstrate how to build and run the RPMsg Inter-Processor Communication (IPC) example between two MCU cores.
This example involves an MCU+ SDK multi-core application. A multi-core application includes at least two cores. The cores available are shown in the below diagram.
What is IPC ?#
First, let’s understand IPC.
AM62AX SOC has multiple CPUs on which distinct applications are run. These applications need to communicate with each other to realize the larger system level application. Communication between processor cores is called Inter Processor Communication (IPC).
For more information about RPMsg IPC, including IPC between Linux and an MCU core, reference the Multicore academy section How to Develop with RPMsg IPC.
Next Steps#
MCU PLUS SDK provides examples on IPC. We will be using the IPC RPMSG ECHO SDK Example to demonstrate Multicore Application.
We will be doing IPC between the following cores:
MCU_R5FSS0_0 & WKUP_R5FSS0_0
Steps to perform IPC#
Lets take a look at the steps in brief.
IPC Communication between MCU_R5FSS0_0 & WKUP_R5FSS0_0#
After you have installed the MCU PLUS SDK for AM62A, you need to follow the steps mentioned here:
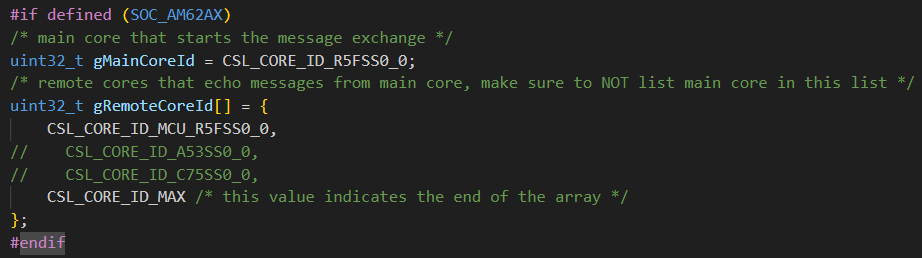
1. Go to MCU_PLUS_SDK_INSTALL_PATH\examples\drivers\ipc\ipc_rpmsg_echo\ipc_rpmsg_echo.c, amd comment out the cores not needed.
2. Go to MCU_PLUS_SDK_INSTALL_PATH\examples\drivers\ipc\ipc_rpmsg_echo\am62ax-sk\mcu-r5fss0-0_freertos\ti-arm-clang and in a command line enter gmake syscfg-gui.
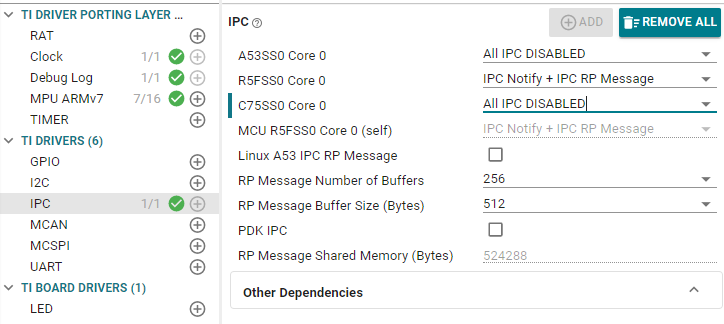
3. A new SysConfig GUI will appear where you need to select IPC and set ALL IPC DISABLED for the cores A53SS0 Core 0 & C75SS0 Core 0.
Now, in the same command line, follow the mentioned sequence to rebuild the appimages:
gmake clean
gmake all PROFILE=debug
gmake all PROFILE=release
4. Similarly go to MCU_PLUS_SDK_INSTALL_PATH\examples\drivers\ipc\ipc_rpmsg_echo\am62ax-sk\r5fss0-0_freertos\ti-arm-clang and in a command line enter gmake syscfg-gui. Now, repeat the steps mentioned in point 3.
5. WKUP R5 core cannot be directly loaded onto CCS. We will instead flash the application appimage via SBL NULL. Follow the steps mentioned below:
Go to MCU_PLUS_SDK_INSTALL_PATH\tools\boot\sbl_prebuilt\am62ax-sk\default_sbl_null_hs_fs.cfg and in the section where DM Image is flashed, simply replace the hello_world.release.appimage.hs_fs image with ipc_rpmsg_echo.release.appimage.hs_fs.
Do the SoC Intialization via SBL NULL as mentioned in the MCU+ SDK Guide for SoC Initialization.
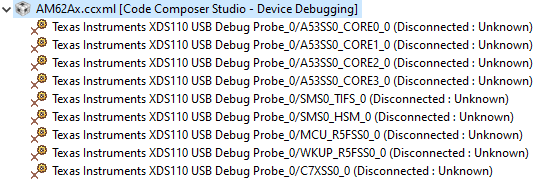
6. Open CCS, and launch a AM62Ax debugging session where you will connect to the core MCU_R5FSS0_0. After connecting to the core, perform a CPU Reset on the core and load the file ipc_rpmsg_echo.debug.out. This is located at MCU_PLUS_SDK_INSTALL_PATH\examples\drivers\ipc\ipc_rpmsg_echo\am62ax-sk\mcu-r5fss0-0_freertos\ti-arm-clang\ipc_rpmsg_echo.debug.out
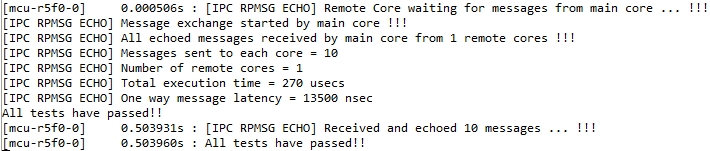
7. Hit Run and you should be able to see the output as attached below. There you go, you just ran your first Multicore Project.