Matter Device Creation#
Introduction#
Matter is a royalty-free standard to connect compatible devices and systems with one another. Its goal is to make connections simpler, more secure and scalable with the foundation for connected things in home and building automation applications. The intention of this module is to outline the necessary steps for users to establish their development environment, build a Matter device project from the Git repository, and program a SimpleLink™ device with the resultant firmware. Through the user interface, developer can then expect to commission their interoperable solution into one of the many smart home ecosystems such as Apple® Homekit®, Google Assistant™, Amazon Alexa, and Samsung SmartThings.
In this lab we will be working with a 64-bit x86 Linux machine, a Wi-Fi router, and a LaunchPad to join and communicate with a mass-produced Matter-certified controller. The following tasks require familiarity with Linux environments and should take one to two hours to complete, not including installation or other setup procedures.
Task 0: Install Linux machine prerequisites
Task 1: Download the Matter repository and build an example
Task 2: Program firmware onto a LaunchPad
Task 3: Join the device to a Matter controller
Note
Technical support: For any questions you may have, please refer to the TI Zigbee & Thread E2E Forum.
Warning
Only Matter over Thread is discussed in this module
Prerequisites#
It is highly recommended that you read and get familiar with the Matter Documentation as it will be referenced throughout this module. The Matter Specification is also necessary for further Matter development. If you want to build your own Matter controller instead of using an off-the-shelf product, the Matter Fabric SLA will need to be completed as well.
Other SimpleLink Academy Labs#
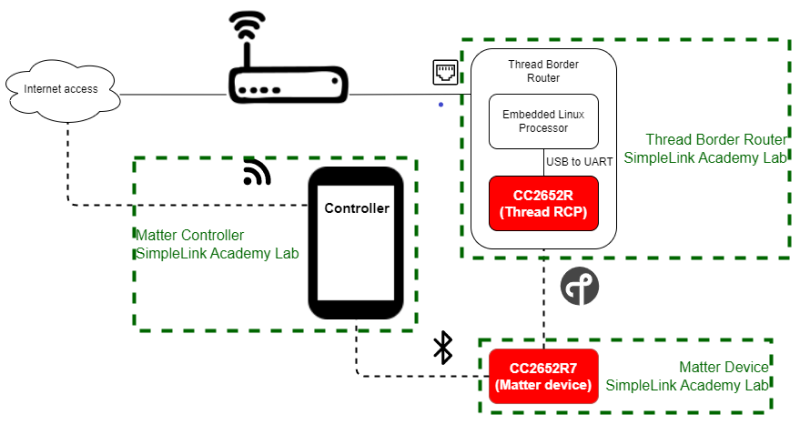
The Matter Controller SLA provides instructions for creating an
open-source Matter controller using the chip-tool Git project
and OTBR (OpenThread Border Router) resources.
Software#
(Optional) Serial terminal program, such as:
(Optional) LightBlue or another Bluetooth LE scanner phone application
Hardware#
64-bit x86 Linux machine
Wi-Fi Router
Matter controller
Matter controller compatible smartphone
Overview#
In this section we give an overview of the Matter device and its function within the Matter fabric.
Error
Only Linux 64-bit x86 is supported. SysConfig and Uniflash are not intended for 32-bit or ARM Linux machines
Matter Environment#
About the Matter Device#
A Matter device is a device which exists within a Matter fabric. Through connection with a Thread Border Router, the Matter device can communicate with an adjacent IPv6 network (an Internet Protocol version 6 network that the Border Router is also connected to. Wi-Fi or Ethernet, for example). In this way the Matter device can achieve communication with Cloud services and other devices within the Matter fabric.
Matter devices can support many different home automation applications,
including lighting, actuation, switches, controllers, sensors, closures,
HVAC, and media. These are built on the ZCL (Zigbee Cluster Library, see
the Zigbee Specification Documents) which contains a defined
structure of endpoints, clusters, attributes, commands, and data types.
Endpoints represent one logical device (ex. on/off), and multiple can exist per
Matter device. One or more cluster, which is a set of attributes and commands
that achieve the desired functionality, is defined per endpoint. By adhering
to the ZCL, products can become certifiable by the CSA (Connectivity Standards
Alliance) and thus prove interoperability with third-party Matter devices
available. You can learn more about the certification process from the
CSA website.
About Commissioning#
Commissioning is the act of joining an untrusted device into a Matter fabric by securely authenticating the device and disseminating the network information.
Note
This section is a brief overview of the Commissioning process. Consult the Matter Specification for more details.
Matter devices are attested with certificates, the DAC (Device Attestation
Certificate) and NOC (Node Operational Certificate) which are rooted in the
CSA’s DCL (Distributed Compliance Ledger) stored in the Cloud. This allows
for a device’s certificate to be revoked if it is found to be out of
compliance. These certificates must be securely programmed onto the device
to be used as part of the commissioning process to verify that this is a
certified Matter device. Devices are attested within this channel before being
brought onto the network. Matter certificate relationships between different
commissioning roles are shown in the following image.
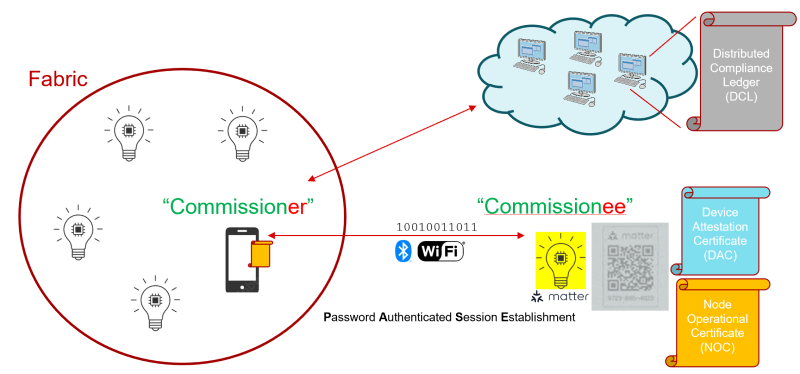
Matter Commissioning#
Password provisioning is accomplished with pre-shared keys which are
transferred over Bluetooth LE(Bluetooth Low Energy) radio packets through the
PASE (Password Authenticated Session Establishment) process. A smartphone
is often the Matter Commissioner which will execute this process with the
Matter Device Commissionee once the device has enabled Bluetooth LE
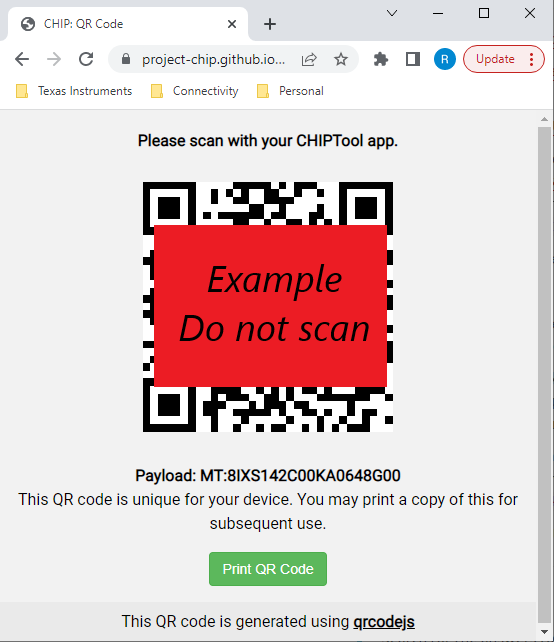
advertising. The smartphone would use the device’s Onboarding Payload obtained
out-of-band from the device to setup the secure session. For example, the
device could offer this in a QR code which the phone would obtain by scanning
it.
Network security follows the standard Thread Specification. Please refer to the Thread Border Router SimpleLink Academy Lab and Thread Specification for a full description of Thread commissioning processes and network security.
Once the Matter device has joined the Thread network with the keys provided by Matter Commissioner and the DCL has approved the Commissionee’s certificates, the Matter controller accepts the Matter device into the Matter fabric and communication between devices within the fabric can commence.
About Matter Controllers#
Each Matter fabric has a randomly generated certificate used to secure group and individual key exchanges. The Matter controller will handle this process along with node assignments for each Matter device which joins its fabric. The controller is also capable of opening the device’s commissioning window so that it may join a separate Matter fabric, resulting in the Matter device existing within multiple fabrics and communicating with each simultaneously.
Each smart home ecosystem (including but not limited to, Apple® Homekit®, Google Assistant™,Amazon Alexa, and Samsung SmartThings) has its own line of Matter controller products. Each of these controllers typically includes a built-in Thread Border Router to reduce hardware requirements. Most controllers also provide their own smartphone app to act as the Commissioner and execute the joining process with the Matter Device Commissionee.
Note
If you would like to develop your own Matter controller instead of using a commercial product, please complete the Matter Fabric SLA.
Task 0 – Install Linux#
Note
These are similar steps as in the Matter Documentation. An Internet connection, such as with Wi-Fi or ethernet, is required but specific setup instructions are not provided in this guide.
Linux Ubuntu 22.04 LTS is the recommended operating system at the time this training was written. After installing and confirming a secure internet connection, perform the following dependencies installation on the Linux terminal command line:
$ sudo apt-get update
$ sudo apt-get upgrade
$ sudo apt-get install git gcc g++ pkg-config libssl-dev libdbus-1-dev \
 libglib2.0-dev libavahi-client-dev ninja-build python3-venv python3-dev \
 python3-pip unzip libgirepository1.0-dev libcairo2-dev libreadline-dev
SysConfig will also need to be downloaded and installed using these commands (the specific version from the Example READMEs should be used):
$ cd ~
$ wget https://dr-download.ti.com/software-development/ide-configuration-compiler-or-debugger/MD-nsUM6f7Vvb/1.15.0.2826/sysconfig-1.15.0_2826-setup.run
$ chmod +x sysconfig-1.15.0_2826-setup.run
$ ./sysconfig-1.15.0_2826-setup.run
Task 1 – Build the Matter project#
Now that the Linux environment is established, it’s time to download the Matter repository and build a Matter device application example which will then be programmed onto the SimpleLink LaunchPad.
$ cd ~
$ sudo git clone --recurse-submodules https://github.com/TexasInstruments/matter.git
This will take more than 30 minutes to complete due to the recursive submodules. Once finished, enter the directory and create the build environment.
$ cd ~/matter
$ source scripts/bootstrap.sh
After completing this the first time, consecutive shell sessions can be activated simply by using scripts/activate.sh instead. If done properly, a successful status should be displayed like below.
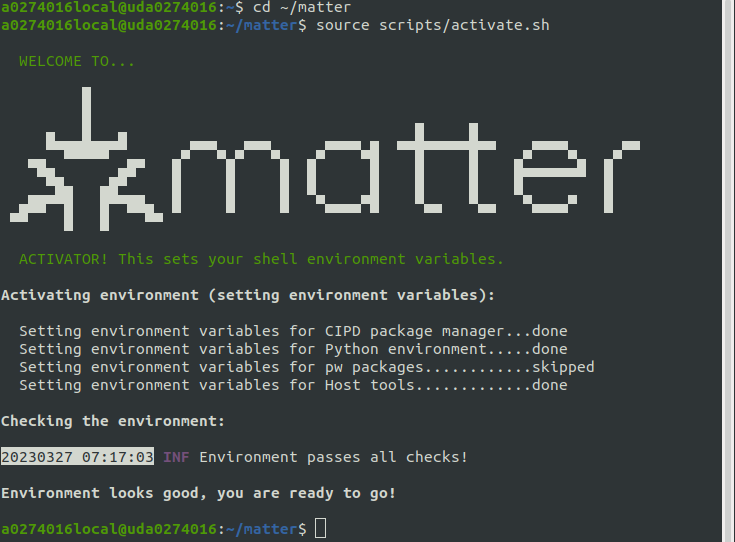
Build Environment Activation#
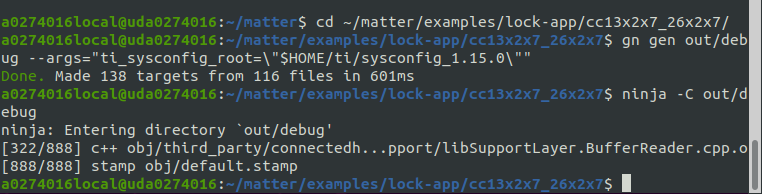
Now enter the build directory for the Matter device application project.
This course will use the lock-app example. The following
commands are used to produce the default executable. Be sure to modify the
ti_sysconfig_root argument if using a different SysConfig installation
directory than the default location.
$ cd ~/matter/examples/lock-app/cc13x2x7_26x2x7
$ gn gen out/debug --args="ti_sysconfig_root=\"$HOME/ti/sysconfig_1.15.0\""
$ ninja -C out/debug
Afterwards, several files should be populated inside the
~/matter/examples/lock-app/cc13x2x7_26x2x7/out/debug directory. The following
project options are available from args.gn, which can be altered using
a text editor such as nano or vi, to customize the Matter device.
chip_progress_logging = trueincreases UART terminal logsmatter_device_vidis the Vendor ID (VID)matter_device_pidis the Product ID (PID)
Warning
Modifying project defaults could affect the Matter device’s ability to join an established Matter Fabric, for example if the Matter controller does not recognize the VID/PID selected.
include/CHIPProjectConfig.h also contains pairing codes (these should not
be enabled in production builds but are useful for test enviornments such
as chip-tool which is used in the
Matter Fabric SLA)
CHIP_DEVICE_CONFIG_USE_TEST_SETUP_PIN_CODEdefault is0x20202021CHIP_DEVICE_CONFIG_USE_TEST_SETUP_DISCRIMINATORdefault is3840
Build Complete#
Task 2 – Program the LaunchPad#
UNIFLASH will be used to program the Matter Device image which was just created to the SimpleLink LaunchPad. First, it must be downloaded and installed. Uniflash v8.2 is demonstrated below, however the latest version is also suitable.
Note
Uniflash GUI also available This module utilizes the Uniflash CLI, however the Uniflash Quick Start Guide provides other Uniflash usage instructions if desired
LP-CC2652R7#
Download and install Uniflash
   $ cd ~
   $ wget https://dr-download.ti.com/software-development/software-programming-tool/MD-QeJBJLj8gq/8.2.0/uniflash_sl.8.2.0.4220.run
   $ chmod +x uniflash_sl.8.2.0.4220.run
   $ ./uniflash_sl.8.2.0.4220.run
A target configuration (.ccxml) file must be supplied to Uniflash. It can be generated and exported using the Uniflash GUI or Code Composer Studio, however the CC2652R7 version has also been provided in this link. Be sure to Right Click → Save Link As and select a specified location (this tutorial will use the Uniflash installation directory), but modify the serial ID value. You can use detect_devices.sh to determine this.
CC2652R7.ccxml#</property> <property Type="choicelist" Value="1" id="Debug Probe Selection"> <choice Name="Select by serial number" value="0"> <property Type="stringfield" Value="L15000ED" id="-- Enter the serial number"/> </choice> </property>
Be sure to only have the desired LaunchPad target connected to the Linux machine. The device will first be mass erased to remove any pre-existing flash contents.
$ cd ~/ti/uniflash_8.2.0
$ ./dslite.sh --mode cc13xx-cc26xx-mass-erase -d XDS110
dslite.sh from the Uniflash installation directory will be used to flash the chip-LP_CC2652R7-lock-example-bim.hex file from the Matter device output build directory.
$ cd ~/ti/uniflash_8.2.0
$ ./dslite.sh --config=CC2652R7.ccxml -f -v $HOME/matter/examples/lock-app/cc13x2x7_26x2x7/out/debug/chip-LP_CC2652R7-lock-example-bim.hex

Uniflash Programming#
Note
Don’t need over-the-air updates with your Matter project? It is possible to save flash memory by removing the OTA feature by setting
chip_enable_ota_requestortofalseinsideargs.gnandCHIP_DEVICE_CONFIG_ENABLE_OTA_REQUESTOR=0insidesrc/platform/BUILD.gn. Doing so negates the BIM requirement and thus, after building the project, chip-LP_CC2652R7-lock-example.hex should be loaded instead.Press the reset button at the top of the LaunchPad, located next to the microUSB port, to start running the Matter
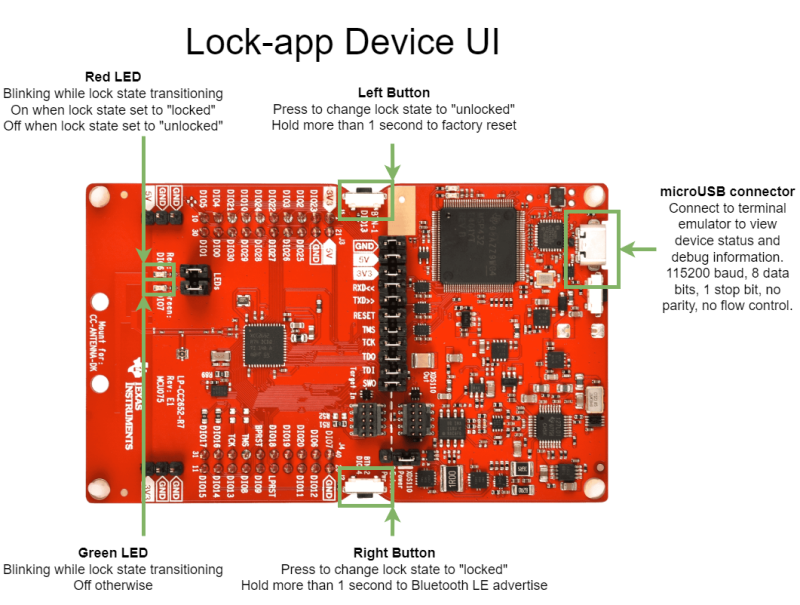
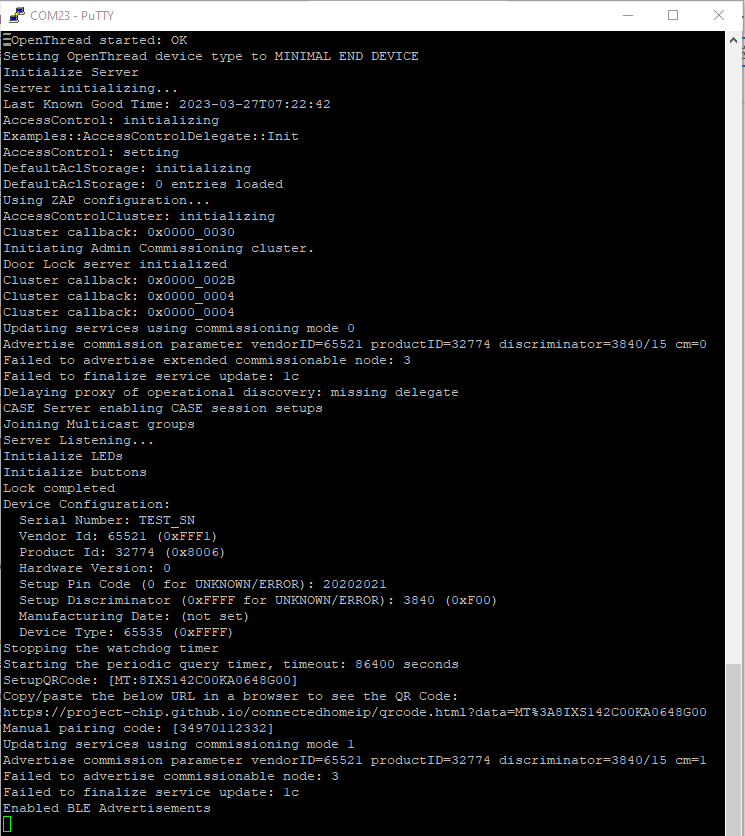
lock-appdevice application. The Red LED should now be lit and can be controlled using the on-boardBTN-1andBTN-2push buttons. The output log can be viewed through a terminal emulator, such as PuTTY or Tera Term using the default Application/User UART settings: 115200 Baud, 8 Data bits, No Parity, 1 Stop bit, and No Flow Control. This will also be necessary to acquire the Matter QR Code for joining a Matter controller.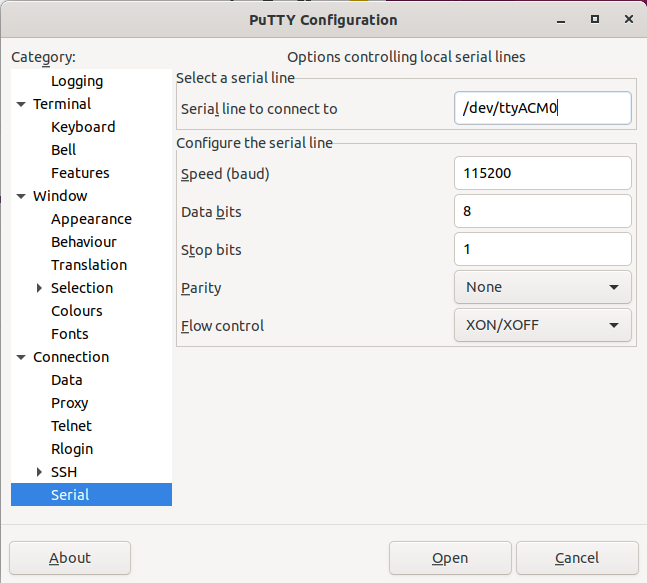
Uniflash Programming#
Complete device
UI(User Interface) instructions are provided in the application README.Note
Linux development machine no longer required Any Windows, MacOS, or Linux computer can be used to view the Matter LaunchPad device’s UART terminal output log
Task 3 – Join a Matter Controller#
Now that a Matter device has been successfully established, it is time to join
an existing Matter controller. For this module, a Google Nest Hub (2nd gen)
is used alongside the Google Home phone application (v2.65.1.6 at the time of
this writing) to demonstrate Matter SimpleLink lock-app capabilities. Matter
ecosystems offered from other companies are also available so long as they
accept the Matter TI credentials and application clusters used. Please read
specific vendor development documentation or contact the company of interest
for more information.
Warning
For the following instructions to be effective, it is paramount that the same Google account be used across all resources and that both the Google Nest Hub and smartphone are connected to the same Wi-Fi network.
Enable Developer options on the smartphone.
Create a Matter integration inside the Google Developer Console. By default, the Vendor ID is 0xfff1 and the Product ID is 0x8006 as defined in
args.gnof the Matter device project.Enable Bluetooth LE advertisement (Bluetooth devices advertise their presence by broadcasting advertisements) on the SimpleLink LaunchPad Matter device by holding
BTN-2for more than one second as instructed in the application README. Advertisements can be confirmed using the UART UI or through a smartphone Bluetooth LE scanner application such as LightBlue. The device name will contain MATTER- followed by the discriminator value defined ininclude/CHIPProjectConfig.h(3840 by default).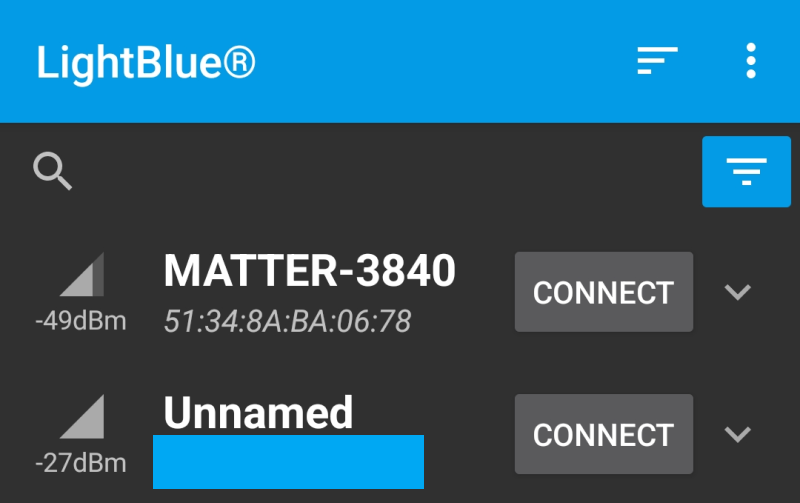
Uniflash Programming#
Lock-app UART UI#
Inside the Google Home smartphone application, navigate to + → Set up device → New device → and select the name designated for the Google Nest Hub.
At this point, after Looking for devices… for a few seconds, the smartphone application will either display Matter-enabled device found (press Continue) or ask What are you setting up? (select Matter-enabled device). Then scan the QR code or enter the manual pairing code provided by the Matter SimpleLink device UART UI and Agree to Google’s terms.
Uniflash Programming#
Note
Connecting multiple devices? Enable Bluetooth LE advertisements and join separately, or change the
CHIP_DEVICE_CONFIG_USE_TEST_SETUP_DISCRIMINATORwith each project build which will generate a unique QR code.After the commissioning process completes successfully, Device connected will be shown. After clicking Done and choosing location and naming values, a widget will be generated inside the Google Home application and can control the Matter SimpleLink
lock-appdevice.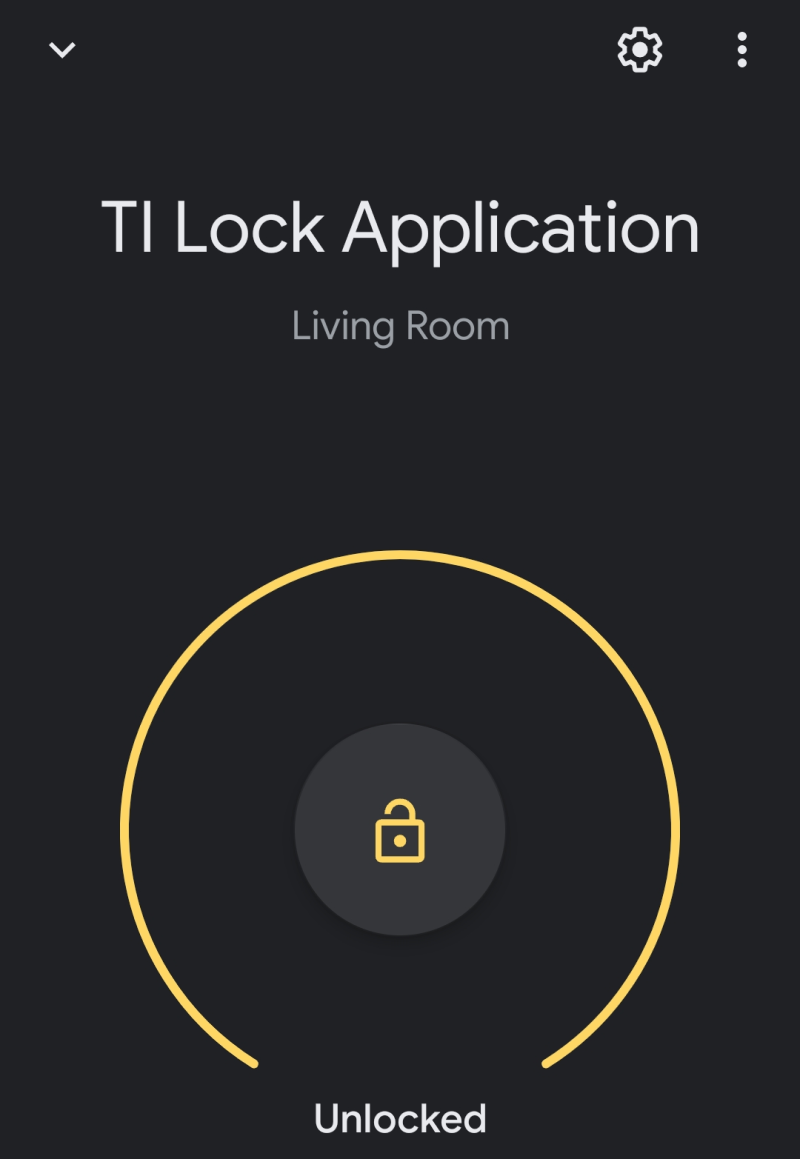
Uniflash Programming#
Note
Having trouble? Try to Factory Reset the SimpleLink LaunchPad device’s lock application by holding
BTN-2for more than one second, and ensure that both the phone and Matter controller are using the same Wi-Fi network. If further help is required, search for the answers to similar problems reported on the TI Zigbee & Thread E2E Forum or create your own post!
Further Reading#
It is recommended that you read the Matter Specification for specific network operation and other Matter documentation for more information on the Matter software development environment. If you want to expand on the lock-app functionality, please continue to the Configuring Matter Applications SLA
Note
Want to develop your own Matter controller? Continue learning with the Matter Fabric SLA which provides instructions for creating an open-source Matter controller using chip-tool and OTBR resources.