2.4. Setup Network
2.4.1. Overview
This section deals with setting up a wired network using an Ethernet cable.
Most TI EVMs, including the AM62x Starter Kit (SK), include support for wired networking using an Ethernet cable. The Processor SDK for Linux that runs on these EVMs also includes networking support right out of the box.
2.4.2. Using an Dedicated Router with DHCP
You must have a method to assign IP addresses in order to use networking with the EVMs. The easiest, most cross-platform way to assign IP addresses is to use a dedicated router that includes a DHCP server. The below diagram shows an example of a setup that uses networking with an EVM and a dedicated router:
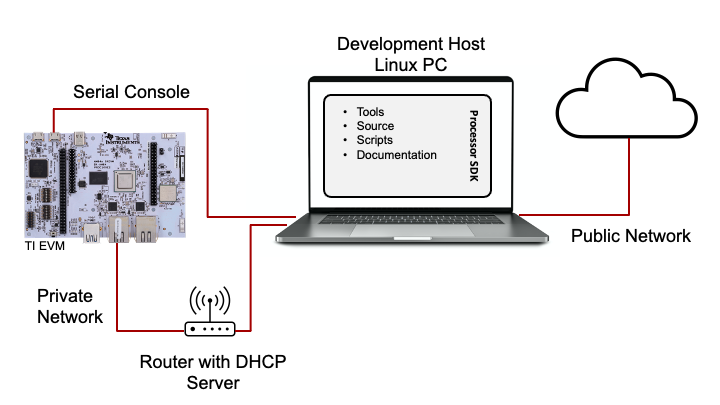
In this setup, the PC being used for evaluation is connected to a router that has a DHCP server configured to serve IP addresses on a certain subnet. The EVM is connected to the same router. Like the PC, the EVM will attempt to get an IP address using DHCP at boot time. In this configuration, both the PC and the EVM should get an IP address from the router on the same subnet. This configuration will allow the EVM and PC to communicate over the network.
“ifconfig” is a good command to run on the EVM (i.e., the “target”), to check the status of the network. In this example, the Starter Kit (SK) is not connected to any networks (no Ethernet cables plugged in).
# ifconfig
eth0: flags=4099<UP,BROADCAST,MULTICAST>  mtu 1500  metric 1
        ether f4:84:4c:f9:7c:17  txqueuelen 1000  (Ethernet)
        RX packets 0  bytes 0 (0.0 B)
        RX errors 0  dropped 0  overruns 0  frame 0
        TX packets 0  bytes 0 (0.0 B)
        TX errors 0  dropped 0 overruns 0  carrier 0  collisions 0

eth1: flags=4099<UP,BROADCAST,MULTICAST>  mtu 1500  metric 1
        ether 70:ff:76:1d:f1:a3  txqueuelen 1000  (Ethernet)
        RX packets 0  bytes 0 (0.0 B)
        RX errors 0  dropped 0  overruns 0  frame 0
        TX packets 0  bytes 0 (0.0 B)
        TX errors 0  dropped 0 overruns 0  carrier 0  collisions 0

lo: flags=73<UP,LOOPBACK,RUNNING>  mtu 65536  metric 1
        inet 127.0.0.1  netmask 255.0.0.0
        inet6 ::1  prefixlen 128  scopeid 0x10<host>
        loop  txqueuelen 1000  (Local Loopback)
        RX packets 82  bytes 6220 (6.0 KiB)
        RX errors 0  dropped 0  overruns 0  frame 0
        TX packets 82  bytes 6220 (6.0 KiB)
        TX errors 0  dropped 0 overruns 0  carrier 0  collisions 0
The eth0 and eth1 interfaces above are the wired Ethernet interfaces on the Starter Kit (SK). These interfaces are connected to the Ethernet Switch (CPSW) on the AM62x SoC. The CPSW can support either a Switch or dual-MAC configuration. By default, the SDK configures the hardware in dual-MAC mode. Thus, there are two Linux interfaces, eth0 and eth1, that correspond to the two MACs.
Connecting an Ethernet cable to the Starter Kit (SK) should start a connection and get an IP address from the DHCP server in the router. The status of the connection should change to having an IP address and can be validated with the same ifconfig command:
# ifconfig
eth0: flags=4163<UP,BROADCAST,RUNNING,MULTICAST>  mtu 1500  metric 1
        inet 192.168.2.19  netmask 255.255.255.0  broadcast 192.168.2.255
        inet6 fe80::f684:4cff:fef9:7c17  prefixlen 64  scopeid 0x20<link>
        ether f4:84:4c:f9:7c:17  txqueuelen 1000  (Ethernet)
        RX packets 6  bytes 926 (926.0 B)
        RX errors 0  dropped 0  overruns 0  frame 0
        TX packets 41  bytes 5532 (5.4 KiB)
        TX errors 0  dropped 0 overruns 0  carrier 0  collisions 0

eth1: flags=4099<UP,BROADCAST,MULTICAST>  mtu 1500  metric 1
        inet6 fe80::72ff:76ff:fe1d:f1a3  prefixlen 64  scopeid 0x20<link>
        ether 70:ff:76:1d:f1:a3  txqueuelen 1000  (Ethernet)
        RX packets 18  bytes 2462 (2.4 KiB)
        RX errors 0  dropped 0  overruns 0  frame 0
        TX packets 69  bytes 8138 (7.9 KiB)
        TX errors 0  dropped 0 overruns 0  carrier 0  collisions 0

lo: flags=73<UP,LOOPBACK,RUNNING>  mtu 65536  metric 1
        inet 127.0.0.1  netmask 255.0.0.0
        inet6 ::1  prefixlen 128  scopeid 0x10<host>
        loop  txqueuelen 1000  (Local Loopback)
        RX packets 82  bytes 6220 (6.0 KiB)
        RX errors 0  dropped 0  overruns 0  frame 0
        TX packets 82  bytes 6220 (6.0 KiB)
        TX errors 0  dropped 0 overruns 0  carrier 0  collisions 0
The above output shows that eth0 now has an IP address, 192.168.2.19. This IP address will vary depending on the configuration of the DHCP server. If the other Ethernet connector on the board was used, eth1 may have gotten an IP address like below:
# ifconfig
eth0: flags=4099<UP,BROADCAST,MULTICAST>  mtu 1500  metric 1
        ether f4:84:4c:f9:7c:17  txqueuelen 1000  (Ethernet)
        RX packets 0  bytes 0 (0.0 B)
        RX errors 0  dropped 0  overruns 0  frame 0
        TX packets 0  bytes 0 (0.0 B)
        TX errors 0  dropped 0 overruns 0  carrier 0  collisions 0

eth1: flags=4163<UP,BROADCAST,RUNNING,MULTICAST>  mtu 1500  metric 1
        inet 192.168.2.26  netmask 255.255.255.0  broadcast 192.168.2.255
        inet6 fe80::72ff:76ff:fe1d:f1a3  prefixlen 64  scopeid 0x20<link>
        ether 70:ff:76:1d:f1:a3  txqueuelen 1000  (Ethernet)
        RX packets 13  bytes 1793 (1.7 KiB)
        RX errors 0  dropped 0  overruns 0  frame 0
        TX packets 33  bytes 5522 (5.3 KiB)
        TX errors 0  dropped 0 overruns 0  carrier 0  collisions 0

lo: flags=73<UP,LOOPBACK,RUNNING>  mtu 65536  metric 1
        inet 127.0.0.1  netmask 255.0.0.0
        inet6 ::1  prefixlen 128  scopeid 0x10<host>
        loop  txqueuelen 1000  (Local Loopback)
        RX packets 82  bytes 6220 (6.0 KiB)
        RX errors 0  dropped 0  overruns 0  frame 0
        TX packets 82  bytes 6220 (6.0 KiB)
        TX errors 0  dropped 0 overruns 0  carrier 0  collisions 0
Once an IP address is assigned, connectivity between the EVM and the PC can be checked with a simple “ping” command sent to the PC’s IP address:
# ping 192.168.2.1
PING 192.168.2.1 (192.168.2.1): 56 data bytes
64 bytes from 192.168.2.1: seq=0 ttl=64 time=0.432 ms
64 bytes from 192.168.2.1: seq=1 ttl=64 time=0.387 ms
64 bytes from 192.168.2.1: seq=2 ttl=64 time=0.431 ms
64 bytes from 192.168.2.1: seq=3 ttl=64 time=0.344 ms
64 bytes from 192.168.2.1: seq=4 ttl=64 time=0.386 ms
^C
--- 192.168.2.1 ping statistics ---
5 packets transmitted, 5 packets received, 0% packet loss
round-trip min/avg/max = 0.344/0.396/0.432 ms
Once IP connectivity is confirmed with a router, other networking learning and evaluation can continue. Feel free to try the Benchmark Demo or the Matrix Demo using wired networking.
2.4.3. Using an DHCP Server on a Linux PC
If a Linux PC is used as the Development host, then a DHCP server can also be installed and configured on the PC. This configuration removes the need for a separate router, but is a bit more complicated to set up. This setup allows the EVM to connect directly to the PC like the diagram below.
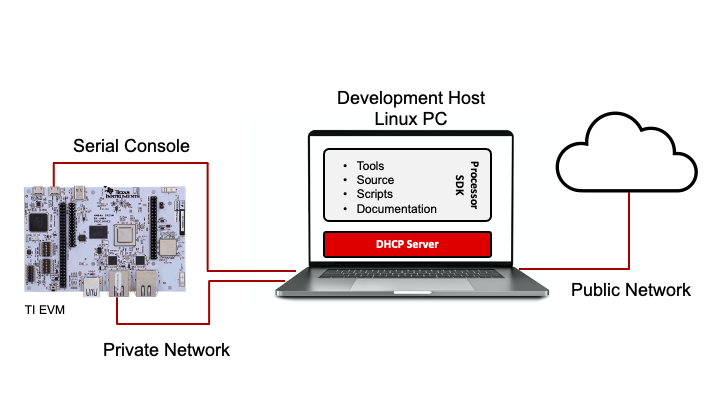
This configuration allows for full control over the DHCP server. This configuration also makes it possible to script certain operations related to the network interfaces. Installing and configuring a DHCP server is beyond the scope of this guide, but these instructions should be a good start.
If the DHCP Server and connection to the PC (i.e., the “host”) are working correctly, then an IP address should be acquired by the target EVM when the EVM Ethernet port is connected to the host. The ifconfig command can be used to check for an IP address:
# ifconfig
eth0: flags=4163<UP,BROADCAST,RUNNING,MULTICAST>  mtu 1500  metric 1
        inet 192.168.2.19  netmask 255.255.255.0  broadcast 192.168.2.255
        inet6 fe80::f684:4cff:fef9:7c17  prefixlen 64  scopeid 0x20<link>
        ether f4:84:4c:f9:7c:17  txqueuelen 1000  (Ethernet)
        RX packets 6  bytes 926 (926.0 B)
        RX errors 0  dropped 0  overruns 0  frame 0
        TX packets 41  bytes 5532 (5.4 KiB)
        TX errors 0  dropped 0 overruns 0  carrier 0  collisions 0

eth1: flags=4099<UP,BROADCAST,MULTICAST>  mtu 1500  metric 1
        inet6 fe80::72ff:76ff:fe1d:f1a3  prefixlen 64  scopeid 0x20<link>
        ether 70:ff:76:1d:f1:a3  txqueuelen 1000  (Ethernet)
        RX packets 18  bytes 2462 (2.4 KiB)
        RX errors 0  dropped 0  overruns 0  frame 0
        TX packets 69  bytes 8138 (7.9 KiB)
        TX errors 0  dropped 0 overruns 0  carrier 0  collisions 0

lo: flags=73<UP,LOOPBACK,RUNNING>  mtu 65536  metric 1
        inet 127.0.0.1  netmask 255.0.0.0
        inet6 ::1  prefixlen 128  scopeid 0x10<host>
        loop  txqueuelen 1000  (Local Loopback)
        RX packets 82  bytes 6220 (6.0 KiB)
        RX errors 0  dropped 0  overruns 0  frame 0
        TX packets 82  bytes 6220 (6.0 KiB)
        TX errors 0  dropped 0 overruns 0  carrier 0  collisions 0
In the output above, eth0 has been connected to the host and obtained an IP address, 192.168.2.19, from the DHCP server running on the host. This address will vary depending on the configuration of the DHCP server.
With an IP address obtained, a simple ping command from the target to the host can be used to validate connectivity:
root@am64xx-evm:~# ping 192.168.2.1
PING 192.168.2.1 (192.168.2.1): 56 data bytes
64 bytes from 192.168.2.1: seq=0 ttl=64 time=0.432 ms
64 bytes from 192.168.2.1: seq=1 ttl=64 time=0.387 ms
64 bytes from 192.168.2.1: seq=2 ttl=64 time=0.431 ms
64 bytes from 192.168.2.1: seq=3 ttl=64 time=0.344 ms
64 bytes from 192.168.2.1: seq=4 ttl=64 time=0.386 ms
^C
--- 192.168.2.1 ping statistics ---
5 packets transmitted, 5 packets received, 0% packet loss
round-trip min/avg/max = 0.344/0.396/0.432 ms
Once IP connectivity is confirmed with a host, feel free to try the Matrix Demo using wired networking.
2.4.4. Using Static IP Addresses
Another option for connecting an EVM to a Development host is to set a static IP address for each port. Here are some commands to set a static IP address on the target EVM. Please note that the EVM’s IP address should be on the same subnet as the host PC’s IP address. The exact IP address may vary from this example:
# ip link set dev eth0 down
# ip addr add 192.168.2.25/24 dev eth0
# ip link set dev eth0 up
Setting the IP address on the host is beyond the scope of this guide, but this link should be helpful.
The “ping” command can be used to check connectivity, much like the DHCP cases above.
With connectivity established, feel free to run the Matrix Demo using the wired network.