3.7.1. Overview
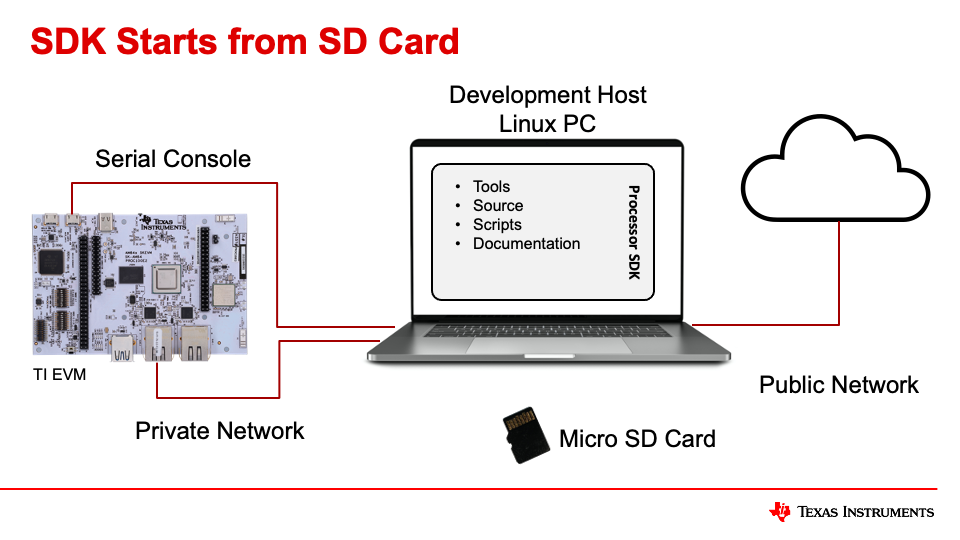
The Processor SDK is set up to support SD Cards right out of the box. SD Cards are a great way to quickly get up and running in an EVM, but they are not as practical for development or production. It is just too much work and takes too much time to unplug the SD Card, plug it into a computer, copy over new files, unplug the SD Card, and plug it back into the target EVM. So, it quickly becomes necessary to move at least certain parts of the target system to flash that is on the target board (OSPI, eMMC, etc.). This process is also necessary for target boards that do not have pluggable memory like SD Cards as an option. In these cases, a procedure for programming these boards needs to be developed to support the development and production stages. The programming process will vary depending on the resources available on the target boards.
TI EVMs like the AM62x Starter Kit (SK) have SD Card interfaces to accelerate and simplify the evaluation phase of development. If the target board to be programmed includes an SD Card interface, or USB Host support for Mass Storage Class devices like thumb drives, then these interfaces can be used to boot a Linux system on the target board. These interfaces can also be used to program the on board flash memory. This process is referred to as “memory boot” as the SD Card is being mounted as part of the memory accessible by the device.
If the target board does not have an SD Card or USB Host interface, then the board will need to be booted using an available peripheral (UART, USB Device, Ethernet, etc.) in order to program the on board flashes. This involves transferring the necessary files over the available interface from a host PC to get to either a U-Boot prompt or a Linux prompt. U-Boot or Linux can then be used to transfer more files and program the flashes.
The sections below cover each of these in more detail.
Using SD Cards to Flash Boards
If the board that needs to be programmed has an SD Card interface, this is an easy way to program the board’s on board memories. TI EVMs like the AM62x Starter Kit (SK) typically have SD Card interfaces and can be used as examples.
In this case, the entire target Linux image (System Firmware, U-Boot, Linux Kernel, and Device Tree files) is placed on the SD Card from a host computer using a native SD Card port or a USB SD Card reader/writer. This process is documented in Flash Linux to SD Card. This process creates a system that looks like the below:
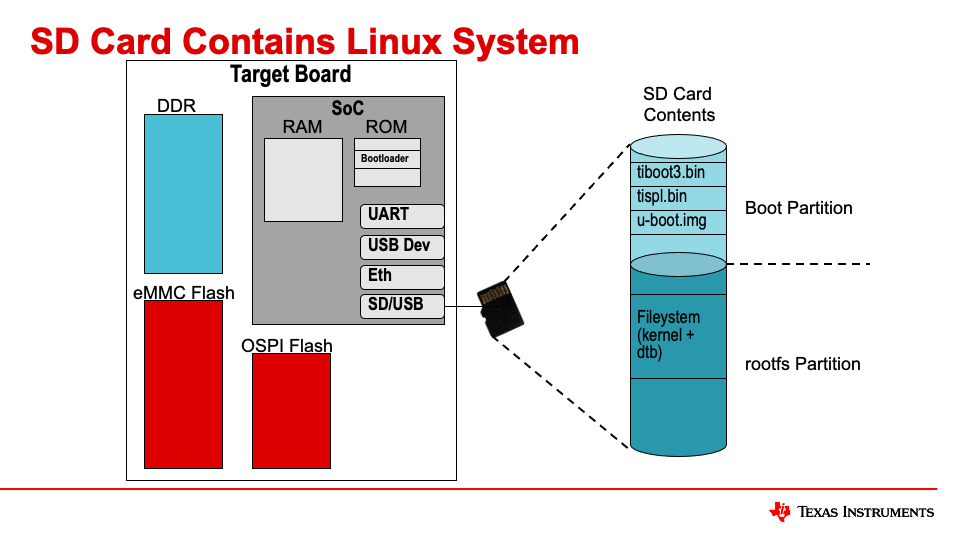
In this case, the entire Linux system boots and runs from the SD Card. Both U-Boot and Linux are available to perform operations on the target board. Either U-boot or Linux can be used to copy files to the available on board flashes. For example, the boot process can be stopped at the U-Boot prompt in order to execute U-boot commands to copy the files from the SD Card to the on boards flashes:
The commands with U-Boot running out of RAM/DDR copy the files from the SD Card boot partition (this is the same U-Boot image that was copied to RAM/DDR).
At this point, U-Boot can be executed from OSPI by changing the boot mode pins on the board. On TI EVMs, these pins are connected to boot switches to allow users to easily make these changes and try different boot modes. More information is available in the EVM Boot Mode Switches section.
It is also possible to boot all the way to Linux from SD Card and copy files from the Linux filesystem to flash on the target board. Using Linux has some advantages; for example, Linux is the best way to partition and format an eMMC device.
Using either U-Boot or Linux from a SD card requires the board to have a SD Card interface. If there is no SD card interface on the board, then using some form of peripheral boot with either U-Boot or Linux is required. Peripheral boot is covered in the next section.
Using Peripheral Boot to Flash Boards
If target boards do not have a pluggable memory interface (SD Card or USB), then a peripheral connection to a host PC will need to be used for flashing. The goal is to transfer the necessary files from the host PC to the target board to move through the boot process and enable either U-Boot or Linux to program the flash on the board. The first step in this process is usually to get to a U-Boot prompt using a peripheral interface like UART or USB DFU. The interface is chosen using the boot mode pins on the SoC, much like choosing SD Card boot. More information about choosing the boot mode is available in the EVM Boot Mode Switches section.
In this case, the target board is connected to the host PC by the interface and the files to boot the board are stored on the host PC.
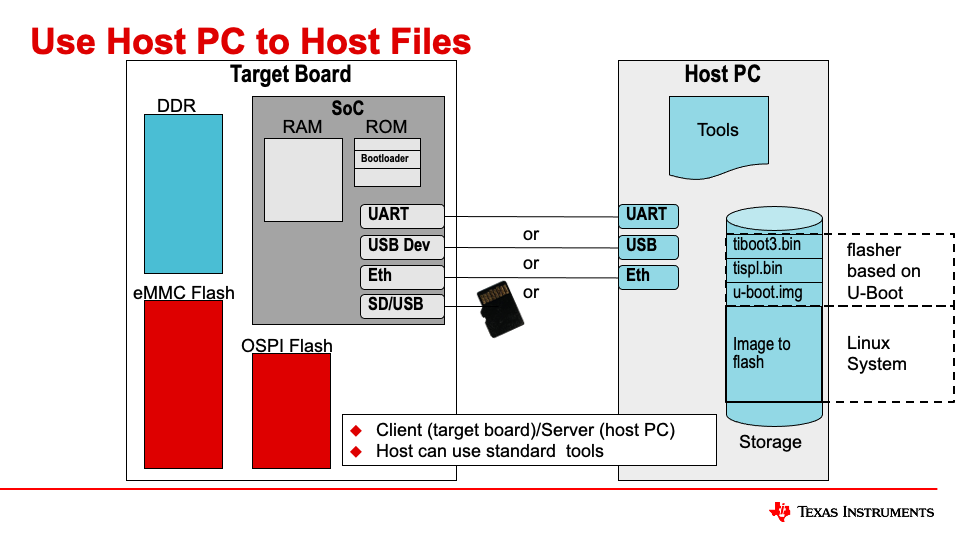
For example, when the target device boots in UART mode, it waits for the host PC to send the files via known formats (i.e., xmodem, ymodem). Commands that can easily be scripted on the host PC can send these files to boot the target device. This boot process takes the target device to the U-Boot prompt, where a number of commands can be used to transfer and flash more files.
As shown below, U-Boot can even use different interfaces like Ethernet for faster transfers of large files like the Linux kernel or filesystem. This method can be used to either transfer a Production Bootloader or Linux System to be programmed on the target board.
