2.10.2. CAN BUS
This section demonstrates how to evaluate the CAN bus interfaces using external loopback. This example shows how to send CAN messages from can0 to can1. can0 and can1 are the interfaces in the Linux network interface list, they correspond to the two CAN modules on AM64x.
Note
This example only works on the AM64x-GPVM as it has two connectors J31 and J32 that are available for can0 and can1, while the AM64x-SKEVM doesn’t expose the CAN interfaces.
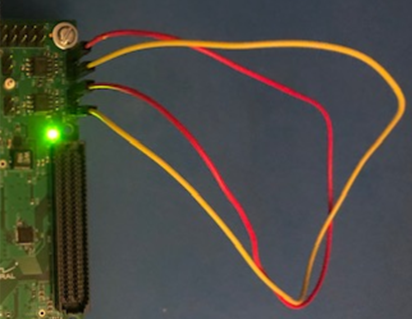
Please follow the example diagram for wiring the CAN interfaces in a loopback configuration on the AM64x-GPEVM. Use two jumper wires to connect J31 pin 1 to J32 pin3, and J31 pin 3 to J32 pin1.
To confirm the can0 and can1 interfaces are available in Linux, please perform this command:
# ifconfig -a
The output should include messages like this:
can0: flags=128<NOARP>  mtu 16  metric 1
     unspec 00-00-00-00-00-00-00-00-00-00-00-00-00-00-00-00  txqueuelen 10  (UNSPEC)
     RX packets 0  bytes 0 (0.0 B)
     RX errors 0  dropped 0  overruns 0  frame 0
     TX packets 0  bytes 0 (0.0 B)
     TX errors 0  dropped 0 overruns 0  carrier 0  collisions 0
     device interrupt 36

can1: flags=128<NOARP>  mtu 16  metric 1
     unspec 00-00-00-00-00-00-00-00-00-00-00-00-00-00-00-00  txqueuelen 10  (UNSPEC)
     RX packets 0  bytes 0 (0.0 B)
     RX errors 0  dropped 0  overruns 0  frame 0
     TX packets 0  bytes 0 (0.0 B)
     TX errors 0  dropped 0 overruns 0  carrier 0  collisions 0
     device interrupt 38
The commands for setting up for the loopback example:
# ip link set can0 type can bitrate 1000000 dbitrate 4000000 fd on
# ip link set can1 type can bitrate 1000000 dbitrate 4000000 fd on
# ip link set can0 up
# ip link set can1 up
To send a CAN message use the cansend utility per this example. The response will be displayed by the candump utility that is running in the background:
# candump can1 &
# cansend can0 143#C0DECAFE
Output from candump on can1 should be:
can1 143 [4] C0 DE CA FE