CRC Introduction#
Introduction#
This academy introduces the basics of using the CRC module. In the tasks below, you will see a basic CRC example and learn how to use it.
Hint
MSPM0L1307 Note: This academy was originally written for the LP-MSPM0G3507 but it will also work with the LP-MSPM0L1307 LaunchPad. There may be small differences in the MSPM0L1307 examples, such as pinouts and launchpad connections, but overall you should still be able to easily complete the included tasks.
Prerequisites#
Hardware#
The following hardware is required for this lab
Software#
Installing the software#
Note
The software examples used in this lab should be imported from within the TI Resource Explorer. This can be accessed from the web or within CCS by clicking View→Resource Explorer. To access TI Resource Explorer to import the examples into the Code Composer Studio (CCS) IDE, the M0 SDK must be installed on your PC. This may be done when CCS was installed or can be done later by clicking the “Download and Install” icon in the top right. Note that installing M0 SDK for any project will install ALL labs and content, so this only needs to be done once.
Associated academies#
These academies cover using the timer in different modes as well as provide additional information on the timer functionality.
[MSP Academy – DMA Introduction Lab]
Recommended Resources#
The Precision Labs training video series provides an introduction to timers, clocks, and microcontrollers. The documentation can be referenced for the MSPM0G3507 and the LaunchPad details.
Overview#
In this lab you will be using the MSPM0G3507 launchpad to learn how Cyclic redundancy check (CRC) module works in the MSPM0 family of devices. The CRC accelerator produces CRC signatures for given sequences of data. The CRC16-CCITT and CRC32-ISO3309 CRC fucntions are supported. Identical input data sequences results in identical CRC signatures when the CRC is initialized with a fixed seed value. Different sequences of input data, in general, result in different signatures for a given CRC function.
Basic operation#
For CRC16-CCITT, the CRC signature is generated based on the polynomial given in the 16-bit CCITT standard, as shown in the equation below.
f(x)= x^16 + x^12 + x^5 + 1
For CRC32-ISO3309, the CRC signature is generated based on the polynomial given in the 16-bit CCITT standard, as shown in the equation below.
f(x)= x^32 + x^26 + x^23 + x^22 + x^16 + x^12 + x^11 + x^10 + x^8 + x^7 + x^5 x^4 + x^2 + x + 1
Key features of the CRC accelerator include:
Support for CRC16-CCITT and CRC32-ISO3309
Fast single-cycle computation of new CRC output for each data input (no wait states)
Support for input/output bit reversal
Support for little or big endian operation
Byte, half-word, or word input to CRCIN
512-word CRCIN_IDX input field in which all addresses are mapped to CRCIN, supporting use of a standard -style memcpy() routine to load data into the CRC module for data lengths up to 2kB
Hardware Setup#
-
- Plug in the MSPM0G3507 Launchpad into your PC using a Micro-USB cable.
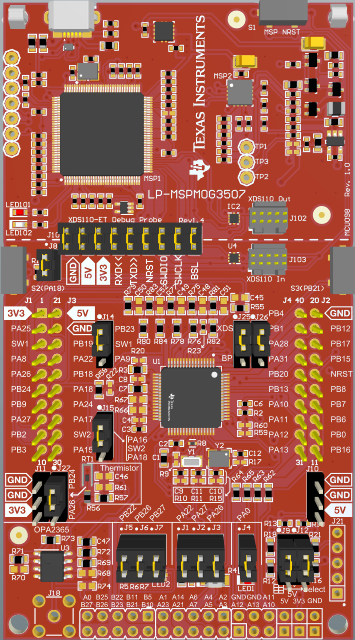
MSPM0 Hardware board#
Task 1 – Calculate CRC Checksum#
Task 1. Example Project Overview#
The purpose of Task 1 is to program MSPM0 LaunchPads with the CRC code and witness that the CRC module works. It isn’t really visually apparent that the CRC is working correctly or not, so once you have the checksum, you can compare it to an online CRC calculator. In the code examples, the expected output is provide and the CRC output is compared to it. For this task, no modification of the code example is required.
Import the crc_calculate_checksum into CCS from TI Resource Explorer.
Software → MSPM0 SDK → Development Tools → MSPM0 → Peripheral Examples → DriverLib → MSPM0 →
crc_calculate_checksum
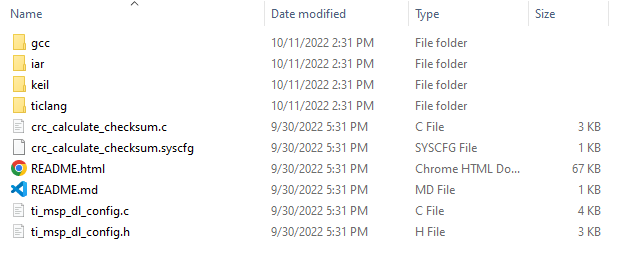
RTC Peripheral Code Example#
Click Import in the upper right-hand corner
Program the LaunchPad.
Code overview#
Function description#
This program calculate the checksum of an array and compares the array with the expected result to verify the crc module.
#include "ti_msp_dl_config.h"

#define CRC_NUM_OF_WORDS (3)
#define CRC_EXPECTED_RESULT (0x91A5D23B)

uint32_t gData32[CRC_NUM_OF_WORDS] = {0x3B4A5812, 0x0C74FECA, 0x0000842F};
const uint32_t gCrcSeed            = CRC_SEED;

int main(void)
{
    volatile uint32_t crcChecksum;
    volatile bool crcChecksumMatch __attribute__((unused));

    SYSCFG_DL_init();

    crcChecksum =
        DL_CRC_calculateBlock32(CRC, gCrcSeed, &gData32[0], CRC_NUM_OF_WORDS);

    if (CRC_EXPECTED_RESULT == crcChecksum) {
        crcChecksumMatch = true;
    } else {
        crcChecksumMatch = false;
    }

    /* Stop the debugger to verify crcChecksumMatch == true */
    __BKPT(0);

    while (1) {
        __WFI();
    }
}
The program contains several steps as below:
1.Initialize the system configuration: reset relative module and enable the power in the SYSCFG_DL_init(). The GPIO and CRC module are set as default through reset function.
SYSCONFIG_WEAK void SYSCFG_DL_initPower(void)
{
    DL_GPIO_reset(GPIOA);
    DL_GPIO_reset(GPIOB);
    DL_CRC_reset(CRC);

    DL_GPIO_enablePower(GPIOA);
    DL_GPIO_enablePower(GPIOB);
    DL_CRC_enablePower(CRC);
    delay_cycles(POWER_STARTUP_DELAY);
}
2.CRC_32 calculate and check the result
crcChecksum =
    DL_CRC_calculateBlock32(CRC, gCrcSeed, &gData32[0], CRC_NUM_OF_WORDS);

if (CRC_EXPECTED_RESULT == crcChecksum) {
    crcChecksumMatch = true;
} else {
    crcChecksumMatch = false;
}
Task 2 – Calculate CRC Checksum using the DMA#
Task 2. Example Project Overview#
The purpose of Task 2 is to program MSPM0 LaunchPads with the CRC code and witness that the CRC module works using the DMA. The output is the same as for Task1, but the data is being loaded automatically via the DMA in this case. For this task, no modification of the code example is required.
Import the crc_calculate_checksum_dma into CCS from TI Resource Explorer.
Software → MSPM0 SDK → Development Tools → MSPM0 → Peripheral Examples → DriverLib → MSPM0 →
crc_calculate_checksum_dma
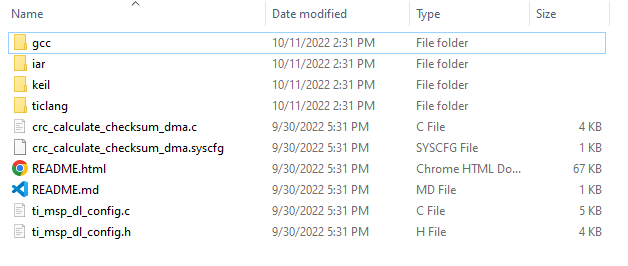
RTC Peripheral Code Example#
Click Import in the upper right-hand corner
Program the LaunchPad.
Task 2. Code Overview#
Function description#
This program tests the CRC_32 acceleratot and DMA function. The input data(IV data) and the output data are tarnsfered through DMA.
#include "ti_msp_dl_config.h"

#define CRC_NUM_OF_WORDS (3)
#define CRC_EXPECTED_RESULT (0x91A5D23B)

uint32_t gData32[CRC_NUM_OF_WORDS] = {0x3B4A5812, 0x0C74FECA, 0x0000842F};
const uint32_t gCrcSeed            = 0xFFFFFFFF;
volatile bool gCheckCRC;

int main(void)
{
uint32_t crcChecksum;
__attribute__((unused)) volatile bool crcChecksumMatch;

SYSCFG_DL_init();

/* Configure DMA source, destination and size */
DL_DMA_setSrcAddr(DMA, DMA_CH0_CHAN_ID, (uint32_t) &gData32[0]);
DL_DMA_setDestAddr(DMA, DMA_CH0_CHAN_ID, DL_CRC_getCRCINAddr(CRC));
DL_DMA_setTransferSize(
    DMA, DMA_CH0_CHAN_ID, sizeof(gData32) / sizeof(uint32_t));
DL_DMA_enableChannel(DMA, DMA_CH0_CHAN_ID);

/*
 * Confirm DMA channel is enabled before issuing a SW trigger of the DMA
 * channel
 */
while (false == DL_DMA_isChannelEnabled(DMA, DMA_CH0_CHAN_ID)) {
    __BKPT(0);
}

/* Configure device exception handling */
DL_SYSCTL_disableSleepOnExit();
NVIC_EnableIRQ(DMA_INT_IRQn);
gCheckCRC = false;

/* Trigger DMA via SW request */
DL_DMA_startTransfer(DMA, DMA_CH0_CHAN_ID);

/* Wait in SLEEP mode until DMA interrupt is triggered */
while (false == gCheckCRC) {
    __WFE();
}

/* Check CRC checksum */
crcChecksum = DL_CRC_getResult32(CRC);

if (CRC_EXPECTED_RESULT == crcChecksum) {
    crcChecksumMatch = true;
} else {
    crcChecksumMatch = false;
}

__BKPT(0);

while (1) {
    __WFI();
}
}

void DMA_IRQHandler(void)
{
switch (DL_DMA_getPendingInterrupt(DMA)) {
    case DL_DMA_EVENT_IIDX_DMACH0:
        gCheckCRC = true;
        break;
    default:
        break;
}
}
The program contains several steps as below:
1.Initialize the system configuration. Find in “ti_msp_dl_config.c”
SYSCONFIG_WEAK void SYSCFG_DL_init(void)
{
SYSCFG_DL_initPower();
SYSCFG_DL_GPIO_init();
/* Module-Specific Initializations*/
SYSCFG_DL_SYSCTL_init();
SYSCFG_DL_DMA_init();
SYSCFG_DL_CRC_init();
}
2.Configure DMA module and start DMA.
/* Configure DMA source, destination and size */
DL_DMA_setSrcAddr(DMA, DMA_CH0_CHAN_ID, (uint32_t) &gData32[0]);
DL_DMA_setDestAddr(DMA, DMA_CH0_CHAN_ID, DL_CRC_getCRCINAddr(CRC));
DL_DMA_setTransferSize(
DMA, DMA_CH0_CHAN_ID, sizeof(gData32) / sizeof(uint32_t));
DL_DMA_enableChannel(DMA, DMA_CH0_CHAN_ID);
3.Compare the CRC_32 result with the expected result
/* Check CRC checksum */
crcChecksum = DL_CRC_getResult32(CRC);

if (CRC_EXPECTED_RESULT == crcChecksum) {
crcChecksumMatch = true;
} else {
crcChecksumMatch = false;
}
Note
Reference:
[MSP Academy – DMA Introduction Lab]
Summary#
At the end of this Academy you should now be familiar with:
What is CRC module
How to use CRC module, with and without the DMA