Introduction
Good old printf is one of the first ways you learn to debug an application.
This page will show why printf is not the best API to use to debug on
embedded devices.
Instead we'll explore the following APIs that are also available in the
SimpleLink™ SDKs:
Display_printfSystem_printfUART_PRINTUARTprintf
We'll look at all the above APIs along with printf and compare them based on
footprint size, stack implications, and calling context. We'll
focus on outputting the debug information via UART and the IDE's console.
For the hands-on tasks, we'll move between the different APIs. During this portion, the focus will be for the TI CCS compiler, but the concepts are applicable for IAR and other compilers.
The goals of this lab is to show options that are available. It's up to you to decide which API works best for you.
What's not covered...
This module is focused on printf-like APIs and does not cover log (or trace) capabilities in the SDK.
SysConfig support
This SimpleLink Academy lab supports both devices with and without SysConfig. Please note instructions are sometimes divided in two in the following way.
Prerequisites
Software
- CCS (version specified in the SimpleLink SDK's Release Notes)
- Any SimpleLink SDK
- Any terminal program with the following settings (if you are using Windows, use Device Manager to determine the port)
Baud-rate:  115200
Data bits:       8
Stop bits:       1
Parity:       None
Flow Control: None
Hardware
- Any supported SimpleLink LaunchPad™ Development Kit
API Descriptions
This section gives an overview of each API and any related nuances.
printf
printf has been part of the 'C' language from the beginning. It is a
well-known API that has been used by probably every 'C' programmer. printf
works on TI-RTOS, FreeRTOS and no-RTOS applications.
printf is not ideal
for embedded development though. Let's see how printf works to see the reason
why.
IDE Console Output
By default in CCS (and similarily in IAR), printf output goes to a CIO
('C' Input/Output)
buffer. When the CIO buffer is full or a EOL character (i.e. '\n') is written,
a breakpoint is hit and CCS reads the contents of the buffer. CCS then resumes
the target. As one can guess, this action can have very bad implications for
real-time performance.
Non IDE Console Output
printf output can be redirected. For the below comparisons, we've redirected
it to a UART via the add_device, freopen and setvbuf APIs.
IAR uses a different mechanism for redirecting printf. Please refer to IAR
documentation.
Calling Restrictions
IDE Console
printf is callable from any location (e.g. main, ISR, task, etc) when
outputting to the IDE console with one exception. By default, TI-RTOS plugs
in a locking mechanism (GateMutex) into the TI Compiler to guarantee
thread-safety. The TI compiler's implementation of printf calls this
locking mechanism. Therefore, by default, printf cannot be called in a
Hwi or Swi in applications that use TI-RTOS and the TI Compiler. If you
have asserts enabled in the TI-RTOS kernel, you'll get an assert failure.
If you don't have asserts enabled, you might get nondeterministic results.
The lock can be disabled by setting the setting the BIOS.rtsGateType
variable in the kernel configuration file (i.e. .cfg file) to
BIOS.NoLocking.
UART
When outputting to the UART, the allowable calling context depends on
the type of UART API call you are making. For the examples in the labs below,
printf can be called from a task on an RTOS-based application or from main
(or function called within main's context) in no-RTOS based applications.
Misc.
The TI Compiler offers a couple of different options with printf. We'll compare
the "minimal" printf along with the "full" printf.
Additional Information
Display_printf
The Display_printf allows a user to send output to various locations: LCD,
IDE console, or UART. We'll focus on the IDE console and UART.
Display_printf's format options are very similar to printf. Display_printf
is available on both RTOS and no-RTOS (bare-metal) based applications.
Many of the SDK examples use Display to output data via the UART to
allow isolation from an OS and IDE.
The parameters specified in the Display_open API and Display_config
variable dictates what physical mechanism is used.
IDE Console (Host)
Display_printf can be directed to the IDE's console also by using
DisplayHost. One of the below labs will show how to move to DisplayHost.
The line and
column parameters in Display_printf are ignored when using the HOST.
#include <ti/display/Display.h>

Display_Handle display;
display = Display_open(Display_Type_HOST, NULL);
...
Display_printf(display, 0, 0, "Count = %d and it's address is 0x%x\n", count, &count);
UART
There are two types of UART interfaces:
- DisplayUartAnsi: Feature rich module (e.g. better cursor management) at the expense of footprint.
- DisplayUartMin: Simple UART management with less features, but smaller.
The default for the majority of the examples is DisplayUartMin. The line and
column parameters in Display_printf are ignored when using the UART.
#include <ti/display/Display.h>

Display_Handle display;
display = Display_open(Display_Type_UART, NULL);
...
Display_printf(display, 0, 0, "Count = %d and it's address is 0x%x\n", count, &count);
Calling Restrictions
IDE Console
DisplayHost has no calling restriction (as long as the potential real-time impact incurred by writting to CIO buffer is acceptable).
UART
If you are using an RTOS, DisplayUart can only be called from a task
(or pthread).
If you are not using an RTOS, DisplayUart can be called from main (or by
any function called within main's context).
Additional Information
More details about the Display module can be found in the "SimpleLink MCU SDK User's Guide" and "Drivers Runtime APIs (doxygen)"
System_printf
System_printf is only available if the application is using TI-RTOS.
System_printf supports the same format strings as printf and some
additional ones.
The System module allows an application to plug in a different System "Proxy". The proxy is responsible for the underlying implementation. The two main Support proxies are
- SysMin
- SysCallback
The proxy can be assigned in the kernel configuration file (e.g. .cfg file). Here is an example of the code to assign the SysMin as the Support proxy.
System.SupportProxy = SysMin;
The top-level System_printf is the same no matter what the underlying
proxy is. Here's an example of the API.
#include <xdc/runtime/System.h>

System_printf("Count = %d and it's address is 0x%x\n", count, &count);
Let's look at the two proxies in more details.
SysMin (ROV/IDE Console Output)
The SysMin module stores the ASCII data into an internal buffer. The size of the
internal buffer is configurable. The data is not flushed to the CIO buffer
until instructed to do so (e.g. call System_flush or configured to flush on
an application exit). So SysMin does not impact real-time performance like
Display_printf (out the IDE console) or printf.
The buffer can be viewed by looking at
the ROV → SysMin → OutputBuffer. For example here are the contents
of SysMin's internal buffer with the Hello example after the System_printf is called.
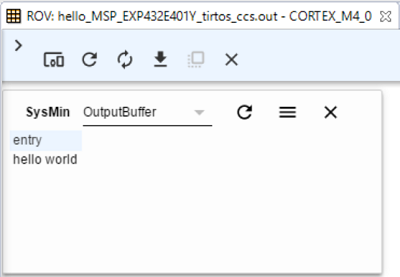
The "debug" kernel project uses the SysMin module.
Please refer to the SimpleLink SDK User's Guide for details about the kernel projects.
SysCallback (UART Output)
The SysCallback module allows a user to plug in a putc-like function (putchFxn)
that is called within System_printf after the formatting is done. The default
putchFxn function does nothing. A common use-case is to plug in a putchFxn
function that writes the character to a UART. One of the below labs shows this.
The "release" kernel project uses the SysCallback module.
The functions plugged into SysCallback in the release.cfg file are empty to minimize code footprint. Therefore the output goes no where. Please refer to the SimpleLink SDK User's Guide for details about the kernel projects.
Calling Restrictions
IDE Console
When using SysMin, there are no calling restrictions.
UART
When using SysCallback and using the UART, the calling restrictions
are dependent on the underlying code.
For the examples in the labs, System_printf can be called
from a task (or pthread) on a TI-RTOS based application.
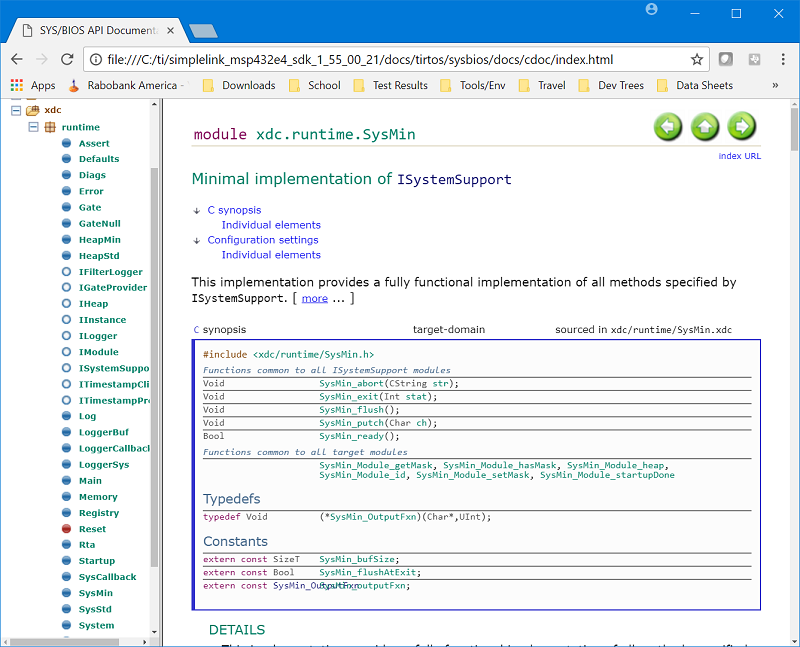
Additional Information
Additional information about System, SysMin and SysCallback can be found in the
<SimpleLink_SDK_Install_Dir>\Docs\Documentation_Overview.html
and click "TI-RTOS Kernel Runtime APIs and Configuration (cdoc)".
UART_PRINT
UART_PRINT is only available in the SimpleLink CC32xx SDK. It is included for
legacy reasons. Only output via the UART is supported with this API.
UART_PRINT supports similar format strings that printf supports.
The code is maintained in the uart_term.c and uart_term.h
files that are included with some of the SimpleLink CC322x SDK examples.
#include "uart_term.h"

InitTerm();
UART_PRINT("Count = %d and it's address is 0x%x\n", count, &count);
Calling Restrictions
IDE Console
N/A
UART
There are no calling restrictions. The code uses the UART_writePolling API,
so the API can be called from any calling context after the board has been
initialized.
Additional Information
Please refer to the source code in the uart_term.c and uart_term.h files
in the SDK examples that use it.
UARTprintf
UARTprintf is only available for no-RTOS examples in the SimpleLink MSP432E4
SDK. It is included for legacy reasons. Only output via the UART is supported
with this API.
UARTprintf supports similar format strings that printf supports.
The code is maintained in the uartstdio.c and uartstdio.h
files that are included with some of the SimpleLink MSP432E4 SDK examples.
#include "uartstdio.h"

UARTprintf("Count = %d and it's address is 0x%x\n", count, &count);
Calling Restrictions
IDE Console
N/A
UART
This API can be called from any calling context, but has only been tested on no-RTOS examples for the MSP432E4 device.
Additional Information
Please refer to the source code in the uartstdio.c and uartstdio.h files
in the SDK examples that use the API.
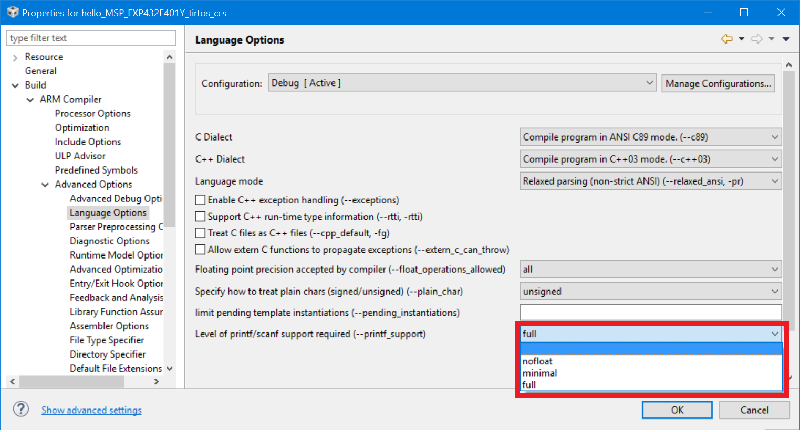
Footprint Comparisons
The following is a comparison of the different debug APIs when displaying to the IDE console and UART. All the test were done with
- TI Compiler v17.6.0.STS
- SimpleLink SDK v1.50.00.xx
- The CCS Debug Build Configuration was used as the baseline
- The GPIO Interrupt example was used as the base
The below tables show the additional memory impact of adding one debug call.
So for the IDE Console Output (for CC3220SF w/ TI-RTOS),
adding the first printf adds 10025 bytes of flash
and 936 bytes of RAM. Alternatively, adding one Display_printf instead
adds 6679 bytes of flash and 1188 bytes of RAM.
Of course the majority of the memory impact is due to bringing in the
basic functionality. The overhead for additional debug calls would be
relatively minimal.
The test string was one of the following:
printf("This is a debug string %d, 0x%x, %f\n", 1, &someVariable, 3.14);
Display_printf(display, 0, 0, "This is a debug string %d, 0x%x, %f\n", 1, &someVariable, 3.14);
System_printf("This is a debug string %d, 0x%x, %f\n", 1, &someVariable, 3.14);
UART_PRINT("This is a debug string %d, 0x%x, %f\n", 1, &someVariable, 3.14);
Please note: TI-RTOS has mechanisms to determine the stack usage for an API call so we've included the stack usage column for TI-RTOS tables.
Note: for the printf (min) test case, the format string used %d instead of %f.
Please note the numbers can vary based on what is already in the application, compiler , compiler options, and device.
IDE Console Output
Here is the summary of the changes made to the GPIO Interrupt example:
- Added debug API along with the necessary initialization calls/changes.
- SysMin was used as the System Proxy and its internal buffer was 256 bytes
for testing
System_printf. - MAXPRINTLEN was set to 256 to reduce the size of the Display buffer (
displayBuf).
GPIO Interrupt on CC3220SF_LAUNCHXL with TI-RTOS
| API | Flash Memory | RAM Memory | Stack Usage |
|---|---|---|---|
| Display_printf | 6679 | 1188 | 344 |
| printf | 10025 | 936 | 936 |
| printf (min) | 4064 | 932 | 400 |
| System_printf | 3580 | 564 | 240 |
GPIO Interrupt on CC3220SF_LAUNCHXL with FreeRTOS
| API | Flash Memory | RAM Memory |
|---|---|---|
| Display_printf | 6198 | 1184 |
| printf | 10044 | 924 |
| printf (min) | 4056 | 920 |
GPIO Interrupt on CC3220SF_LAUNCHXL with no-RTOS
| API | Flash Memory | RAM Memory |
|---|---|---|
| Display_printf | 6532 | 1198 |
| printf | 10962 | 938 |
| printf (min) | 4974 | 934 |
UART Output
Using the same test debug API, these tables show the impact when moving the data out of a UART. We are going to omit the FreeRTOS and no-RTOS tables since they are basically the same as the TI-RTOS ones (as shown in the Console numbers above).
We've also included CC2640R2_LAUNCHXL for additional comparisons.
We are not including UARTprintf since it has only been tested for MSP432E4 no-RTOS applications.
Here is the summary of the changes made to the GPIO Interrupt example
- Added debug APIs along with the necessary initialization calls/changes.
THREADSTACKSIZEinmain_tirtos.cwas increased to 2048 since a couple of the APIs required more stack space. All the examples had the change made (including the base example with no debug API calls) to keep the comparison meaningful.- SysCallback was used but different
SysCallback.putchFxnandSysCallback.readyFxnfunctions were used. Please refer to the below labs for more details.
GPIO Interrupt on CC3220SF_LAUNCHXL with TI-RTOS
| API | Flash Memory | RAM Memory | Stack Usage |
|---|---|---|---|
| Display_printf | 9293 | 629 | 496 |
| printf | 18541 | 1317 | 1320 |
| printf (min) | 13636 | 1313 | 572 |
| System_printf | 9284 | 385 | 472 |
| UART_PRINT | 12897 | 365 | 1348 |
GPIO Interrupt on CC2640R2_LAUNCHXL with TI-RTOS
| API | Flash Memory | RAM Memory | Stack Usage |
|---|---|---|---|
| Display_printf | 7176 | 479 | 420 |
| printf | 16360 | 1291 | 1328 |
| printf (min) | 11492 | 1287 | 468 |
| System_printf | 7148 | 359 | 368 |
API Summary
| API | RTOS Dependency | Summary |
|---|---|---|
printf |
None | Easy to use at the expensive of impacting real-time performance when using the default setup |
printf over UART |
None | Easy to use with possible calling restrictions |
Display_printf |
None | Additional setup but is flexible and OS/IDE independent |
System_printf |
TI-RTOS | Flexible and potentially the smallest impact on the application |
UART_PRINT |
None | Available on CC3220 devices only |
UARTprintf |
No-RTOS | Available on MSP432E4 when using no-RTOS |
Receiving on the UART
When using the UART, the Display_printf API sets up the UART instance to be
transmit only (unless you want to modify the code in the SDK).
The other debug APIs allow the UART instance to be set up for transmit
and receive.
Be careful using the different debug APIs together
While using the UART, care must be taken to make sure there is only
one call to UART_open and the handle is shared. A common issue is that
an application calls Display_open (over a UART) and uses UART_PRINT.
If both modules are trying to use the same UART, the second one to call
UART_open will fail.
Labs: Getting started
We have several tasks below that show the different debug APIs and how to add them into your application. Please refer to the prerequisites listed at the beginning of this page.
Task 1: Showing printf Downside
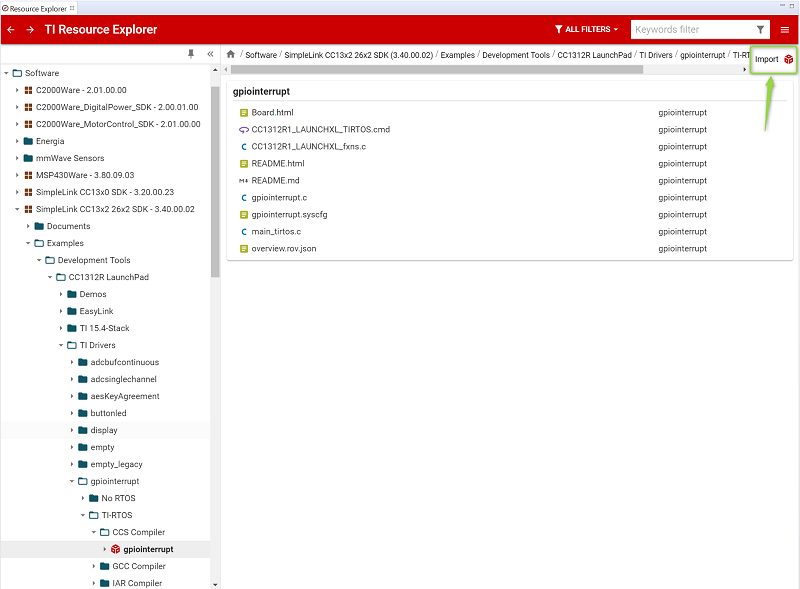
For this task, we are going to import the GPIO Interrupt example.
We are going to change the buttons to call printf and
System_printf instead of toggling LEDs. The goal is to show
that printf has an impact on real-time.
Please import the GPIO Interrupt example with TI-RTOS and the CCS compiler for your desired LaunchPad.
Remove the
GPIO_togglecalls from the first GPIO callback function and replace it with the followingprintfin thegpiointerrupt.cfile. Please add the include also to get rid of any compiler warnings.#include <stdio.h> void gpioButtonFxn0(uint_least8_t index) { printf("Hello world via printf\n"); }gpiointerrupt.c
...wait a minute
Question: I thought you said that
printfcould not be called in the context of an interrupt for TI-RTOS based applications that are using the TI Compiler. Why does this work?!Answer: The release kernel configuration does not have asserts enabled and with such a simple application, it's not a problem. Doing this on a real application is not recommended!
Remove the
GPIO_togglecalls from the second GPIO callback function and replace the with the followingSystem_printf. Please add the include also to get rid of any compiler warnings/errors.#include <xdc/runtime/System.h> void gpioButtonFxn1(uint_least8_t index) { System_printf("Hello world via System_printf\n"); }gpiointerrupt.c
Add the following code at the end (but before the
return) ofmainThreadto toggle the LED. Note: this will probably give you an unreachable compiler warning. Please ignore the warning.
     while (1) {
         GPIO_toggle(CONFIG_GPIO_LED_0);
     }
gpiointerrupt.c :: mainThread() – right before the return
     while (1) {
         GPIO_toggle(Board_GPIO_LED0);
     }
gpiointerrupt.c :: mainThread() – right before the return
Build, load and run the application. Note: the brightness of LED0.
Press Button0. What happens? (more than one answer)
printf real-time impact
The moral of the story here is that while
printfis easy to use, it can have negative impact on your real-time performance.Press Button1. What happens? (one answer)
Task 2: Getting System_printf to work
In the previous task we added printf and saw the negative real-time impact it
can have. We also added System_printf but it seemed to do nothing...what's up
with that?!
Remember that most of the examples have SysCallback as the default System proxy and the default functions do nothing.
var SysCallback = xdc.useModule('xdc.runtime.SysCallback');
System.SupportProxy = SysCallback;
//SysCallback.abortFxn = "&myUserAbort";
//SysCallback.exitFxn  = "&myUserExit";
//SysCallback.flushFxn = "&myUserFlush";
//SysCallback.putchFxn = "&myUserPutch";
//SysCallback.readyFxn = "&myUserReady";
release.cfg
On this task, we'll enable move to the SysMin System proxy. This can be accomplished in one of three ways to allow the output string to be placed in an internal buffer that can be viewed via ROV.
- Change the release.cfg file to use SysMin: Easiest way, but you should see
if this will have an impact on other projects using this kernel project.
For CC13xx/CC26xx Devices
To use SysMin, you cannot use the kernel in the ROM. The release kernel project uses the kernel in the ROM.
- Create new kernel project and use it: You could copy/paste the release kernel project, rename it, use SysMin and point GPIO Interrupt to the new kernel project. This would minimize impact on other projects.
- Move to the debug kernel project: This will also work since the
debug kernel project uses SysMin as well as many other debug features.
Footprint impact
The debug kernel project enables many debug features. This has a non-trivial impact on footprint. Additionally for CC13xx/CC26xx devices, the debug kernel configuration does not use the kernel in the ROM, thus causing an even larger footprint impact.
printf usage
The debug kernel project enables assert checking in the TI-RTOS kernel. So as noted earlier, if the
printfin thegpioButtonFxn0function executes, an assert occurs.
We are going to do the last one. Note for more details on the kernel projects, please refer to the SDK's User Guide and TI-RTOS Basic Lab
Import the debug kernel for your LaunchPad (Project → Import CCS Projects...) while in the edit perspective. The kernel project is located in the
<SimpleLink_SDK_Install_Dir>\kernel\tirtos\builds\<Board>\debugdirectory.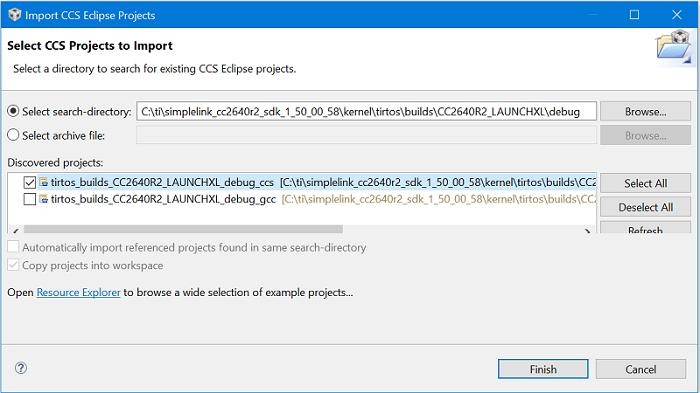
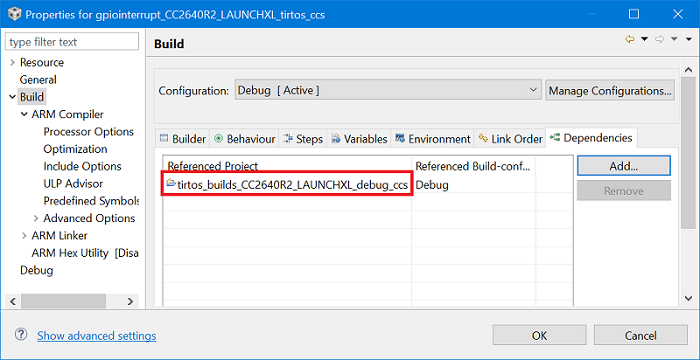
Select Project Properties on the GPIO Interrupt project and navigate to Build → Dependencies. Select Add and select the debug kernel. Now Remove the release kernel. Once completed, your dependency list should look like this (the board name may be different).
Build, load and run the GPIO Interrupt project. Note: the debug kernel project will get built first. If it is not, please do a
Rebuild Projecton the GPIO Interrupt project.Let's repeat the last step in the previous task...Press Button1. What happens (one answer)?
Let's make the
System_printfoutput come out on the CCS console. Remember writing to CIO will impact real-time performance. We can simply add aSystem_flushto the while loop inmainThread:
    while (1) {
        GPIO_toggle(CONFIG_GPIO_LED_0);
        System_flush();
    }
gpiointerrupt.c
    while (1) {
        GPIO_toggle(Board_GPIO_LED0);
        System_flush();
    }
gpiointerrupt.c
Note that adding a call to System_flush in gpioButtonFxn1 would
result in an assert as System_flush with SysMin calls blocking APIs
in the context of a hardware interrupt (as noted on printf).
Task 3: Display_printf out the UART
For this task, we are going to import the drivers/empty example.
We are going to add in a Display_printf into the empty task
that is toggling the LED.
Please import the driver's
Emptyexample with TI-RTOS and the CCS compiler for your favorite LaunchPad.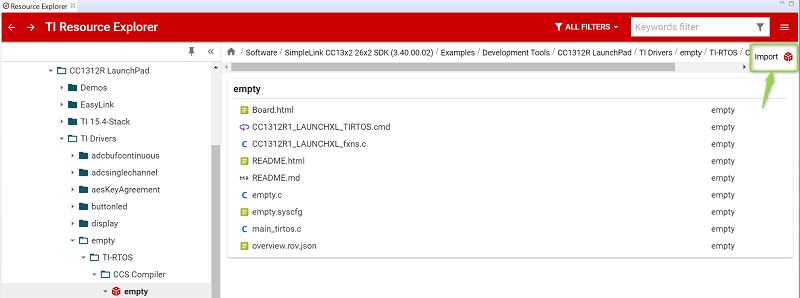
We need to add the Display driver into the application. Open the
empty.syscfg(double-click it). Select "+" on the Display module. This will create a Display instance that defaults to use a UART. Now select "XDS110 UART" for the "Use Hardware" field (and save the file). This will use the UART back-channel on the XDS110 USB connection.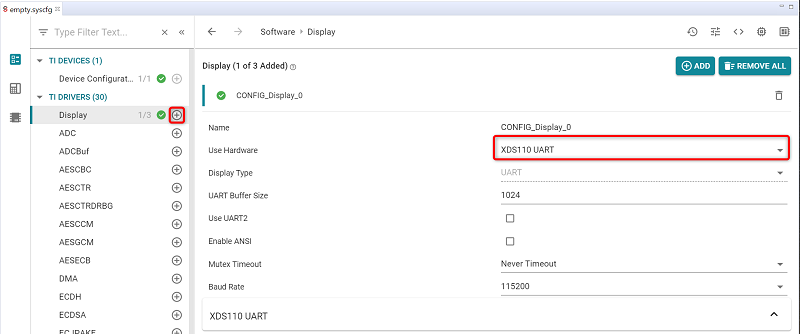
Add the following Display lines at the beginning of the
mainThreadfunction inempty.c.void *mainThread(void *arg0) { Display_Handle display; display = Display_open(Display_Type_UART, NULL);empty.c
Add the following
Display_printfline in the while loop.while (1) { sleep(time); GPIO_toggle(CONFIG_GPIO_LED_0); Display_printf(display, 0, 0, "Hello world via Display_printf"); }empty.c
Add the following Display lines at the beginning of the
mainThreadfunction inempty.c.void *mainThread(void *arg0) { Display_Handle display; display = Display_open(Display_Type_UART, NULL);empty.c
Add the following
Display_printfline in the while loop.while (1) { sleep(time); GPIO_toggle(Board_GPIO_LED0); Display_printf(display, 0, 0, "Hello world via Display_printf"); }empty.c
Then finally add the following header include
// #include <ti/drivers/Watchdog.h>
#include <ti/display/Display.h>
empty.c
Build, load and run that application.
Connect your favorite terminal program to the UART port.
You should be seeing the debug string coming out every second.

Quiz
Where can
Display_printfbe placed when it's sending data out the UART and you are using an RTOS (more than one answer)?Where can
Display_printfbe placed when it's sending data out the UART and you are using an not RTOS (more than one answer)?
Task 4: Display_printf out the IDE console
Let's take the example we did in Task 3 and have it use the IDE Console instead of the UART. The two areas to change will be
Display_opencall- Display instance configuration
Let's get started...
Modify the
Display_opencall to useDisplay_Type_HOST.void *mainThread(void *arg0) { Display_Handle display; display = Display_open(Display_Type_HOST, NULL);empty.c
Open the
empty.syscfgfile and select "None" for the "Use Hardware" and then "Host" for the "Display Type" (and save).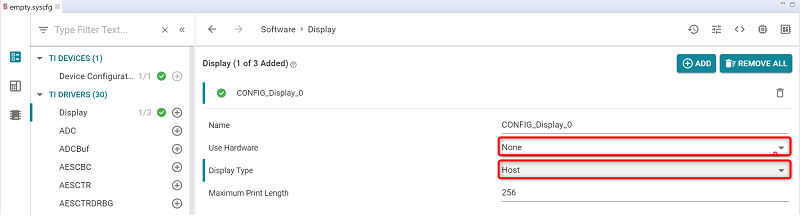
Open the Board.c file (e.g. CC2640R2_LAUNCHXL.c) and locate the
Display_configvariable.For simplicity's sake, please comment out (or
#ifout) the entire section of code that configures the Display module. We'll add the configuration for using the console IDE instead. For example,/* * =============================== Display =============================== */ #if 0 #include <ti/display/Display.h> ... #endif /* (BOARD_DISPLAY_USE_UART || BOARD_DISPLAY_USE_LCD) */ #else // we are going to add Display configuration // for console IDE (i.e. Host) here... #endif /* * =============================== GPIO =============================== */CC2640R2_LAUNCHXL.c or whatever board file you are using
Add the following into the space we reserved in the previous step. This supplies the memory for the Host display object, supplies the internal buffer and sets up the function table for the Display module.
/*
 *  =============================== Display ===============================
 */
#if 0
...
#endif /* (BOARD_DISPLAY_USE_UART || BOARD_DISPLAY_USE_LCD) */
#else
#include <ti/display/Display.h>
#include <ti/display/DisplayHost.h>

#define MAXPRINTLEN 256

static char displayBuf[MAXPRINTLEN];

DisplayHost_Object displayHostObject;

const DisplayHost_HWAttrs displayHostHWAttrs = {
    .strBuf = displayBuf,
    .strBufLen = MAXPRINTLEN
};

const Display_Config Display_config[] = {
    {
        .fxnTablePtr = &DisplayHost_fxnTable,
        .object = &displayHostObject,
        .hwAttrs = &displayHostHWAttrs
    }
};

const uint_least8_t Display_count = sizeof(Display_config) / sizeof(Display_Config);
#endif
CC2640R2_LAUNCHXL.c or whatever board file you are using
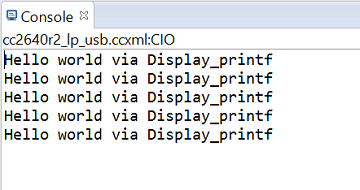
Build, load and run that application. The debug output should be coming out the CCS Console now.
Quiz
Where can
Display_printfbe placed when it's sending data out the IDE console?
Additional Resources
Forums
This work is licensed under a Creative Commons Attribution-NonCommercial-NoDerivatives 4.0 International License.