Introduction
This lab will go further into the details behind the security protocols found in Bluetooth Low Energy, and in particular how these are implemented in the SimpleLink CC13x2 / CC26x2 SDK. This lab will focus on the security provided by the specific cryptographic algorithms, and discuss why and in what degree they are secure.
Each algorithm is given a short introduction which should provide an intuitive understanding of their function. The reader is encouraged to continue exploring these algorithms on their own if more knowledge is desired. There is a lot to learn here, and it may take time before you see the complete picture. Most of the algorithms are common on other platforms as well, so taking the time to understand them can be very useful.
The tasks will highlight different aspects of security in Bluetooth LE. The first two tasks will show the use of the security drivers for AES-ECB and AES-CCM and go through how to encrypt and decrypt a message. Task 3 shows how to implement and use a Filter Accept List. Task 4 and 5 showcases use of the APIs in the GAP Bond Manager, and specifically how to interact with the Simple Non-Volatile (SNV) memory driver to add or remove bonding information for specific devices, and how to use the same key for multiple pairings in a row.
It is recommended to read the TI BLE5-Stack User's Guide alongside this lab for details and further information. Some references will also be made to this document. See the Recommended Reading section for details.
Prerequisites
Hardware
For this lab, you need one or two Bluetooth-enabled development boards. Supported devices are:
- SimpleLink™ CC26x2R LaunchPad™
- SimpleLink™ CC2652RSIP LaunchPad™
- SimpleLink™ CC2652RB LaunchPad™
- SimpleLink™ CC1352R LaunchPad™
- SimpleLink™ CC1352P LaunchPad™
- SimpleLink™ CC2652R7 LaunchPad™
- SimpleLink™ CC1352P7 LaunchPad™
- SimpleLink™ CC2651P3 LaunchPad™
Other SimpleLink Academy Labs
- Completion of Bluetooth Low Energy 5 Fundamentals
Software
- CCS 12.1 or IAR 8.50.9 installed with support for CC13xx/CC26xx devices.
- SimpleLink™ CC13xx and CC26xx SDK 6.30
For testing, a Bluetooth client application is required:
- BTool (located in the
tools\ble5stackdirectory of the SimpleLink™ SDK installation) OR - A Bluetooth Client mobile app - instructions will use the below mobile apps:
- Android: BLE Scanner by Bluepixel Technology LLP - available on the Google Play store
- iOS: LightBlue Explorer - Bluetooth Low Energy by Punch Through - available on the App Store
Recommended Reading
- GAP Bond Manager and LE Secure Connections chapter of TI BLE5-Stack User's Guide
- Privacy chapter of TI BLE5-Stack User's Guide
- Bluetooth Core Specification v5.2)
- [Vol 1] Part A, Section 5.4 – LE Security
- NIST: Guide to Bluetooth Security
- 3.2 Security Features of Bluetooth Low Energy
Security Overview
Definitions
- Asymmetric key: Different keys are used for encryption and decryption.
- Block Cipher: An encryption algorithm that operates on fixed-length group of bits, a block, with an unvarying transformation that is specified by a symmetric key.
- Cryptographic Nonce: An arbitrary number that can be used just once in a cryptographic communication
- ECDH: Elliptic-curve Diffie-Hellman key exchange algorithm
- Hashing algorithm: A one-way function that takes an arbitrarily long block of bits and produces a fixed length output that is seemingly random.
- Message Authentication Code (MAC): An appended data unit which ensures authentication of the message.
- Public-Key Cryptography: A system where each device has a public key that everyone knows, and a private key that only they know. This is an asymmetric key system. A message encrypted with a public key can only be decrypted with a private key, and vice versa.
- Resolvable Private Address: A random, changing address is used by a Bluetooth LE device. If a peer device knows the identity resolving key, it can find the identity address of the device.
- SHA-256: Secure Hashing Algorithm with 256 bits of output
- Stream Cipher: An encryption algorithm that encrypts a message one bit at a time, combining each bit with a bit in a pseudo-random cipher digit stream generated with a symmetric key.
- Symmetric Key: The same key is used for both encryption and decryption.
True Random Number Generator (TRNG)
At the heart of every security algorithm lays the ability to produce completely random values. If any of the generated numbers are by any means dependent, it would represent a big security risk. Throwing dices seems like a very easy thing to accomplish, but the problem lays in the fact that computers are deterministic, meaning that if you input the same parameters to a function you would get the same result over and over again. To overcome this, the SimpleLink CC13XX and CC26XX MCUs feature a dedicated hardware unit, the True Random Number Generator (TRNG). This unit contains 24 ring oscillators that produce unpredictable output to feed a complex non-linear combinatorial circuit, all to make sure its output is impossible to predict. If you want to learn more about the TRNG, consult the Technical Reference Manual.
Speed
It is important to highlight that the TRNG is relatively slow. It is thus NOT suited for generating random numbers on-the-fly that do not require the same level of security as encryption. A pseudo-random number generator would be much better for these use-cases. Frequent calls to the TRNG will significantly hamper the responsiveness of your system.
A better practice is to calculate a true random number with the TRNG at startup, and use this to seed a pseudo-random number generator.
Cryptographic Algorithms
Diffie-Hellman
The Diffie-Hellman algorithm is an ingenious way of two devices agreeing on a shared secret encryption key that is used for encrypting the data between them. It ensures that a passive listener who listens to all the communication between the devices before the connection is encrypted, cannot calculate their shared secret encryption key.
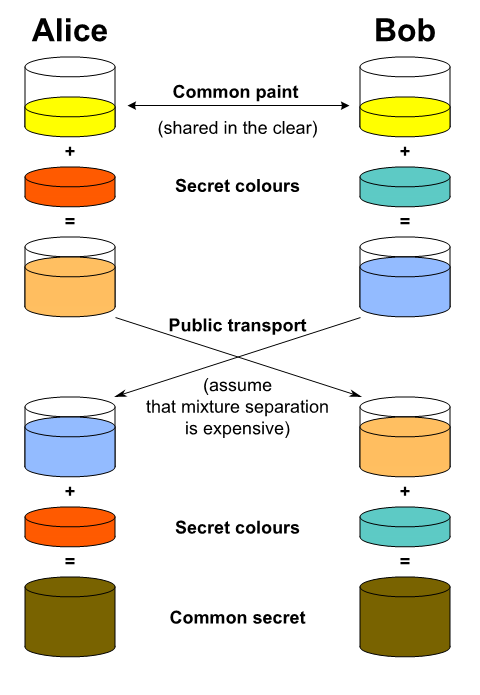
The basic concept is that every device has a private key, and that there exists a public key for everyone to see. If device A then combines its private key with the public key, it will be computationally very expensive to separate them from one another. A common analogy to this process is shown in the figure below, and involves mixing containers of colored water. This is because one can imagine that separating a mixed container into two different containers with separate and correct colors is nearly impossible. This means that a device now can transmit this "mixture" safely unencrypted. When a device receives a mixture, it adds its own private key, or colored water, so that it ends up with a new color mixture that is equal on both devices. Two devices have now agreed on a common key without the possibility of someone intercepting it.
 |
|---|
| Diffie-Hellman Key exchange |
In reality, this is done with some clever math. A common way to do this, is with Basic Exponential maths. However, for Bluetooth this is done with Elliptic-curve. For context, both basic exponential maths and Elliptic-Curve will be explained here.
Basic Exponential Maths
Two devices publicly agree on a modulus p and a base g.
Device A then chooses a secret integer a which is its private key. The "mixing of colors" has the following mathematical formula:
A = g a mod p
Trying to find a when one knows A, p and g is shown to be very computationally expensive. Thus A is safe to send unencrypted, and it is sent to device B.
Device B does the same, chooses a secret integer b and calculates B = g b mod p. It then sends it unencrypted to device A.
Device A can now calculate the shared private key, s = B a.
Device B also calculates the shared secret key, s = A b.
Both devices now have the same shared secret key. This holds true because:
Ab mod p = g ab mod p = B a mod p
Elliptic-Curve
Elliptic-Curve Cryptography (ECC) is an alternative approach to public-key cryptography that is widely used. This is because it requires smaller keys compared to non-ECC to provide equivalent security. In two of the drivers in the SimpleLink CC13xx / CC26xx SDK, Elliptic-Curves are used: Elliptic Curve Digital Signature Algorithm (ECDSA) and Elliptic Curve Diffie-Hellman key exchange algorithm (ECDH). It is thus worth the effort exploring this method a little further.
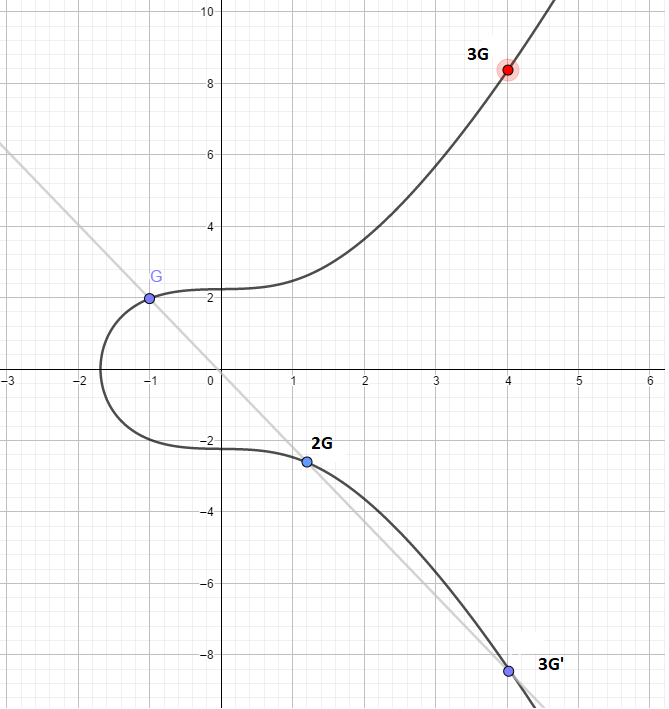
An elliptic curve is provided together with a base point G. We are now going to do operations with this point on the curve to get new values. In the first operation, we need to calculate G + G. This corresponds to making a line from G to G, which becomes the tangent of G, and seeing where it intersects the Elliptic-Curve. This is 2G'. We then mirror that point around the x-axis, and we have 2G.

In the second step, we want to find 3G. This is equal to G + 2G. We take the line through both G and 2G, and see where it intersects the curve. We then mirror that point around the X axis to find 3G.
In the third step, we do the same thing. G + 3G = 4G is found using the same method as in the previous step.
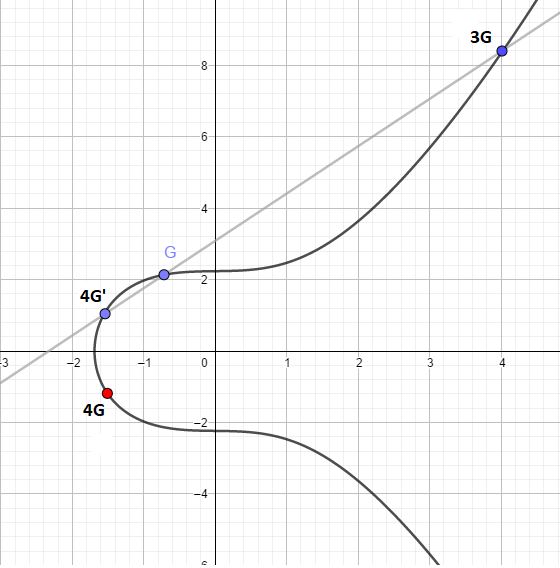
This is where the genius part of the algorithm comes in. If someone gave you the coordinates of a point A, it would be extremely time consuming finding out how many times you would have to add G to itself before landing at this point. If we set this up as an equation, A = bG, b would be our private key.

This time, the public key is the coordinate of a point A, which is now both X and Y coordinates. The private key is the number of times one has to do a geometric operation to the (publicly available) base G before ending up at the coordinates of A. A is then our water container of mixed colors. As discussed previously, finding the multiplicity of the base G before ending up at the shared point A, is extremely time consuming to calculate.
Quiz
Which statement(s) is true?
Advanced Encryption Standard
Advanced Encryption Standard (AES) describes a symmetric encryption algorithm, meaning that the same key is used for encrypting the data as decrypting it. AES can be used for both symmetric data encryption as well as authenticated encryption. A block cipher is a deterministic algorithm transforming a fixed-length group of bits using a symmetric key, which is exactly what AES does.
LE Legacy connections and LE Secure connections collectively use AES in four different variants; AES-ECB, AES-CBC, AES-CTR and AES-CCM. LE Legacy uses AES-ECB for key generation, and AES-CBC and AES-CTR are subroutines in AES-CCM that both LE Secure and LE Legacy connections use.
AES - Electronic Codebook (ECB)
The data to be encrypted is partitioned into blocks of equal sizes that are fed into the encryption algorithm separately with the same key. The disadvantage of this method is that it lacks diffusion. This means that equal plaintext blocks will be encrypted to equal ciphertext blocks, and thus a data pattern can emerge. In the case of AES-128 which is a variant of AES-ECB used for key generation in LE Legacy pairing key generation, the block size is 128-bits. When using AES-128,when you have encrypted a data block of 128 bits you would need to change the key before encrypting a new block of 128-bits to avoid the problem of diffusion. In the key generation step in LE Legacy, only one 128-bit data block is encrypted, and thus the encryption is secure.
 |
|---|
| AES in Electronic Codebook (ECB) mode encryption |
AES - Cipher Block Chaining (CBC)
This method of encrypting makes sure that any data pattern do not persist after the encryption is done. Before the plaintext is fed into the encryption algorithm, it is XORed with the ciphertext of the previous block. This ensures that each ciphertext block depends on all the plaintext blocks processed up to that point, and diffusion is achieved.
 |
|---|
| AES in Cipher Block Chaining (CBC) mode encryption |
AES - Counter (CTR)
Counter mode turns a block cipher into a stream cipher. A stream cipher is a symmetric key cipher where the data to be encrypted is combined with a pseudo-random cipher digit stream. This means that each plaintext digit of our data is encrypted one at a time with the corresponding digit of the keystream.
CTR-mode encrypts a constant random Nonce together with a counter that increases for each block. It then XORs it with the data to be encrypted. The counter ensures that any data patterns are diffused, as two equal blocks of plaintext will be encrypted differently. Since each block of text can be encrypted independently in parallel (as opposed to CBC), this mode is more efficient.
 |
|---|
| AES in Counter (CTR) mode |
AES - Counter with CBC-MAC (AES-CCM)
This is the encryption standard used in Bluetooth LE connections. We first have to introduce the CBC-MAC. This is a method of constructing a Message Authentication Code (MAC) from a block cipher. To calculate a CBC-MAC, one first encrypts a message with CBC mode and keeps the last block. This last block is thus our MAC. This method ensures that any changes to the message will alter the MAC in unexpected and seemingly random ways.
Then, both the message and the MAC is encrypted with the CTR mode. This means that when the message is decrypted at the receiver end, the MAC appended in the message can be compared to the calculated MAC of the message. If someone has tampered with the data, these two MACs will not be equal! We now have an algorithm that provides both authentication and encryption!
Quiz
Which statement(s) is true?
Cipher-Based Message Authentication Code (AES-CMAC)
This algorithm is frequently used in the key generation process. The core of the CMAC is the previously discussed CBC-MAC. The key difference between these two is that the CMAC works on messages of any bit lengths. The function takes as input a secret key, a message and its length, and returns a 128-bit string which is the MAC. This 128-bit string is now our long term key ( LTK ).
SHA-256
SHA stands for Secure Hashing Algorithm. A hashing algorithm is a one-way function that takes an arbitrarily long block of bits, and produces a fixed length output that is seemingly random. If you only know the output of the function, it is impossible to calculate the original data block. If one bit in the input changes the output is completely changed, seemingly at random. It is also highly unlikely that two different inputs to the hashing function will produce the same hash. This means that if you receive a message and you know its hash already, you can verify that the integrity of the data is preserved by calculating the hash yourself with the message as input, and comparing it with the stored hash. SHA-256 produces a 256-bit output, which means that there are 2256 different possible outputs to the hashing function. A hash collision happens when to inputs hashes to the same value, but because of the many possible combinations in the output, the probability of this happening is very small.
The SimpleLink CC13x2 and CC26x2 devices feature a hardware accelerator for SHA-2, with support for SHA224, SHA256, SHA384 and SHA512, making this operation much quicker.
Quiz
Which statement(s) is true?
Keyed-hash Message Authentication Code (HMAC)
HMAC is a type of Message Authentication Code involving a cryptographic hash function and a secret cryptographic key. It can be used for both verifying data integrity and authenticating a message. Any cryptographic hash function can be used to calculate the HMAC, but Bluetooth LE uses SHA-256.
The main use of this function is when dealing with stream ciphers. Changing a bit in a stream cipher text is an easy way of manipulating the decrypted data, even if you don't know how to decrypt it. This is in contrast with a block cipher, where changing one bit of the cipher text will ruin the decryption process and thus expose meddling by attackers. The solution is to attach a Message Authentication Code at the end of the data string that verifies the integrity of the data. The naive approach is to attach the hash of the message itself after the message, as a kind of checksum. The downside of this approach is that an attacker can easily both change the message, and recalculate a hash to match it. What we need to do, and what HMAC does, is calculate the hash not only with the message, but with private keys as well. This ensures that an attacker can't recalculate the hash attached to the message, without also knowing the secret keys. Now the message is both authenticated and verified.
Comparison of Different MAC Algorithms
Comparing HMAC to the previously discussed CBC-MAC and AES-CMAC they share many similarities. All of them calculate a signature of the message using a one-way function, thus making it impossible to recalculate the original message if one knows the signature. HMAC uses SHA-256, and AES-CMAC and CBC-MAC uses AES-CBC as this one-way function. At the same time, they all try to make it impossible for an attacker to forge the hash if the message is changed. HMAC solves this by signing the MAC with private keys. CBC-MAC is used as a subroutine in AES-CCM, which means that this MAC is encrypted with AES-CTR and thus makes it hard to forge for an attacker. The AES-CMAC is signed with the shared secret Diffie-Hellman key in the key generation procedure, and the output is thus also safe from forging.
Quiz
Which statement(s) is true?
Implementation of Security Protocols in Bluetooth LE Security
In both LE Legacy pairing and LE secure connections the actual encryption is done with stream ciphers. This is because a stream cipher is computationally more efficient than block ciphers, and thus block ciphers are only used for key generation and authentication purposes.
Let's take a look at how everything fits together:
Key Generation
The job of the key generation algorithms is to create a password which is very hard to break, thus rendering the communication useless for anyone without a key. It is a way of ensuring that no attacker can passively listen to a transmission.
LE Legacy and LE Secure Connections both use AES-CCM for encryption. Under FIPS (Federal Information Processing Standards), which is considered a safe encryption algorithm. However, this all depends on the key being securely computed, which brings us to the differences of the two.
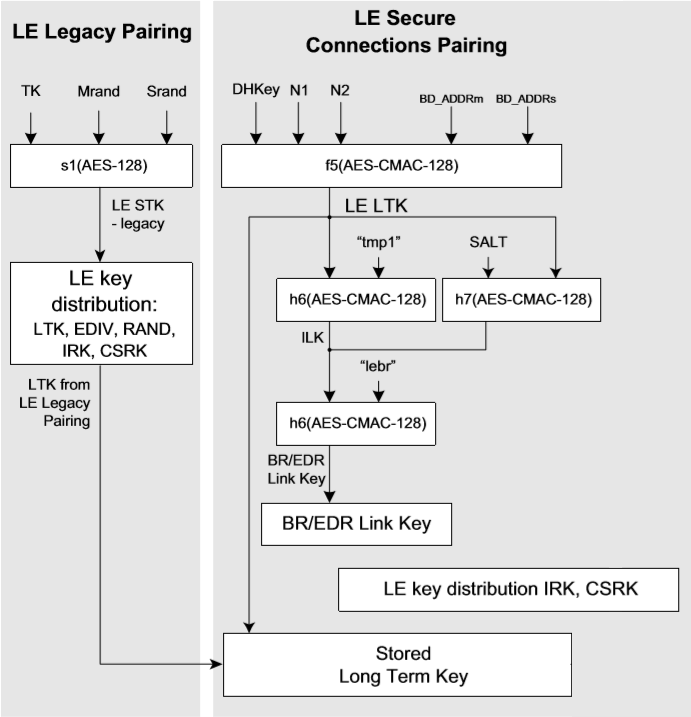
LE Legacy Pairing
As we can see in the above illustration, the function s1() that calculates the short-term key ( STK ) uses AES-128. This is the AES-ECB that we deemed unsafe for encryption given that the plaintext to be encrypted was longer than 128 bits. However in this case AES-ECB is only used to encrypt one data block so we can safely say there is no chance of compromising repeating data patterns.
Once the STK is generated, the connection is encrypted using AES-CCM, which is considered a safe encryption algorithm. The LTK is then transferred over the encrypted connection.
The big weak point of the LE Legacy connections is the derivation of the TK, which is thoroughly explained in Bluetooth Low Energy Security Fundamentals.
LE Secure Connections
The big differentiator for LE Secure Connections is the use of Elliptic-Curve Diffie-Hellman method explained earlier. This ensures that a passive listener to the pairing process won't be able to resolve the shared key between two devices. For MITM-protection, use OOB, Passkey entry or Numeric comparison pairing. For more information, see Bluetooth Low Energy Security Fundamentals.
The key generation algorithm used here is AES-CMAC. The input to this function is the shared secret Diffie-Hellman key, together with the Nonces and the Addresses. Since the Diffie-Hellman key is secret, the LTK is too.
An important distinction between LE Legacy and LE Secure Connections is that in LE Secure Connections the LTK is never shared over the air.
Confirmation Value Algorithms
While the job of the key generation is to ensure no passive listening, Confirmation values help authenticate a connection. This means that an attacker will have a hard time pretending to be someone else, and thus thwart a MITM attack. In the Bluetooth Low Energy Security Fundamentals lab we discussed the vulnerabilities of such attacks using the different Association Models in LE Legacy and LE Secure Connections. However, this assumed that the confirmation value is safely generated, meaning that if someone listens in on the transmission while the confirmation value and the random Nonce are exchanged, they aren't able to figure out the private keys. These private keys are the TK in the case of LE Legacy, and ra and rb in LE Secure Connections.
In this section, we will discuss which algorithms are used for implementing this one-way function.
LE Legacy connections
To reiterate the core learning goal from Bluetooth Low Energy Security Fundamentals lab, choosing the TK through the different Association Model rules is by far the weakest link in the security chain of LE Legacy pairing. It is no use to have a strong Confirmation Value Algorithm if an attacker already knows the TK. If an attacker can listen in to the connection when the Confirmation Value is being sent, the attacker has probably intercepted the TK as well (if using Just Works or Passkey Entry pairing).
But for the sake of argument, let's assume that the TK is not compromised. This is possible either if the attacker didn't listen in to the transmission early enough to intercept the TK, or the OOB-method with a secure channel was used. The random Nonce generated is encrypted with TK as a key (using AES-128 as the confirmation value algorithm). Again, this is safe because we only encrypt one 128-bit block of data, and any data pattern is thus impossible to detect.
LE Secure Connections
In LE Secure Connections, Confirmation values are calculated and compared twice. Once for the key generation step (Diffie-Hellman), and once for the authentication step.
In the authentication step, the previously discussed HMAC-SHA-256 algorithm is used to calculate:
- the hash of the random nonce of the device
- the two public Diffie-Hellman keys exchanged earlier (PKa and PKb)
- the private key derived through the specific Association Model chosen.
This ensures that this authentication value cannot be forged by anyone unless they also have the private keys (ra and rb derived through the different association models). It also ensures that anyone intercepting the confirmation value won't be able to figure out what went into the function (including the private key), because of the nature of SHA-256 being a one-way function.
In the key generation step, we need to make sure that both devices are using the same key for encryption. First, we calculate the LTK and MAC-key using AES-CMAC, as described previously. These two should be identical on both devices, and thus we use the second Confirmation value algorithm to check this. The algorithm used here is also the AES-CMAC. It takes the MAC-key and the private key from the previous step as input together with Nonces, addresses, and the bits corresponding to the different IO-capabilities. This creates a confirmation value that can be safely transmitted. Both devices do this, and compare it to their own calculated version. If the check succeeds, the connection is encrypted with the LTK.
Quiz
Which statement(s) is true?
Why is LE Secure connections stronger than LE Legacy Just Works connections?
Task 1 – Security Drivers - AES-128
In this exercise we will take a closer look at the APIs (Application Program Interface) of the some of the drivers provided in the SimpleLink CC13xx / CC26xx SDK. There is a dedicated AES hardware accelerator increasing the speed of the AES operations on these devices.
In this task we will look at the Secure Hashing Algorithm, True Random Number Generator, and the driver for the AES-128. We will use a number generated by the TRNG as a key to encrypt and decrypt a 128-bit string of plaintext with AES-128. A brute force attack on an AES-128 encrypted ciphertext is practically infeasible, as the illustration bellow shows.
| Key size | Number of combinations |
|---|---|
| 1-bit | 2 |
| 2-bit | 4 |
| 4-bit | 16 |
| 8-bit | 256 |
| 16-bit | 65536 |
| 32-bit | 4294967296 |
| 64-bit | 1.84467 ∗ 10 19 |
| 128-bit | 3.40282 ∗ 10 38 |
The age of the universe
The number of combinations needed to crack a 128-bit key is 3.4 * 1038 which is an insane amount of computations. If you put one of today's supercomputers on the task it would take it longer than the age of the universe to crack it.
This AES algorithm is the plain vanilla electronic codebook (ECB) method, and is thus only safe for data strings up to 128-bits. If you are encrypting longer strings than 128-bit, remember to use an algorithm that diffuses the output so that any data patterns are obscured.
This is the motivation for using the TRNG to generate a key: it will provide a true and unique random number.
In this task we will use the project example sha2hash located in (SDK
INSTALLATION PATH)\examples\rtos\(YOUR LAUNCHPAD)\drivers\sha2hash.
1) Build and flash the SHA2 example.
Now try hashing different strings. There are four things you should remark:
- The hash looks completely random and unrelated to the input
- The length of the hash is always the same
- Even minuscule changes to the input changes the output completely and seemingly at random
- Two equal strings always produces the same hash.
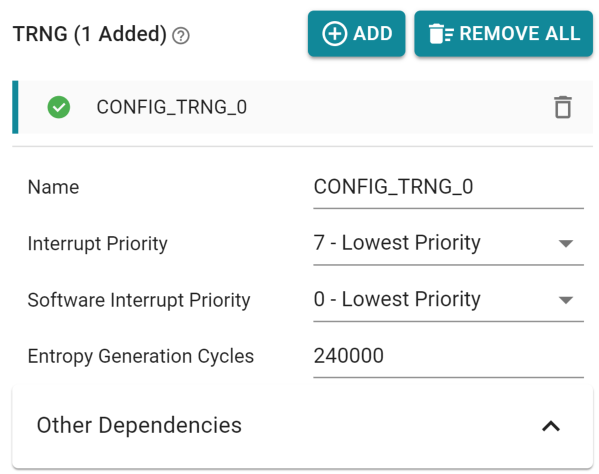
2) Use the TRNG driver to generate a random seed.
We will now use this project as a basis for testing out AES-128, as it contains all the functionality we need.
Open SysConfig and add an instance of the TRNG driver (SysConfig → TI DRIVERS → TRNG)
Include the the CryptoKeyPlaintext.h utility in sha2hash.c.
#include <ti/drivers/TRNG.h>
#include <ti/drivers/cryptoutils/cryptokey/CryptoKeyPlaintext.h>
sha2hash.c
Since we will be using 32 bytes buffers for the rest of this task, you can change
printHash to only print 32 bytes.
/*
 *  ======== printHash ========
 */
void printHash(UART2_Handle handle, uint8_t* msg)
{
   .
   .
   .
    /* Print result */
    UART2_write(handle, formatedMsg, 32, NULL);
}
sha2hash.c :: printHash() - Modify this line to use 32 byte buffers
The main function will now be changed to generate a random key and print it to
the serial monitor. It is worth looking at the header-files TRNG.h and
CryptoKey.h to understand the APIs and the data structures used below.
void *mainThread(void *arg0)
{
  .
  .
  .

    if (!uart2Handle) {
        /* UART2_open() failed */
        while (1);
    }

    /* Erase everything under this if-statement in the original project
     and replace with the following code: */

    //Initializing the TRNG driver
    TRNG_init();

    //Initialize a handle to the TRNG driver and a CryptoKey to store random number.
    TRNG_Handle handle;
    CryptoKey entropyKey;

    uint8_t entropyBuffer[16];

    //Opens an instance of the TRNG
    handle = TRNG_open(0, NULL);

    if (!handle) {
        // Handle error
        while(1);
     }

    //Initialize entropyKey as a blank CryptoKey
    uint16_t keyLength = 16;
    CryptoKeyPlaintext_initBlankKey(&entropyKey, entropyBuffer, keyLength);

    //Generate the random number and put it in entropyKey
    result = TRNG_generateEntropy(handle, &entropyKey);

    if (result != TRNG_STATUS_SUCCESS)
    {
        // Handle error
        while(1);
    }

    TRNG_close(handle);

    // Print out the random key
    printHash(uart2Handle, entropyKey.u.plaintext.keyMaterial);
    return 0;
}
sha2hash::*mainThread() – The main function in our project.
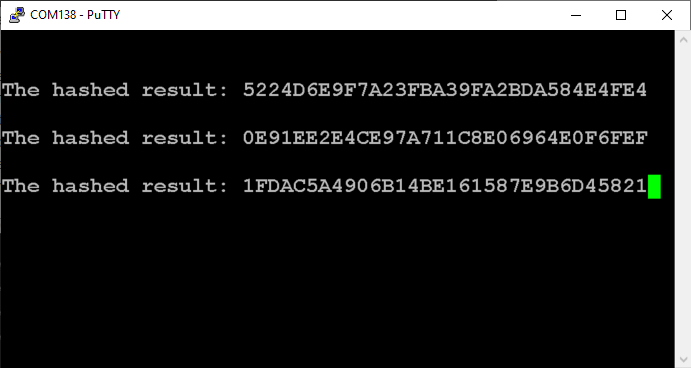
Now the function will write random numbers to the serial monitors. Press the
reset-button and observe that completely new random values are generated each
time. (Note that the printHash function will always print out 32 bytes, so you
can set keyLength to a different length but it will not necessarily be reflected
in the print.)
Perfect! Now we are able to generate a key with the required level of security for encryption.
3) Now we will use this key to encrypt a string using AES-128.
Keep in mind that this algorithm is only safe for encryption when encrypting data strings of 128 bits (16 bytes) or less, otherwise a pattern may emerge.
Low-level drivers
Note that the drivers used in this exercise are not thread safe, meaning that
if different threads call them at the same time, strange bugs can appear. For
the specific thread-safe implementations see
(SDK INSTALLATION PATH )/docs/tidrivers/tidriversAPIs.html.
We will use a hardware interrupt disable function to make the calling of the
drivers critical sections of our code.
Open SysCongif and add and instance of the AESECB driver.

Copy the code below to enable encryption, and be sure to look up anything unclear in the documentation.
// Import AESECB Driver definitions and hardware interrupts
#include <ti/drivers/AESECB.h>
#include <ti/sysbios/hal/Hwi.h>

/* Defines */
#define MAX_MSG_LENGTH 256

/* UART pre-formated strings */
static const char promptSecretInfo[] = "\n\n\rSecret information to encrypt: ";
static const char promptEncrypt[]    =    "\n\n\rEncrypted text:                ";

//The information to be encrypted and buffer for encrypted information
uint8_t secretInformation[] = {0x00, 0x11, 0x22, 0x33, 0x44, 0x55, 0x66, 0x77,
                       0x88, 0x99, 0xaa, 0xbb, 0xcc, 0xdd, 0xee, 0xff};
uint8_t encryptedInformation[sizeof(secretInformation)];
sha2hash.c Include drivers and define variables.
We are still using the code snippet from step 2, so don't delete it. Add the
following in mainThread():
//Printing secretInformation to serial monitor
UART2_write(uart2Handle, promptSecretInfo, strlen(promptSecretInfo), NULL);
printHash(uart2Handle, secretInformation);

// Define name for AESECB channel index
#define AESECB_INSTANCE 0

//Begin Critical section
Hwi_disable();

//Initialize AES ECB driver
AESECB_init();
AESECB_Params aesParams;
AESECB_Params_init(&aesParams);
AESECB_Handle handleAES = AESECB_open(AESECB_INSTANCE, NULL);

// Set up AESECB_Operation
AESECB_Operation encryptOperation;
AESECB_Operation_init(&encryptOperation);
encryptOperation.key               = &entropyKey;
encryptOperation.input             = secretInformation;
encryptOperation.output            = encryptedInformation;
encryptOperation.inputLength       = sizeof(secretInformation);

//Do the encryption
int_fast16_t encryptionResult = AESECB_oneStepEncrypt(handleAES, &encryptOperation);

//Print the encrypted text to serial monitor
UART2_write(uart2Handle, promptEncrypt, strlen(promptEncrypt), NULL);
printHash(uart2Handle, encryptedInformation);

//Close AES operation
AESECB_close(handleAES);
Hwi_enable();

return 0;
sha2hash. c :: *mainThread() – The encryption operation.
The serial monitor should now print this:

Superb! You have now safely encrypted some data using a safely generated key.
4) Now we will decrypt the information.
We have to use the same key for this as we encrypted it with. For this operation we need to define a callback:
/*
 *  ======== ecbCallback ========
 */
void ecbCallback(AESECB_Handle handle,
                 int_fast16_t returnValue,
                 AESECB_Operation *operation,
                 AESECB_OperationType operationType) {
    if (returnValue != AESECB_STATUS_SUCCESS) {
        // handle error
    }
}
sha2hash.c :: ecbCallback()
In mainThread(), insert the following before return 0;:
//Initialize AES ECB driver
AESECB_Operation decryptOperation;
AESECB_Handle handleAES_de;
AESECB_Params aesParamsDecrypt;
uint8_t decryptedInformation[sizeof(secretInformation)];
AESECB_Params_init(&aesParamsDecrypt);
aesParamsDecrypt.returnBehavior = AESECB_RETURN_BEHAVIOR_CALLBACK;
aesParamsDecrypt.callbackFxn = ecbCallback;
handleAES_de = AESECB_open(AESECB_INSTANCE, &aesParamsDecrypt);

// Set up AESECB_Operation
AESECB_Operation_init(&decryptOperation);
decryptOperation.key               = &entropyKey;
decryptOperation.input             = encryptedInformation;
decryptOperation.output            = decryptedInformation;
decryptOperation.inputLength       = 16;

//Do the decryption
int_fast16_t decryptionResult = AESECB_oneStepDecrypt(handleAES_de, &decryptOperation);

//Print the decrypted information to serial monitor
static const char promptDecrypt[] =    "\n\n\rDecrypted text:                ";
UART2_write(uart2Handle,promptDecrypt,strlen(promptDecrypt), NULL);
printHash(uart2Handle,decryptOperation.output);

//Close AES operation
AESECB_close(handleAES_de);
sha2hash.c :: *mainThread() – The decryption operation.
The serial monitor should now display this:
Good job! You have now successfully encrypted and decrypted a message. As previously mentioned, AES-128 is used in the key generation in LE Legacy pairing. The Mrand and Srand values are encrypted with the TK as key, and thus both devices have a shared secret key that is used in AES-CCM.
Task 2 – Security Drivers - AES-CCM
In this exercise we will take a look at the workhorse of Bluetooth LE encryption; AES-CCM. This mode of operation provides both authentication and encryption. This algorithm is a bit more complex than AES-128 from the previous task, so a general understanding of this algorithm is recommended before you begin.
Application-layer Encryption
In Bluetooth LE connections, packets can be encrypted after pairing as part of the Bluetooth Core Spec as discussed. However, the Bluetooth Core Spec does not contain a mechanism for encrypting advertisement packets.
If you do want to encrypt advertisements, you can do application-level encryption. This will allow you to encrypt a message sent by a beacon, and several Central devices can read the information from the beacon at once. However, it is important to note that you are then not using the built-in security features in pairing and bonding in TI's BLE5-Stack. It is then your own responsibility that the information is safely encrypted and decrypted. As always the security of a system should be evaluated as one, not just on component level.
If you do decide to use application-layer Encryption, AES-CCM should be your weapon of choice. Then the shared secret key of the AES-CCM can be coded into the devices before they are deployed. This makes sense since the process of exchanging keys and authentication are the most vulnerable steps. Remember to change the key before the counter overflows.
If you want to see this algorithm in action in a pairing process, it is highly
encouraged to take a look at the aesKeyAgreement diver example ((SDK
INSTALLATION PATH)\examples\rtos\(YOUR LAUNCHPAD)\drivers\aesKeyAgreement).
Having the AESCCM.h File Reference open next to this task is useful. (You can navigate to the AESCCM.h file from the link.)
This exercise will look similar to the previous one, and we will reuse some of the functions. The procedure looks very similar to AES-ECB, with the exception of two new lines: Nonce and Message Authentication Code (MAC). Recall from AES-CTR that the encryption process itself uses a nonce together with a counter, which is then encrypted with the key and XORed with the plaintext to be sent secretly. Because this is now effectively a stream cipher, a MAC is needed for verifying the integrity of the message. Therefore a MAC is calculated first, and then encrypted together with the message. If someone tampers with the message between the transmitting and receiving device, it can be discovered because it is very hard to modify both the message and its MAC correctly.
We will reuse the code from the previous task for generating a random key, but
discard the other code changes from task 1. Feel free to reset the mainThread
function or comment out the changes made in task 1. Re-do the random key
generation or follow the instructions for task 1.2 if you need further
instructions. If you want to hard code a key here instead, please do. If you
hard code a key in both the Central and the Peripheral before deploying the devices,
you know that no-one can intercept this key (since it's not being transmitted over
the air).
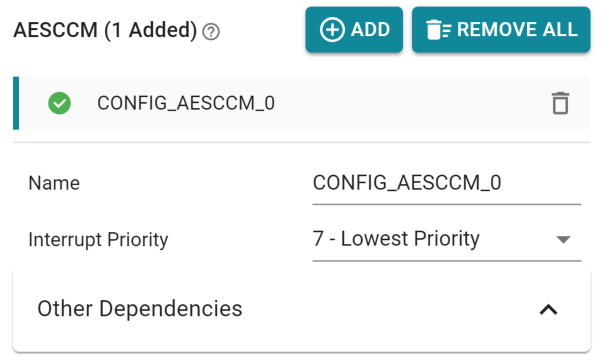
In SysConfig, you can remove the AESECB instance. Add an AESCCM instance.
First we print to screen the information that we want to encrypt, thus making it easier to verify whats going on along the way.
//The information to be encrypted and buffer for encrypted information
uint8_t secretInformation[] = {0x00, 0x11, 0x22, 0x33, 0x44, 0x55, 0x66, 0x77,
                               0x88, 0x99, 0xaa, 0xbb, 0xcc, 0xdd, 0xee, 0xff};

//Printing secretInformation to serial monitor
UART2_write(uart2Handle, "\n\n\rSecret information to encrypt: ",
                strlen("\n\n\rSecret information to encrypt: "), NULL);
printHash(uart2Handle, secretInformation);
sha2hash.c :: mainThread() – The information to be encrypted
We will now initialize the encryption process and encryption handle. The key used is the one generated previously by the TRNG (or your hard-coded key), and the nonce is hard coded. Remember to include the code for generating entropyKey from the previous task. The MAC is initialized as an empty array, as this will be filled by the encrypting function.
#include <ti/drivers/AESCCM.h>
#include <ti/sysbios/hal/Hwi.h>
Add these include statements at the top, together with the rest!
//ENCRYPTION

AESCCM_init();
AESCCM_Handle encryptHandle;
CryptoKey cryptoKey = entropyKey;
int_fast16_t encryptionResult;
uint8_t nonce[] = {0x31, 0x41, 0x59, 0x26};
uint8_t mac[16];
uint8_t ciphertext[sizeof(secretInformation)];
encryptHandle = AESCCM_open(0, NULL);
if (encryptHandle == NULL) {
    // handle error
}
AESCCM_Operation encryptOperation;
AESCCM_Operation_init(&encryptOperation);
encryptOperation.key               = &cryptoKey;
encryptOperation.input             = secretInformation;
encryptOperation.output            = ciphertext;
encryptOperation.inputLength       = sizeof(secretInformation);
encryptOperation.nonce             = nonce;
encryptOperation.nonceLength       = sizeof(nonce);
encryptOperation.mac               = mac;
encryptOperation.macLength         = sizeof(mac);
sha2hash.c :: mainThread() – Initialization of the encryption process
In the encrypting function, several exciting things are happening at once. First,
the secretInformation is run through the AES-CBC procedure, where the last block
is kept as the MAC. Then both the message and the MAC are encrypted using
AES-CTR. Later we print the encrypted information to the screen.
encryptionResult = AESCCM_oneStepEncrypt(encryptHandle, &encryptOperation);
if (encryptionResult != AESCCM_STATUS_SUCCESS) {
    //handle error
}

UART2_write(uart2Handle,"\n\n\rEncrypted text:  ",
               strlen("\n\n\rEncrypted text:  "), NULL);
printHash(uart2Handle,encryptOperation.output);
AESCCM_close(encryptHandle);
sha2hash.c :: mainThread() – Encryption function
The decryption process follows a similar path as encryption, with the exception of the modification of some of the AES-CCM parameters:
//DECRYPTION
AESCCM_init();
uint8_t decryptPlaintext[sizeof(secretInformation)];
AESCCM_Operation decryptOperation;
AESCCM_Handle decryptHandle;
AESCCM_Params params;
int_fast16_t decryptionResult;
AESCCM_Params_init(¶ms);
params.returnBehavior = AESCCM_RETURN_BEHAVIOR_CALLBACK;
params.callbackFxn = ccmCallback;
decryptHandle = AESCCM_open(0, ¶ms);
if (handle == NULL) {
//handle error
}
AESCCM_Operation_init(&decryptOperation);
decryptOperation.key = &cryptoKey;
decryptOperation.input = encryptOperation.output;
decryptOperation.output = decryptPlaintext;
decryptOperation.inputLength = sizeof(secretInformation);
decryptOperation.nonce = nonce;
decryptOperation.nonceLength = sizeof(nonce);
decryptOperation.mac = mac;
decryptOperation.macLength = sizeof(mac);
sha2hash.c :: mainThread() – Decrypting procedure setup
The callback function ccmCallback() must be defined as a function above the
main() function:
/*
 *  ======== ccmCallback ========
 */
void ccmCallback(AESCCM_Handle handle,
                 int_fast16_t returnValue,
                 AESCCM_Operation *operation,
                 AESCCM_OperationType operationType)
{
    switch(returnValue){
        case AESCCM_STATUS_SUCCESS:
            // handle decryption success here
            break;
        case AESCCM_STATUS_MAC_INVALID:
            // handle error
            break;
        default:
            break;
    }
}
sha2hash.c :: ccmCallback() – Callback function
The AES-CCM decrypting function also does many things at the same time. The ciphertext is first decrypted using AES-CTR with the provided nonce and key. Then the MAC code is checked against the last block AES-CBC from the sent message. If these match, we have verified the integrity of the message.
AESCCM_oneStepDecrypt(decryptHandle, &decryptOperation);
sha2hash.c :: mainThread() – Decrypting function
Since we are using callback mode for the decryption operation, the return status
for decryptOperation is sent to the callback (ccmCallback()). Add the
following code snippet to print the decrypted message to screen and compare it
with the original.
UART2_write(uart2Handle,"\n\n\rDecrypted text: ",
               strlen("\n\n\rDecrypted text: "), NULL);
printHash(uart2Handle,decryptOperation.output);
sha2hash.c :: mainThread() – Printing decrypted information to screen
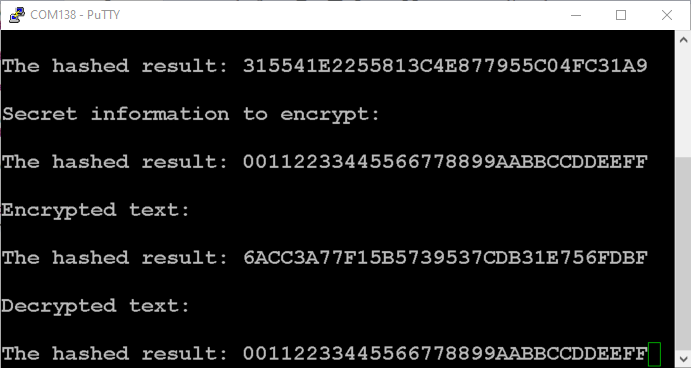
Run the code and double-check that the string has not changed after going though encryption and decryption. The output should look similar to what we saw at the end of Task 2.
Note that at this point there is a high probability
to get a stack overflow. The sha2hash example has a 1 kB stack per default, and
we have spent it all and more. If this happens, go to main_tirtos.c and
increase the size of THREADSTACKSIZE.
/* Stack size in bytes */
#define THREADSTACKSIZE    2048
main_tirtos.c – Increase the task stack size.
Great! We have now encrypted and decrypted using AES-CCM. If you still want to experiment more, try to tamper with the encrypted message before passing the message to the decrypting function, and see what happens.
Task 3 – Filter Accept List
A Filter Accept List is a list of devices that the Link Layer (LL) can use for filtering advertisers, scanners or initiators. This is a great way of saving power, as the LL will be able to filter packets without awakening the host. Initially, if the peer device is not using privacy, the incoming packets can be filtered in the RF Core without waking up the M4. This will save even more power.
Using a Filter Accept List can be a great security enabler. If you are working with a system built with a fixed set of Bluetooth LE devices, you know all the device addresses and you can add them to the Filter Accept List. Alternatively, you can update the white list at runtime with addresses of Bluetooth LE devices that are paired to your device.
Even when using privacy a Filter Accept List can be useful. The Filter Accept List contains only identity addresses. If a resolvable private address (RPA) is used, one must have the Identity Resolving Key (IRK) to be able to know the identity address of a device. IRKs are exchanged after pairing and bonding, thus it's not possible to use a pre-programmed Filter Accept List in combination with privacy. In this case, we use the pairing process for authentication and then we can safely add the device to the Filter Accept List.
The GAP Bond Manager can be configured to automatically add bonded devices to
the Filter Accept List by setting the GAPBOND_AUTO_SYNC_WL parameter. If you want to
know more about Privacy and the Filter Accept List, you can read about it in the TI
BLE5-Stack User's Guide under the "Privacy" section inside "Privacy and the Filter Accept List".
In this exercise we will implement the Filter Accept List on both the Central and the Peripheral. For this we will use Simple Central and Simple Peripheral.
1) Flash Simple Central and Simple Peripheral to two LaunchPads.
Open serial windows for both. If you need a refresher on how to do this, see the Scanning and Advertising lab. Do a scan with Simple Central, and note how many devices show up:
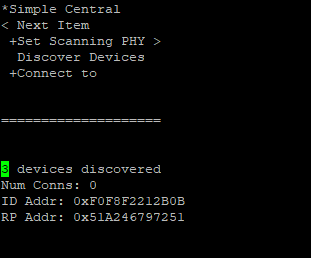
(Note that the number of discovered devices will depend on your environment.)
2) Add a device to the Filter Accept List.
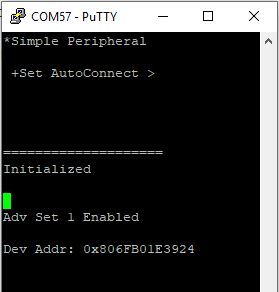
We now need to add the identity address of our Simple Peripheral to the white list of the Simple Central. For simplicity we will switch Simple Peripheral to use ADDRMODE_PUBLIC on the peripheral device, since this will make Simple Peripheral advertise with its identity address.
Open simple_peripheral.syscfg and go to BLE → General Configuration and
change the Address mode to Public Address.

Reprogram the peripheral device and start the program. The addresses of the peripheral device is now written in the serial monitor.
We will now add this address to a Filter Accept List on the central side. An important
thing to keep in mind when we insert the address is the endianness. In the
serial window, the address is written in the big-endian format, however the
function adding the address needs it in the little-endian format. In our example,
the address 0x806FB01E3924 is transformed to [0x24, 0x39, 0x1E, 0xB0,
0x6F, 0x80]. A good place to add this is in the function
SimpleCentral_doDiscoverDevices() in simple_central.c, as this function
deals with the scanning of other devices. First we update the scan filter policy
to use a Filter Accept List filter, then we add the address of our peripheral device as
demonstrated in the code snippet below: (Remember to change the address to your
own!)
/*********************************************************************
 * @fn      SimpleCentral_doDiscoverDevices
 *
 * @brief   Enables scanning
 *
 * @param   index - item index from the menu
 *
 * @return  always true
 */
bool SimpleCentral_doDiscoverDevices(uint8_t index)
{
  (void) index;

  //Update the Scan filter policy
  uint8_t whitelistfilter = SCAN_FLT_POLICY_WL;
  GapScan_setParam(SCAN_PARAM_FLT_POLICY, &whitelistfilter);

  //Adding an address to the white list
  static uint8 bdAddressPeer[6] = {0x24, 0x39, 0x1E, 0xB0, 0x6F, 0x80};
  HCI_LE_ClearWhiteListCmd("");
  HCI_LE_AddWhiteListCmd(ADDRMODE_PUBLIC, bdAddressPeer);

#if (DEFAULT_DEV_DISC_BY_SVC_UUID == TRUE)
  // Scanning for DEFAULT_SCAN_DURATION x 10 ms.
  // The stack does not need to record advertising reports
  // since the application will filter them by Service UUID and save.
  // Reset number of scan results to 0 before starting scan
  numScanRes = 0;
  GapScan_enable(0, DEFAULT_SCAN_DURATION, 0);
#else // !DEFAULT_DEV_DISC_BY_SVC_UUID
  // Scanning for DEFAULT_SCAN_DURATION x 10 ms.
  // Let the stack record the advertising reports as many as up to DEFAULT_MAX_SCAN_RES.
  GapScan_enable(0, DEFAULT_SCAN_DURATION, DEFAULT_MAX_SCAN_RES);
#endif // DEFAULT_DEV_DISC_BY_SVC_UUID

  // Enable only "Stop Discovering" and disable all others in the main menu
  tbm_setItemStatus(&scMenuMain, SC_ITEM_STOPDISC,
                    (SC_ITEM_ALL & ~SC_ITEM_STOPDISC));

  return (true);
}
simple_peripheral.c :: SimpleCentral_doDiscoverServices() – Enable Filter Accept List scanning and add peripheral to Filter Accept List
3) Flash your Simple Central Device and do a new scan.
Now only your peripheral device should show up. (If you are getting 0 discovered devices, double-check that you added the correct address and that your peripheral device is advertising.)

Great! Now only the correct peripheral will show up in the scan, and thus only the central will only connect to this device. Next we want to activate white list in the Peripheral device as well. This will ensure that only the intended Central device will be able to connect.
4) Add a Filter Accept List on the peripheral side.
Again, for this to work, set Simple Central to use a public address. Open
simple_central.syscfg and go to BLE → General Configuration and change
the Address mode to Public Address.
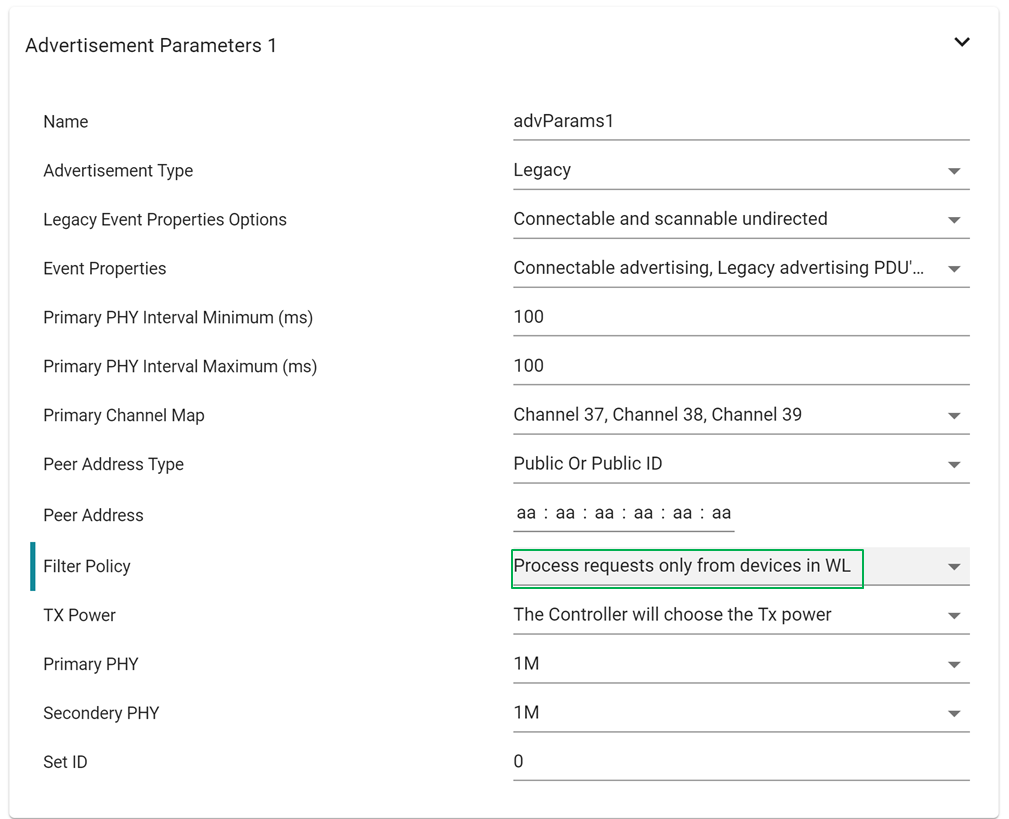
For simple peripheral, we will first configure the filter policy for
advertisement set 1. Open simple_peripheral.syscfg and go to BLE →
Broadcaster Configuration and go to BLE → Advertisement set 1 →
Advertisement Parameters and set Filter Policy to Process requests only from
devices in WL.
Advertisement sets
Per default, Simple Peripheral has two advertisement sets:
- Advertisement Set 1 (Legacy advertising)
- Advertisement Set 2 (which advertises on LE Coded PHY)
In this task we will only care about the first set.
We will also need to add a Filter Accept List to the peripheral device. Add the code
snippet below, for example in the GAP_DEVICE_INIT_DONE_EVENT in
SimplePeripheral_processGapMessage(). Remember again to change to the address
of the Central device, and the endianness of it.
/*********************************************************************
 * @fn      SimplePeripheral_processGapMessage
 *
 * @brief   Process an incoming GAP event.
 *
 * @param   pMsg - message to process
 */
static void SimplePeripheral_processGapMessage(gapEventHdr_t *pMsg)
{
  switch(pMsg->opcode)
  {
    case GAP_DEVICE_INIT_DONE_EVENT:
    {
      bStatus_t status = FAILURE;

      gapDeviceInitDoneEvent_t *pPkt = (gapDeviceInitDoneEvent_t *)pMsg;

      if(pPkt->hdr.status == SUCCESS)
      {
          // Add the central device address to the white list
          static uint8 bdAddressPeer[6] = {0x93, 0x36, 0x29, 0xB0, 0x6F, 0x80};
        HCI_LE_ClearWhiteListCmd("");
        HCI_LE_AddWhiteListCmd(ADDRTYPE_PUBLIC, bdAddressPeer);
simple_peripheral.c :: SimplePeripheral_processGapMessage() – Add Filter Accept List
Try to connect and make sure it connects with your Central device.
5) Now try changing the address in the Filter Accept List, and connect again.
Now you will not be able to make a connection. Alternatively, try to connect to the peripheral with a different device. You will get a timeout on your connection request since this peripheral now only accepts connections from the device with the correct address.

Task 4 – Bonding and the SNV
When two devices are bonded, the bonding information is stored in the Non-Volatile (NV) memory area. This means that if the unit resets or the power is toggled, the bonding information is still stored. This is handled through the Simple Non-Volatile (SNV) driver. It is therefore useful to know how to manipulate and interact with the SNV. Luckily, the GAP Bond Manager has exactly the right APIs to use.
Re-flashing the device
Keep in mind that when you reprogram your device from Code Composer Studio, the SNV will be overwritten and all the bonds deleted.
Privacy and Addresses
Smart phones usually use private addresses, meaning the device address of a smart phone will change from time to time. This means hard-coding a smart phone address is often a bad idea.
For this task use a device you can configure to use a public address, such as BTool, if possible.
1) Take a look at the chapter on the GAP Bond Manager
in the TI BLE5-Stack User's Guide and find all the macros used to set parameters related to the bond information.
GAPBOND_COUNT: This Read-only Macro will return the number of devices currently bonded to the device.
GAPBOND_BONDING_ENABLED: Whether or not the device accepts bonding.
GAPBOND_LRU_BOND_REPLACEMENT: When the maximum number of bonds is reached, you will need to delete a bond before adding a new one. Instead of deleting all bonds, or deleting a specific bond, this parameter enables the device to delete the Least Recently Used (LRU) one.
GAPBOND_ERASE_ALLBONDS: This will erase all the bonds stored in the SNV.
GAPBOND_ERASE_SINGLEBOND: This macro lets you delete a bond with a specific device address.
GAPBOND_BOND_FAIL_ACTION: If the bonding fails, this macro will let you
decide what the device should do next. Choose between do nothing
(GAPBOND_FAIL_NO_ACTION), re-start the pairing process
(GAPBOND_FAIL_INITIATE_PAIRING) and terminate the connection
(GAPBOND_FAIL_TERMINATE_LINK).
2) Program Project Zero on one device
Use a second device (BTool, iOS or Android phone) to connect, pair and bond with this device. The next step is to try out some of the API commands. First we want to know how many peer devices are bonded to the device. One way to do this in the function handling button presses. Change this function to print the number of bonds currently saved when a button is pressed.
static void ProjectZero_handleButtonPress(pzButtonState_t *pState)
{
    uint16_t count;
    Log_info2("%s %s",
              (uintptr_t)(pState->gpioId ==
                          CONFIG_GPIO_BTN1 ? "Button 0" : "Button 1"),
              (uintptr_t)(pState->state ?
                          ANSI_COLOR(FG_GREEN)"pressed"ANSI_COLOR(ATTR_RESET) :
                          ANSI_COLOR(FG_YELLOW)"released"ANSI_COLOR(ATTR_RESET)
                         ));

    // Update the service with the new value.
    // Will automatically send notification/indication if enabled.
    switch(pState->gpioId)
    {
    case CONFIG_GPIO_BTN1:
        ButtonService_SetParameter(BS_BUTTON0_ID,
                                   sizeof(pState->state),
                                   &pState->state);
        break;
    case CONFIG_GPIO_BTN2:
        GAPBondMgr_GetParameter(GAPBOND_BOND_COUNT, &count);
        Log_info1("Number of bonded devices %d", count );
        break;
    }
}
project_zero.c :: ProjectZero_handleButtonPress()
Great! Now observe that the number of saved bonds do not change if you hit the reset button on the device. This is because the bonds are saved in Non-volatile memory, and is thus safe from resets and power cuts. Try adding more bonds, and see how the number of bonds increments.
3) Delete a bond.
Let's now say that we have reached the maximum number of bonded devices, and need to delete old bonding information to make room for a new device. First we will delete all the bonded devices. Change the buttonpress-function so that button0 deletes all bonded devices.
static void ProjectZero_handleButtonPress(pzButtonState_t *pState)
{
    uint16_t count;
    Log_info2("%s %s",
              (uintptr_t)(pState->gpioId ==
                          CONFIG_GPIO_BTN1 ? "Button 0" : "Button 1"),
              (uintptr_t)(pState->state ?
                          ANSI_COLOR(FG_GREEN)"pressed"ANSI_COLOR(ATTR_RESET) :
                          ANSI_COLOR(FG_YELLOW)"released"ANSI_COLOR(ATTR_RESET)
                         ));

    // Update the service with the new value.
    // Will automatically send notification/indication if enabled.
    switch(pState->gpioId)
    {
    case CONFIG_GPIO_BTN1:
        Log_info1("Deleting all bonded devices", 1);
        GAPBondMgr_SetParameter(GAPBOND_ERASE_ALLBONDS, 0, 0);
        break;
    case CONFIG_GPIO_BTN2:
        GAPBondMgr_GetParameter(GAPBOND_BOND_COUNT, &count);
        Log_info1("Number of bonded devices %d", count );
        break;
    }
}
project_zero::ProjectZero_handleButtonPress()
Again, when re-programming the Project Zero device please delete all bonds on the Central device.
Perfect. Now connect, pair and bond the Project Zero and Central device.
GAPBOND_ERASE_ALLBONDS cannot delete the bonding information while the device
is in a connection, so terminate the connection and delete the bonding
information.
4) Delete just one bond.
Sometimes deleting all the bonded devices is a bit too drastic, and we only want
to remove one bond to make room for a new one. The GAPBOND_LRU_BOND_REPLACEMENT
command is really useful for this purpose, as it will enable the device to delete
the least recently used bond when a new device wants to bond and the Bond list is
full. But we will instead demonstrate the GAPBOND_ERASE_SINGLEBOND-command for
practical purposes. This command will delete the bond with a specific
device.
Configure the other button to delete the bond from Btool/iOS/Android. This address is shown in the project_zero serial terminal window upon connecting the devices. Use the documentation for help.
Remember to replace the address with the one of your Central device.
static void ProjectZero_handleButtonPress(pzButtonState_t *pState)
{
    uint16_t count;
    uint8_t deviceAddress[B_ADDR_LEN + 1] = {ADDRTYPE_PUBLIC, 0xF0,0xF8,0xF2,0x21,0x2B,0x0B};
    Log_info2("%s %s",
              (uintptr_t)(pState->gpioId ==
                          CONFIG_GPIO_BTN1 ? "Button 0" : "Button 1"),
              (uintptr_t)(pState->state ?
                          ANSI_COLOR(FG_GREEN)"pressed"ANSI_COLOR(ATTR_RESET) :
                          ANSI_COLOR(FG_YELLOW)"released"ANSI_COLOR(ATTR_RESET)
                         ));

    // Update the service with the new value.
    // Will automatically send notification/indication if enabled.
    switch(pState->gpioId)
    {
    case CONFIG_GPIO_BTN1:
        Log_info1("Deleting all bonded devices", 1);
        GAPBondMgr_SetParameter(GAPBOND_ERASE_SINGLEBOND, B_ADDR_LEN + 1, deviceAddress);
        break;
    case CONFIG_GPIO_BTN2:
        GAPBondMgr_GetParameter(GAPBOND_BOND_COUNT, &count);
                Log_info1("Number of bonded devices %d", count );
        break;
    }
}
project_zero.c::ProjectZero_handleButtonPress() – Deleting a specific bond from the SNV
Connect your Central device again to add it to the list of bonded devices. Now press button0 and then button1, and observe that the counter decrements by one. We have successfully deleted a bond from the SNV.
Task 5 – Key Regeneration Policy
Note
This task is only applicable to LE Secure Connections as LE Legacy pairing does not use the ECC procedure.
Generating ECC keys is a time consuming endeavor, and thus the ability to generate these keys beforehand and reusing them for several connections translates to more responsive systems. A way to minimize this time usage is to use the same private keys for multiple consecutive connections. This will free the computational resources. Keep in mind that the Bluetooth core spec recommends not using the same password for more than 10 consecutive connections. To do this, we will reuse Project Zero and the GAP Bond Manager. Take a look in the TI BLE5-Stack User's Guide's chapter about the GAP Bond Manager to find how to configure this.
Open SysConfig → BLE → Bond Manager and set ECC Key Generation Policy to the number of times you want to reuse the key. Every time the device pairs with a new device, the counter is decremented by 1, or 3 if the pairing fails. When the counter reaches zero, the key is regenerated. Choose a value for this parameter that suits your security needs.

It is worth noting that this parameter has no effect if you are manually specifying the keys.
References
Bluetooth Core Specification Version 5.2
NIST: Guide to Bluetooth Security
This work is licensed under a Creative Commons Attribution-NonCommercial-NoDerivatives 4.0 International License.