Introduction
The intention of this lab is to get developers started with Z-Stack by showing how to get a simple Zigbee network up and running with a Coordinator and an End Device, as well as create binds between these two devices. This lab is based on the Light and Switch - Zigbee Project Zero Lab in the Zigbee SimpleLink Academy folder, but uses a LaunchPad SensorTag kit for the Zigbee switch.
Task 1: Building and loading the Zigbee Coordinator
Task 2: Loading the Zigbee switch to the LaunchPad SensorTag using OAD
Task 3: Setting up the Zigbee network and creating binds
Task 4: Testing the Sample Application features
Technical support
For any questions you may have, please refer to the TI Zigbee & Thread E2E Forum.
Prerequisites
Software
- Code Composer Studio v9.2 or later
- SimpleLink CC13xx / CC26xx SDK
- Uniflash
- Tera term or any other equivalent terminal program
- The SimpleLink Starter smartphone application.
Hardware
- 1x LAUCHXL-CC1352R LaunchPad (to act as a Zigbee Coordinator)
- 1x LPSTK-CC1352R (to act as a Zigbee end device Light Switch)
Recommended Reading
Task 1: Building and loading the sample applications
In CCS, go to
File > Import > C/C++ > CCS Projectsand underSelect search-directory:select the following search path for the Light Coordinator:C:\ti\simplelink_cc13xx_cc26xx_<version>\examples\rtos\[DEVICE]_LAUNCHXL\zstack\zc_light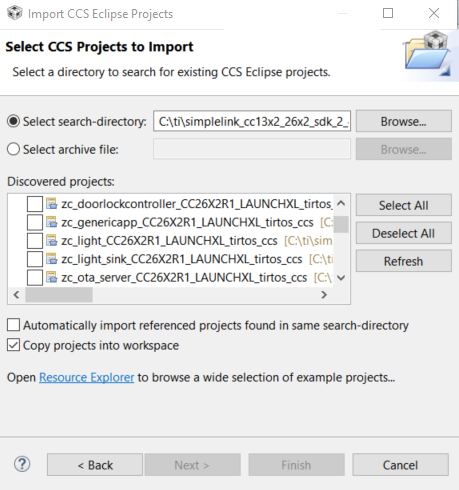
Build the project by going to
Project > Build Project. Once this has completed, make sure you have a LaunchPad connected to your PC and go toRun > Debugto flash the program on your LaunchPad.
Task 2: Loading the Zigbee End Device example to the LPSTK
In this section we will use the OAD (Over the Air Download) feature of the mobile app to load the pre-built Zigbee End Device Switch example to your LPSTK.
Make sure your LPSTK is in the Out of Box state. If not, hold down BTN-1 (left button) and toggle power on then off. On the next power-up, your LPSTK will revert to the Out-of-Box image.
Note
if you have flashed an image besides the 3 LPSTK examples in the mobile app, you may not be able to revert to the factory image. You will need to debug your LaunchPad SensorTag and re-program it with the Multi Sensor example. For more information, please refer to the LPSTK OOB SimpleLink Academy and the README for the
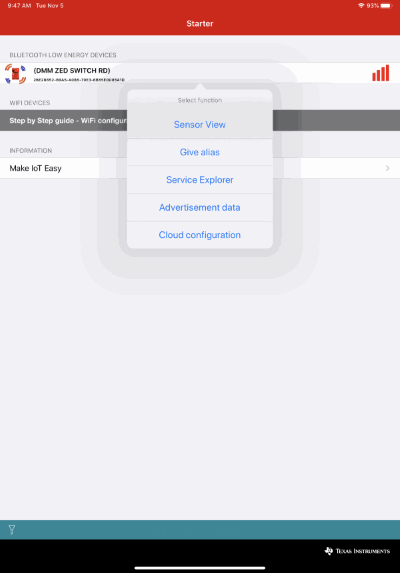
multi_sensorproject in the SDK.Open the SimpleLink Starter App and select your LPSTK from the list of devices
Select Sensor View
Click "FW Download (Enhanced)"
Click "Select FW File"
From the list of Supported Factory Images, select "DMM ZED Switch" (DMM Zigbee End Device Switch)
Click "Program" on the next screen
After a successful download, toggle the power on your LaunchPad Sensor tag off, then on again
Task 3: Accessing the Sample Application User Interface
The Z-Stack Sample Applications provide the user a variety of run-time configuration options and application actions which are available through the UI. To access the UI, we will need to use a terminal emulator program like PuTTY.
Note
Some terminal emulator programs like the CCS terminal or Tera Term will not work properly with the User Interface due to to how the "Form Feed/New Page" character is interpreted by each program (ASCII 0x0C). PuTTY is known to work with the UI properly in its default configuration.
Determine which COM port your LaunchPad is on. There are various ways to do this, but one way is to open Windows Device Manager and go to Ports.
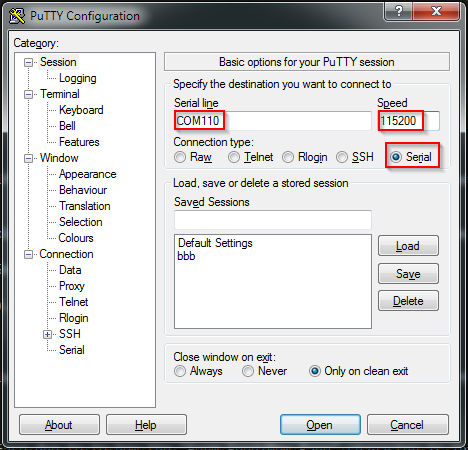
Open PuTTY and select Serial connection type, enter your COM Port, and use a speed of 115200 Baud.
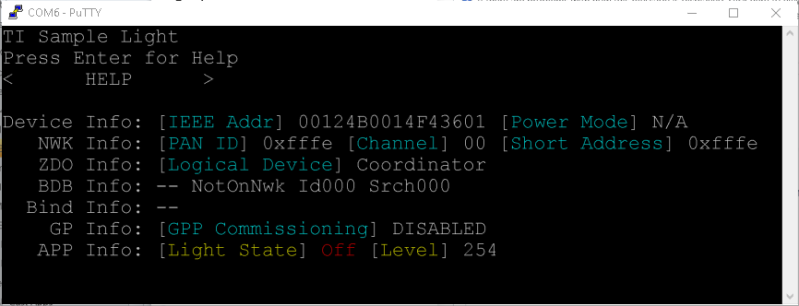
You may need to press the 'Reset' key on the LaunchPad at this point to get the UI to appear in PuTTY after your session is connected.
You can navigate through the User Interface using arrow keys and make selections using Enter. For more information about the User Interface, check the Zigbee Developer's Guide under the Common User Interface section.
Task 4: Setting up the Zigbee network and creating binds
Now it's time to form a simple Zigbee network with a Coordinator and one End Device.
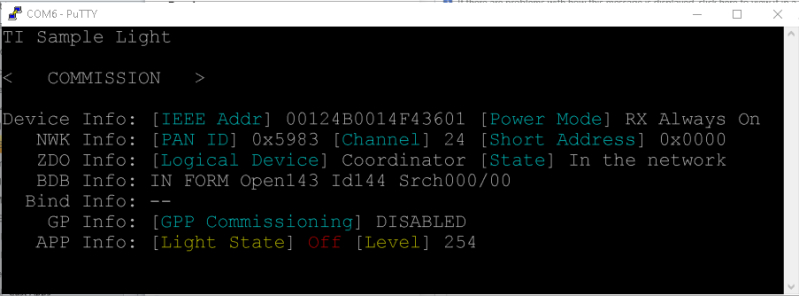
1. Form and open the network with the Coordinator
To do this action with the Sample Application UI, navigate to the < COMMISSION > screen using a serial terminal program of your choice and press Enter. Alternatively, pressing BTN-1 on your LaunchPad accomplishes the same function.
2. Join our newly created network with the End Device
Press BTN-1 on your LaunchPad SensorTag to join the new Zigbee Network
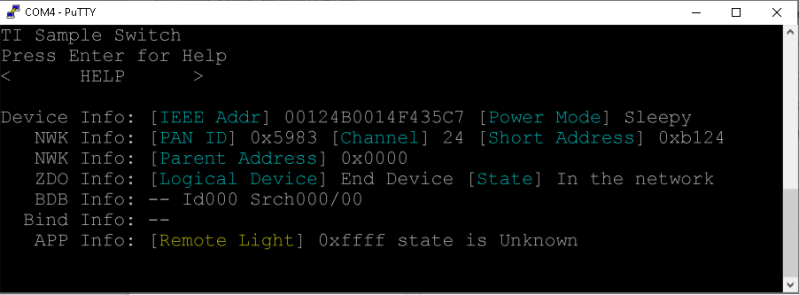
3. Check the network information screen of our Zigbee Coordinator
The common UI screen provides various information about our current network like the PAN ID, NWK address, and channel.
Task 5: Testing the Sample Application features
Now that we finally have the network set up, we can test out the sample application commands. In this particular case, we can toggle the Light on and off using the LaunchPad SensorTag Switch.
To toggle the light on and off, press BTN-2 on your LPSTK.
Task 6: Controlling the Zigbee Switch with DMM and Bluetooth Low Energy
We can also take advantage of DMM (Dynamic Multi-Protocol Manager) to control the Zigbee Switch from a mobile device.
Toggle Bluetooth "off" then "on" on your mobile device. Since we were previously connected to the LaunchPad SensorTag using the Out Of Box image, we need to clear the BLE settings that might be chached on your device
Open the SimpleLink Starter App and connect to "DMM ZED SWITCH RD"
- Note: Depending on your mobile device, the advertised name of the LaunchPad SensorTag might be displayed as "Multi-Sensor". This happens when the mobile device caches the name from the previous connection.
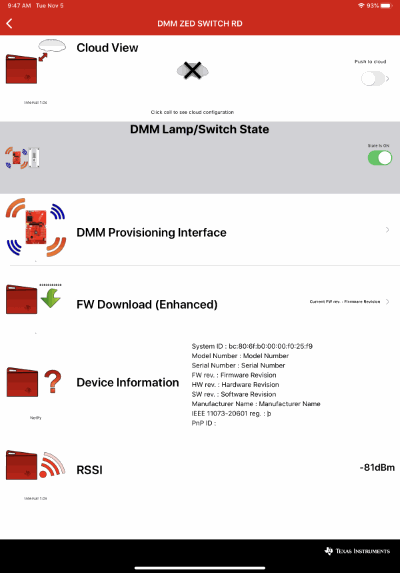
- Select "Sensor View"
- You should see a toggle switch called "DMM Lamp Switch State". Toggling this switch performs the same action as pressing BTN-2 on your LaunchPad SensorTag and toggled the Zigbee light.
- Note: If you want to do an OAD or use the mobile app for network provisioning, you may be asked for a BLE passcode. The passcode is 123456.
- Congratulations! You have sucessfully created a Zigbee network consisting of a Light Coordinator and a Switch End Device. You have also demonstrated DMM by connecting the ZED Switch and controlling the switch state via BLE.
Note
To perform a factory reset on either device, hold down the BTN-2 button on the LaunchPad while restarting the device (power cycle or pressing the reset button). This will erase all NV memory which contains network information such as binding tables, PanID, network keys, etc.
References
What's New in Zigbee 3.0: https://www.ti.com/lit/pdf/swra615
CC13X2/CC26X2 TRM: https://www.ti.com/lit/pdf/swcu185
Zigbee Alliance website: https://zigbee.org/
This work is licensed under a Creative Commons Attribution-NonCommercial-NoDerivatives 4.0 International License.