Introduction
This workshop offers a deeper dive in the basic_ble example project.
Together with basic_ble_oad and basic_ble_ptm, the basic_ble
is recommended as starting point for the development of your own system.
Prerequisites
Hardware
- SimpleLink™ CC2340RX LaunchPad™ Target
- SimpleLink™ Modular LaunchPad™ Emulator
- USB cable
- SmartPhone or Tablet with a GATT Table viewer application installed (such as TI SimpleLink Connect app)
Note
Here are links to the TI SimpleLink Connect app
TI SimpleLink Connect on Google App Store
Find the QR code to download the app below:

Software
- CCS version 12.3 and newer
- SIMPLELINK-LOWPOWER-F3-SDK SimpleLink™ Software Development Kit
Readings
- SDK User's Guide
Agenda
In this training, we will discuss how to get prepare the basic_ble example for custom development.
First, we will discuss how to set up the environment. Afterwards, we will cover how to add a driver example project's functionality into
the basic_ble project along with showing how to interface these tasks together. We will also learn how
to take control of the GATT table as well as the BLE5Stack within the basic_ble project.
Environment setup
The following section will go through how to get the development environment up and running. Download and Install the SDK found in the Software section above.
Follow the Quick Start Guide found inside the BLE5 Stack User Guide
PATH = C:\ti\simplelink_lowpower_f3_sdk_x_xx_xx_xx\docs\ble5stack\ble_user_guide\quickstart_guide.html

"Merge" drivers examples into basic_ble
Note
This lab guides you through "the scenic" route to complete this task. There are more direct ways to "merge" this, but you would not see elements that could be useful for future use
Prepare the environment
Import the
basic_bleproject example. File > Import > Code Composer Studio > CCS Projects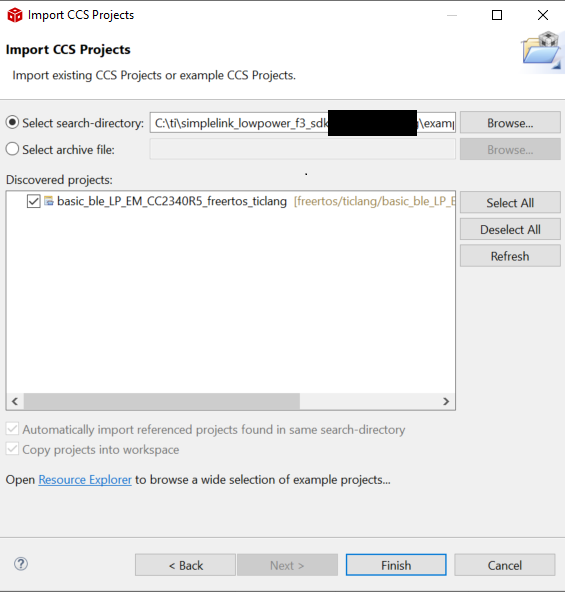
Browse to find the
basic_bleproject located at: C:\ti\simplelink_lowpower_f3_sdk_x_xx_xx_xx\examples\rtos\LP_EM_CC2340R5\ble5stack\basic_bleImport the
emptyproject example, making sure to select the same RTOS and Toolchain as for thebasic_bleproject example.The
emptyproject located at: C:\ti\simplelink_lowpower_f3_sdk_x_xx_xx_xx\examples\rtos\LP_EM_CC2340R5\drivers\emptyNote: All the code modifications will be done in the
basic_bleproject example.
Copy the
empty.cfileempty.cis available at the root of theemptyproject example
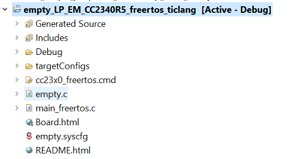
- Copy the file into the
basic_bleproject >app>empty.c

Copy the code used for task creation
- In order to keep the
main()function inmain_freertos.cclear, all task creations are deferred to other files. The same will be done for our new task. - In the newly created
empty.c(in thebasic_bleproject), add the functionemptyMain. This function can be placed at the end of the file. Copy-paste into this function the code used in the
emptyproject example to create the task. This code is located in the filemain_freertos.c. Don't forget to add all the includes, variable declarations and other global symbols to your file.- Make to ensure the Bluetooth® LE stack is always running with the highest priority. To do so, lower the priority assigned to the newly created function.
/* POSIX Header files */
 #include <pthread.h>

/* RTOS header files */
 #include <FreeRTOS.h>
 #include <task.h>

 /* Stack size in bytes */
 #define THREADSTACKSIZE 1024
Header Files and Defines
 void emptyMain(void)
 {
     pthread_t thread;
     pthread_attr_t attrs;
     struct sched_param priParam;
     int retc;

     /* Initialize the attributes structure with default values */
     pthread_attr_init(&attrs);

     /* Set priority, detach state, and stack size attributes */
     priParam.sched_priority = 5; // Lower the priority of this task
     retc = pthread_attr_setschedparam(&attrs, &priParam);
     retc |= pthread_attr_setdetachstate(&attrs, PTHREAD_CREATE_DETACHED);
     retc |= pthread_attr_setstacksize(&attrs, THREADSTACKSIZE);
     if (retc != 0)
     {
         /* failed to set attributes */
         while (1) {}
     }

     retc = pthread_create(&thread, &attrs, mainThread, NULL);
     if (retc != 0)
     {
         /* pthread_create() failed */
         while (1) {}
     }
 }
Code to add in
empty.cfile inside thebasic_bleproject. TheemptyMainfunction handles task creation.
- In order to keep the
Call the newly added code from the
main()function inmain_freertos.cmain_freertos.cis available at the root of thebasic_bleproject exampleDeclare the
emptyMainfunction as an extern function inmain_freertos.c/******************************************************************************* * EXTERNS */ extern void appMain(void); extern void AssertHandler(uint8 assertCause, uint8 assertSubcause); extern void emptyMain(void); // Add this!The
emptyMainfunction is declared as an extern functionCall the
emptyMainfunction right before turning on the RTOS/* Initialize all applications tasks */ appMain(); emptyMain(); // Add this! /* Start the FreeRTOS scheduler */ vTaskStartScheduler();emptyMain()is called right before turning on the RTOS
Port over the SysConfig configurations
- Open the file
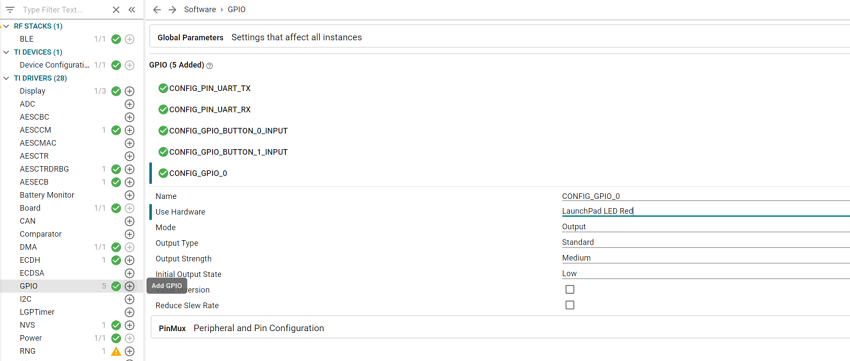
empty.syscfgfrom theemptyproject example - Identify the drivers not enabled in the
basic_bleproject
Here only one instance of the GPIO driver (
CONFIG_GPIO_LED_0) is missing in thebasic_bleproject.- Open the file
In case you do not manage to identify the missing symbols, you can trigger a build and review the linking errors
- Copy the missing configuration from
empty.syscfgtobasic_ble.syscfgin thebasic_bleproject.
Test your system
At this point you can build and flash the code on the device. If you need help for this, make sure to review Quick Start Guide!
*The Next section will go over on how to integrate a task with the BLE5Stack.
Interface with the BLE5Stack
This section presents methods for interfacing with the BLE5Stack. We will discuss using hook functions to signal other tasks of certain events occurring and and we will show how callbacks can be leveraged to make the device take certain actions.
First, we will be turning an LED off and on based on whenever the device is connected or disconnected.
- Create a new instance of a GPIO module (the same way it was done for the section above). Name it
CONFIG_GPIO_LED_1and use the Green LaunchpadLED Hardware.

- Open the
empty.cfile. We will create and define theBLEConnectionEstablishedandBLEConnectionTerminatedfunctions here. These functions may be placed at the end of theempty.cfile.
/*********************************************************************
 * @fn      BLEConnectionEstablished
 *
 * @brief   Called when a Bluetooth connection has been established
 *          with a peer device.
 *
 * @param   None
 *
 * @return  None.
 */
void BLEConnectionEstablished(void)
{
    // Indicate connection by turning on the green LED
    GPIO_write(CONFIG_GPIO_LED_1, CONFIG_LED_ON);
}
/*********************************************************************
 * @fn      BLEConnectionTerminated
 *
 * @brief   Called when the Bluetooth connection has been terminated.
 *
 * @param   None
 *
 * @return  None.
 */
void BLEConnectionTerminated(void)
{
    // Indicate disconnection by turning off the LED
    GPIO_write(CONFIG_GPIO_LED_1, CONFIG_LED_OFF);
}
Copy these functions into empty.c
Open the
app_peripheral.cfile inside the app folder of thebasic_bleproject.Add the following extern function declarations to give the
app_peripheral.cfile access to the newly created functions. The extern function declarations should be added near the top of the file, after the#includestatements.
extern void BLEConnectionEstablished();
extern void BLEConnectionTerminated();
Example of Extern Function
- Call these functions in the
Peripheral_GAPConnEventHandler(this handler takes care of the Bluetooth LE connection events)
/*********************************************************************
 * @fn      Peripheral_GAPConnEventHandler
 *
 * @brief   The purpose of this function is to handle connection related
 *          events that rise from the GAP and were registered in
 *          @ref BLEAppUtil_registerEventHandler
 *
 * @param   event - message event.
 * @param   pMsgData - pointer to message data.
 *
 * @return  none
 */
void Peripheral_GAPConnEventHandler(uint32 event, BLEAppUtil_msgHdr_t *pMsgData)
{
    switch(event)
    {
        case BLEAPPUTIL_LINK_ESTABLISHED_EVENT:
        {
            BLEConnectionEstablished(); //Add this line!
            /* Check if we reach the maximum allowed number of connections */
            if(linkDB_NumActive() < linkDB_NumConns())
            {
                /* Start advertising since there is room for more connections */
                BLEAppUtil_advStart(peripheralAdvHandle_1, &advSetStartParamsSet_1);
            }
            else
            {
                /* Stop advertising since there is no room for more connections */
                BLEAppUtil_advStop(peripheralAdvHandle_1);
            }
            break;
        }

        case BLEAPPUTIL_LINK_TERMINATED_EVENT:
        {
            BLEConnectionTerminated(); //Add this line!
            BLEAppUtil_advStart(peripheralAdvHandle_1, &advSetStartParamsSet_1);
            break;
        }

        default:
        {
            break;
        }
    }
}
Functions added to the Perihperal_GAPConnEventHandler
The BLEConnectionEstablished() and BLEConnectionTerminated() functions act as "hook" functions.
The establishment of a Bluetooth LE connection is signaled by the reception of a BLEAPPUTIL_LINK_ESTABLISHED_EVENT event.
The termination of a Bluetooth LE connection is signaled by the reception of a BLEAPPUTIL_LINK_TERMINATED_EVENT event.
BLEConnectionEstablished() and BLEConnectionTerminated() are then executed respectively when a connection is established
(BLEAPPUTIL_LINK_ESTABLISHED_EVENT) and terminated (BLEAPPUTIL_LINK_TERMINATED_EVENT).
Another method to interface with the BLE5Stack is via profile callbacks. In this case, we can use the SimpleGatt_changeCB()
callback function to detect when a value as a value change handler and is present in the app_simple_gatt.c file. This means that whenever
an attribute is changed in the profile, this function is notified. Let's add some functionality to the SimpleGatt_changeCB()
which turns on and off an LED based on the value present in Characteristic 1 of the Simple Profile.
First, we need to make a small change to the mainThread() function found in the empty.c file. We need to comment out the LED
toggling within the while loop. We will do this so we can reuse the LED for the value change functionality. Modify the code as follows:
/*
 *  ======== mainThread ========
 */
void *mainThread(void *arg0)
{
    /* 1 second delay */
    uint32_t time = 1;

    /* Call driver init functions */
    GPIO_init();
    // I2C_init();
    // SPI_init();
    // Watchdog_init();

    /* Configure the LED pin */
    GPIO_setConfig(CONFIG_GPIO_LED_0, GPIO_CFG_OUT_STD | GPIO_CFG_OUT_LOW);

    /* Turn on user LED */
    GPIO_write(CONFIG_GPIO_LED_0, CONFIG_GPIO_LED_ON);

    while (1)
    {
        sleep(time);
    }
}
Modification necessary in empty.c
Now we must create a new function in empty.c which will determine if the LED should be turned off or on
based on the new characteristic value and then proceed to do so. The function will be named evaluateNewCharacteristicValue()
and should be placed at the end of the empty.c file. The function body may be found below:
/*********************************************************************
 * @fn      evaluateNewCharacteristicValue
 *
 * @brief   Based on the new value of a given characteristic determine
 *          if the LED should be turned off or on.
 *
 * @param   newValue: Value of the characteristic to consider
 *
 * @return  None.
 */
void evaluateNewCharacteristicValue(uint8_t newValue)
{
    // If the new value of the characteristic is 0, then we turn off the red LED
    if(newValue == 0)
    {
        GPIO_write(CONFIG_GPIO_LED_0, CONFIG_LED_OFF);
    }
    else
    {
        GPIO_write(CONFIG_GPIO_LED_0, CONFIG_LED_ON);
    }
}
Copy this function to the end of the empty.c file
We will now navigate towards the app_simple_gatt.c file that was previously mentioned. First, we should add
an extern function declaration to allow the app_simple_gatt.c access to the evaluateNewCharacteristicValue()
function. The extern declaration is shown below and should be placed near the top of app_simple_gatt.c after the #include
statements.
extern void evaluateNewCharacteristicValue(uint8_t);
Extern required in app_simple_gatt.c
The evaluateNewCharacteristicValue() function should be called inside the SIMPLEGATTPROFILE_CHAR1 case located
inside of the SimpleGatt_changeCB() function. The call must be made after the SimpleGattProfile_GetParameter()
call and should be passed the newValue variable as a parameter. The function should look as follows:
static void SimpleGatt_changeCB( uint8_t paramId )
{
  uint8_t newValue = 0;

  switch( paramId )
  {
    case SIMPLEGATTPROFILE_CHAR1:
      {
        SimpleGattProfile_getParameter( SIMPLEGATTPROFILE_CHAR1, &newValue );

        // Print the new value of char 1
        MenuModule_printf(APP_MENU_PROFILE_STATUS_LINE, 0, "Profile status: Simple profile - "
                          "Char 1 value = " MENU_MODULE_COLOR_YELLOW "%d " MENU_MODULE_COLOR_RESET,
                          newValue);

        evaluateNewCharacteristicValue(newValue); // Add this line!
      }
      break;
    default:
      // should not reach here!
      break;
  }
}
Included evaluateNewCharacteristicValue(newValue) to Characteristic Callback
The function call is able to take data from the BLE5Stack, in this case the new value of Characteristic 1,
and pass it to the empty.c file during runtime. This allows the empty.c to make decisions based on
BLE5 activity, even if it does not have direct access to the BLE5Stack.
Test your system
At this point you can build and flash the code on the device.
To test your code, a central device must connect to the BLE Basic board. An easy way to do this is by using a Smartphone or Tablet device with a GATT Table viewer application. In this example we will be using the TI SimpleLink Connect application.
With this application, one should be able to scan and connect to the BLE Basic device as well as interact with the characteristics present in the BLE Basic project.
The following steps will showcase how to connect and change the value of Characteristic 1 by using the application.
Scan and locate the
Basic BLE projectdevice.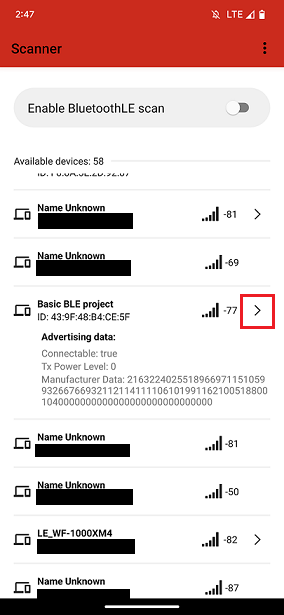
Connect to the
Basic BLE projectdevice by tapping on it. The GATT table should now be visible. At this point, the red LED on the LP-EM-CC2340R5 should turn on.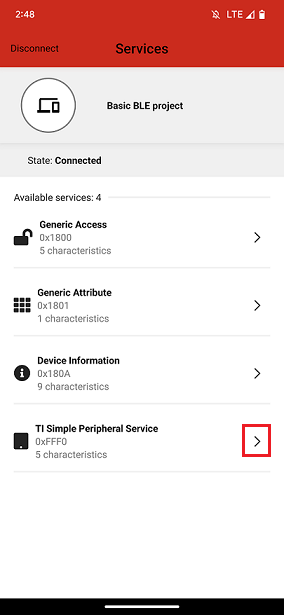
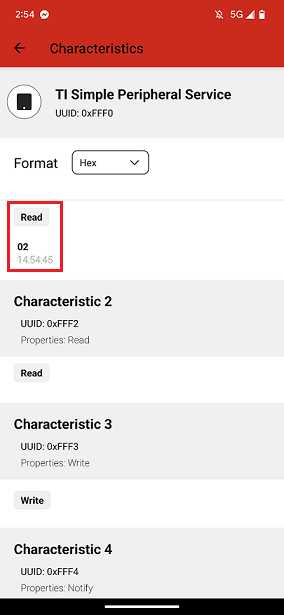
Expand the "TI Simple Peripheral Service" tab, this tab contains the
Simple Profileservice and can be identified by the UUID ofFFF0which is visible in the hex string underneath the "TI Simple Peripheral Service" text.
Characteristic 1 in the "Simple Profile" service can be identified by its UUID of
0xFFF1which can be seen in the first characteristic. To write a value to this characteristic, press the "Write" button. In this case, we want to write a hex value, so we can write 00 for 0x00 and 01 for 0x01 as shown in the images below. For this example, lets write 01 for 0x01.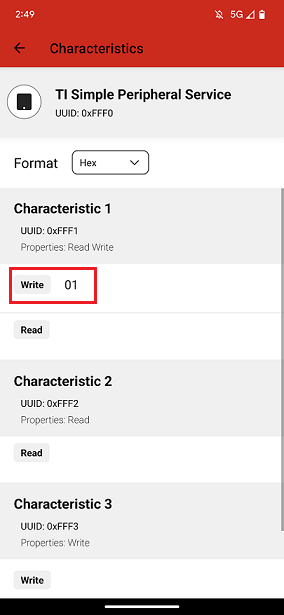
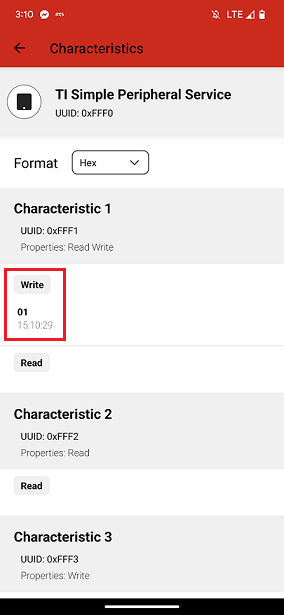
- At this point, the written characteristic can be seen in the 0xFFF1 characteristic and the Red LED
should have turned on.
Take control over Advertising
One is also able to configure the settings such as the device name, address mode, maximum number of connections, bonding, advertising parameters, connection parameters, advertising data, scanning parameters, among others.
Advertising Parameters
The following table summarizes the parameters that can be configured for advertising.
| Advertising Parameter | Description |
|---|---|
| Advertising Interval | Time between the start of two consecutive advertising events |
| Advertising Types | Different PDUs are sent for different types of advertising |
| Advertising Channels | Legacy advertising packets are sent on three channels |
Advertising Task – Change Advertising Parameters with SysConfig
Settings related to advertising are found in the Broadcaster Configuration section of the BLE configuration SysConfig tab, under RF STACKS.
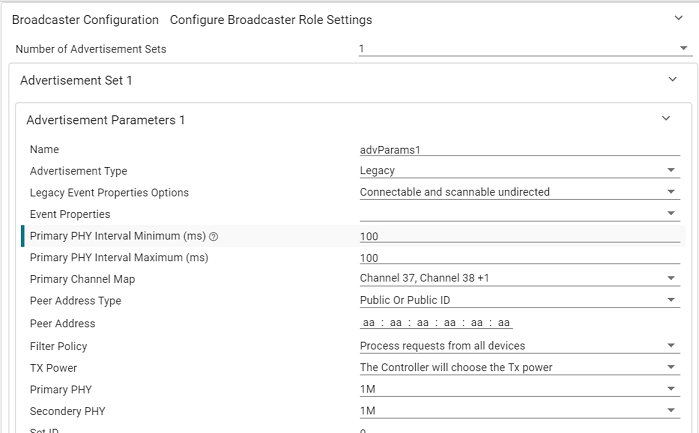
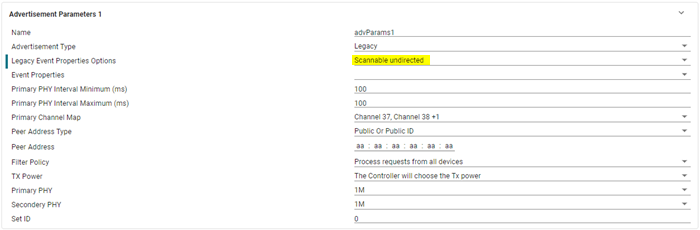
In some cases we want to save power. One way to do this is by increasing the advertisement interval (advertise less frequently), and just advertise on one channel. In this task, we will configure the device to advertise on one channel every 500 ms using the basic_ble project. Per default, the basic_ble project advertises with two different advertisement sets. The default values of the advertising set 1 are shown below:
You can read more about these values in
gap_advertiser.hIn order to change the advertising interval, simply change the value for
Primary PHY Interval MinimumandPrimary PHY Interval Maximum. In this case we will set them to 500 (ms).If you press the
Show Generated Filesbutton in the upper right corner of SysConfig and openti_ble_config.c, you will see that theprimIntMin,primIntMaxandprimChanMapvalues of theGapAdv_params_t advParams1struct have changed:// Advertisement Params 1 GapAdv_params_t advParams1 = { .eventProps = GAP_ADV_PROP_CONNECTABLE | GAP_ADV_PROP_LEGACY | GAP_ADV_PROP_SCANNABLE, .primIntMin = 800, .primIntMax = 800, .primChanMap = GAP_ADV_CHAN_37, .peerAddrType = PEER_ADDRTYPE_PUBLIC_OR_PUBLIC_ID, .peerAddr = { 0xaa, 0xaa, 0xaa, 0xaa, 0xaa, 0xaa }, .filterPolicy = GAP_ADV_WL_POLICY_ANY_REQ, .txPower = GAP_ADV_TX_POWER_NO_PREFERENCE, .primPhy = GAP_ADV_PRIM_PHY_1_MBPS, .secPhy = GAP_ADV_SEC_PHY_1_MBPS, .sid = 0 };ti_ble_config.c :: advParams1 – Generated code for Advertisement Set 1 configuration.
Take control over the GATT Table
The GATT Table is a very important part of a Bluetooth LE peripheral. The attributes stored in the GATT table can be written or read and are one of the primary ways that Bluetooth LE devices communicate with one another. To learn more about the GATT Table, please reference the GATT chapter of the User's Guide.
Default SDK Path: C:\ti\simplelink_lowpower_f3_sdk_x_xx_xx_xx\docs\ble5stack\ble_user_guide
In this section, we will discuss a few ways one can interact with the GATT table and how custom functionality can be added that interacts with the GATT Table or is controlled by the GATT table.
GATT Task – Increment and Decrement Attribute in the GATT Table
In this task we will use the Launchpad GPIOs to increment or decrement a value on the GATT Table which can be read using a GATT Table viewer application.
The first step is to add the GPIOs in the
basic_ble.syscfg. Set to any availabe Header Pin on Launchpad.
In the
empty.c fileinclude the following code into the mainThread which has the GPIO configurations and callbacks/* * ======== mainThread ======== */ void *mainThread(void *arg0) { /* 1 second delay */ uint32_t time = 1; /* Call driver init functions */ GPIO_init(); // I2C_init(); // SPI_init(); // Watchdog_init(); /* Configure the LED pin */ GPIO_setConfig(CONFIG_GPIO_LED_0, GPIO_CFG_OUT_STD | GPIO_CFG_OUT_LOW); GPIO_setConfig(CONFIG_GPIO_Increment, GPIO_CFG_IN_PU | GPIO_CFG_IN_INT_FALLING); //Add this Line! GPIO_setConfig(CONFIG_GPIO_Decrement, GPIO_CFG_IN_PU | GPIO_CFG_IN_INT_FALLING); //Add this Line! /* Turn on user LED */ GPIO_write(CONFIG_GPIO_LED_0, CONFIG_GPIO_LED_ON); /* Install Button callback */ GPIO_setCallback(CONFIG_GPIO_ButtonIncrement, IncrementGatt); //Add this Line! GPIO_setCallback(CONFIG_GPIO_ButtonDecrement, DecrementGatt); //Add this Line! /* Enable interrupts */ GPIO_enableInt(CONFIG_GPIO_Increment); //Add this Line! GPIO_enableInt(CONFIG_GPIO_Decrement); //Add this Line! while (1) { sleep(time); GPIO_toggle(CONFIG_GPIO_LED_0); } }**empty.c : GPIO Configurations
Next we must also add the IncrementGatt and DecrementGatt extern functions in
empty.cextern void IncrementGatt(); extern void DecrementGatt();Extern GPIOCallback functions: Add them before mainThread()
We will need to define these GPIO callbacks in the
app_simple_gatt.cfile located inside the app folder. Include the function definition at the end of the file.void IncrementGatt() { Count++; SimpleGattProfile_setParameter(SIMPLEGATTPROFILE_CHAR1, sizeof(uint8_t), &Count); } void DecrementGatt() { if(Count > 0){ Count--; } SimpleGattProfile_setParameter(SIMPLEGATTPROFILE_CHAR1, sizeof(uint8_t), &Count); }GPIO Callbacks: place in app_simple_gatt.c
Using the function SimpleGattProfile_setParameter we are able to update the value and either increment or decrement depending on which GPIO is toggled. Remember to make the variable
Countglobal by defining it at the begining of this file outside any function.
Test your system
At this point you can build and flash the code on the device.
Verifying using GATT Table Viewer Application (TI SimpleLink connect)
Find the device and connect to it on BLE Scanner as done before.
Once Connected open the custom characteristic section. We will be focusing on the first custom characteristic. Press the Read button in order to read the value of the characteristic. It will look like below.
Next Increment the characteristic by toggling the Increment GPIO. On the phone app Press the Read again to read the new updated Hex Value.
Congratulations!
You have completed this lab 🏆 Keep reading for a few Bonus...
[BONUS] Implement a Bluetooth® LE Beacon
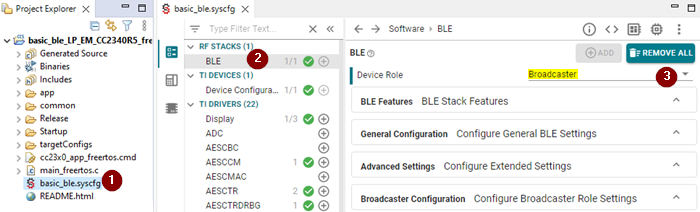
Change the configuration of the BLEStack to Broadcaster using SysConfig
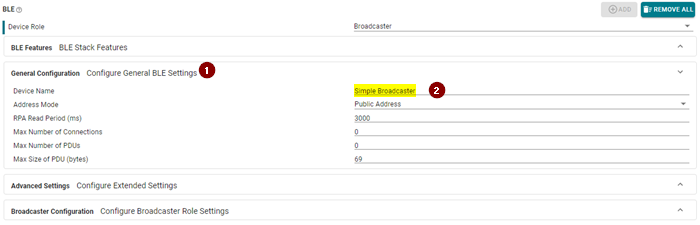
In General Configuration, set-up the name of the beacon
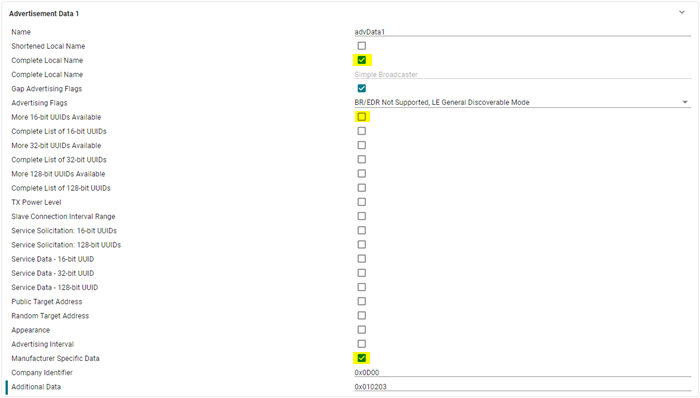
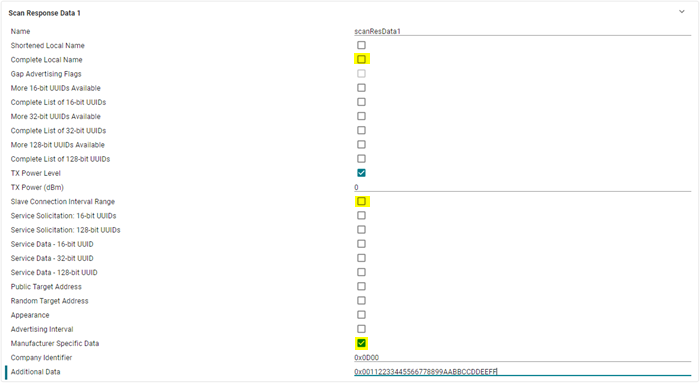
In Broadcaster, set-up the Advertisement Parameters, Advertisement Data and Scan Response Data.
Here are the settings you can use:
Implement the usage of the scan-response in the embedded code.
- In the
basic_bleproject, open the fileapp>app_broadcaster - Find the struct
broadcasterInitAdvSet1 Update the parameters
scanRespDataLenandscanResData1const BLEAppUtil_AdvInit_t broadcasterInitAdvSet1 = { /* Advertise data and length */ .advDataLen = sizeof(advData1), .advData = advData1, /* Scan respond data and length */ .scanRespDataLen = sizeof(scanResData1), .scanRespData = scanResData1, .advParam = &advParams1 };broadcasterInitAdvSet1is used to initialize the advertising set
- In the
You're done
At this point you can build and flash the code on the device.
[BONUS] Migrating from projects from Simple Framework to Basic BLE
Examples based on the Simple Framework (simple_peripheral, simple_central, multi_role) can be migrated to the
basic BLE examples. This section will detail how to migrate from simple_peripheral to basic_ble.
Transfer BLE profiles from the
simple_peripheralproject to thebasic_bleproject.- In the
simple_peripheralproject, the profiles may be found at the following directory:{PROJECT_LOC}/Profiles - In the
basic_bleproject, the profiles may be found at the following directory:{PROJECT_LOC}/common/Profiles - Make sure that any
#includestatements that reference thesimple_peripheraldirectory structure are updated to use thebasic_bledirectory structure if needed.
- In the
Transfer SysConfig settings
- Select the desired BLE role. In the case of
simple_peripheral, select "Peripheral" - Select desired BLE parameters.
- Add any necessary SysConfig modules (UART, SPI, I2C, etc.)
- Remove any unneeded SysConfig modules.
- Select the desired BLE role. In the case of
Remove any unnecessary application files within the "app" folder
- For example, if your application will only implement the observer role, then the
app_broadcaster.c,app_central,app_data,app_pairing, andapp_peripheralmay be removed. These additional files implement functionality that may not be useful in an observer-only application. - In the case of the
simple_peripheralexample, only theapp_broadcaster.c,app_central, andapp_observershould be removed to if only the ``simple_peripheral functionality is desired.
- For example, if your application will only implement the observer role, then the
Transfer custom application code to the basic BLE project.
- Almost all of the application code present in the
simple_peripheralproject was located in thesimple_peripheral.cfile. In thebasic_bleproject, a lot of potentially unnecessary code is removed entirely and the remaining code is placed in modular files that can be expanded or minimized as needed. - The functionality of the custom code as well as the location of the custom code in the
simple_peripheralproject will determine the best location in thebasic_bleproject to transfer the code to.- For example, any custom code added to the pairing process should likely be added to
app_pairing.cfile - Any custom code that deals with peripheral specific functionality such as advertising or connecting should likely
be added to the
app_peripheral.cfile. - Any code that is not directly related to the BLE5Stack operation can be placed in its own file within the
apporcommonfolders.
- For example, any custom code added to the pairing process should likely be added to
- Highly customized code may require a bit more effort to migrate, but should be relatively straight forward to do so.
- Almost all of the application code present in the
Additional details to consider
- The
basic_bleproject may be configured to act a peripheral, central, broadcaster, observer, or multirole device. This means that thebasic_bleproject can implement any and all functionality that thesimple_peripheral,simple_central, andmulti_roleprojects can implement. - As mentioned previously, any files that are not used for a given application may be safely removed from the project.
- Custom profile files should require little to no migration effort.
- Most of the migration effort will likely consist of migrating custom code.
- The
This work is licensed under a Creative Commons Attribution-NonCommercial-NoDerivatives 4.0 International License.