Introduction
This lab demonstrates the SimpleLink™ Wi-Fi® MQTT library, which enables you to set up a MQTT Client and connect to a cloud MQTT broker. This lab also shows how to start with an empty CC32xx project and add SimpleLink Wi-Fi and MQTT functionality. These steps can be used as an introduction to integrating any custom application.
This workshop will provide a brief overview of the MQTT protocol and then walk through some fundamental MQTT demos:
- Add MQTT to an empty project
- Configuring a MQTT Client Demo
- Configuring a MQTT Client Demo with secure connection
Prerequisites
Software
- Code Composer Studio v10.3 or newer
- SimpleLink Wi-Fi CC32xx Wireless MCUs support installed
- Make sure that CCS is using the latest updates: Help → Check for Updates
- CC32xx SDK v5.20 or newer
- Terminal emulator program such as TeraTerm or PuTTY
- MQTT client application on an internet-connected smartphone/computer (e.g. MyMQTT for Android, ICPDAS MQTT for iOS)
Hardware
- 1 CC32xx LaunchPad
- CC3235S LaunchPad (LAUNCHXL-CC3235S)
- CC3235SF LaunchPad (LAUNCHXL-CC3235SF)
- CC3220S LaunchPad (CC3220S-LAUNCHXL)
- CC3220SF LaunchPad (CC3220SF-LAUNCHXL)
- 1 Micro-USB cable (included with LaunchPad)
- 802.11b/g/n Wireless Access Point (AP)
MQTT Overview
MQTT Protocol
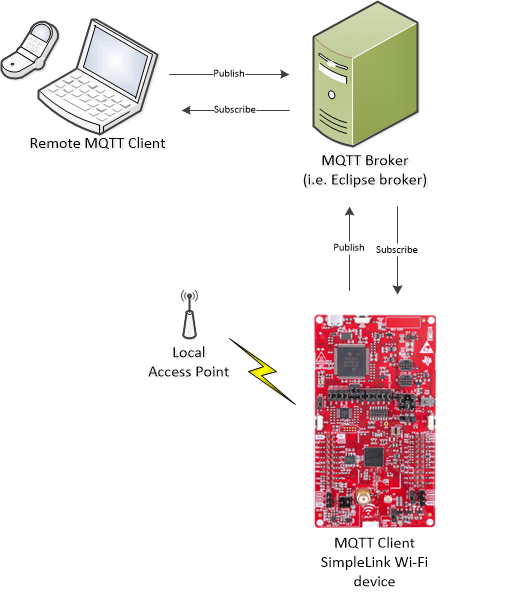
MQTT (Message Queue Telemetry Transport) protocol is a light-weight machine-to-machine connectivity protocol. It is based on a publish/subscribe messaging model and is designed to be used on the top of TCP/IP protocol. Key benefits of this protocol include small code footprint and a low network bandwidth requirement. Other features include faster response time, low power requirement, and ease of scalability. All of these advantages make it an ideal candidate for a communication protocol in embedded devices intended to implement IOT (Internet of Things) applications.
A Simple MQTT infrastructure contains a broker (like a central hub) connected to multiple clients, each of which has the capability of publishing on any topic (token). The broker has the responsibility of sending the message published on any topic to all the subscribers of that topic. A typical MQTT network has many more features and configuration parameters.
SimpleLink MQTT Client Library
The MQTT library abstracts the underlying intricacies of a MQTT network and provides the user application with an API to implement the MQTT protocol on the CC32xx device. Separate modules and APIs are used for the MQTT Server and the MQTT Client functionality.
The MQTT Client Library APIs includes:
- Create (or delete) a client instance
- Connect to an MQTT server (based on URL or IP Address)
- Subscribe (or unsubscribe) to a topic
- Publish a topic and a message
- Run the client main task loop
The source for the MQTT library can be found under simplelink_cc32xx_sdk_x_xx_xx_xx\source\ti\net\mqtt
SimpleLink MQTT Client Module
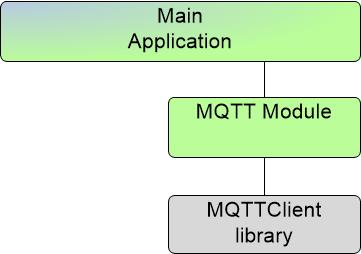
To make it as easy as possible for the user to use an MQTT client on Simplelink Wi-Fi, there is an MQTT client interface module that abstracts the SimpleLink MQTT library requirements to the user. This interface simplifies the development of applications that use an MQTT client and make it easier to integrate to other applications. The module has a simple and well documented API that is defined in the mqtt_if.h and mqtt_if.c files.
The MQTT Client Module APIs includes:
MQTT_IF_initcreates the infrastructure of the moduleMQTT_IF_deinitdestroys the resources created by MQTT_IF_initMQTT_IF_connectsets the client parameters and connects to brokerMQTT_IF_disconnectwill instruct the library to close the connectionMQTT_IF_subscribeto subscribe to topics and register topic callbacksMQTT_IF_unsubscribeto unsubscribe from a topicMQTT_IF_publishto publish a payload to a specific topic
To learn more, refer to the mqtt_if.h and mqtt_if.c files in the mqtt_client example.
Adding a MQTT Client to a Project
This section will demonstrate the steps to add the MQTT client library and MQTT client module to any CC32xx project. We will start from an empty driver example, but these steps are a general guideline that could apply to any custom application. This lab will demonstrate the CC3235SF TI-RTOS CCS example: empty_CC3235SF_LAUNCHXL_tirtos_ccs.
Do you want to get started with the default mqtt_client example instead?
Use the menu on the right to jump to the next section: Configuring the Client Demo
Task 1: Import and configure the Empty project
In CCS, go to the menu Project → Import CCS Projects, navigate to your SimpleLink CC32xx SDK installation, and import the
emptyexample from your LaunchPad's drivers folder:simplelink_cc32xx_sdk_x_xx_xx_xx\examples\rtos\CC3235SF_LAUNCHXL\drivers\emptyWhat is the Empty project?
We will be using this CC32xx project as a development starting point. This is a baseline project in the drivers folder that creates a thread and toggles a GPIO. Note that this project does not contain source or libraries for any connected technology. The next steps will show you what libraries and directories must to be linked to enable general Simplelink Wi-Fi features and the MQTT client library.
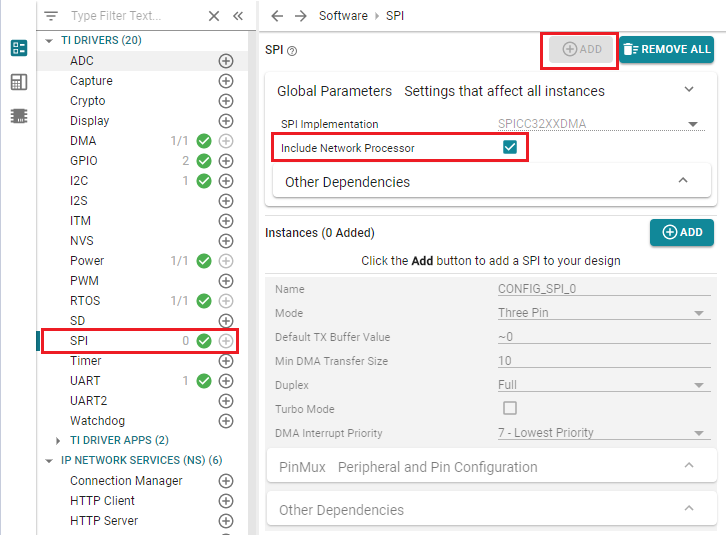
Open
empty.syscfg. We need to add a SPI instance in SysConfig for the host driver to communicate between the application MCU and the network processor. Select the SPI driver from the left-hand menu and press Add.You will notice that we still have zero external SPI instances, but we have added global parameters and Include Network Processor. This is the internal SPI peripheral handled by the CC32xx host driver. You do not need to do anything further.
Why is there an internal SPI instance?
Check out the Device Overview in the CC3220 or CC3235 Out of Box Experience!
Next, we will link the libraries needed to add Wi-Fi functionality. We can do that by adding two software modules within SysConfig: SimpleLink Wi-Fi General and Network Services SlNetSock. Select the SlNet library from the "IP Network Services" dropdown from the left-hand menu and press Add. Then, select the General library from the "SimpleLink WiFi" dropdown from the left-hand menu and press Add
If you take a look at the SysConfig generated files preview (by selecting the icon in the top-right menu), you will see the following SDK libraries were added to the generated
.genlibsfile:- SimpleLink Wi-Fi Host Driver: host driver library for communication between application MCU and network processor (NWP)
- Network Interface (SlNetIf) Library: handles the Wi-Fi socket stack
Network Socket (SlNetSock) Library: SlNetSock provides a standard BSD API for TCP and UDP transport layers and a lower-level SlNetSock API for basic and extended usage on Wi-Fi and Ethernet

What is SysConfig? What is the Genlibs file?
To learn more about the SysConfig and its features, see the SysConfig Tool Basics lab.
- SimpleLink Wi-Fi Host Driver: host driver library for communication between application MCU and network processor (NWP)
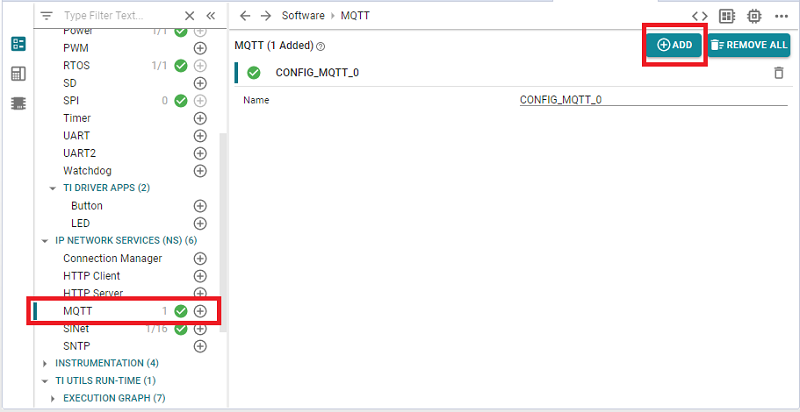
- Next, add in the MQTT. Select the MQTT library from the "IP Network Services" dropdown dropdown from the left-hand menu and press Add.
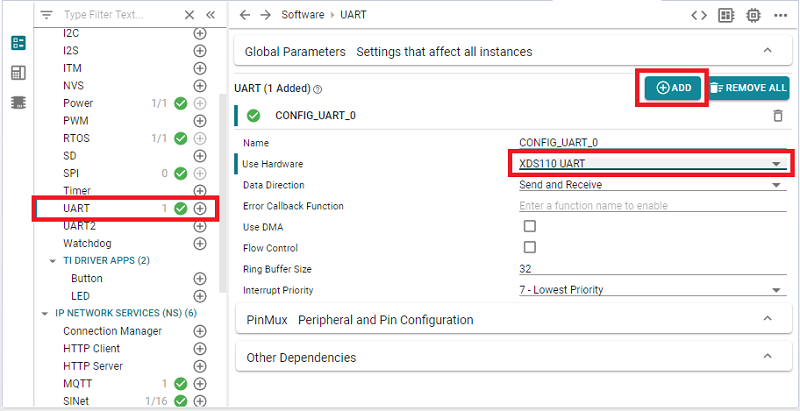
Finally, select UART under the TI Drivers tab, then Add to add a UART instance to the project. In this new UART instance, go to the Use Hardware drop-down menu and select XDS110 UART.
What are we doing with the UART?
SysConfig generates the configuration source for the UART driver, so we can use it later to print logs to a serial terminal. To learn more about the SysConfig tool, see the SysConfig Tool Basics lab.
Task 2: Add MQTT client module application code
To easily add MQTT functionality to our project, we will need some helper files from the
mqtt_clientSDK example. Navigate to your Simplelink CC32xx SDK installation and find themqtt_clientexample in the demos folder:simplelink_cc32xx_sdk_x_xx_xx_xx\examples\rtos\CC3235SF_LAUNCHXL\demos\mqtt_clientFrom the
mqtt_clientexample directory, copy and paste these source files to youremptyproject:mqtt_if.hmqtt_if.cnetwork_if.hnetwork_if.cuart_term.huart_term.cdebug_if.hmqtt_if: MQTT client module application code
network_if: contains default SimpleLink host driver callbacks and helpful networking functions such as connecting to an AP
uart_term: easily use the UART to print logs to a serial terminal
debug_if: wrapper for print statements that make it easy to port to examples that may use either Display drivers or UART drivers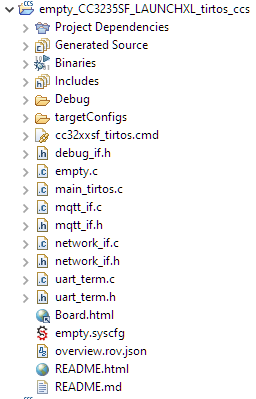
Add the following includes to the top of
empty.c. Thepthreadinclude is to create a context thread for the host driver. This allows the use of SimpleLink APIs. Thesimplelinkinclude is for the host driver andslnetifwifiinclude is required for the use of sockets for MQTT. TheSPIinclude is to communicate with the NWP.#include <unistd.h> #include <stdint.h> #include <stddef.h> #include <stdlib.h> #include <pthread.h> #include <ti/drivers/net/wifi/simplelink.h> /* TI Driver Includes */ #include <ti/drivers/GPIO.h> #include <ti/drivers/SPI.h> /* Application Headers */ #include "network_if.h" #include "mqtt_if.h" #include "debug_if.h" /* Driver configuration */ #include "ti_drivers_config.h"empty.c - Include files
Add the following defines to the top of
empty.c. These definitions are used to configure the MQTT client module and select the MQTT broker.#define MQTT_MODULE_TASK_PRIORITY 2 #define MQTT_MODULE_TASK_STACK_SIZE 2048 #define MQTT_WILL_TOPIC "cc32xx_will_topic" #define MQTT_WILL_MSG "will_msg_works" #define MQTT_WILL_QOS MQTT_QOS_2 #define MQTT_WILL_RETAIN false #define MQTT_CLIENT_PASSWORD NULL #define MQTT_CLIENT_USERNAME NULL #define MQTT_CLIENT_KEEPALIVE 0 #define MQTT_CLIENT_CLEAN_CONNECT true #define MQTT_CLIENT_MQTT_V3_1 true #define MQTT_CLIENT_BLOCKING_SEND true #define MQTT_CONNECTION_FLAGS MQTTCLIENT_NETCONN_URL #define MQTT_CONNECTION_ADDRESS "test.mosquitto.org" #define MQTT_CONNECTION_PORT_NUMBER 1883empty.c - MQTT defines
Add the global variables for the MQTT client module into
empty.c, below the definitions from the previous step. Many of the MQTT client structures use the definitions from the previous step.char ClientId[13] = {'\0'}; MQTT_IF_InitParams_t mqttInitParams = { MQTT_MODULE_TASK_STACK_SIZE, // stack size for mqtt module MQTT_MODULE_TASK_PRIORITY // thread priority for MQTT }; MQTTClient_Will mqttWillParams = { MQTT_WILL_TOPIC, // will topic MQTT_WILL_MSG, // will message MQTT_WILL_QOS, // will QoS MQTT_WILL_RETAIN // retain flag }; MQTT_IF_ClientParams_t mqttClientParams = { ClientId, // client ID MQTT_CLIENT_USERNAME, // user name MQTT_CLIENT_PASSWORD, // password MQTT_CLIENT_KEEPALIVE, // keep-alive time MQTT_CLIENT_CLEAN_CONNECT, // clean connect flag MQTT_CLIENT_MQTT_V3_1, // true = 3.1, false = 3.1.1 MQTT_CLIENT_BLOCKING_SEND, // blocking send flag &mqttWillParams // will parameters }; MQTTClient_ConnParams mqttConnParams = { MQTT_CONNECTION_FLAGS, // connection flags MQTT_CONNECTION_ADDRESS, // server address MQTT_CONNECTION_PORT_NUMBER, // port number of MQTT server 0, // method for secure socket 0, // cipher for secure socket 0, // number of files for secure connection NULL // secure files };empty.c - MQTT global variables
Add the
SetClientIdNamefromMacAddress()function toempty.c. This function retreives the device's MAC address from the network processor and assigns the last 6 hexadecimals of this address to theClientIDarray.Each MQTT client must register a unique Client ID that will not conflict with other active MQTT client/broker sessions. This is especially important when testing the demo on a public server.
 int32_t SetClientIdNamefromMacAddress()
 {
     int32_t ret = 0;
     uint8_t Client_Mac_Name[2];
     uint8_t Index;
     uint16_t macAddressLen = SL_MAC_ADDR_LEN;
     uint8_t macAddress[SL_MAC_ADDR_LEN];

     /*Get the device Mac address */
     ret = sl_NetCfgGet(SL_NETCFG_MAC_ADDRESS_GET, 0, &macAddressLen,
                        &macAddress[0]);

     /*When ClientID isn't set, use the mac address as ClientID               */
     if(ClientId[0] == '\0')
     {
         /*6 bytes is the length of the mac address                           */
         for(Index = 0; Index < SL_MAC_ADDR_LEN; Index++)
         {
             /*Each mac address byte contains two hexadecimal characters      */
             /*Copy the 4 MSB - the most significant character                */
             Client_Mac_Name[0] = (macAddress[Index] >> 4) & 0xf;
             /*Copy the 4 LSB - the least significant character               */
             Client_Mac_Name[1] = macAddress[Index] & 0xf;

             if(Client_Mac_Name[0] > 9)
             {
                 /*Converts and copies from number that is greater than 9 in  */
                 /*hexadecimal representation (a to f) into ascii character   */
                 ClientId[2 * Index] = Client_Mac_Name[0] + 'a' - 10;
             }
             else
             {
                 /*Converts and copies from number 0 - 9 in hexadecimal       */
                 /*representation into ascii character                        */
                 ClientId[2 * Index] = Client_Mac_Name[0] + '0';
             }
             if(Client_Mac_Name[1] > 9)
             {
                 /*Converts and copies from number that is greater than 9 in  */
                 /*hexadecimal representation (a to f) into ascii character   */
                 ClientId[2 * Index + 1] = Client_Mac_Name[1] + 'a' - 10;
             }
             else
             {
                 /*Converts and copies from number 0 - 9 in hexadecimal       */
                 /*representation into ascii character                        */
                 ClientId[2 * Index + 1] = Client_Mac_Name[1] + '0';
             }
         }
     }
     return(ret);
 }
empty.c :: SetClientIdNamefromMacAddress()
Now we are going to add an MQTT callback handler. When calling
MQTT_IF_Connect, the user is expected to provide an event callback. This callback will be used by the MQTT client module to notify the main application when certain MQTT events have occured (e.g. connect, disconnect, etc). Copy and paste the function below toempty.c.void MQTT_EventCallback(int32_t event) { switch(event){ case MQTT_EVENT_CONNACK: { LOG_INFO("MQTT_EVENT_CONNACK\r\n"); break; } case MQTT_EVENT_CLIENT_DISCONNECT: { LOG_INFO("MQTT_EVENT_CLIENT_DISCONNECT\r\n"); break; } case MQTT_EVENT_SERVER_DISCONNECT: { LOG_INFO("MQTT_EVENT_SERVER_DISCONNECT\r\n"); break; } case MQTT_EVENT_DESTROY: { LOG_INFO("MQTT_EVENT_DESTROY\r\n"); break; } default: { LOG_INFO("Unknown MQTT event\r\n"); break; } } }empty.c :: MQTT_EventCallback()
MQTT_EVENT_CONNACK indicates that the server sent a CONNACK packet in response to a CONNECT packet received from a client
MQTT_EVENT_CLIENT_DISCONNECT indicates that the client has disconnect from the server
MQTT_EVENT_SERVER_DISCONNECT indicates that the server has disconnect the client from the server
MQTT_EVENT_DESTROY indicates that the MQTT client module has been de-initailized
Task 3: Add Wi-Fi initialization application code
The SimpleLink Wi-Fi host driver requires the application to create the thread
sl_Task. Add the size and priority definitions to the top ofempty.c.#define SL_TASKSTACKSIZE 2048 #define SPAWN_TASK_PRIORITY 9empty.c
Add
WifiInit()toempty.c. This function will allow us to easily createsl_Task, start the network processor, set the MQTT Client ID, and then connect to a local network.int WifiInit(){ int32_t ret; SlWlanSecParams_t security_params; pthread_t spawn_thread = (pthread_t) NULL; pthread_attr_t pattrs_spawn; struct sched_param pri_param; pthread_attr_init(&pattrs_spawn); pri_param.sched_priority = SPAWN_TASK_PRIORITY; ret = pthread_attr_setschedparam(&pattrs_spawn, &pri_param); ret |= pthread_attr_setstacksize(&pattrs_spawn, SL_TASKSTACKSIZE); ret |= pthread_attr_setdetachstate(&pattrs_spawn, PTHREAD_CREATE_DETACHED); ret = pthread_create(&spawn_thread, &pattrs_spawn, sl_Task, NULL); if(ret != 0){ LOG_ERROR("could not create simplelink task\n\r"); while(1); } Network_IF_ResetMCUStateMachine(); Network_IF_DeInitDriver(); ret = Network_IF_InitDriver(ROLE_STA); if(ret < 0){ LOG_ERROR("Failed to start SimpleLink Device\n\r"); while(1); } SetClientIdNamefromMacAddress(); security_params.Key = (signed char*)SECURITY_KEY; security_params.KeyLen = strlen(SECURITY_KEY); security_params.Type = SECURITY_TYPE; ret = Network_IF_ConnectAP(SSID_NAME, security_params); if(ret < 0){ LOG_ERROR("Connection to an AP failed\n\r"); } else{ ret = sl_WlanProfileAdd((signed char*)SSID_NAME, strlen(SSID_NAME), 0, &security_params, NULL, 7, 0); if(ret < 0){ LOG_ERROR("failed to add profile %s\r\n", SSID_NAME); } else{ LOG_INFO("profile added %s\r\n", SSID_NAME); } } return ret; }empty.c :: WifiInit()
Task 4: Implement the mainThread
Open
main_tirtos.cand increase themainThreadstack size to 4096. Since we are going to be adding the MQTT implementation tomainThread, we need a larger stack size.#define THREADSTACKSIZE 4096main_tirtos.c
Open
empty.cand add the following variables to the beginning ofmainThread:int32_t ret; UART_Handle uartHandle; MQTTClient_Handle mqttClientHandle;empty.c :: mainThread() - variables
Inside
mainThread, uncommentSPI_init(). We need to initialize the SPI driver because it is used inside the host driver.Inside
mainThread, add the following code to open a UART instance. This will enable the application to print to a terminal on the PC.uartHandle = InitTerm(); /* Optional - disable UART Rx interrupt to allow MCU to enter LPDS when power policy is enabled */ UART_control(uartHandle, UART_CMD_RXDISABLE, NULL);empty.c :: mainThread() - Initialize UART terminal
Next, initialize the IP network services layer for the MQTT client module. You will also need to extend the function
ti_net_SlNet_initConfigat the top ofempty.c. This function is automatically generated by the SysConfig tool and defined inti_net_config.c.extern int32_t ti_net_SlNet_initConfig();empty.c - Extend ti_net_SlNet_initConfig()
 ret = ti_net_SlNet_initConfig();
 if(0 != ret)
 {
     LOG_ERROR("Failed to initialize SlNetSock\n\r");
 }
empty.c :: mainThread() - Initialize SlNetSock
SlNetIf, SlNetSock, and SlNetUtil are abstraction layers used by the Network Services libraries, including MQTT.
Call
WifiInit()to start the network processor and connect to an Access Point.ret = WifiInit(); if(ret < 0){ while(1); }empty.c :: mainThread() - Initialize the Wi-Fi
Initialize the MQTT client module:
 ret = MQTT_IF_Init(mqttInitParams);
 if(ret < 0){
     while(1);
 }
empty.c :: mainThread() - Initialize the MQTT client module
Finally, connect to the MQTT broker and register your event callback:
 mqttClientHandle = MQTT_IF_Connect(mqttClientParams, mqttConnParams, MQTT_EventCallback);
 if(mqttClientHandle < 0){
     while(1);
 }
empty.c :: mainThread()
Task 5: Add messages to subscribe and publish
Now that you have connected to an MQTT broker, you have all the basics down to build your application and MQTT functionality however you want. Subscribe to a topic and publish messages to interact with the MQTT broker.
To subscribe a topic, you must first define a topic callback. Topic callbacks are functions registered to the MQTT client module that are executed when a mesage is received on a subscribed topic. Add a basic callback function to
empty.c:void MQTTDemo(char* topic, char* payload, uint8_t qos) { LOG_INFO("TOPIC: %s PAYLOAD: %s\r\n", topic, payload); }empty.c - Callback function
You are free to define the function however you want as long as you provide the 3 parameters (topic, payload, and QOS) and a void return type.
We have defined a topic callback, but we still have to subscribe to a topic. Add
MQTT_IF_SubscribetomainThreadto subscribe to a topic and register the topic callback:ret = MQTT_IF_Subscribe(mqttClientHandle, "Broker/to/cc32xx", MQTT_QOS_2, MQTTDemo);empty.c :: mainThread() - Subscribe
Here we are subscribing to the topic
Broker/to/cc32xxwith a QoS (quality of service) of 2 and registering theMQTTDemocallback for this topic.Publishing is very simple with the MQTT client module. Add this code inside the while loop in
mainThreadto publish once every second:MQTT_IF_Publish(mqttClientHandle, "cc32xx/MQTTDemo", "hello from TI\r\n", strlen("hello from TI\r\n"), MQTT_QOS_2);empty.c :: mainThread() - Publish
This call will publish to topic
cc32xx/MQTTDemowith a payload of"hello from TI"and a QoS of 2.
Configuring the Client Demo
This demo uses the MQTT Client APIs to communicate with a public Eclipse broker. The CC32xx can be controlled by a remote MQTT client by publishing messages on our subscribed topics. Similarly, the CC32xx can publish messages.
Task 1: Preparing the MQTT Client application
Are you starting from the empty project or the mqtt_client project?
This section of the lab can be a continuation of the previous Adding a MQTT Client to a Project section, or users can start with the default mqtt_client example from the SDK.
If you completed the Adding a MQTT Client to a Project section, please continue to the next step.
To import the default
mqtt_clientexample, open CCS and go to the menu Project → Import CCS Projects.... Navigate to your Simplelink CC32xx SDK installation and find themqtt_clientexample in the demos folder for your LaunchPad:simplelink_cc32xx_sdk_x_xx_xx_xx\examples\rtos\CC3235SF_LAUNCHXL\demos\mqtt_clientOpen
network_if.hand set your local Access Point parameters (SSID_NAME,SECURITY_TYPEandSECURITY_KEY). Be sure your Access Point has internet access.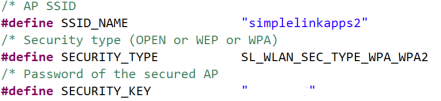
Take a look at your MQTT settings. They can be found in the macros in your
empty.cormqtt_client_app.c, depending on which project you started from. The important ones are:MQTT_CONNECTION_ADDRESSMQTT_CONNECTION_PORT_NUMBERMQTT_CONNECTION_FLAGS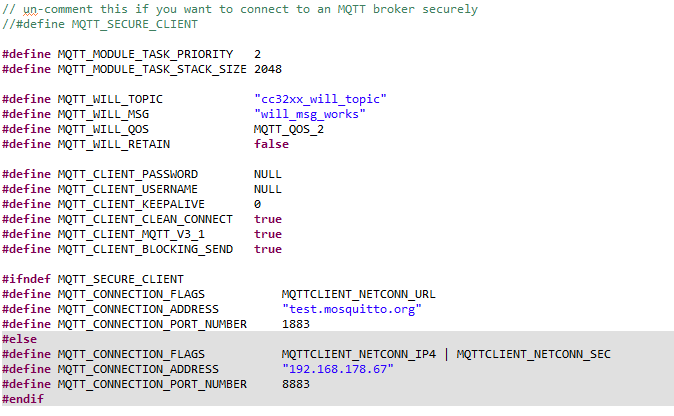
- The client ID must be unique. The
ClientIdis set to the local MAC Address inSetClientIdNamefromMacAddress()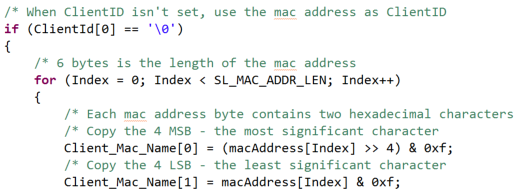
Task 2: Setting up the MQTT Client demo
Plug in your LaunchPad, build the project, and flash the application.
Open a terminal emulation program such as TeraTerm and select the XDS110 Class Application/User UART port.
UART Configuration
Baud rate: 115200
Data: 8 bit
Parity: None
Stop: 1 bit
Flow control: None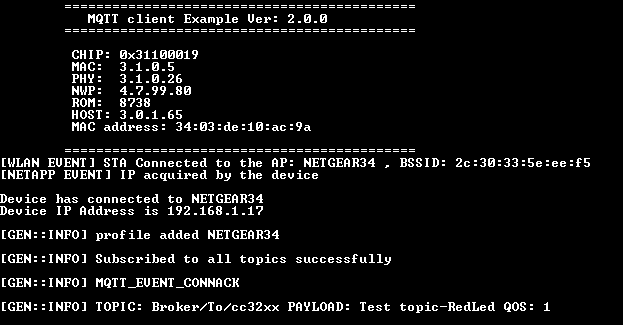
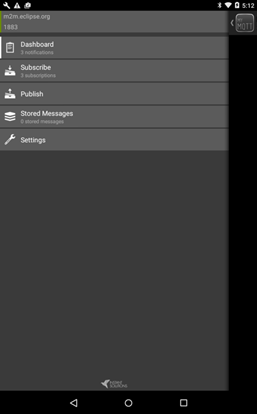
On a device connected to the internet, use your installed MQTT client mobile app (see lab prerequisites) to connect to the MQTT broker used by the CC32xx: mqtt.eclipse.org
- Verify that the port is 1883.
Leave all other settings as default, and Connect.
Note
Ensure that the Username and Password fields are left blank. By default, the MQTT client application does not set the
MQTT_CLIENT_USERNAMEandMQTT_CLIENT_PASSWORD.
Task 3: Run the MQTT Client application
From the MQTT client mobile app, use the
Broker/To/cc32xxtopic to publish a message to the CC32xx that will be printed on the serial terminal.Using the MQTT client app, subscribe to the topic published by the SimpleLink client (
cc32xx/MQTTDemo).Using the MQTT client app, subscribe to the topic published by the SimpleLink client (
cc32xx/ToggleLED1). Press the SW2 button on the LaunchPad to publish a message.Verify your output on the serial terminal and the MQTT client mobile app.
Configuring the Secure Client Demo
These tasks will demonstrate the MQTT Client demo with a secure connection to the Eclipse broker. This will be done by using a TLS socket to communicate with the MQTT server. For more information on secure sockets, check out the Wi-Fi Secure Socket training.
Task 1: Enabling the Secured Client
In
empty.c, replace themqttConnParamsstruct with the following secure parameters:MQTTClient_ConnParams mqttConnParams = { MQTT_CONNECTION_FLAGS, // connection flags MQTT_CONNECTION_ADDRESS, // server address MQTT_CONNECTION_PORT_NUMBER, // port number of MQTT server SLNETSOCK_SEC_METHOD_SSLv3_TLSV1_2, // method for secure socket SLNETSOCK_SEC_CIPHER_FULL_LIST, // cipher for secure socket 1, // number of files for secure connection MQTTClient_secureFiles // secure files };empty.c - secure MQTT connection parameters struct
In
empty.c, changeMQTT_CONNECTION_PORT_NUMBERto the secure MQTT port8883. Add the following additional flags toMQTT_CONNECTION_FLAGS. We will be using the public servertest.mosquitto.orgfor this secure client demo.#define MQTT_CONNECTION_FLAGS MQTTCLIENT_NETCONN_URL | MQTTCLIENT_NETCONN_SEC \ | MQTTCLIENT_NETCONN_SKIP_CERTIFICATE_CATALOG_VERIFICATION #define MQTT_CONNECTION_ADDRESS "test.mosquitto.org" #define MQTT_CONNECTION_PORT_NUMBER 8883empty.c - secure MQTT parameters
Add the global variable
secureFiles. This variable is an array of strings indicating the certificates that can be used for a secure connection. In this demo, we will be usingmosquitto.org.crt.char *MQTTClient_secureFiles[1] = {"mosquitto.org.crt"};empty.c - secureFiles global variable
In order to validate the certificate used for the secure connection, the network processor needs to be configured with an updated date and time. Copy the following code with the current date and time into
empty.c.The date and time can also be synchronized using the SNTP library in the SDK.
 /* Day of month (DD format) range 1-31                                       */
 #define DAY                      1
 /* Month (MM format) in the range of 1-12                                    */
 #define MONTH                    8
 /* Year (YYYY format)                                                        */
 #define YEAR                     2020
 /* Hours in the range of 0-23                                                */
 #define HOUR                     12
 /* Minutes in the range of 0-59                                              */
 #define MINUTES                  00
 /* Seconds in the range of 0-59                                              */
 #define SEC                      00

 void setTime()
 {
 SlDateTime_t dateTime = {0};
 dateTime.tm_day = (uint32_t)DAY;
 dateTime.tm_mon = (uint32_t)MONTH;
 dateTime.tm_year = (uint32_t)YEAR;
 dateTime.tm_hour = (uint32_t)HOUR;
 dateTime.tm_min = (uint32_t)MINUTES;
 dateTime.tm_sec = (uint32_t)SEC;
 sl_DeviceSet(SL_DEVICE_GENERAL, SL_DEVICE_GENERAL_DATE_TIME,
              sizeof(SlDateTime_t), (uint8_t *)(&dateTime));
 }
empty.c :: setTime()
Call the
setTimefunction inmainThreadafterWifiInit()and beforeMQTT_IF_Init().setTime();empty.c :: mainThread - call setTime()
Uncomment the
MQTT_SECURE_CLIENTdefine in the macros section ofmqtt_client_app.cto enable the secure client.Enabling this will use a different
MQTTClient_ConnParamsstruct inmqtt_client_app.cand different application macros configured to use secure MQTT.Update the
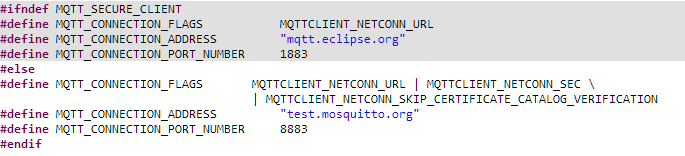
MQTT_CONNECTION_FLAGSdefinition inmqtt_client_app.cto successfully connect to a secure broker. Copy the code below and replace theMQTT_CONNECTION_FLAGSandMQTT_CONNECTION_ADDRESS. Be sure you are updating the correct macro forMQTT_SECURE_CLIENTenabled.#define MQTT_CONNECTION_FLAGS MQTTCLIENT_NETCONN_URL | MQTTCLIENT_NETCONN_SEC \ | MQTTCLIENT_NETCONN_SKIP_CERTIFICATE_CATALOG_VERIFICATION #define MQTT_CONNECTION_ADDRESS "test.mosquitto.org" #define MQTT_CONNECTION_PORT_NUMBER 8883mqtt_client_app.c - secure MQTT parameters
Find the
MQTTClient_secureFilesarray inmqtt_client_app.c, which by default has a size of 1. Change the string in this array fromca-cert.pemto a name of your choosing. In this example, we will name it tomosquitto.org.crt.char *MQTTClient_secureFiles[1] = {"mosquitto.org.crt"};*mqtt_client_app.c - secureFiles global variable
In order to validate the certificate used for the secure connection, the network processor needs to be configured with an updated date and time. Update the following defines to reflect your current time.
The date and time can also be synchronized using the SNTP library in the SDK.
 /* Day of month (DD format) range 1-31                                       */
 #define DAY                      1
 /* Month (MM format) in the range of 1-12                                    */
 #define MONTH                    8
 /* Year (YYYY format)                                                        */
 #define YEAR                     2020
 /* Hours in the range of 0-23                                                */
 #define HOUR                     12
 /* Minutes in the range of 0-59                                              */
 #define MINUTES                  00
 /* Seconds in the range of 0-59                                              */
 #define SEC                      00
mqtt_client_app.c
What are the MQTT connection flags and other connection parameters?
These MQTT connection flags defined by the internal MQTT library in mqttclient.h. These paramaters indicate that we want a secure connection, but we are skipping certificate catalog verification and domain name verification.
For information on all of the MQTT library configurations, please see the Network Services API Reference Guide available in the SDK.
Task 2: Obtain and flash the root CA certificate
To create a secure connection with the the Eclipse broker, we need to obtain the correct certificate. One way to do this is to obtain the certificate directly from the website. In this example, we will demonstrate this with Chrome as our browser.
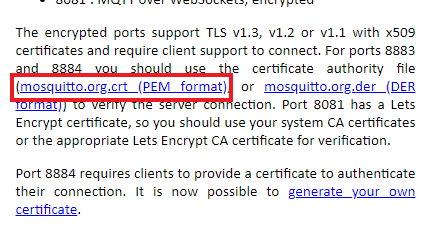
Typically you can find the root CA certificate for a public broker on its website. In this case, the webpage for the Eclipse broker is https://test.mosquitto.org/.
Click the hyperlink in the box shown below to download the certificate for the broker. It should automatically download and be saved as mosquitto.org.crt.
Now that you have obtained the root certificate, use SysConfig ImageCreator to add it to the file system. Add the root certificate file to the
userFilesfolder in your CCS project. Be sure your LaunchPad is plugged in, rebuild the project, and then select the Flash button from the top menu.
Task 3: Run the secure demo
- Run tasks 2 and 3 from the previous demo section and verify that you are able to successfully connect to the MQTT broker.
Want to test the security?
Do this task but flash the LaunchPad without the root certificate. The CC32xx should fail to connect to the MQTT broker!
Technical support
For any questions, please search on the Wi-Fi E2E Forum
This work is licensed under a Creative Commons Attribution-NonCommercial-NoDerivatives 4.0 International License.