Bluetooth Low Energy Scanning and Advertising#
Texas Instruments
36 min read
Introduction#
This workshop is a detailed description of how to use the advertising and scanning features of the TI BLE5-Stack. All tasks in this lab session are targeted to be completed within a 2-4 hour time frame. You should have an intermediate level of knowledge of the C programming language as well as experience with embedded software development to be able to complete the tasks.
The first section describes the GAP layer of the Bluetooth Low Energy (LE) protocol, and the subsequent tasks will explore scanning and advertising and how to make some small changes to the Bluetooth LE application.
It is recommended to read the BLE5 Stack User’s Guide alongside this lab for details and further information. Some references will also be made to the Bluetooth Core Specification which specifies how Bluetooth LE devices should operate and communicate with other devices.
Prerequisites#
Hardware#
2 x SimpleLink CC2340R5 LaunchPad Target
2 x SimpleLink™ LaunchPad™ XDS110 Debugger
2 x USB cable
Software#
CCS 12.3 or IAR 9.32.1 installed with support for CC23xx devices.
SIMPLELINK-LOWPOWER-F3-SDK SimpleLink™ Software Development Kit
Readings#
The GAP chapter of the BLE5 Stack User’s Guide (located in BLE5-Stack → Generic Access Profile (GAP)) can also provide further insight into the topics discussed in this SimpleLink Academy lab.
Getting started – Desktop#
Environment setup#
The following section will go through how to get the development environment up and running. You may skip this section if you already have your environment setup and working.
Initial Setup (Click here to expand)
All the collaterals required are available on TI website.
Download and Install the SDK found in the software section above.
Follow the Quick Start Guide found inside the BLE5 Stack User’s Guide
PATH =
C:/ti/simplelink_lowpower_f3_sdk_x_xx_xx_xx/docs/ble5stack/ble_user_guide/html/quickstart-guide/quickstart-intro-cc23xx.html
Setting up the Serial terminal
If you already have a functional serial terminal setup skip this part and go directly to the following section.
Identify the COM port used by the SimpleLink CC2340R5 LaunchPad.
Disconnect all the LaunchPads™ you may have connected to your computer leaving only the SimpleLink CC2340R5 LaunchPad.
Open the Device Manager. You can do so by typing Device Manager in the Windows start menu.
In the Device manager, find the menu Ports (COM & LPT) and unroll it.
Observe the line called XDS110 Class Application/User UART. Note down the COM port this interface is using. In my case (see below), the COM port used is called COM27.

Identify the COM port used#
Open a serial terminal to observe the COM port identified previously. For this example, I’ll show how to use the serial port provided by Code Composer Studio, but you can use your favorite serial terminal provider.
On CSS, click on
View→Terminal, or use the shortcutCtrl+Alt+Shift+T.A pop-up allowing you to configure the terminal will appear. Select the following settings:
Choose Terminal: Serial Terminal
Serial Port: The serial port identified before (COM27 for me)
Baud rate: 115200
Data size: 8
Parity: None
Stop bits: 1
Encoding: Default (ISO-8859-1)
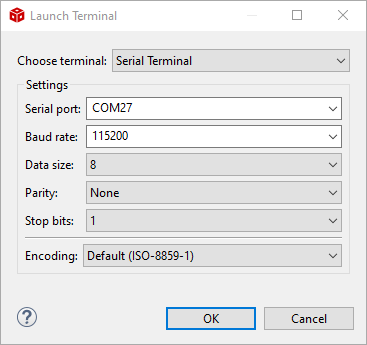
Set up the serial terminal#
Once done, click
OK.Display the Command Input Field by clicking on
Toggle Command Input Field(see label 1), then clear the terminal content by clicking onClear Terminal(see label 2)
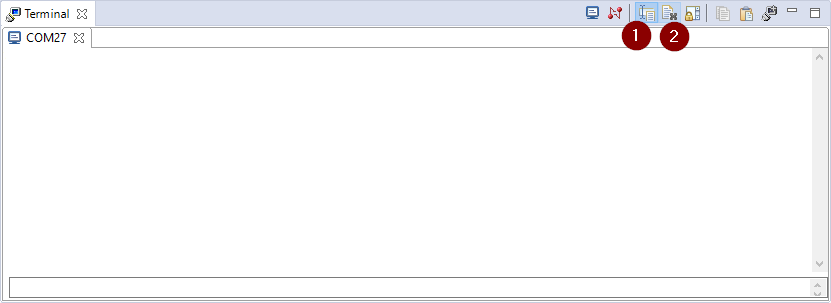
Code Composer Studio Serial Terminal#
To finish, reset the SimpleLink CC2340R5 LaunchPad by pressing the reset button on the emulator.
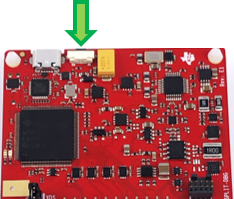
Reset#
Note
At this point open Code Composer Studio, create a new Workspace (don’t forget to add the workspace variable
FREERTOS_INSTALL_DIR) and import the data_stream project. Then build and flash the
code on the device.
If you need help for this, make sure to review Quick Start Guide!
Modify/Load the software#
Connecting multiple boards at the same time
As mentioned before, you will use two boards for this lab. You can assign a specific LaunchPad to each CCS project. You can find instructions to do that here.
Create two basic_ble projects–one for each board. The basic_ble project follows our
new BLEAppUtil framework, which will be expanded upon throughout this workshop.
The basic_ble project is found in the ble5stack examples folder,
e.g. <SDK_INSTALL_DIR>\examples\rtos\<BOARD_NAME>\ble5stack\basic_ble
The tasks ahead will make modifications to the projects above to showcase scanning and advertising features. Modify these projects in the Simplelink SDK as you follow along and complete the tasks.
Background#
GAP#
The Generic Access Profile (GAP) layer sits at the top in the host protocol stack and defines how Bluetooth LE devices behave in standby and connecting states. The purpose of GAP is to ensure interoperability with other Bluetooth LE devices. Additionally, GAP describes discovery, link establishment and security procedures. The GAP APIs may be called from the application layer.
Note
You can read more about GAP in the BLE5 Stack User’s Guide here BLE5-Stack → Generic Access Profile (GAP)
The following figure shows the GAP layer in relation to other layers in the software hierarchy:

There are four GAP roles defined in the Bluetooth Core Specification
and are described in gap.h
GAP Role |
Description |
|---|---|
Broadcaster |
A device that only sends advertising events. |
Observer |
A device that only receives advertising events. |
Peripheral |
A device that accepts the establishment of an LE physical link using the connection establishment procedure. |
Central |
A device that supports the Central role initiates the establishment of a physical connection. |
The GAP layer API gives very fine-grained control of the device behavior. To help using GAP, the BLE5-Stack contains four modules with higher lever APIs the application can use:
GAP Advertiser
The GAP Advertiser module lets you create advertisement sets. The application can then enable and disable the sets. This way, the application can quickly change the advertisement parameters and advertisement data. For example, an application can create an advertisement set for legacy advertising and one for long range advertising.
GAP Scanner
The GAP Scanner performs Extended Scanning and Legacy Scanning operations. It controls the Scanner GAP state.
GAP Initiator
The initiator module is used to initiate the connection to a peripheral device. Unlike the GAP Advertiser and GAP Scanner modules, GAP Initiator doesn’t have any callback function to call or to be called. Only a device initiated with the GAP Central Role can become an initiator.
GAPBondMgr
The GAP Bond Manager is a configurable module that offloads most of the security mechanisms from the application.
Advertising#
Advertising Basics#
Bluetooth devices can send advertising packets PDUs (Protocol Data Units) to broadcast data, or to allow other Bluetooth devices to discover and connect to them.
Bluetooth Low Energy uses 40 different RF channels (an RF channel is defined by a frequency and bandwidth at which the data is sent). Three of these channels are called primary advertising channels, and are used for communication outside of connections. This includes:
Advertisements
Scan Requests
Scan Responses
Connection Requests
The remaining 37 channels are primarily used for data exchanges within BLE connections. This is illustrated in the following figure. The primary advertising channels are placed to avoid the Wi-Fi channels since Wi-Fi transmissions cause noise on the BLE channels.
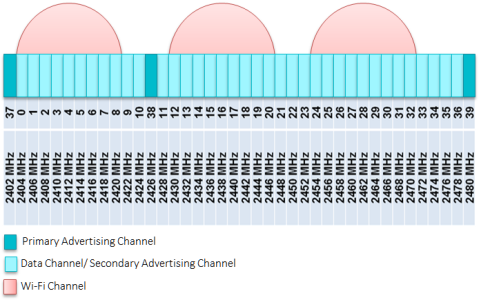
Hint
On advertisement channels, both advertisement, scan request and connection request packets are sent. So if there is too much noise on the advertisement channel, the devices will be unable to establish a connection. This is why the advertisement channels are placed the farthest away from the Wi-Fi channels. In addition, they are placed far away from each other.
Bluetooth 5 introduced new advertisement types that expand the possibilities of sending data in advertisement packets. The new advertisement packet types are listed in the Advertising Packets section. Bluetooth 5 opens for advertising on the 37 data channels. When advertisements are sent on the data channels, they are called secondary advertising channels.
Advertising Parameters#
The following table summarizes the parameters that can be configured for advertising.
Advertising Parameter |
Description |
Range |
|---|---|---|
Advertising Interval |
Time between the start of two consecutive advertising events |
20 ms to 10.24 s |
Advertising Types |
Different PDUs are sent for different types of advertising |
See table under Advertising Packets |
Advertising Channels |
Legacy advertising packets are sent on three channels |
Different combinations of channels 37, 38 and 39. |
The advertising channels for legacy advertising are channel 37 (2402 MHz), channel 38 (2426 MHz), and channel 39 (2480 MHz). The device can advertise on one, two or three of these. The following diagram shows an advertising event when advertising on all three channels.
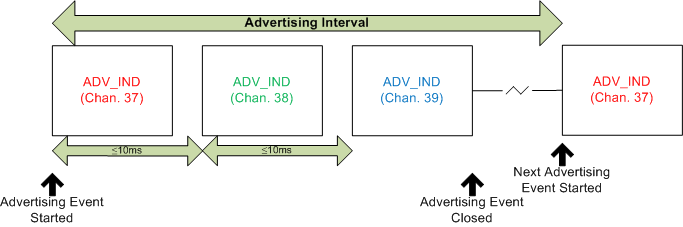
Note that the same data (ADV_IND) is sent on all three channels. Since the
packet is quite small (remember that the advertisement data is no more than 31
bytes), it takes less than 10 ms to send it. The device can be modified to
advertise only on selected channels. Advertising on fewer channels will save
power, however using more channels will increase the likelihood of a peer device
receiving the packet. The user can configure the advertising interval based on
the application use case. For example, if a door lock is advertising at a slower
interval, it will take longer for the peer device to connect to the door lock
which would adversely affect user experience.
Advertising Packets#
The advertising data consists up to 31 bytes (For Bluetooth 5 advertising packets, the adv data can be up to 254 bytes.) of user configurable data. There are eight different types of advertising packets, listed in the table below. The last four (in bold type) have been added with Bluetooth 5. They are called extended advertisement PDUs. The packets that start with ADV_ are transmitted on the primary advertising channels. The packets that start with AUX_ are transmitted on the secondary advertisement channels.
Advertising PDU |
Description |
Max adv data len |
Allow scan req |
Allow connect |
Channel |
|---|---|---|---|---|---|
ADV_IND |
Used to send connectable undirected advertisement |
31 bytes |
Yes |
Yes |
Primary |
ADV_DIRECT_IND |
Used to send connectable directed advertisement |
[N/A]{Directed advertisement only includes the 6-byte device address of the initiating device} |
No |
Yes |
Primary |
ADV_SCAN_IND |
Used to send [scannable]{Scannable means that if a device receives a scan request, it can respond with a scan response} undirected advertisement |
31 bytes |
Yes |
No |
Primary |
ADV_NONCONN_IND |
Used to send non-connectable undirected advertisement |
31 bytes |
No |
No |
Primary |
ADV_EXT_IND |
Used to indicate that an advertisement will be sent on a secondary advertisement channel. |
No adv data allowed. |
No |
No |
Primary |
AUX_ADV_IND |
Used to send connectable directed advertisement on a secondary advertisement channel. |
254 bytes |
Yes* |
Yes* |
Secondary |
AUX_SYNC_IND |
Used for periodic advertisements on secondary advertisement channels. |
254 bytes |
No |
No |
Secondary |
AUX_CHAIN_IND |
Used to chain advertisement packets, allowing the advertisement data to extend beyond one packet. |
254 bytes |
N/A |
N/A |
Secondary |
AUX_ADV_IND packets can be either scannable or connectable.
See the Bluetooth Core Specification Volume 6, Part B, Chapter 4.4 or the GAP chapter of the BLE5 Stack User’s Guide (located in BLE5-Stack → Generic Access Profile (GAP)) for more information about the different non-connected states.
For example, if you want to advertise on LE Coded PHY (long range), the device
would first use the ADV_EXT_IND to advertise on the primary advertising channels.
This ADV_EXT_IND packet would tell scanning devices what secondary channel to use to
receive the following AUX_ADV_IND.
Another example: If the device wants to send a lot of advertisement data, it may want to
send many advertisement packets chained together to hold more than the 31-byte limit.
It may also choose to send them on the faster 2M PHY. To accomplish this, the device must first
advertise with ADV_EXT_IND. The ADV_EXT_IND packet would tell scanning devices which secondary channel
to listen on (in this case the 2M PHY) for the following AUX_ADV_IND. Then, the AUX_ADV_IND would
tell scanning devices that there are chained advertisements coming containing the remaining adv data
though AUX_CHAIN_IND PDU’s. In this case, you are not allowed to advertise in connectable or scannable mode.
The above table shows that the legacy advertising modes use the 31 payload bytes for advertisement data except directed advertising, which uses the 6-byte device address of the initiating device as adv data. Directed advertisements have an intended receiving device (scanner), while undirected advertisements do not have a specific intended receiver. In addition, all the legacy advertising types enable sending a scan response, except for the directed and non-connectable advertising. See the scanning section below for an illustration of the sequence of events when a scan response occurs.
It may be worth noting that for directed advertising, the advertisement duration cannot be higher than 1.28 s.
Note
Bluetooth 5 Advertisement PDUs
The rules for directed/undirected, scannable/non-scannable and connectable/non-connectable are a bit more complex for the extended advertising PDUs. The extended advertising PDUs contain an additional header where this information is stored.
You can read about the Common Extended Advertising Payload Format in the Bluetooth Core Specification Volume 6, Part B, Chapter 2.3.4.
The Common Extended Advertising Payload Format is given below. No fields of the extended header are mandatory.

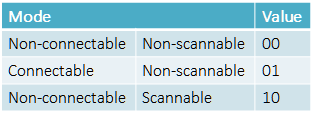
Scannable and Connectable#
The extended advertisement PDUs can not be both scannable and connectable.
They can be either scannable or connectable (or neither). This is indicated
in the AdvMode field of the packet.
Scannable ADV_EXT_IND and AUX_ADV_IND can not contain any advertising data
(just the header).
PHYs#
ADV_EXT_IND can be sent on the LE 1M PHY, or a LE Coded PHY. The other extended
advertising PDUs can be sent on any PHY.
The following tasks will demonstrate advertising using the basic_ble project.
Advertising Task 1 – Change Advertising Parameters#
Settings related to advertising are found in the Broadcaster Configuration section of the BLE configuration SysConfig tab, under RF STACKS.
In some cases we want to save power. One way to do this is by increasing the advertisement interval (advertise less frequently), and just advertise on one channel. In this task, we will configure the device to advertise on one channel every 500 ms using the basic_ble project. Per default, the basic_ble project advertises with two different advertisement sets. The default values of the advertising set 1 are shown below:
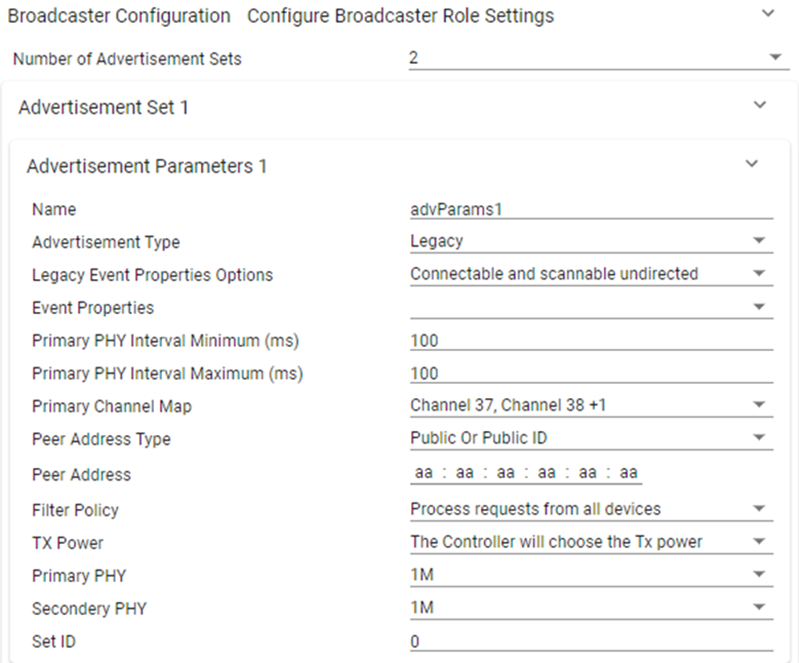
You can read more about these values in
gap_advertiser.hor the TI BLE5-Stack API References, under GAP.
In order to change the advertising interval, simply change the value for Primary PHY Interval Minimum and Primary PHY Interval Maximum. In this case we will
set them to 500 (ms).

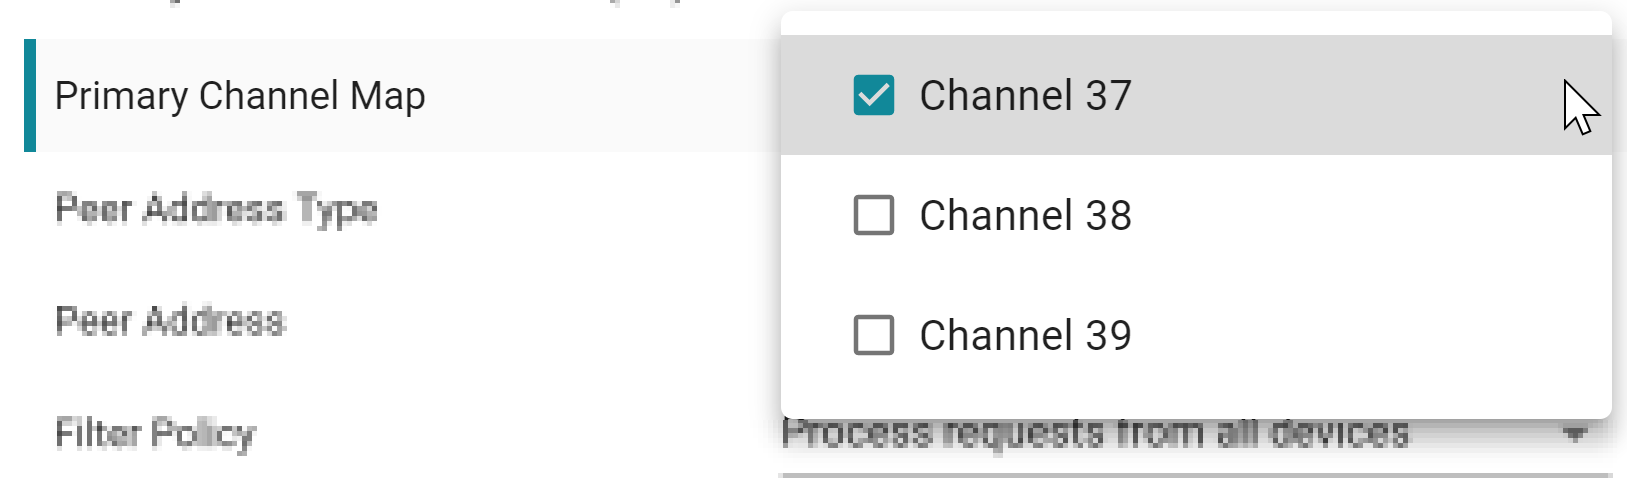
To change the advertisement channel, open the Primary Channel Map drop-down
menu and un-check Channel 38 and Channel 39.
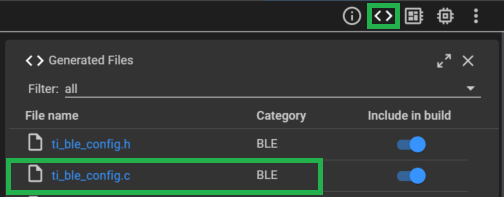
After making these changes, you can press the Show Generated Files button in the upper right corner of
SysConfig and open ti_ble_config.c.
Observe that the primIntMin,
primIntMax (Note that in the BLE5-Stack, advertisement intervals are given in
units of 0.625 ms. Thus, 500 ms is given as 800 * 0.625 ms.”) and primChanMap
values of the GapAdv_params_t advParams1 struct have changed:
// Advertisement Params 1
GapAdv_params_t advParams1 = {
  .eventProps =   GAP_ADV_PROP_CONNECTABLE | GAP_ADV_PROP_LEGACY | GAP_ADV_PROP_SCANNABLE,
  .primIntMin =   800,
  .primIntMax =   800,
  .primChanMap =  GAP_ADV_CHAN_37,
  .peerAddrType = PEER_ADDRTYPE_PUBLIC_OR_PUBLIC_ID,
  .peerAddr =     { 0xaa, 0xaa, 0xaa, 0xaa, 0xaa, 0xaa },
  .filterPolicy = GAP_ADV_WL_POLICY_ANY_REQ,
  .txPower =      GAP_ADV_TX_POWER_NO_PREFERENCE,
  .primPhy =      GAP_ADV_PRIM_PHY_1_MBPS,
  .secPhy =       GAP_ADV_SEC_PHY_1_MBPS,
  .sid =          0
};
You can now build the project by pressing the hammer icon in Code Composer Studio for the changes to take effect.
Warning
Changing Advertising Interval at Runtime To change advertising interval when advertising is enabled, you need to stop and re-start advertising again for the new changes to take effect. Please refer to Advertising Task 3 for an example on how to correctly change advertising interval runtime.
Advertising Task 2 – Change the Advertisement Data#
In this task, we will change the advertisement data. The advertisement data can
be configured in the
Advertisement Data 1 section of the BLE SysConfig tab
(Located under BLE -> Broadcaster Configuration -> Advertisement Set 1).
When you open Advertisement Data 1 you will be able to enable or disable all possible
advertisement data types (AD types). You can read more about the different
advertisement data types in gap.h.
After building the example, you can find the default advertisement data by
navigating to the generated syscfg ti_ble_config.c located in Release →
syscfg → ti_ble_config.c, as shown below:
// Advertisement data
uint8_t advData1[] =
{
  0x02,
  GAP_ADTYPE_FLAGS,
  GAP_ADTYPE_FLAGS_BREDR_NOT_SUPPORTED | GAP_ADTYPE_FLAGS_GENERAL,

  0x03,
  GAP_ADTYPE_16BIT_MORE,
  LO_UINT16(0xfff0),
  HI_UINT16(0xfff0),
};
As you can see, the structure of the advertisement data always contains:
Length of the following data
GAP AD type
Data
For example the default advertisement data:
Length |
GAP_ADTYPE |
Explanation |
Data |
|---|---|---|---|
0x02 |
GAP_ADTYPE_FLAGS |
Describes the advertisement mode: Limited, General etc. |
GAP_ADTYPE_FLAGS_BREDR_NOT_SUPPORTED and GAP_ADTYPE_FLAGS_GENERAL |
0x03 |
GAP_ADTYPE_16BIT_MORE |
This flag contains some of the 16bit Service UUIDs of the device; more UUIDs are available. |
LO_UINT16(0xfff0), HI_UINT16(0xfff0) |
The length always includes the length of the GAP_ADTYPE. Note that advertising data should follow a certain format described in the Bluetooth Core Specification. The different data types that can be used in the advertisement data are further explained in the Core Specification Supplement (CSSv7, Part A, Chapter 1) along with examples.
Note
Changing the Advertisement Data There are several ways to change the advertisement data. You can read about them in the BLE5 Stack User’s Guide. See BLE5-Stack → Generic Access Profile (GAP)
Here, we will change the advertisement data when advertising is first enabled. This is shown in the flow diagram below:
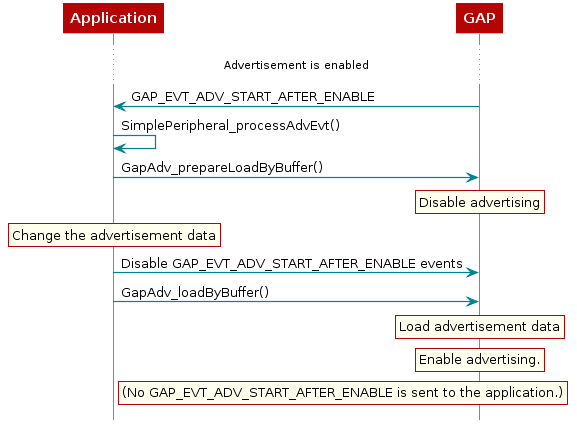
When advertising is enabled, the application receives an event from GAP
Advertiser, BLEAPPUTIL_ADV_START_AFTER_ENABLE. We will update the advertisement
data with the Load a New Buffer To Multiple Advertising Handles (We have to use this
method since there are two advertisement sets using this data; the legacy advertising
set that we have already looked at, and a long rangeadvertisement set.)
method described in the GAP Chapter of the BLE5 Stack User’s Guide. Copy
the following code into the BLEAPPUTIL_ADV_START_AFTER_ENABLE case of the
Peripheral_AdvEventHandler function in app_peripheral.c
case BLEAPPUTIL_ADV_START_AFTER_ENABLE:
{
    MenuModule_printf(APP_MENU_ADV_EVENT, 0, "Adv status: Started - handle: "
                      MENU_MODULE_COLOR_YELLOW "%d" MENU_MODULE_COLOR_RESET,
                      ((BLEAppUtil_AdvEventData_t *)pMsgData)->pBuf->advHandle);


    /** New Code **/
    BLEAppUtil_AdvEventData_t * pkt = (BLEAppUtil_AdvEventData_t *)pMsgData;

    if (pkt->pBuf->advHandle == peripheralAdvHandle_1)
    {
        bStatus_t status = FAILURE;

        status = GapAdv_prepareLoadByHandle(peripheralAdvHandle_1, GAP_ADV_FREE_OPTION_DONT_FREE);

        if (status != SUCCESS)
            for(;;); // Loop

        uint8_t ADV_DATA2_LEN = 11;
        uint8_t *advData2 = ICall_malloc(ADV_DATA2_LEN);

        advData2[0] = 0x02;
        advData2[1] = GAP_ADTYPE_FLAGS;
        advData2[2] = GAP_ADTYPE_FLAGS_BREDR_NOT_SUPPORTED | GAP_ADTYPE_FLAGS_GENERAL;

        advData2[3] = 0x03;
        advData2[4] = GAP_ADTYPE_16BIT_MORE;
        advData2[5] = LO_UINT16(0xfff0);
        advData2[6] = HI_UINT16(0xfff0);

        advData2[7] = 0x03;
        advData2[8] = GAP_ADTYPE_MANUFACTURER_SPECIFIC;
        advData2[9] = 0xAA;
        advData2[10] = 0xBB;

        peripheralAdvHandler.eventMask = BLEAPPUTIL_ADV_END_AFTER_DISABLE
                                        | BLEAPPUTIL_ADV_SET_TERMINATED
                                        | BLEAPPUTIL_SCAN_REQ_RECEIVED;

        status = GapAdv_loadByHandle(peripheralAdvHandle_1,
                                            GAP_ADV_DATA_TYPE_ADV,
                                            ADV_DATA2_LEN,
                                            advData2);

        if (status != SUCCESS)
            for(;;);
        /** End New Code **/

    }

    break;
}
In the code snippet above, the following occurs:
BLEAppUtil_advPrepareLoadByHandle()disables advertising for all advertisement sets who uses theperipheralAdvHandle_1handle.ICall_malloc()allocates memory in the ICall heap for the new advertisement data.By using the
GAP_ADTYPE_MANUFACTURER_SPECIFICdata type, we can put whatever we want in the advertisement data. In this case it’s0xAAand0xBBbut you can change it to something else if you want.BLEAppUtil_advLoadByHandle()loads theadvData2to the relevant advertisement sets and re-enables advertising.
Make sure the code builds without errors. If successful, you should see the advertisement data updated accordingly.
Hint
Limited Advertising Limited advertising can be used to conserve power by advertising for a limited amount of time. General advertisers will continue advertising indefinitely, while limited advertisers advertise for a given amount of times, e.g. 30 s, then stop. This is usually enough time for any devices trying to scan and/or connect to the device to discover it. You can also set a number of advertisement events. In this case, the device will advertise until the number of advertisement events is reached (or until something else disables advertising).
To use limited advertising in app_peripheral.c, change the calls to BLEAppUtil_advStart() to have the
following parameters:
// To advertise for a limited amount of time, use the option GAP_ADV_ENABLE_OPTIONS_USE_DURATION
advSetStartParamsSet_1.enableOptions = GAP_ADV_ENABLE_OPTIONS_USE_DURATION;

// The time to advertise before stopping is given in units of 10 ms. The range is 10 ms - 655 540 ms
advSetStartParamsSet_1.durationOrMaxEvents = 3000; //Advertise for 30 s (30 000 / 10 ms = 3000 )

BLEAppUtil_advStart(peripheralAdvHandle_1, &advSetStartParamsSet_1);
To limit the number of advertisement events, change the calls to GapAdv_enable() to have the
following parameters:
// To advertise for a limited amount of advertisement events, use the option GAP_ADV_ENABLE_OPTIONS_USE_MAX_EVE
advSetStartParamsSet_1.enableOptions = GAP_ADV_ENABLE_OPTIONS_USE_MAX_EVENTS;
// The maximum number of advertisements to send before stopping has the range 1-256
advSetStartParamsSet_1.durationOrMaxEvents = 60;

BLEAppUtil_advStart(peripheralAdvHandle_1, &advSetStartParamsSet_1);
Note that BLEAppUtil_advStart() is called multiple times in app_peripheral.c.
When an advertisement set is terminated (because the time/number of adv events
is used up), a BLEAPPUTIL_ADV_SET_TERMINATED event is posted. In order to receive this event we will
need to add the case inside app_peripheral.c::Peripheral_AdvEventHandler(). We will need to
modify our event mask to receive BLEAPPUTIL_ADV_SET_TERMINATED.
BLEAppUtil_EventHandler_t peripheralAdvHandler =
{
    .handlerType    = BLEAPPUTIL_GAP_ADV_TYPE,
    .pEventHandler  = Peripheral_AdvEventHandler,
    .eventMask      = BLEAPPUTIL_ADV_START_AFTER_ENABLE |
                      BLEAPPUTIL_ADV_END_AFTER_DISABLE  |
                      BLEAPPUTIL_ADV_SET_TERMINATED
};
Go ahead and add code to BLEAPPUTIL_ADV_SET_TERMINATED event in app_peripheral.c::Peripheral_AdvEventHandler() to print out
something fun!
void Peripheral_AdvEventHandler(uint32 event, BLEAppUtil_msgHdr_t *pMsgData)
{
    switch(event)
    {
        case BLEAPPUTIL_ADV_SET_TERMINATED:
        {
            MenuModule_printf(APP_MENU_ADV_EVENT, 0, "Adv status: terminated: "
                              MENU_MODULE_COLOR_YELLOW "%d" MENU_MODULE_COLOR_RESET,
                              ((BLEAppUtil_AdvEventData_t *)pMsgData)->pBuf->advHandle);
            //
            // Place your code here!
            //
            break;
        }

        default:
        {
            break;
        }
    }
}
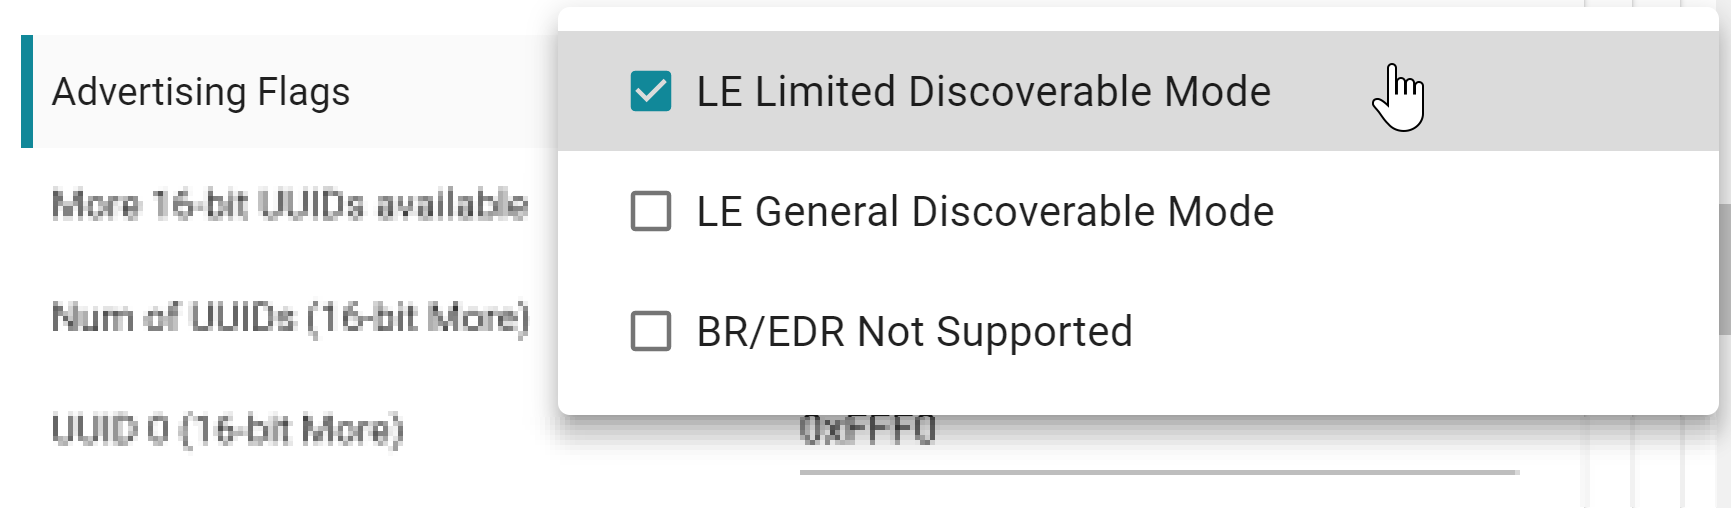
In addition, the flag in the advertisement data should be changed to
GAP_ADTYPE_FLAGS_LIMITED. You can do this directly in the advertisement data.
Limited advertising can be used to classify/filter devices. For example, devices that are scanning in limited discovery mode can only receive advertisement data from limited advertising devices. See the Bluetooth Core Specification for more information on the limited discovery procedure.
Advertising Task 3 – Change Advertising Interval at Runtime#
In this task we will advertise as previously, but when the device is discovered it will change the advertising interval to advertise more frequently. Imagine a BLE beacon that transmits data to passing phones. If no phones are around there is no reason to advertise often, since every advertisement packet consumes power. When the beacon receives a scan request it knows that someone is around and it makes sense to advertise more frequently. In the first task we changed the advertising interval to 500 ms. We will keep this, but when the device is discovered for the first time it will start advertising with 100 ms interval. You can use a Bluetooth packet sniffer to observe the advertising interval. You can also use EnergyTrace ™ to indirectly measure the advertising interval by monitoring the device’s current consumption. See the [Measuring Current Consumption App Note] for details and setup.
We want this change to happen at runtime, thus it cannot be configured in
SysConfig. Open the application file (app_peripheral.c). In order to see if
the application has received any scan requests, we have to add
BLEAPPUTIL_SCAN_REQ_RECEIVED to the event mask. In app_peripheral.c we will need to modify the
peripheralAdvHandler struct:
BLEAppUtil_EventHandler_t peripheralAdvHandler =
{
    .handlerType    = BLEAPPUTIL_GAP_ADV_TYPE,
    .pEventHandler  = Peripheral_AdvEventHandler,
    .eventMask      = BLEAPPUTIL_ADV_START_AFTER_ENABLE |
                      BLEAPPUTIL_ADV_END_AFTER_DISABLE  |
                      BLEAPPUTIL_ADV_SET_TERMINATED     |
                      BLEAPPUTIL_SCAN_REQ_RECEIVED
};
Whenever a scan request is received, an event will be sent to the GapAdv
callback function (Peripheral_AdvEventHandler()). We can use this event to
set the advertisement interval, using the BLEAppUtil_setParam() API. However,
before the BLEAppUtil_setParam() is used, advertising has to be disabled.
The scan request event is received in Peripheral_AdvEventHandler(), as
BLEAPPUTIL_SCAN_REQ_RECEIVED.
Inside this event we need to disable advertising (because
BLEAppUtil_setParam()can not be used while advertising is enabled)The event is posted every time the device receives a scan request. However we only want to update the advertisement interval once, so check whether this one is already updated.
Solution for BLEAPPUTIL_SCAN_REQ_RECEIVED
case BLEAPPUTIL_SCAN_REQ_RECEIVED:
{

    MenuModule_printf(APP_MENU_SCAN_EVENT, 0, "Scan req: "
                      MENU_MODULE_COLOR_YELLOW "%d" MENU_MODULE_COLOR_RESET,
                      ((BLEAppUtil_AdvEventData_t *)pMsgData)->pBuf->advHandle);


    BLEAppUtil_AdvEventData_t * pkt = (BLEAppUtil_AdvEventData_t *)pMsgData;

    if (pkt->pBuf->advHandle == peripheralAdvHandle_1)
    {

        uint32_t advInterval = 0;
        GapAdv_getParam(peripheralAdvHandle_1,
                        GAP_ADV_PARAM_PRIMARY_INTERVAL_MIN,
                        &advInterval, NULL);

        if (advInterval != 160)
        {
            BLEAppUtil_advStop(peripheralAdvHandle_1);
        }
    }
    break;
}
When advertisement is disabled, GAP posts an event,
BLEAPPUTIL_ADV_END_AFTER_DISABLE. Inside this event we know that advertising is
disabled, so we can use BLEAppUtil_setParam().
Find the list of advertising parameters that can be changed with
GapAdv_setParam()in gap_advertiser.h (Hint: Look for the type definition of GapAdv_ParamId_t.). Find the parameter you would like to change.Again, the advertisement interval is given in units of 0.625 ms. Calculate the correct value for 100 ms advertisement interval.
Make sure the advertisement interval is only updated once.
Remember to re-enable advertising.
You can read about
GapAdv_setParam()ingap.hor go to the API Reference Guide by navigating to the BLE5 Stack User’s Guide and go to API References → GAP.
Solution for BLEAPPUTIL_ADV_END_AFTER_DISABLE:
case BLEAPPUTIL_ADV_END_AFTER_DISABLE:
{

    MenuModule_printf(APP_MENU_ADV_EVENT, 0, "Adv status: Ended - handle: "
                      MENU_MODULE_COLOR_YELLOW "%d" MENU_MODULE_COLOR_RESET,
                      ((BLEAppUtil_AdvEventData_t *)pMsgData)->pBuf->advHandle);


    uint32_t advInterval = 0;
    GapAdv_getParam(peripheralAdvHandle_1,
                    GAP_ADV_PARAM_PRIMARY_INTERVAL_MIN,
                    &advInterval, NULL);

    if (advInterval != 160)
    {
        advInterval = 160;
        GapAdv_setParam(peripheralAdvHandle_1,
                        GAP_ADV_PARAM_PRIMARY_INTERVAL_MIN,
                        &advInterval);

        GapAdv_setParam(peripheralAdvHandle_1,
                        GAP_ADV_PARAM_PRIMARY_INTERVAL_MAX,
                        &advInterval);

        // Re-enable advertising.
        BLEAppUtil_advStart(peripheralAdvHandle_1, &advSetStartParamsSet_1);
    }

    break;
}
If you haven’t loaded the basic_ble project into your device yet - do it now!
After you have completed Scanning Task 1, come back to this quiz and adjust advertising interval accordingly in basic_ble. Also refer to the tips in Choosing Advertising Interval: Fast or Slow and Optimizing Scanning: How to get data fast?
Scanning#
Scanning Basics#
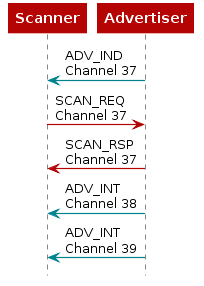
When not connected, Bluetooth Low Energy devices can either advertise their presence by transmitting advertisement packets or scan for nearby devices that are advertising. The process of scanning for devices is called device discovery. There are two types of scanning; active and passive. The difference is that an active scanner can send a scan request to request additional information from the advertiser, while a passive scanner can only receive data from advertising device. Note that the terms discovery and scanning may be used interchangeably. The figure below shows the sequence where the scanner sends a scan request to an advertiser during an advertising event.
When it comes to the timing of a scan, there are a few parameters you need to get familiar with. Each of these parameters has a range dictated by the Bluetooth Core Specification. The Time Inter Frame Space (T_IFS) is the time interval between two consecutive packets on the same channel index and is set to 150us by the BLE specification.
Scan Parameter |
Description |
Range |
|---|---|---|
Scan Interval |
The interval between the start of two consecutive scan windows |
10ms to 10.24s |
Scan Window |
The duration in which the [Link Layer]{The Link Layer is a layer in the controller, see the figure in the Background section.} scans on one channel |
10ms to 10.24s |
Scan Duration |
The duration in which the device stays in the scanning state |
10ms to [infinity]{Max value is 65534ms but if this value is set to 0, the device scans indefinitely} |
The following diagram visually shows the scanning parameters:
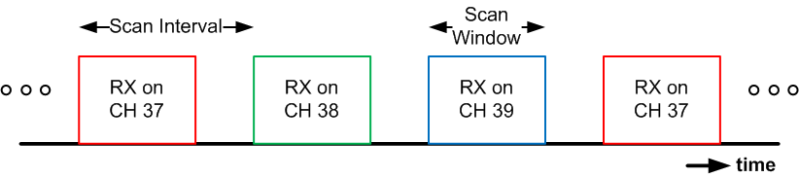
Note that the order of the scanning channels are not configurable. The device will scan on channel 37 (2402 MHz), then channel 38 (2426 MHz), and then channel 39 (2480 MHz) respectively and in that order on every scanning interval for the length of time defined by the scanning window.
Scanning Packets#
Scannable advertisement packets on secondary advertising channels can also incite a scan request and scan response. These are called AUX_SCAN_REQ and AUX_SCAN_RSP. All scanning related packets are summarized in the following table:
Scanning PDU |
Transmitting device |
Payload |
|---|---|---|
SCAN_REQ |
Scanner |
Scanner’s address + advertiser’s address |
SCAN_RSP |
Advertiser |
Advertiser’s address + 0-31 bytes scan response data |
AUX_SCAN_REQ |
Scanner |
Scanner’s address + advertiser’s address |
AUX_SCAN_RSP |
Advertiser |
[Header]{Common Extended Advertising Payload Format header} + 0-254 bytes data |
You can read more about each scanning PDU in the Bluetooth Core Specification.
Scan requests and scan responses are always sent on the same channel and PHY as the advertising packet that prompted them.
The following tasks will demonstrate scanning using the basic_ble project. If you haven’t already done so, import basic_ble to your workspace!
Scanning Task 1 – Change Scanning Parameters#
Before we change the scan parameters, let’s find out where to change this in
SysConfig. Open basic_ble.syscfg and change the Device Role to Central
and scroll down to the Observer section of the BLE configuration tab.
The following is a screenshot of the default scan
settings.

In this task, we will scan continuously with the following scan parameters:
Scan interval: 150 ms
Scan window: 150 ms
Scan duration: 5 s
Scan type: Passive
Scan PHY: LE 1M PHY (Legacy scanning)
Once you have changed the settings as above, open the
Show Generated Files view (Look for the <> icon at the top right of the SysConfig window!)
to see the changes in ti_ble_config.h.
In
gap_scanner.hyou can find a full description on all parameters that can be configured for the GAP Scanner module.
Warning
Two Kinds of Discovery Note that this discovery procedure to discover nearby devices is not to be confused with the characteristic discovery procedure which can be started after a connection is established.
If you haven’t loaded the basic_ble project into your device yet –
now is the time!
Scanning Task 2 – Print Scanning Results#
Every time the device receives an advertisement or scan response packet, the
application receives a BLEAPPUTIL_ADV_REPORT event from the GAP layer. This event
is caught in Central_ScanEventHandler() (you can see and change what GAP Scanner
events Central_ScanEventHandler() will receive in the centralConnHandler structure).
The information received during a scan, used to discover devices advertising, is encapsulated in the bleStk_GapScan_Evt_AdvRpt_t structure:
/// Event for advertising report
typedef struct {
  /**
   * Bits 0 to 4 indicate connectable, scannable, directed, scan response, and
   * legacy respectively
   */
  uint8_t  evtType;
  /// Public, random, public ID, random ID, or anonymous
  GAP_Addr_Types_t addrType;
  /// Address of the advertising device
  uint8_t  addr[B_ADDR_LEN];
  /// PHY of the primary advertising channel
  GapScan_ScannedPhy_t primPhy;
  /// PHY of the secondary advertising channel
  GapScan_ScannedPhy_t secPhy;
  /// SID (0x00-0x0f) of the advertising PDU. 0xFF means no ADI field in the PDU
  uint8_t  advSid;
  /// -127 dBm <= TX power <= 126 dBm
  int8_t   txPower;
  /// -127 dBm <= RSSI <= 20 dBm
  int8_t   rssi;
  /// Type of TargetA address in the directed advertising PDU
  GAP_Addr_Types_t directAddrType;
  /// TargetA address
  uint8_t  directAddr[B_ADDR_LEN];
  /// Periodic advertising interval. 0 means no periodic advertising.
  uint16_t periodicAdvInt;
  /// Length of the data
  uint16_t dataLen;
  /// Pointer to advertising or scan response data
  uint8_t  *pData;
} bleStk_GapScan_Evt_AdvRpt_t;
We will need to update the CentralScanHandler to receive the BLEAPPUTIL_ADV_REPORT.
// Events handlers struct, contains the handlers and event masks
// of the application central role module
BLEAppUtil_EventHandler_t centralScanHandler =
{
    .handlerType    = BLEAPPUTIL_GAP_SCAN_TYPE,
    .pEventHandler  = Central_ScanEventHandler,
    .eventMask      = BLEAPPUTIL_SCAN_ENABLED |
                      BLEAPPUTIL_SCAN_DISABLED |
                      BLEAPPUTIL_ADV_REPORT
};
Now we can update the Central_ScanEventHandler() :: BLEAPPUTIL_ADV_REPORT to print out
the data in the advertisment reports we receive.
case BLEAPPUTIL_ADV_REPORT:
{
    bleStk_GapScan_Evt_AdvRpt_t *pScanRpt = &scanMsg->pBuf->pAdvReport;
    if (pScanRpt->pData != NULL)
    {
        uint8_t indx = 0;
        for (; indx < pScanRpt->dataLen; indx++)
        {
            MenuModule_printf(APP_MENU_SCAN_EVENT + indx, 0, "Data: %d", pScanRpt->pData[indx]);
        }
    }
    break;
}
Re-build and flash the project. Now we can see the data in the advertisement report!
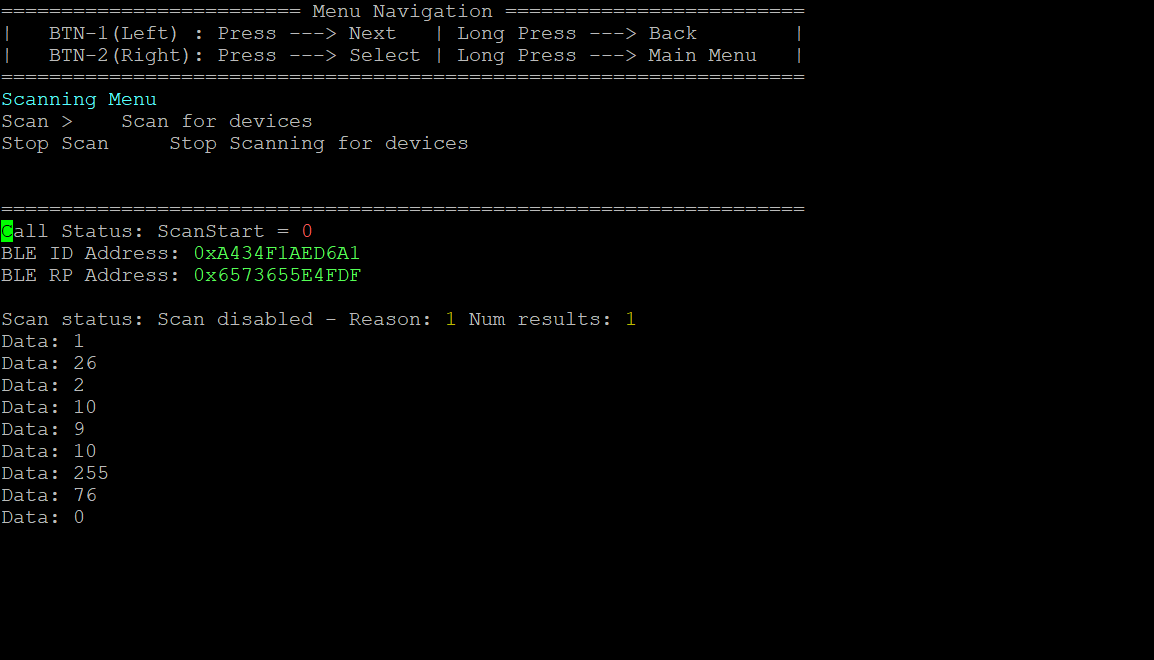
You may notice that you only receive advertisement packets and no scan response packets. This is because in the last task we configured the device to do passive scanning, i.e. we’re not sending out scan requests.
Scanning Task 3 – Scan Indefinitely#
When the application needs to scan for nearby devices at all times, i.e. always
be in the scanning state. We can set these parameters in the centralScanStartParams structure.
By setting the centralScanStartParams.scanDuration variable to 0, we can scan indefinitely.
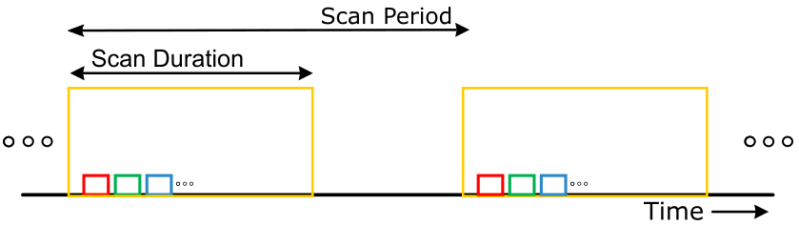
Alternatively, we can set the device to scan continuously for a while, then take a break periodically.
We will do this by setting the scan duration and scan period as follows:
Scan duration: 1 s
Scan period: 5 s
const BLEAppUtil_ScanStart_t centralScanStartParams =
{
/*! Zero for continuously scanning */
.scanPeriod     = 4, /* Units of 1.28sec */

/*! Scan Duration shall be greater than to scan interval,*/
/*! Zero continuously scanning. */
.scanDuration   = 0, /* Units of 10ms */

/*! If non-zero, the list of advertising reports will be */
/*! generated and come with @ref GAP_EVT_SCAN_DISABLED.  */
.maxNumReport   = 0
};
This will make the device scan for 1 s, then pause for 4 s, before scanning for 1 s, etc.
Note that even in indefinite scanning, the number of scanned results will still
be limited by centralScanStartParams.maxNumReport. In this case, centralScanStartParams.maxNumReport is
set to 0. When zero, this parameter is ignored.
Filter Duplicate Advertisers#
For some applications, processing multiple advertisements by the same peer device can be useful. E.g. when collecting information from a beacon that updates its advertisement data frequently. By default, the scanning device will filter advertising data. You can turn this off by navigating to the Observer Configuration tab in SysConfig and setting Duplicate Filter to disabled.
To modify the filtering parameters, modify the following structure:
const BLEAppUtil_ScanInit_t centralScanInitParams =
{
/*! Opt SCAN_PRIM_PHY_1M | SCAN_PRIM_PHY_CODED */
.primPhy                    = SCAN_PRIM_PHY_1M,

/*! Opt SCAN_TYPE_ACTIVE | SCAN_TYPE_PASSIVE */
.scanType                   = SCAN_TYPE_ACTIVE,

/*! Scan interval shall be greater than or equal to scan window */
.scanInterval               = 800, /* Units of 625 us */

/*! Scan window shall be less than or equal to scan interval */
.scanWindow                 = 800, /* Units of 625 us */

/*! Select which fields of an advertising report will be stored */
/*! in the AdvRptList, For mor field see @ref Gap_scanner.h     */
.advReportFields            = SCAN_ADVRPT_FLD_ADDRESS |
                              SCAN_ADVRPT_FLD_ADDRTYPE,

/*! Opt SCAN_PRIM_PHY_1M | SCAN_PRIM_PHY_CODED */
.scanPhys                   = SCAN_PRIM_PHY_1M,

/*! Opt SCAN_FLT_POLICY_ALL | SCAN_FLT_POLICY_WL |   */
/*! SCAN_FLT_POLICY_ALL_RPA | SCAN_FLT_POLICY_WL_RPA */
.fltPolicy                  = SCAN_FLT_POLICY_ALL,

/*! For more filter PDU @ref Gap_scanner.h */
.fltPduType                 = SCAN_FLT_PDU_CONNECTABLE_ONLY |
                              SCAN_FLT_PDU_COMPLETE_ONLY,

/*! Opt SCAN_FLT_RSSI_ALL | SCAN_FLT_RSSI_NONE */
.fltMinRssi                 = SCAN_FLT_RSSI_ALL,

/*! Opt SCAN_FLT_DISC_NONE | SCAN_FLT_DISC_GENERAL | SCAN_FLT_DISC_LIMITED
 *  | SCAN_FLT_DISC_ALL | SCAN_FLT_DISC_DISABLE */
.fltDiscMode                = SCAN_FLT_DISC_DISABLE,

/*! Opt SCAN_FLT_DUP_ENABLE | SCAN_FLT_DUP_DISABLE | SCAN_FLT_DUP_RESET */
.fltDup                     = SCAN_FLT_DUP_ENABLE,
};
You can read about all the different scanning filters available in
gap_scanner.hin the BLE5 Stack User’s Guide.
Miscellaneous Guidelines#
Choosing advertising interval: Fast or slow?#
The advertising interval should be set based on use case. Both fast and slow advertising have pros and cons:
Slow advertising: higher advertising interval, lower power consumption, low probability of short discovery time.
Fast advertising: lower advertising interval, higher power consumption, high probability of short discovery time.
Optimizing Scanning: How to get data quickly?#
In a time-constrained application, when the user needs to receive the data as fast as possible, make sure that the scan window is more than the advertising interval + 10ms to guarantee discovery. (The 10 ms extra account for the 0 ms to 10 ms of pseudo-random delay in between each advertising event, assuming no interference.) Following this rule will increase the chance of receiving the advertising packet on the first scan.
References#
[SimpleLink™ CC2340R5 LaunchPad™]
SIMPLELINK-LOWPOWER-F3-SDK
BLE5 Stack User’s Guide
TI BLE5-Stack API References
EnergyTrace ™
CCS 12.3
Bluetooth Core Specification
Core Specification Supplement (CSSv7, Part A, Chapter 1)
FreeRTOS
TI BLE5-Stack Quick Start