Introduction
This workshop shows how to use the SimpleLink™ MQTT library, which enables you to connect as a MQTT Client to a cloud MQTT broker and/or create a local MQTT broker that can serve as a gateway for local MQTT clients.
This workshop will walk you through an overview of the MQTT protocol and then walk through the bring up of two MQTT demos:
- MQTT Client Example
- MQTT Client-Server Example
Prerequisites
Software
- Code Composer Studio v9.2 or later
- Must have SimpleLink MSP432 support
- Make sure that CCS is using the latest updates: Help → Check for Updates
- MSP432E4 SDK v3.30.00.xx or later
- Terminal emulator program such as TeraTerm or PuTTY
- MQTT client application on an internet-connected smartphone/computer (e.g. MyMQTT for Android, ICPDAS MQTT for iOS)
Hardware
- 2x MSP432E4 LaunchPad™ (MSP-EXP432E401Y)
- 2x Micro-USB cable (included with LaunchPad)
- Ethernet Connection to Internet
Note
The MQTT Client-Server exercise in this lab requires two MSP-EXP432E401Y LaunchPads. The MQTT Client exercise can be completed with one LaunchPad.
Further Reading
- SysConfig Basics
- under SimpleLink Academy→Tools→SysConfig Tool Basics
MQTT Overview
MQTT Protocol
MQTT (Message Queue Telemetry Transport) protocol is a light-weight machine-to-machine connectivity protocol. It is based on a publish/subscribe messaging model and is designed to be used on the top of TCP/IP protocol. Key benefits of this protocol include small code footprint and a low network bandwidth requirement. Other features include faster response time, low power requirement, and ease of scalability. All of these advantages make it an ideal candidate for a communication protocol in embedded devices intended to implement IOT (Internet of Things) applications.
A Simple MQTT infrastructure contains a broker (like a central hub) connected to multiple clients, each of which has the capability of publishing on any topic (token). The broker has the responsibility of sending the message published on any topic to all the subscribers of that topic. A typical MQTT network has many more features and configuration parameters.
SimpleLink MQTT Library
The MQTT library abstracts the underlying intricacies of a MQTT network and provides the user application with an intuitive and easy to use API to implement the MQTT protocol on the SimpleLink devices. Separate modules and APIs are used for the MQTT Server and the MQTT Client functionality.
The Client API includes the following:
- Create (or delete) a client instance
- Connect to an MQTT server (based on URL or IP Address)
- Subscribe (or unsubscribe) to a topic
- Publish a topic and a message
- Run the client main task loop
The Server has a similar interface excluding the Connect command. The source for the MQTT library can be found under simplelink_msp432e4_sdk_x_xx_xx_xx/source/ti/net/mqtt.
MQTT Client Demo
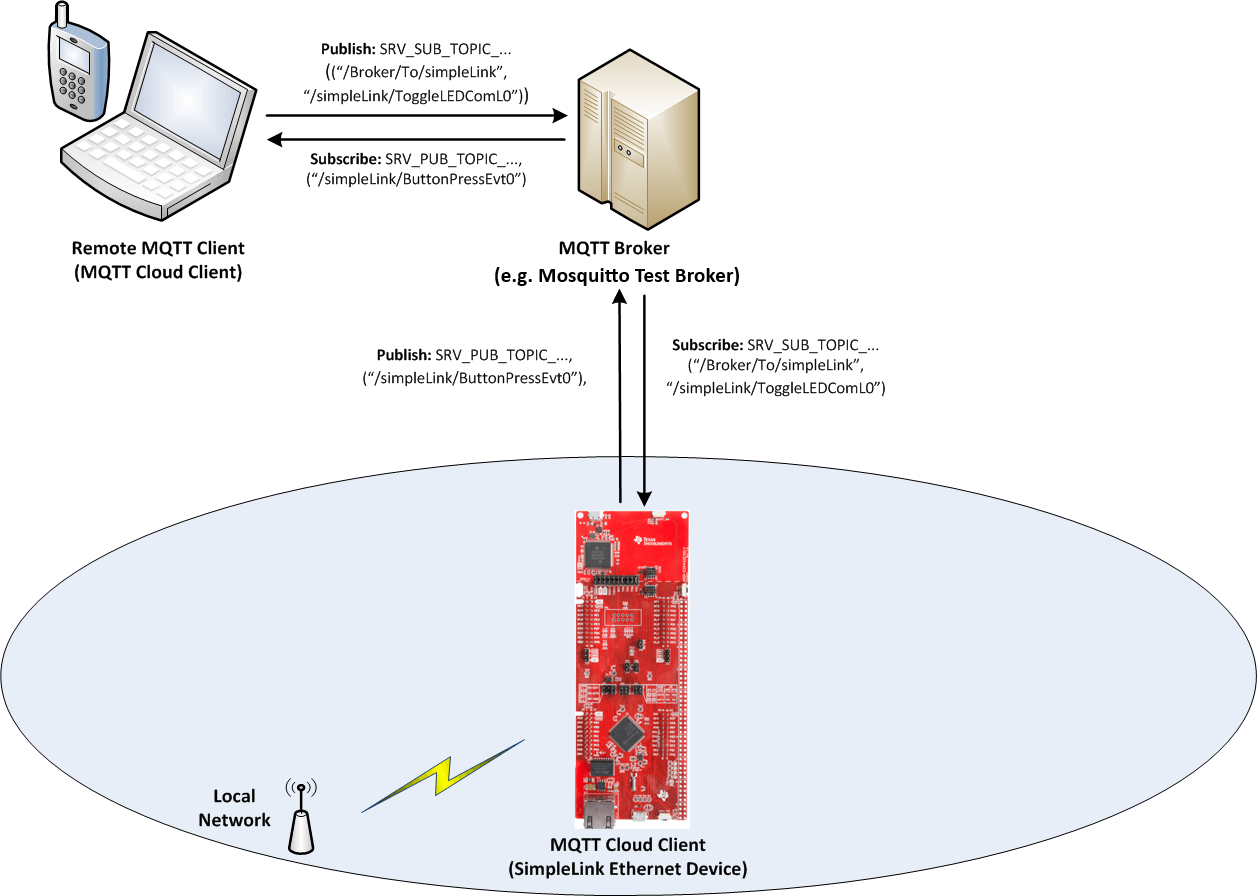
This application uses the MQTT Client API to communicate with an Mosquitto Test broker. An LED on the Launchpad can be controlled from a remote MQTT client by publishing messages on appropriate topics. Similarly, a message can be published on pre-configured topics (defined in the code) by pressing a button on the host platform.
Task 1: Preparing the MQTT Client application
In CCS, import the
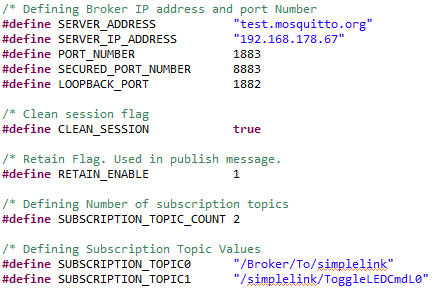
mqttclient_MSP_EXP432E401Y_tirtos_ccsexample (simplelink_msp432e4_sdk_x_xx_xx_xx/examples/rtos/[board]/ns/mqttclient/tirtos/ccs)Take a look at your MQTT settings. They can be found in the macros at the beginning of
mqtt_client_app.c. The important ones are:SERVER_ADDRESSPORT_NUMBERSubscription topics:
SUBSCRIPTION_TOPIC0SUBSCRIPTION_TOPIC1
ClientId(must be unique)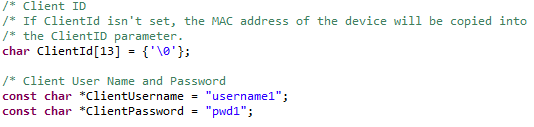
If
ClientIdis not specified, it is by default set to the local MAC Address inSetClientIdNamefromMacAddress()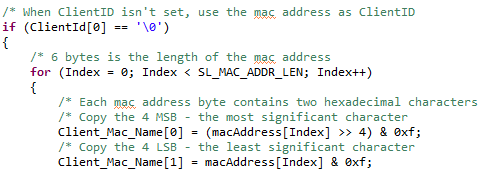
Publishing topics:
publish_topicpublish_data

In this example, the client subscribes to 2 topics and publishes to 1 topic.
Task 2: Setting up the MQTT Client demo
Start a CCS Debug session to load and run the application.
Open a terminal emulation program such as TeraTerm and select the XDS110 Class Application/User UART port.
UART Configuration
Baud rate: 115200
Data: 8 bit
Parity: None
Stop: 1 bit
Flow control: None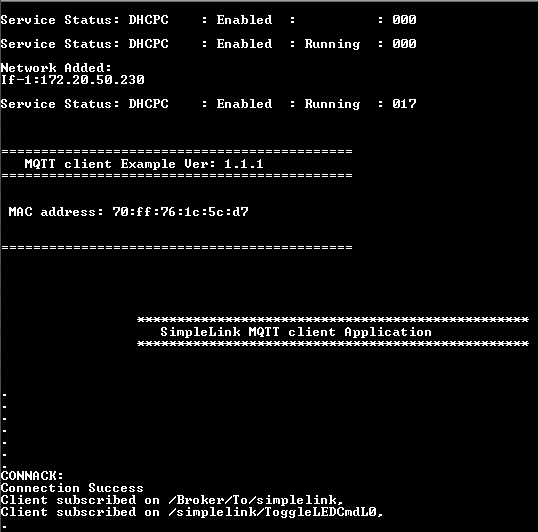
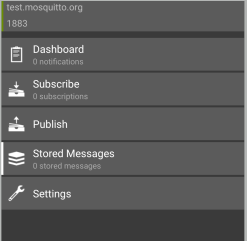
On a mobile device, use the installed MQTT client (see prerequisite) to connect to the MQTT broker used by this example: test.mosquitto.org
- Verify that the port is 1883 and select a unique Client ID.
- Leave all other settings as default, and Connect.
Task 3: Running the MQTT Client application
Send a message from the MQTT client app to the SimpleLink device by publishing the
/simplelink/ToggleLEDCmdL0topic. You should see an LED toggle on the LaunchPad.Use
/Broker/To/simplelinktopic to send a text message that will be printed on the console.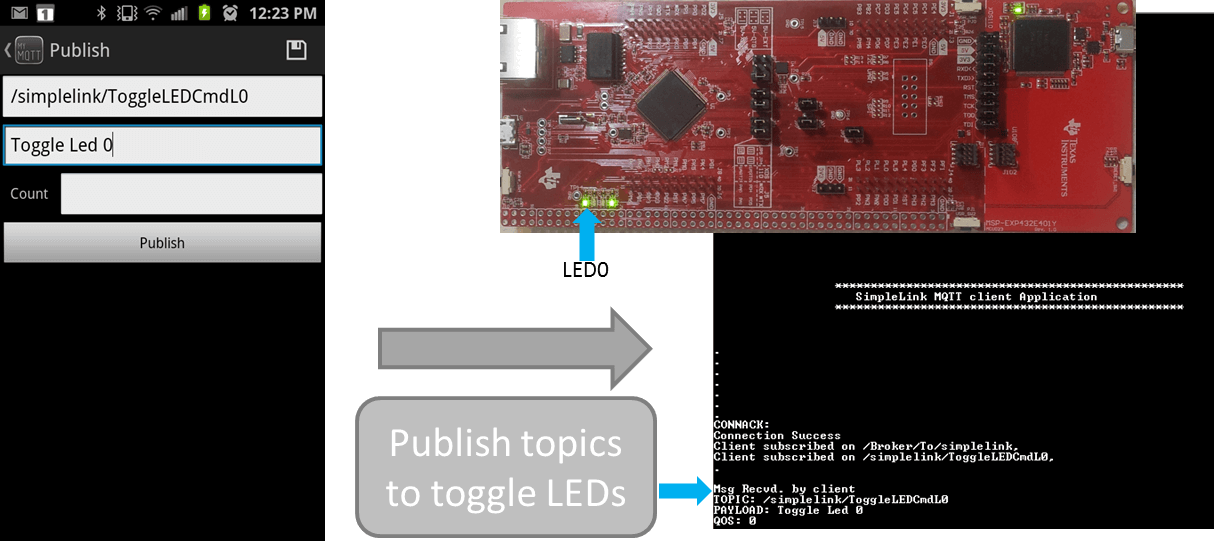
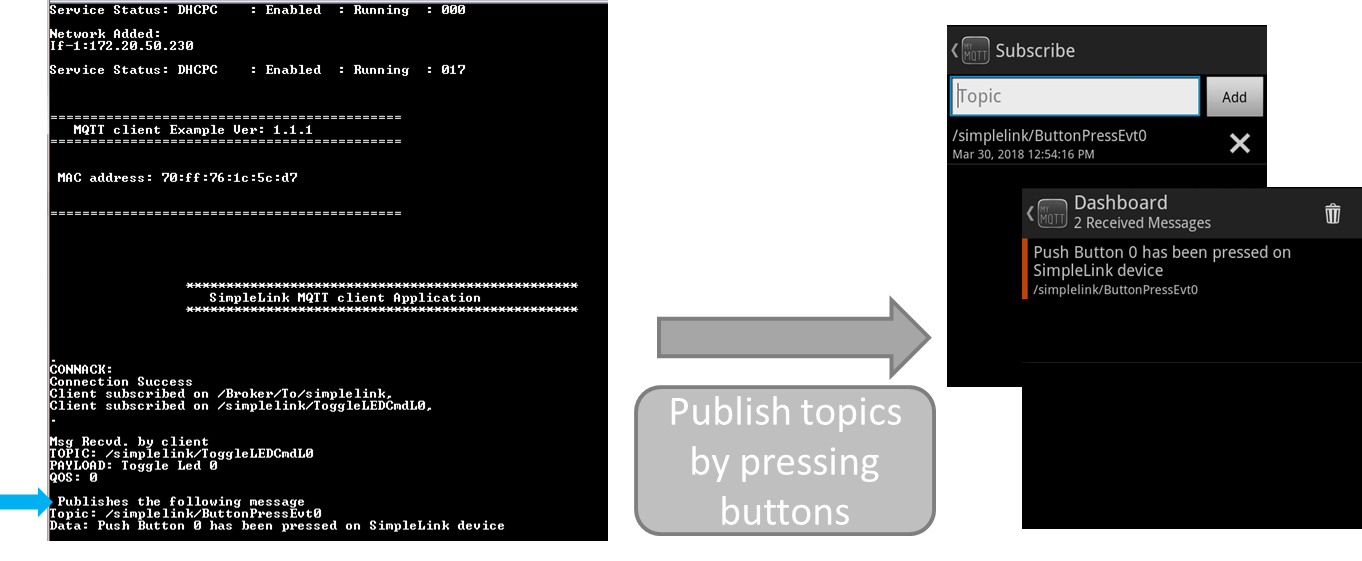
Using the MQTT client app, subscribe to the topic published by the SimpleLink client (
/simplelink/ButtonPressEvt0).Send a message from the SimpleLink device to the MQTT client app by pressing the button on the left side of the Launchpad (USR_SW1).
MQTT Client-Server Demo
In this example, the SimpleLink device is running a MQTT server (“local broker”) which allows local MQTT clients to communicate with each other. Simultaneously, it is also running a client which is connected to a cloud broker. This operation mode is also called “bridge mode.” The interface between the on-board client and the server is such that the local clients can also communicate with the remote MQTT clients, which are connected to the same cloud broker as the on-board client.
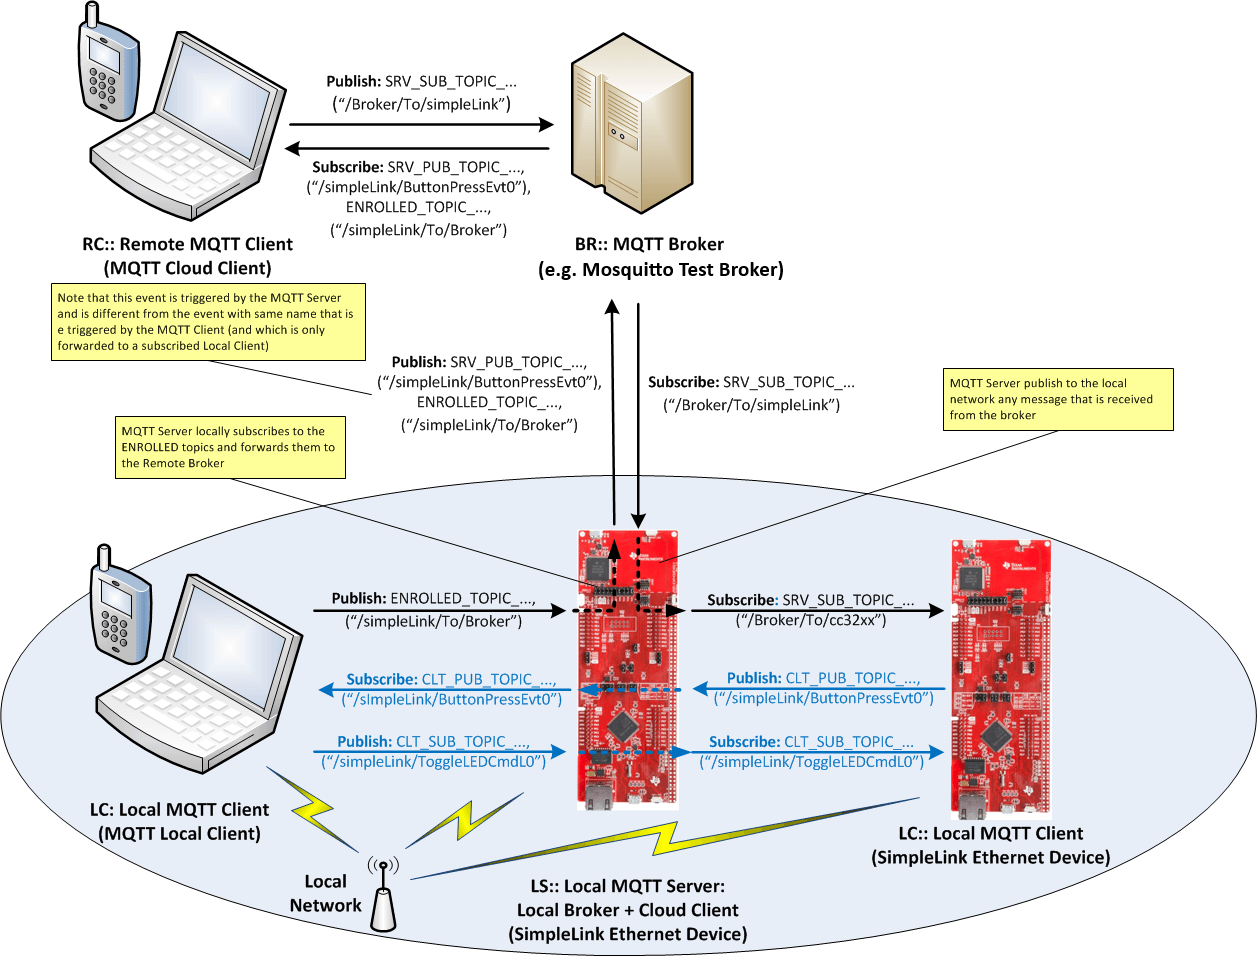
MQTT allows remote control of an IOT device through a cloud-based broker. Every transaction through the external broker has a fee. The Client-Server demo demonstrates a solution for the local network that will eliminate the need for cloud broker access.
Within the local (home) network, the controlling device (typically a mobile phone) should connect to a local server rather than the cloud broker. The sample application demonstrates a working setup where multiple local MQTT clients can communicate with each other as well as talk to a remote client via an external broker.
For simplicity, the following abbreviations are used:
- LC: MQTT Client (Local Client)
- This can be the SimpleLink platform(s) running the MQTT Client application or a smartphone
- LS: One SimpleLink platform running MQTT Server/Bridge (Local Server)
- RC: Remote MQTT Client (mobile MQTT app connected to the Mosquitto Test Broker)
- BR: External MQTT Broker (Mosquitto Test Broker)
- AP: The access point with internet connection
LC1, LC2, and LS are all connected to the same AP. The server address configuration for LC(s) is the local address of LS.
Task 4: Setting up the MQTT Server/Bridge
In this task we setup the local MQTT Server, LS, on a MSP_EXP432E401Y.
Import the
mqttclientserver_MSP_EXP432E401Y_tirtos_ccsexample (simplelink_msp432e4_sdk_x_xx_xx_xx/examples/rtos/MSP_EXP432E401Y/ns/mqttclientserver/tirtos/ccs).Take a look at your settings for the MQTT Server/Bridge. They can be found in the macros at the beginning of
mqtt_server_app.c. The important ones are:SERVER_ADDRESS: Since we usedtest.mosquitto.orgbroker for MQTT Client Demo, we will use the same broker here.ClientIdpublish_topicSUBSCRIPTION_TOPIC0ENROLL_TOPIC: These events received by the local MQTT server, will be distributed (published) to the cloud server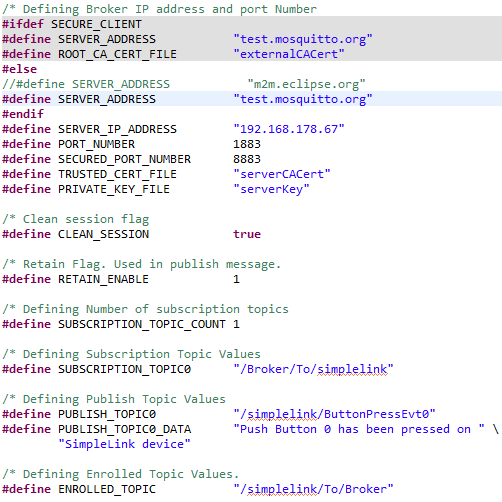
Recompile the MQTT Client-Server application and program it to an MSP_EXP432E401Y. This is your LS (Local Server) device.
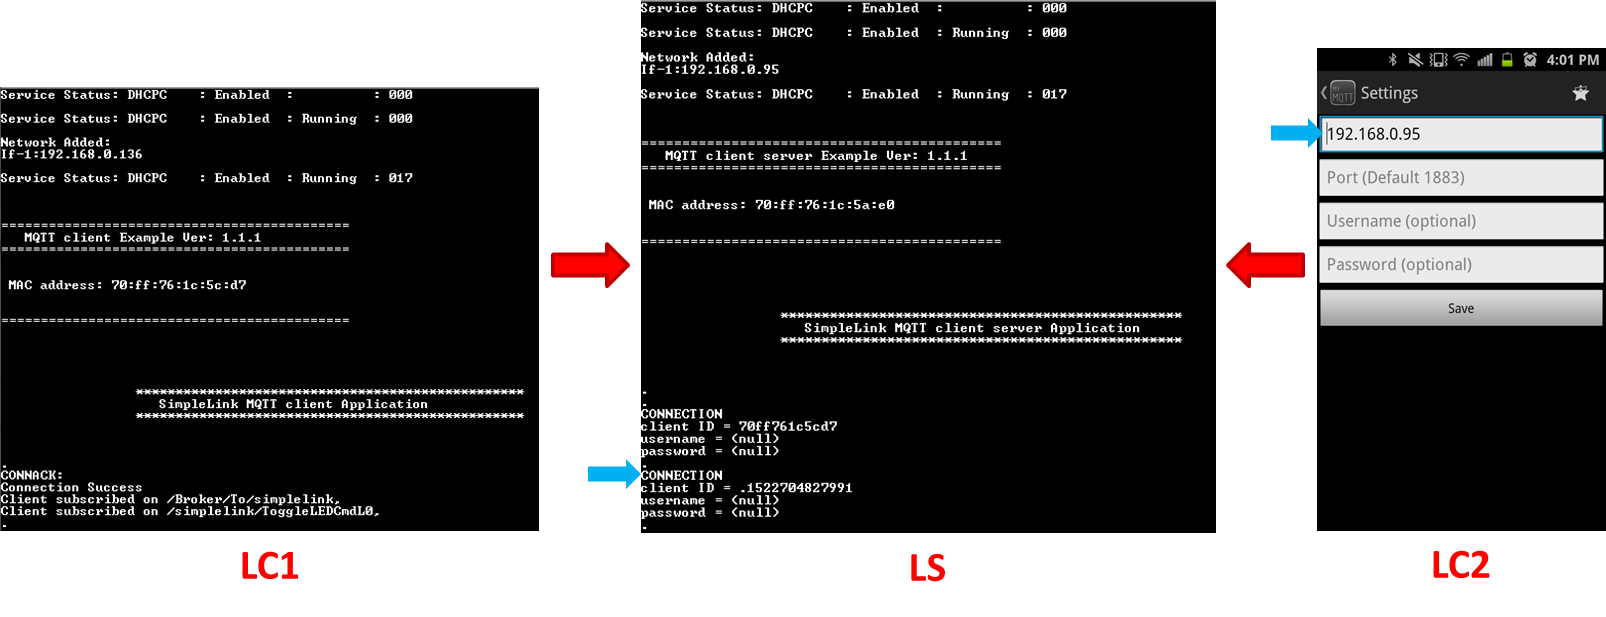
Task 5: Setting up the MQTT Clients
In this task, we setup the local MQTT Clients. We will setup the second MSP_EXP432E401Y as LC1 and use the mobile app as LC2.
We need to find the server IP address in order to set up the local client. To find the server IP address, start by running the MQTT Client-Server application on the target device with CCS debugger. This is your LS (Local Server).
Open a terminal emulation program such as TeraTerm and select the XDS110 Class Application/User UART port.
UART Configuration
Baud rate: 115200
Data: 8 bit
Parity: None
Stop: 1 bit
Flow control: NoneOnce the terminal is connected, run the Client-Server application and record the IP address. Enter this address in the
SERVER_IP_ADDRESSdefinition inside themqtt_client_app.cof themqttclientapplication.Use the rest of settings from the MQTT Client example we completed earlier (task 1).
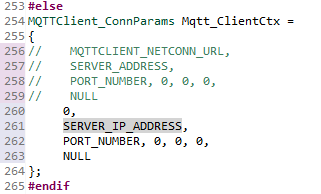
Search for the
Mqtt_ClientCtxstructure inmqtt_client_app.cin the Variables section. Set the flags and address to the local broker address (shown below). We need the Local Clients to be linked to the Local Server by IP address instead of the example's default URL.MQTTClient_ConnParams Mqtt_ClientCtx = { // MQTTCLIENT_NETCONN_URL, // SERVER_ADDRESS, // PORT_NUMBER, 0, 0, 0, // NULL 0, SERVER_IP_ADDRESS, PORT_NUMBER, 0, 0, 0, NULL };mqtt_client_app.c :: Mqtt_ClientCtx
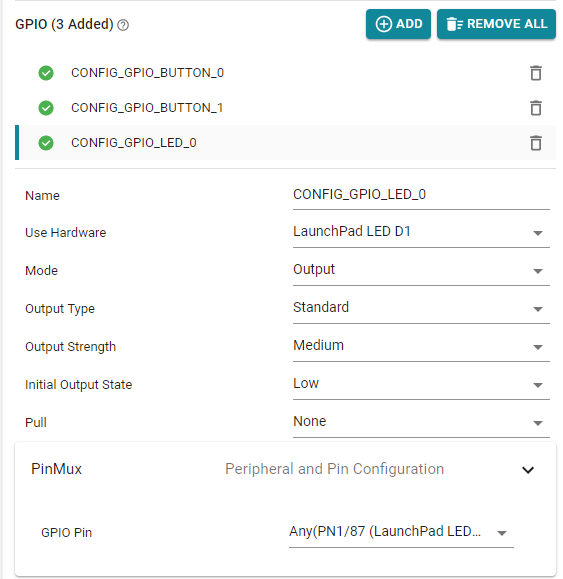
Check that the LED is being configured correctly in the
mqttclient.syscfgfile.- Double click on the
mqttclient.syscfgfile in CCS. This will launch the SysConfig GUI. - In the SysConfig GUI, under the section
TI DRIVERS, selectGPIO. - This will open the configurations of the different GPIOs that were configured for this example.
Refer the image below for correct configuration.
Note
A more detailed introduction to SysConfig is available in the Sysconfig Tool Basics located in the Simplelink Academy Tools folder.
- Double click on the
Recompile the
mqttclientapplication and program this to another MSP_EXP432E401Y. This is your LC1 (Local Client #1). LC1 should connect to LS.On your mobile app (LC2), connect to the same IP address you found with the MQTT server (task 5, step 3).
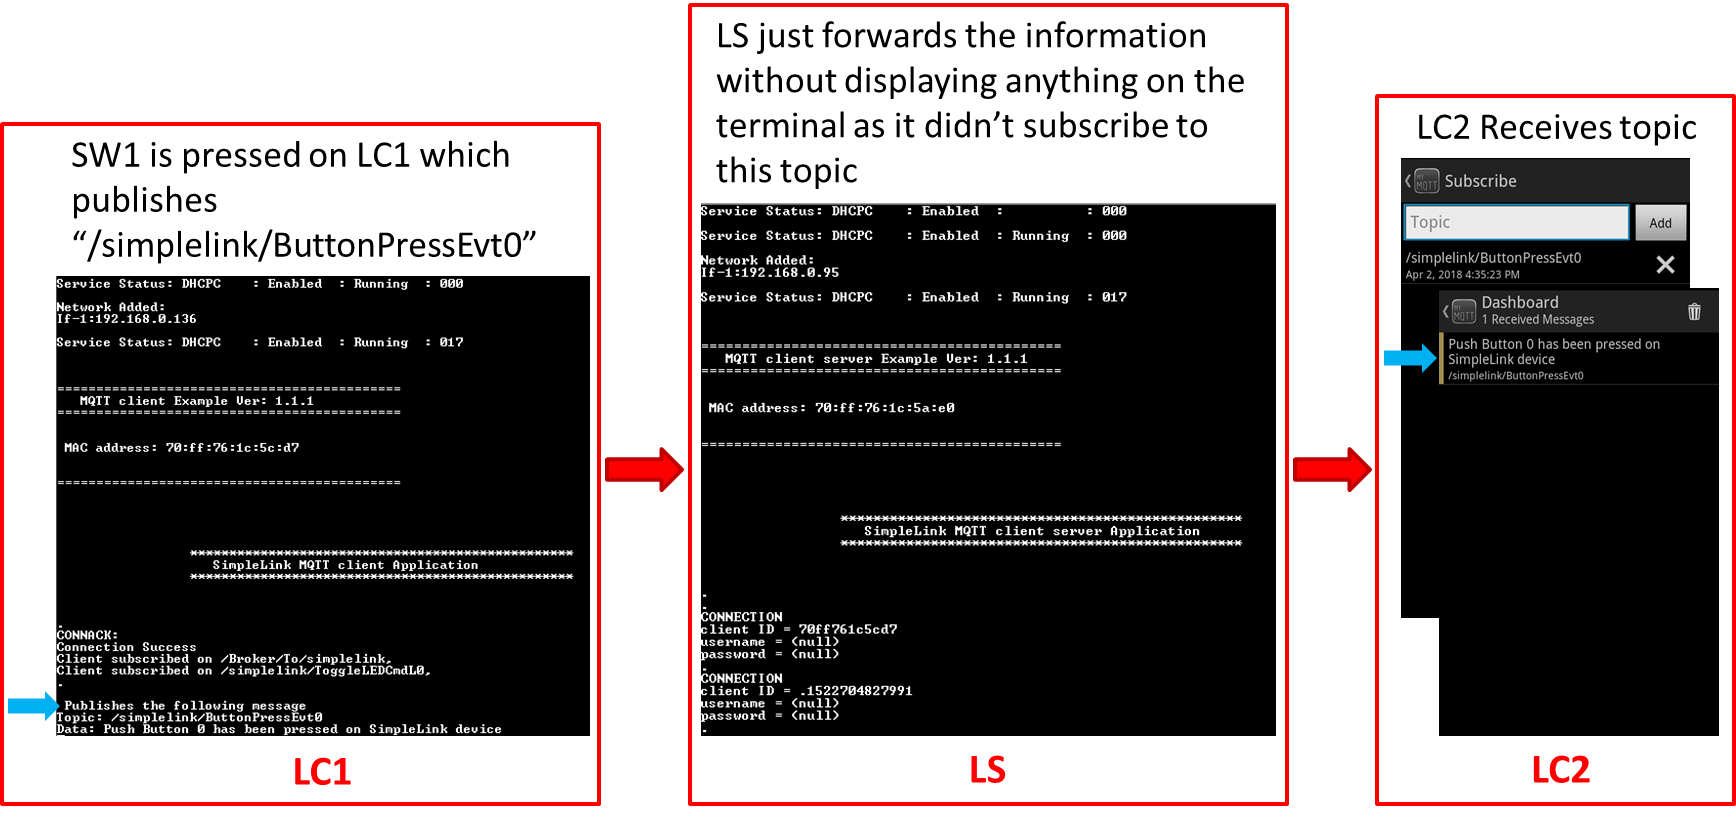
Task 6: Demo Local Communication (LC1 -> LS -> LC2)
This sequence demonstrates local communication (between two clients on a local network). In this demo, /simplelink/ButtonPressEvt0 is the text for PUBLISH_TOPIC0. This message is triggered by pressing the USR_SW1 on the MSP_EXP432E401Y LaunchPad.
Connect both local clients (LC1 and LC2) to the local server (LS).
LC2 subscribes to
PUBLISH_TOPIC0. (Use the text:/simplelink/ButtonPressEvt0.)Press USR_SW1 which makes LC1 publish
PUBLISH_TOPIC0.
Results
- LC2 receives the event (message will be printed through the terminal).
- Note that LS did not subscribe to the PUBLISH_TOPIC0, so LS shows nothing.
- RC (Remote Client) and BR (external broker) show nothing.
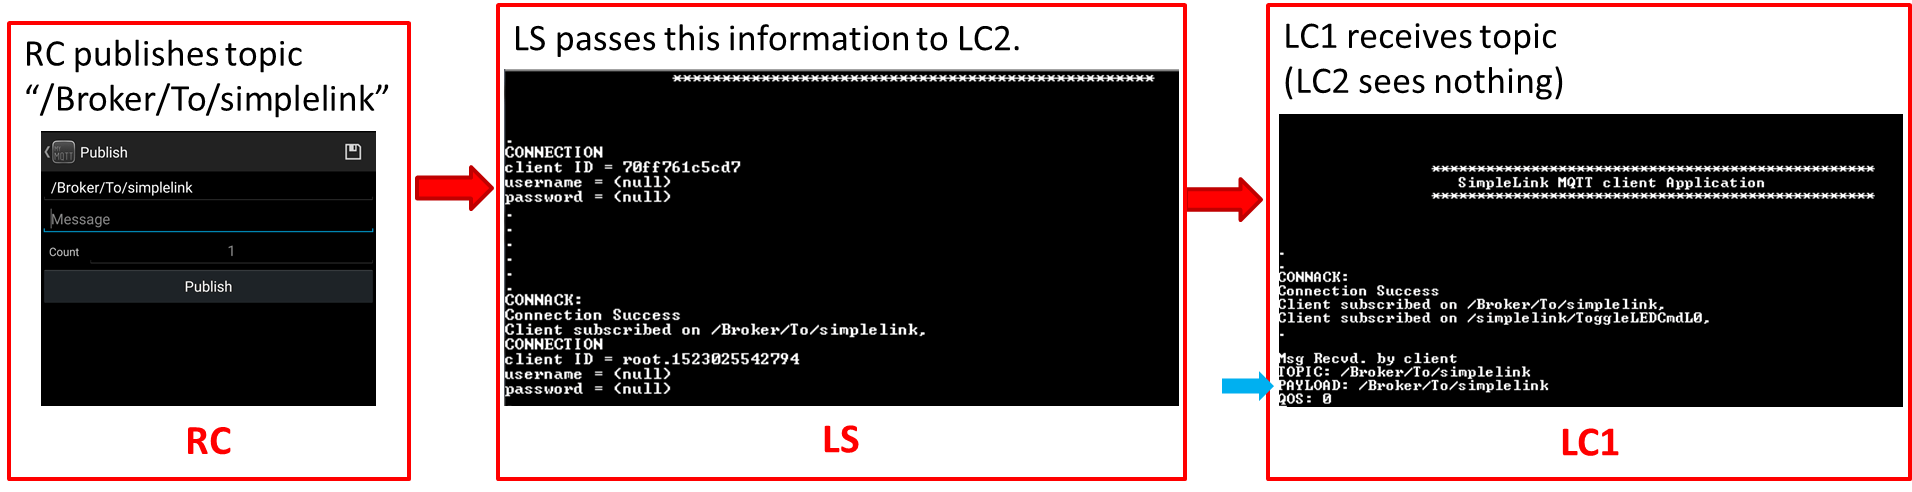
Task 7: Demo Remote Control (RC -> BR -> LS -> LC1)
This sequence demonstrates communication between a remote client, RC, (through the cloud) and an IOT device. In this demo, /Broker/To/simplelink will be the text for SUBSCRIPTION_TOPIC0. This message is triggered by entering text on RC.
Note
For rest of the lab, RC will be the same mobile app that we previously used as LC2. Instead of communicating over the local network, you may choose to connect your mobile to internet to demonstrate a remote client.
LC1 subscribes to
SUBSCRIPTION_TOPIC0. (Use the text:/Broker/To/simplelink.)LS (as a client of the BR) also subscribes to the same topic. LS will forward any message it receives from BR to the local network.
Publish the same text of
SUBSCRIPTION_TOPIC0(/Broker/To/simplelink) from the Remote Client (RC).
Results
- LS will publish the message in the local network.
- LC1 receives
SUBSCRIPTION_TOPIC0(see terminal) as a client on the local network. - Note LC2 shows nothing because it did not subscribe to
SUBSCRIPTION_TOPIC0.
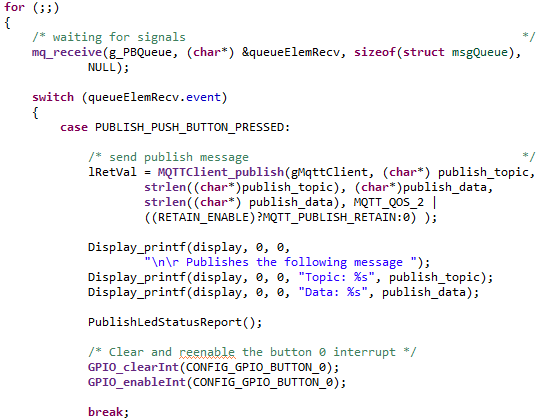
Task 8: Add a New Publish Function to MQTT Client
All the following modifications for this task are done within mqttclient_MSP_EXP432E401Y_tirtos_ccs/mqtt_client_app.c. We will be using this function later in the demos.
Add the function below to
mqtt_client_app.c. This publishes the status of the LED.#include "stdio.h" #define PUBLISH_TOPIC1 "/simplelink/To/Broker" const char *publish_topic1 = { PUBLISH_TOPIC1 }; static void PublishLedStatusReport() { char pubMsg[20]; /* retreive status of LED0 */ sprintf(pubMsg, "L0=%d", GPIO_read(CONFIG_GPIO_LED_0)); /* send publish message */ MQTTClient_publish(gMqttClient, (char *)publish_topic1, strlen((char *)publish_topic1), pubMsg, 4, MQTT_QOS_2 | MQTT_PUBLISH_RETAIN); Display_printf(display, 0, 0, "\n\r SimpleLink Device Publishes the following message \n\r"); Display_printf(display, 0, 0, "Topic: %s\n\r", publish_topic1); Display_printf(display, 0, 0, "Data: %s\n\r", pubMsg); }mqtt_client_app.c
Add the
PublishLedStatusReport()function call to the incoming message handler inMqttClient()as shown below.PublishLedStatusReport();mqtt_client_app.c :: MqttClient()
Recompile the
mqttclientapplication and program this to another MSP432E4. This is still your LC1 (Local Client #1).
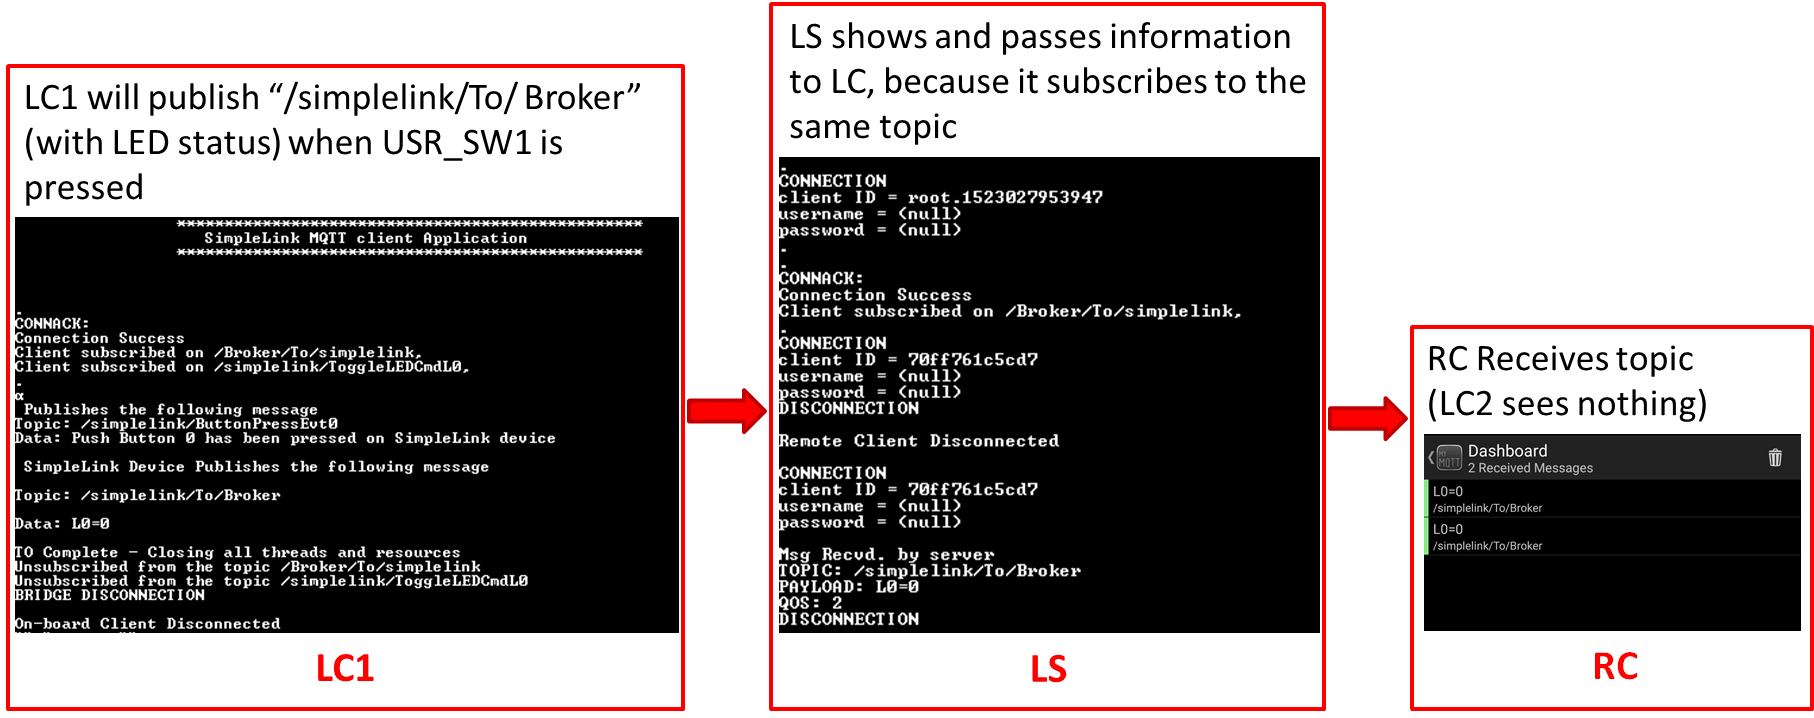
Task 9: Demo Remote Notification (LC1 -> LS -> BR -> RC)
This sequence demonstrates an IOT device sending a notification to a remote client (through the local server and the cloud broker). In this demo, /simplelink/To/Broker will be the text for PUBLISH_TOPIC1 and ENROLLED_TOPIC.
Subscribe RC to
PUBLISH_TOPIC1. (Use the text:/simplelink/To/Broker.)Enroll LS to topic
ENROLLED_TOPICwhich has the same string asPUBLISH_TOPIC1(/simplelink/To/Broker).- LS subscribes on an
ENROLLED_TOPICwithin the local network (as any other client). Whenever it will receive an enrolled message, LS will publish it to BR.
- LS subscribes on an
Publish
PUBLISH_TOPIC1(/simplelink/To/Broker) from LC1.
Results
- LS receives
PUBLISH_TOPIC1(prints to terminal) and passes onto BR. - RC receives
PUBLISH_TOPIC1(prints to terminal). - LC2 shows nothing because it did not subscribe to
PUBLISH_TOPIC1.
Technical support
For any questions, please search on the TI SimpleLink MSP432 E2E Forum
This work is licensed under a Creative Commons Attribution-NonCommercial-NoDerivatives 4.0 International License.