Introduction
Note
Please note that this lab only applies to SDK 3.30.00. We are in the process of revamping our RTLS SimpleLink Academy Lab content and plan to release an update for SDK 3.40.00.
For updated documentation RTLS for SDK 3.40.00 please refer to the TI BLE-Stack User's Guide.
Please also note that the RTLS Agent has moved and is now found in the
<SIMPLELINK_CC2640R2_SDK_INSTALL_DIR>\tools\blestack\rtls_agent folder. For
more info, see the RTLS example project readme files.
This module is an introduction to Time of Flight (ToF) as well as a discussion of the physical aspects of the solution. ToF is a localization method used to perform secure range bounding.
Time of Flight is based on the common RTLS Architecture that is discussed in the Realtime Localization System Introduction lab.
It is assumed that the reader has a basic knowledge of embedded tool chains and general C and Python programming concepts.
This lab is based on the rtls_master, rtls_slave, and rtls_passive
projects that are part of the
SimpleLink™ CC2640R2 SDK.
This lab is a follow up to the RTLS Introduction lab, and will cover:
- ToF Modes of Operation
- ToF Security
- ToF Accuracy and Confidence intervals
- ToF Python Walk-through
The first three sections will describe the ToF commands and parameters from the UNPI perspective.
The fourth section will detail how to configure ToF functionality through the RtlsUtil
abstraction in Python.
Prerequisites
Other SimpleLink Academy Labs
- Completion of Realtime Localization System Introduction
Required Training
It is required that users complete all steps of the RTLS Introduction lab before moving on to the Time of Flight lab. It is also assumed that the user has already installed the software, setup the hardware, and read the recommended chapters covered by the introduction lab. For brevity, only new content will be listed here.
Hardware
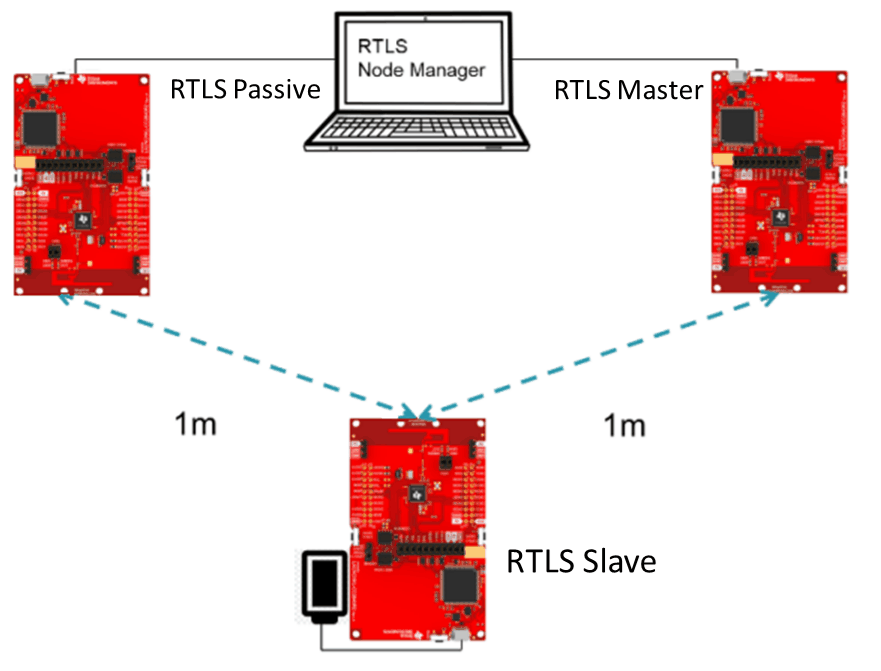
This module requires the following kits:
BOOSTXL-AOA and ToF
The ToF examples in the SDK do not initialize the RF switch pins on the BOOSTXL-AOA; therefore, the BOOSTXL-AOA should be removed before running the ToF examples. ToF examples require a LaunchPad that is setup to use the on board PCB antenna.
Getting started – Desktop
Install the Software
This lab requires that you have completed all the steps in the RTLS Introduction lab. This means that you must have
- CC2640R2 SDK installed
- Working Python environment
- Tested
rtls_example_with_rtls_util.pyto successfully set up an RTLS network.
Modify/Load the software
- Load Board #1 with
rtls_passiveproject:
<SimpleLink CC2640R2 SDK> → examples → rtos → CC2640R2_LAUNCHXL → blestack → rtls_passive - Load Board #2 with
rtls_slaveproject:
<SimpleLink CC2640R2 SDK> → examples → rtos → CC2640R2_LAUNCHXL → blestack → rtls_slave - Load Board #3 with
rtls_masterproject:
<SimpleLink CC2640R2 SDK> → examples → rtos → CC2640R2_LAUNCHXL → blestack → rtls_master
ToF Modes of Operation
The behavior of ToF is controlled via the parameters set in the
RTLS_CMD_TOF_SET_PARAMS UNPI request. This request is sent to the master and
passive. The master will relay the selected ToF settings to the slave over BLE.
RTLS_CMD_TOF_SET_PARAMS must be called before running ToF.
ToF Result Mode
The RTLS nodes can be configured to report ToF sample data in the following ways:
| ToF Result Mode | Summary | Number of serial frames/burst | Payload Information |
|---|---|---|---|
RTLS_CMD_TOF_RESULT_DIST |
Provides a single distance estimation across all frequencies in the burst and moving averaged across all bursts | 1 |
|
RTLS_CMD_TOF_RESULT_STAT |
Provides tick average and variance per frequency | 1 for each frequency used |
|
RTLS_CMD_TOF_RESULT_RAW |
Provides each tick sample within the burst directly from the RF core. | numBurstSamples/2 |
|
ToF mode can be controlled via the resultMode field of
RTLS_CMD_TOF_SET_PARAMS. Result modes lower in the table provide more data to
the PC, but also require the embedded device to send UNPI frames more frequently
and use more RAM.
Selecting a ToF Result Mode
It is recommended to use the most verbose mode to prototype ToF algorithms on PC and then reduce the frequency at which data is sent by balancing the processing between the node manager and embedded devices.
ToF Run Mode
runMode is a parameter within the RTLS_CMD_TOF_SET_PARAMS that describes
what will trigger ToF measurements to be taken and how frequently ToF
measurements will run.
| ToF Mode | Summary |
|---|---|
TOF_MODE_CONT |
ToF will run continuously until RTLS_CMD_TOF_ENABLE is called with the stop parameter |
TOF_MODE_AUTO |
ToF is automatically triggered based on RSSI of the slave device The RSSI is measured during the connection event and the threshold is set by the autoTofRssiThresh parameter of RTLS_CMD_TOF_SET_PARAMS |
It is important to consider power budget when selecting a runMode. Continuously running ToF is good for prototyping algorithms on the PC side as a lot of data is provided, but is not the most efficient for battery powered operations.
It is recommended to trigger ToF based on RSSI and only run to collect the minimum number samples required to achieve a given confidence interval. The number of samples vs confidence interval tradeoff is discussed in ToF Accuracy and Confidence intervals.
ToF runs will always be interleaved with BLE as described in the [RTLS User's Guide], RTLS Toolbox > Time of Flight chapter.
Syncwords Per Burst
Another parameter of interest in the RTLS_CMD_TOF_SET_PARAMS command
is the number of samples. numSamples dictates how many
syncwords are used by each ToF burst. From reading the [RTLS User's Guide],
you might remember that it takes two syncwords to create a single ToF sample
(PING + PONG). This yields the following equation:
NumTickMeasurements = numSamples/2
Put another way, the number of tick measurements performed per time of flight
burst is half of the numSamples parameter. The number of samples should be
divisble by 16 to accommodate the double buffering of syncwords
ToF Result Mode and Ticks
Remember that not all ToF modes report out the raw tick values of each sample.
This means you might not observe more data being sent to the PC when increasing
numSamples. This is because in modes like RTLS_CMD_TOF_RESULT_DIST and
RTLS_CMD_TOF_RESULT_STAT there is some preprocessing of the samples performed
on the device.
As mentioned above, the ToF runs will be interleaved with BLE connection events. It is important the ToF exchanges can fit in between the BLE connection interval selected. The amount of time it takes to perform a ToF measurement is covered in ToF Accuracy and Confidence intervals.
Frequencies
RTLS_CMD_TOF_SET_PARAMS also takes a frequency list and number of frequencies.
Each entry in the frequency list corresponds to a channel that Time of Flight
should be performed on. It is important to have diversity in the frequencies
selected for ToF as Physical factors such as multi-path fading are frequency
selective.
frequenciesis a list of frequencies in MHz of the BLE channels to use for ToFnumFreqis the number of channels in this list
BLE channels are spaced 2MHz apart and range from [2402, 2480] (inclusive). While ToF does not use the BLE physical packet format directly, it does use the same channel map. Frequencies in this range are acceptable ToF params. A channel is specified by the frequency of its carrier wave.
Which is the most power efficient ToF run mode?
Assuming RTLS_CMD_TOF_RESULT_RAW, how much data in bytes is sent per burst?
ToF Security
The integrity of Time of Flight relies on an eavesdropper being unable to guess
the next syncword to be used in the ToF burst. In order to realize this,
ToF employs the AESCTRDRBG algorithm to generate syncwords securely such that
nodes within the ToF network will be able to derive the next syncword, but
eavesdroppers may not.
AESCTRDRBG relies on a random seed being distributed to all nodes in the
network. This seed is sent from rtls_master to rtls_slave over an
authenticated encrypted BLE L2CAP connection oriented channel. The seed
also needs to be distributed from the rtls_master to the rtls_passive
devices via the PC/ Node Manager.
This section will not go into the theory of AESCTRDRBG or seed generation,
but instead will focus on the steps necessary to distribute the seed in a ToF
network using Python.
The UNPI command RTLS_CMD_TOF_GET_SEC_SEED will extract the seed from the master
and the command RTLS_CMD_TOF_SET_SEC_SEED will inform the passive to use
this seed.
The ToF seed should be obtained from the master after setting up the ToF parameters and then distrbuted to all passive nodes.
With the seed shared and parameters set, it is now possible to enable ToF. This will be covered in Task 1.
ToF Accuracy and Confidence Intervals
Each ToF tick has a resolution defined by TICK_TO_METER (defined in TOF.h).
The resolution is 18.75 meters per tick. However, thanks to random offsets
between the symbol clocks in the transmitter and receiver between master, slave,
and passive, tick results will be jittered. When averaging over many ToF
samples this jitter makes it possible to measure distance
(within a given confidence interval)
that is below the resolution of a single tick. The [RTLS User's Guide]
(RTLS Toolbox > Time of Flight > Accuracy) has a concrete example of this.
The basic principle is that a higher confidence interval can be achieved by adding more samples. More samples can be added by way of increasing the burst size of a ToF run or adding ToF passive nodes. More samples come at the cost of power and time.
Confidence interval
We are using a two sided confidence interval.
For example a confidence interval of 4 meters at 95% confidence level means that the ToF measurements will be within +/- 2m of the true distance at 95% confidence level.
Configure ToF using the following guidelines.
- Set the number of nodes collecting samples in the system.
- Set the confidence interval (m) and confidence level (%)
- Use the tool below to calculate the required number of samples and time
Recommendations:
- Limit the ToF time to fit in between BLE connection events
- Use largest possible burst size for available system RAM
- The number of samples may need to be split across multiple bursts
- Round up number of samples to nearest power of 2
ToF samples consume at least sizeof(rfc_CMD_TOF_sample_t) (from rfc_cmd_tof.h).
Additionally there is overhead required to send ToF results through UNPI and
calculating results depending on resultMode set in RTLS_CMD_TOF_SET_PARAMS.
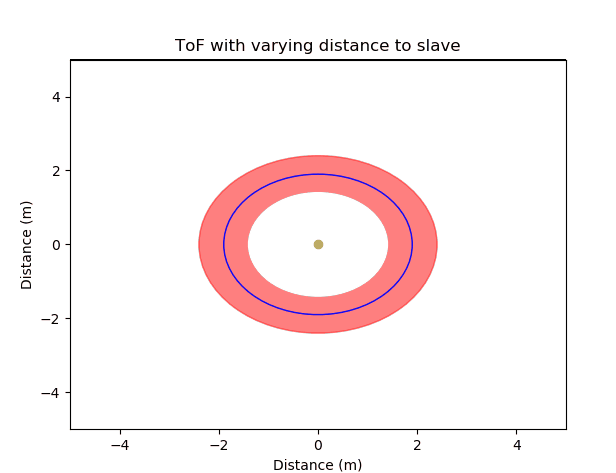
Below is an illustration of changing the distance to the rtls_slave node
with a fixed confidence interval. The confidence interval is illustrated by the
red ring.
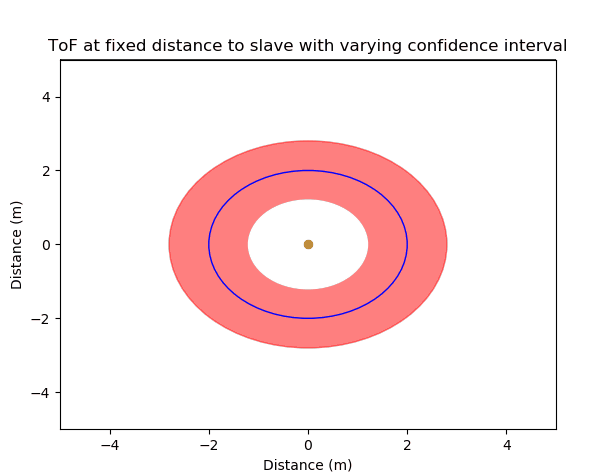
In contrast, the next illustration shows varying the confidence interval
with the distance to the rtls_slave fixed.
How Does the ToF Calculator Work?
Time of Flight ticks will be normally distributed around the true distance.
Given a variance of TICK_TO_METER*0.64, the calculator will use a lookup
table of Z values for given confidence level and confidence interval. This will
be plugged into the equation below (taken from NIST weblink above).
                         (z1−α/2)σ
Confidence interval = ± ----------
                          sqrt(N)
Legend:
(z1−α/2): Z value for given confidence level, from lookup tableσ: The variance of ToF samples. We use0.64, see note below.sqrt(N): Square root of sample size
The calculator will solve the equation above for N. Then it solves for number of samples based on the number of nodes using the equation below.
N = numNodes*numSamplesPerNode
Remember from syncwords per burst that each burst
only produces numSamples/2 samples.
It then multiplies the ToF time slot(520us) by the number of packets to
determine how long it takes to gather this many samples.
ToF Calculator
The ToF calculator is not production verified and is provided for estimation only. The variance has been observed to be between 1 and 0.64. This is dependent on device and frequency.
ToF Python Walk-through
In section ToF Modes of Operation and ToF Security we covered the required setup procedure for running ToF. In this task we will pick up where the "Setting up RTLS Network in Python" section of Task 3 in the Realtime Localization System Introduction left off.
In order to setup ToF, the following steps must be performed, all of which are described in proceeding sections:
- Setup RTLS network as done in the RTLS Intro Lab
- At this point a connection is formed, encrypted with authentication, and an L2CAP CoC is open between master and slave
- Set ToF Parameters and node parameters
- Get ToF Security Seed from master and distribute it to passives
- Calibrate the device for distance mode.
- Enable ToF run
Setup RTLS network as done in the RTLS Intro Lab
Now we will pick up where we left off at the end of the RTLS Introduction Lab.
The last command we had completed was RtlsUtil.ble_connect():
rtlsUtil.ble_connect(scan_results[0], connect_interval_mSec)
print("Connection Success")
Set ToF Parameters and Distribute Security Seed
Next, we should focus on setting up ToF parameters. The snippet below will build a
dictionary of ToF parameters and pass this to RtlsUtil.tof_set_params().
tof_params = {
    "tof_sample_mode": "ToF_MODE_DIST",
    "tof_run_mode": "ToF_MODE_CONT",
    "tof_slave_lqi_filter": 255,
    "tof_post_process_lqi_thresh": 255,
    "tof_post_process_magn_ratio": 111,
    "tof_samples_per_burst": 256,
    "tof_freq_list": [2408, 2412, 2418, 2424],  ## [2408, 2412, 2414, 2418, 2420, 2424]
    "tof_auto_rssi": -55,
}
rtlsUtil.tof_set_params(tof_params)
print("ToF Params + Seed Set")
Finding Possible Parameter Values
The possible values for each parameter can be found by inspecting the TofSetParamsReq class in
ss_rtls.py:
class TofSetParamsReq(NpiRequest, SyncReq, FromAp):
command = Commands.RTLS_CMD_ToF_SET_PARAMS
struct = Struct(
    'tofRole' / Enum(Int8ul, TofRole),
    'numSamples' / Int16ul,
    'numFreq' / Int8ul,
    'slaveLqiFilter' / Int8ul,
    'postProcessLqiThresh' / Int8ul,
    'postProcessMagnRatio' / Int16ul,
    'autoTofRssiThresh' / Int8sl,
    'resultMode' / Enum(Int8ul, TofResultMode),
    'runMode' / Enum(Int8ul, TofRunMode),
    'frequencies' / Int16ul[this.numFreq],
)
To further clarify this, see the following table mapping the dictionary key of the parameter passed
into RtlsUtil.tof_set_params() to the Construct Field of the TofSetParamsReq class struct element.
| Dictionary Key | Summary of Construct Field |
|---|---|
| "tof_sample_mode" | TofResultMode Enum in ss_rtls.py |
| "tof_run_mode" | TofRunMode Enum in ss_rtls.py |
| "tof_slave_lqi_filter" | A little-endian unsigned 8-bit number |
| "tof_post_process_lqi_thresh" | A little-endian unsigned 8-bit number |
| "tof_post_process_magn_ratio" | A little-endian unsigned 16-bit number |
| "tof_samples_per_burst" | A little-endian unsigned 16-bit number |
| "tof_freq_list" | A list of little-endian unsigned 16-bit numbers |
| "tof_auto_rssi" | A little-endian signed 8-bit number |
Which of the following are valid values to use with the "tof_run_mode" key in RtlsUtil.tof_set_params()?
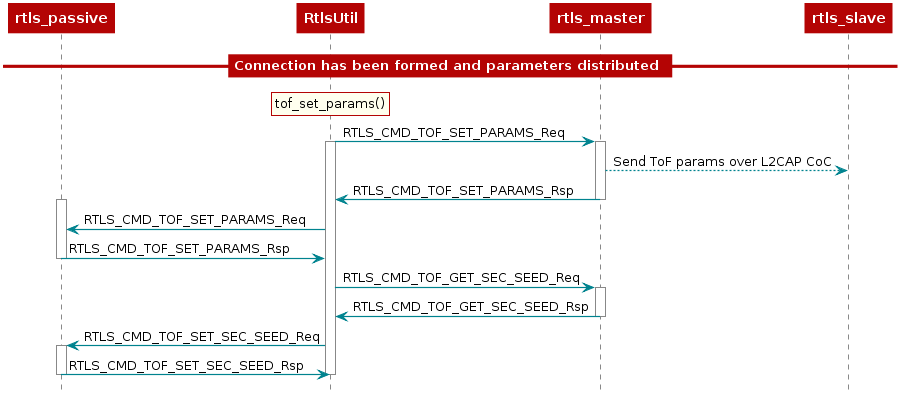
Once called, RtlsUtil.tof_set_params() will perform the following autonomously without
user interaction:
- Send the parameters to the
master_nodeand eachpassive_nodeand wait for responses - Get the security seed from the
master_nodeand distribute to thepassive_node
A sequence diagram for this is shown below. This continues where the RTLS Setup Sequence Diagram from the RTLS Introduction lab left off.
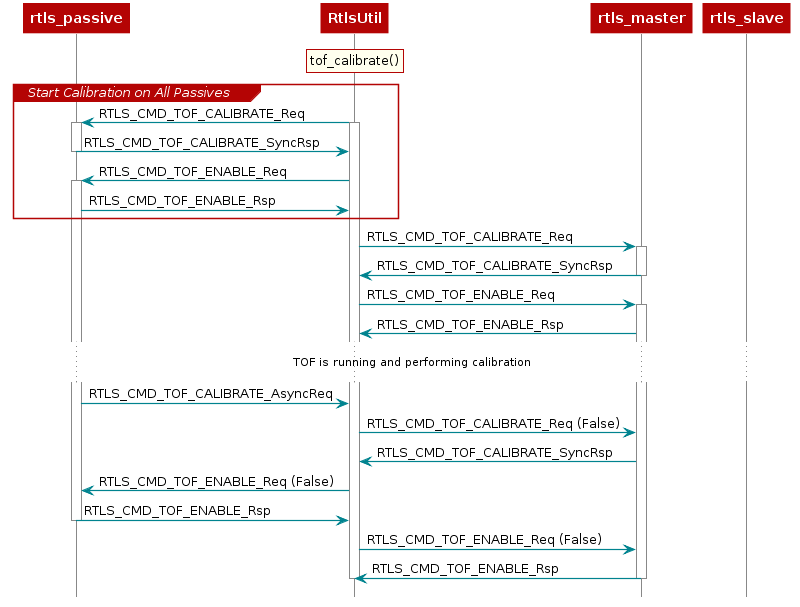
Calibrate the device for distance mode.
With the security seed distributed, ToF calibration can be started as below. The distance parameter
is set to 1 to indicate distance mode will be used.
rtlsUtil.tof_calibrate(samples_per_freq=1000, distance=1)
This will instruct RtlsUtil to perform the following:
- Start calibration on all
passivenodes. - Start calibration on the
masternode. - Wait for
passivecalibration to complete. The calibration command will send anAsyncReqonce calibration is completed informing the host of the calibration values. At this time calibration can be stopped. - Stop
mastercalibration. - Stop ToF on all nodes.
Starting / Stopping ToF during Calibration
Note that the RTLS_CMD_ToF_CALIBRATE_Req UNPI command only instructs the node to prepare for
calibration. ToF must be started (with RTLS_CMD_ToF_ENABLE_Req) for calibration to start.
Also, RtlsUtil.tof_calibrate() explicitly stops ToF (with RTLS_CMD_ToF_ENABLE_Req (False)) after
calibration is complete. This is to mimic a situation where, for example, calibration is performed
initially at the factory.
This is demonstrated in the sequence diagram here:
Enable ToF run
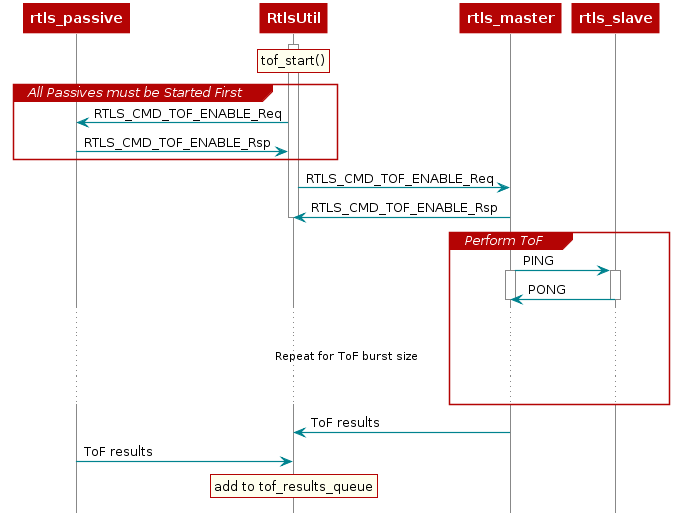
Once calibration is completed, it is time to start ToF. Passive nodes should be started first so that they can hear the first sync-word exchange. This is all handled via:
rtlsUtil.tof_start()
After ToF is enabled, nodes will send ToF results when applicable as described in
ToF Modes of Operation. Depending on the ToF mode,
these will be received by RtlsUtil as one of the following UNPI Messages:
- RTLS_CMD_TOF_RESULT_DIST
- RTLS_CMD_TOF_RESULT_STAT
- RTLS_CMD_TOF_RESULT_RAW
RtlsUtil will receive each response and append it to the RtlsUtil.tof_results_queue. This queue
can then be processed as desired. The out-of-box example periodically reads and prints
from this queue in results_parsing() in a separate thread.
This is shown in the sequence diagram here:
Task 1 – Enable ToF
As covered in the RTLS Introduction lab, the default functionality of the rtls_example_with_rtls_util.py
python script is to only enable the Continuous Connection Information (CCI) localization mode. This task
will cover enabling ToF.
First, set the following boolean variables at the top of main():
## Continuous Connection Info Demo Enable / Disable
cci = False
## Angle of Arival Demo Enable / Disable
aoa = False
## Time of Flight Demo Enable / Disable
tof = True
tof_use_calibrate_from_nv = False
## Switch TOF Role Demo Enable / Disable
tof_switch_role = False
## Update connection interval on the fly Demo Enable / Disable
update_conn_interval = False
CCI Disabling
Note that CCI is only disabled to allow for more succinct ToF-specific logs. It is possible to run with any combination of localization modes.
Configuration Reminder
Be sure to adjust the COM port to match master and passive LaunchPads.
Also update slave_addr to match rtls_slave or set to None
At this stage we have configured the Python environment to start ToF data collection in distance mode.
Now, run the program:
python -u ./rtls_example_with_rtls_util.py
At this point we have achieved the same setup as the GUI will make in Task 2 of the RTLS Introduction lab.
Sample Output
Here is a small snippet of the expected output from the solution above. Note
that the ToF results will run continuously for 5 seconds or until the program is stopped
with ctrl + c. This timeout can be changed by setting timeout_sec.
Master : <RTLSNode(CC2640R2 Master, started 17680)>
Passives : [<RTLSNode(CC2640R2 Passive, started 25128)>]
All : [<RTLSNode(CC2640R2 Passive, started 25128)>, <RTLSNode(CC2640R2 Master, started 17680)>]
Devices Reset
Start scan of 54:6C:0E:83:36:B5 for 15 sec
Scan Results: [{'addr': '54:6C:0E:83:36:B5', 'addrType': 0}]
Connection Success
TOF Paramas + Seed Set
Calibration Done
TOF Callback Set
TOF Started
Going to sleep for 5 sec
[10:18:2019 17:19:09:758209] : {"name": "CC2640R2 Passive", "type": "tof", "identifier": "54:6C:0E:83:31:84", "payload": {"distance": -0.05248451232942131, "rssi": -54}}
[10:18:2019 17:19:09:758209] : {"name": "CC2640R2 Master", "type": "tof", "identifier": "54:6C:0E:83:35:31", "payload": {"distance": 0.8921966552732243, "rssi": -46}}
[10:18:2019 17:19:09:858204] : {"name": "CC2640R2 Passive", "type": "tof", "identifier": "54:6C:0E:83:31:84", "payload": {"distance": 0.451026916504226, "rssi": -54}}
[10:18:2019 17:19:09:859203] : {"name": "CC2640R2 Master", "type": "tof", "identifier": "54:6C:0E:83:35:31", "payload": {"distance": 0.43406105041514564, "rssi": -45}}
[10:18:2019 17:19:09:959201] : {"name": "CC2640R2 Passive", "type": "tof", "identifier": "54:6C:0E:83:31:84", "payload": {"distance": -0.7420196533194598, "rssi": -53}}
[10:18:2019 17:19:09:960201] : {"name": "CC2640R2 Master", "type": "tof", "identifier": "54:6C:0E:83:35:31", "payload": {"distance": 1.5317211151117718, "rssi": -47}}
[10:18:2019 17:19:10:060200] : {"name": "CC2640R2 Master", "type": "tof", "identifier": "54:6C:0E:83:35:31", "payload": {"distance": 0.5290470123281423, "rssi": -46}}
[10:18:2019 17:19:10:061199] : {"name": "CC2640R2 Passive", "type": "tof", "identifier": "54:6C:0E:83:31:84", "payload": {"distance": 0.2419719696050251, "rssi": -53}}
[10:18:2019 17:19:10:163246] : {"name": "CC2640R2 Master", "type": "tof", "identifier": "54:6C:0E:83:35:31", "payload": {"distance": 1.2527999877928622, "rssi": -45}}
[10:18:2019 17:19:10:163246] : {"name": "CC2640R2 Passive", "type": "tof", "identifier": "54:6C:0E:83:31:84", "payload": {"distance": -0.060466766357315294, "rssi": -54}}
[10:18:2019 17:19:10:265194] : {"name": "CC2640R2 Master", "type": "tof", "identifier": "54:6C:0E:83:35:31", "payload": {"distance": 1.731105804443466, "rssi": -47}}
[10:18:2019 17:19:10:265194] : {"name": "CC2640R2 Passive", "type": "tof", "identifier": "54:6C:0E:83:31:84", "payload": {"distance": -0.2553310394284978, "rssi": -53}}
[10:18:2019 17:19:10:367192] : {"name": "CC2640R2 Master", "type": "tof", "identifier": "54:6C:0E:83:35:31", "payload": {"distance": 2.1132526397704012, "rssi": -47}}
[10:18:2019 17:19:10:367192] : {"name": "CC2640R2 Passive", "type": "tof", "identifier": "54:6C:0E:83:31:84", "payload": {"distance": 1.1413059234620206, "rssi": -53}}
[10:18:2019 17:19:10:469424] : {"name": "CC2640R2 Passive", "type": "tof", "identifier": "54:6C:0E:83:31:84", "payload": {"distance": 1.1720905303960407, "rssi": -53}}
[10:18:2019 17:19:10:469424] : {"name": "CC2640R2 Master", "type": "tof", "identifier": "54:6C:0E:83:35:31", "payload": {"distance": 1.8626270294188387, "rssi": -46}}
[10:18:2019 17:19:10:571457] : {"name": "CC2640R2 Passive", "type": "tof", "identifier": "54:6C:0E:83:31:84", "payload": {"distance": 0.5033550262455435, "rssi": -52}}
[10:18:2019 17:19:10:571457] : {"name": "CC2640R2 Master", "type": "tof", "identifier": "54:6C:0E:83:35:31", "payload": {"distance": 1.1928329467778767, "rssi": -48}}
[10:18:2019 17:19:10:671564] : {"name": "CC2640R2 Master", "type": "tof", "identifier": "54:6C:0E:83:35:31", "payload": {"distance": 0.7289466857903761, "rssi": -48}}
[10:18:2019 17:19:10:673563] : {"name": "CC2640R2 Passive", "type": "tof", "identifier": "54:6C:0E:83:31:84", "payload": {"distance": 0.6752738952636719, "rssi": -52}}
[10:18:2019 17:19:10:771768] : {"name": "CC2640R2 Master", "type": "tof", "identifier": "54:6C:0E:83:35:31", "payload": {"distance": 1.4287528991698153, "rssi": -47}}
[10:18:2019 17:19:10:774769] : {"name": "CC2640R2 Passive", "type": "tof", "identifier": "54:6C:0E:83:31:84", "payload": {"distance": 1.0720405578615413, "rssi": -52}}
[10:18:2019 17:19:10:872018] : {"name": "CC2640R2 Master", "type": "tof", "identifier": "54:6C:0E:83:35:31", "payload": {"distance": 0.929046630859375, "rssi": -48}}
[10:18:2019 17:19:10:875052] : {"name": "CC2640R2 Passive", "type": "tof", "identifier": "54:6C:0E:83:31:84", "payload": {"distance": 1.4502391815188744, "rssi": -52}}
[10:18:2019 17:19:10:973017] : {"name": "CC2640R2 Master", "type": "tof", "identifier": "54:6C:0E:83:35:31", "payload": {"distance": -0.4354610443117366, "rssi": -48}}
[10:18:2019 17:19:10:978015] : {"name": "CC2640R2 Passive", "type": "tof", "identifier": "54:6C:0E:83:31:84", "payload": {"distance": 0.6202278137211295, "rssi": -52}}
[10:18:2019 17:19:11:074109] : {"name": "CC2640R2 Master", "type": "tof", "identifier": "54:6C:0E:83:35:31", "payload": {"distance": 1.2118015289303443, "rssi": -47}}
[10:18:2019 17:19:11:079109] : {"name": "CC2640R2 Passive", "type": "tof", "identifier": "54:6C:0E:83:31:84", "payload": {"distance": 1.9405612945551312, "rssi": -53}}
[10:18:2019 17:19:11:174472] : {"name": "CC2640R2 Master", "type": "tof", "identifier": "54:6C:0E:83:35:31", "payload": {"distance": -0.02224349975692519, "rssi": -48}}
[10:18:2019 17:19:11:181204] : {"name": "CC2640R2 Passive", "type": "tof", "identifier": "54:6C:0E:83:31:84", "payload": {"distance": 0.7713470458986507, "rssi": -52}}
[10:18:2019 17:19:11:275239] : {"name": "CC2640R2 Master", "type": "tof", "identifier": "54:6C:0E:83:35:31", "payload": {"distance": 0.4511413574217684, "rssi": -48}}
[10:18:2019 17:19:11:282202] : {"name": "CC2640R2 Passive", "type": "tof", "identifier": "54:6C:0E:83:31:84", "payload": {"distance": 0.5265865325924537, "rssi": -52}}
[10:18:2019 17:19:11:378353] : {"name": "CC2640R2 Master", "type": "tof", "identifier": "54:6C:0E:83:35:31", "payload": {"distance": 1.7595729827876596, "rssi": -47}}
[10:18:2019 17:19:11:383201] : {"name": "CC2640R2 Passive", "type": "tof", "identifier": "54:6C:0E:83:31:84", "payload": {"distance": 2.0887336730963426, "rssi": -53}}
[10:18:2019 17:19:11:483307] : {"name": "CC2640R2 Master", "type": "tof", "identifier": "54:6C:0E:83:35:31", "payload": {"distance": 1.7450389862054152, "rssi": -46}}
Task 2 – Use Calibration Info from NV
The default ToF example as shown in the previous step performs a calibration each time it is run. It is more realistic to only perform this calibration once, then store the results to NV (non-volatile memory) and load the calibration upon subsequent resets. This can be accomplished from the demo by setting the following variable:
tof_use_calibrate_from_nv = True
With the default example, there is not a good method of observing the results of this. Therefore, it is
recommended to add some time logging to the following lines in rtls_example_with_rtls_util:
rtlsUtil.tof_set_params(tof_params)
calib_time_start = time.time()
print("TOF Params + Seed Set")

if tof_params['tof_sample_mode'] == "TOF_MODE_DIST":
    rtlsUtil.tof_calibrate(samples_per_freq=1000, distance=1, use_nv_calib=tof_use_calibrate_from_nv)
    calib_time_end = time.time()
    print(f"Calibration Done in {calib_time_end - calib_time_start} seconds")
Now, when you run the example, you will be able to see how long calibration takes.
Here is sample output from a full calibration:
Master : <RTLSNode(CC2640R2 Master, started 28244)>
Passives : [<RTLSNode(CC2640R2 Passive, started 25844)>]
All : [<RTLSNode(CC2640R2 Passive, started 25844)>, <RTLSNode(CC2640R2 Master, started 28244)>]
Devices Reset
Start scan of 80:6F:B0:1E:3A:8B for 15 sec
Scan Results: [{'addr': '54:6C:0E:A0:4B:E4', 'addrType': 0}, {'addr': '80:6F:B0:1E:3A:8B', 'addrType': 0}]
Connection Success
TOF Params + Seed Set
Calibration Done in 2.691110849380493 seconds
TOF Callback Set
TOF Started
Calibration took 2.691110849380493 seconds
Here is sample output from reading calibration data from NV:
Master : <RTLSNode(CC2640R2 Master, started 27272)>
Passives : [<RTLSNode(CC2640R2 Passive, started 27676)>]
All : [<RTLSNode(CC2640R2 Passive, started 27676)>, <RTLSNode(CC2640R2 Master, started 27272)>]
Devices Reset
Start scan of 80:6F:B0:1E:3A:8B for 15 sec
Scan Results: [{'addr': '54:6C:0E:A0:4B:E4', 'addrType': 0}, {'addr': '80:6F:B0:1E:3A:8B', 'addrType': 0}]
Connection Success
TOF Params + Seed Set
Calibration Done in 0.902055025100708 seconds
TOF Callback Set
TOF Started
Reading calibration from NV took 0.902055025100708 seconds
Rough Time Estimates
Note that these times do not accurately reflect embedded processing time as there are delays accrued through UART, Python, NPI, etc.
Task 3 – Changing Initial Connection Interval and Burst Size
The total time of a single ToF sample is approximately 520us. Using this,
we can calculate the total time of a ToF exchange using the following formula:
time (ms) = (520*num_samples)/1000
The default burst size used by rtls_example_with_rtls_util.py is 256, which results in 128
samples per burst. Plugging this in to the equation above results in 66.56ms of
ToF time per connection event.
By default rtls_example_with_rtls_util.py, the BLE5-Stack central role implemented by rtls_master will
initiate connections at a 100ms connection interval.
It is ideal to fill the free space in the connection interval with ToF communication. At this time, some of the interval is unused which makes pairing and RTLS network establishment take longer.
The connection interval used for connecting can be changed since it is a parameter
for RtlsUtil.ble_connect(). In order to increase the rate at which ToF runs, set the
following variable:
# connection interval in milliseconds
connect_interval_mSec = 65
rtlsUtil.ble_connect(slave_bd_addr, connect_interval_mSec)
rtls_example_with_rtls_util.py
The connection parameter will be passed to the following function in the embedded software. Therefore both the maximum and minimum connection interval will be set to 65 ms:
    // Configure both Min/Max connection interval with same value
    GAP_SetParamValue(TGAP_CONN_EST_INT_MIN, bleConnReq->connInterval);
    GAP_SetParamValue(TGAP_CONN_EST_INT_MAX, bleConnReq->connInterval);
    GAPCentralRole_EstablishLink(DEFAULT_LINK_HIGH_DUTY_CYCLE,
                                 DEFAULT_LINK_WHITE_LIST,
                                 bleConnReq->addrType, bleConnReq->addr);
rtls_master.c :: RTLSMaster_processRTLSConnReq()
Changing Connection Interval a Connection
As discussed in the RTLS Introduction lab, it is also possible to change the connection interval after the BLE connection has been formed. The same considerations apply in this case.
It is important to follow the guidance in the TI BLE-Stack User's Guide (Generic Access Profile > Connection Parameters, Configuring the GAP layer) when selecting the connection parameters to ensure that a valid combination are selected.
Does the new connection interval affect the throughput of ToF data being sent to PC?
Task 4 – Enable Role-Switching
The ToF role as discussed in the [RTLS User's Guide] is independent of the RTLSCtrl role
(e.g. rtls_passive, rtls_master, etc). This means that it is possible for the passive
to act as the master and the master to act as the passive. This concept is
known as "role switching." Role switching improves system robustness through spatial diversity which
is important because of multi-path reflections. If a given node is currently
functioning as master but is unable to measure a direct path, a role switch can occur and
appoint a new node as master. The new master, being placed at a different location, has a
chance of receiving the PONG from the slave with a direct path.
Role switching cannot be executed during a ToF burst and thus should be coordinated to occur in between bursts. If the command is sent during a burst it will take affect on the next burst.
Recalibration
The device must be recalibrated after assuming its new role since master and passive
calibration data is not the same.
Role switching can be achieved from the demo by setting the following variable:
## Switch TOF Role Demo Enable / Disable
tof_switch_role = True
This will perform the following after ToF has been enabled:
rtlsUtil.tof_stop()
print("TOF Stopped")

rtlsUtil.tof_role_switch(tof_master_node=master_node, tof_passive_node=passive_nodes[0])
print("TOF Role Switch Done")

rtlsUtil.tof_calibrate(samples_per_freq=1000, distance=1)
print("Calibration Done")

rtlsUtil.tof_start()
print("TOF Re-Started")
This entire process is shown in the sequence diagram here:

The role switch will be evident in the python output as such:
Slept for 2 sec before switching roles
TOF Stopped
[10:17:2019 17:03:23:244918] : {"name": "CC26x2 Master", "type": "tof", "identifier": "80:6F:B0:1E:3F:06", "payload": {"distance": -0.18951320648204018, "rssi": -50}}
[10:17:2019 17:03:23:257987] : {"name": "CC26x2 Passive", "type": "tof", "identifier": "80:6F:B0:1E:58:E0", "payload": {"distance": 0.09385681152258485, "rssi": -64}}
RTLS MASTER capability before role switch: {
    "node_mac_address": "54:6C:0E:83:35:31",
    "capabilities": {
        "CM": false,
        "AOA_TX": false,
        "AOA_RX": false,
        "TOF_SLAVE": false,
        "TOF_PASSIVE": false,
        "TOF_MASTER": true,
        "RTLS_SLAVE": false,
        "RTLS_MASTER": true,
        "RTLS_PASSIVE": false
    }
}
TOF Role Switch Done
RTLS MASTER capability after role switch: {
    "node_mac_address": "54:6C:0E:83:35:31",
    "capabilities": {
        "CM": false,
        "AOA_TX": false,
        "AOA_RX": false,
        "TOF_SLAVE": false,
        "TOF_PASSIVE": true,
        "TOF_MASTER": false,
        "RTLS_SLAVE": false,
        "RTLS_MASTER": true,
        "RTLS_PASSIVE": false
    }
}
[10:17:2019 17:03:25:470591] : {"name": "CC26x2 Master", "type": "tof", "identifier": "80:6F:B0:1E:3F:06", "payload": {"distance": -0.3530635833737037, "rssi": -49}}
[10:17:2019 17:03:25:576208] : {"name": "CC26x2 Master", "type": "tof", "identifier": "80:6F:B0:1E:3F:06", "payload": {"distance": 0.45494651794550833, "rssi": -50}}
Calibration Done
TOF Re-Started
Going to sleep for 5 sec
Thats all folks!
You earned a coffee ☕.
Now go off and make something awesome with Time of Flight!
This work is licensed under a Creative Commons Attribution-NonCommercial-NoDerivatives 4.0 International License.