3.1. Development Host
3.1.1. Overview
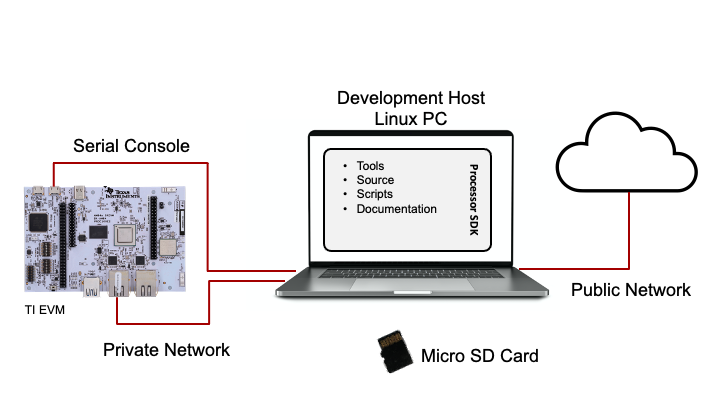
The Linux development host is a very important part of the development system. In general, this is the main interface between the software developer and the target system. It is the system that the developer uses to store, build, and debug target code. It is commonly a single Linux PC, and that is how it will be referred to here. However, there are certainly more elegant and complex setups for different use cases. For example, since Linux is relatively large and complex to build, it is not unusual to have a high-powered build server available for Linux development. Here is an example of a single Linux PC as a development host.
| Component | Description |
|---|---|
| Linux PC | Used to build Linux. Recommended to be a dedicated machine (no Virtual Machines). The higher performance, the more efficient the developer. The SDK is validated with Ubuntu 18.04. |
| TI EVM | Represents the target embedded system. |
| Serial Console | Provides console interaction between host and target. View debug output. |
| Micro SD Card | SDK default for storing embedded Linux system. Host writes Linux system to SD Card and card is placed in the TI EVM to execute. This method is too slow for real, iterative development, and should be replaced by something like network/NFS. |
| Private Network | Used to quickly and efficiently copy between host and target. Helps protect public network form system under development. Enables NFS, TFTP, and other network functions. |
| Public Network | Access to downloads, git repos, servers, etc. |
3.1.2. Setting Up the Development Host
As mentioned above, a dedicated Linux machine with the highest performance possible is recommended. Building Linux and Yocto in particular, speeds up with more processors and performance. RAM and hard disk space are also important requirements to consider.
Virtual Machines can be used instead of dedicated machines, but they can lead to issues with connectivity with the target that are best to avoid. VMs also have a performance impact that should be avoided when possible. VMs simply complicate a set up for minimal value.
As indicated in the diagram above, having two Ethernet interfaces is a nice feature to have on the development host. This connectivity allows simultaneous connection to the outside world and the target system, without having to put the target system directly on the public network.
One thing to consider is how to assign an IP address to the target. This operation can be done a few different ways:
- The simplest is using a router with DHCP enabled. Then connecting the host and target to the router with the DHCP server will allow each to get an IP address.
- Another option is to directly connect the host and target (no router needed) and run a DHCP server on the host. This is pretty easy on Linux using the ISC DHCP Server.
- The last option is to use direct connect with static IP addresses.
3.1.3. Basic Setup Steps
So, the steps to get a basic Linux Development host set up are:
- Obtain a PC to use as the Development Host.
- Add a second network interface if desired.
- Install Ubuntu 18.04.
- Set up public and private networks.
- Download and install the SDK.
- Set up and configure the SDK.
After Ubuntu is installed per the steps above, please run the following command in an Ubuntu terminal to install the additional packages. They are required for compiling U-Boot and Kernel as detailed in the following sections.
$ sudo apt update
$ sudo apt install build-essential bison flex libssl-dev libncurses-dev u-boot-tools