Introduction
TI 15.4-Stack is an IEEE 802.15.4e/g RF communication stack. It is a main part of the SimpleLink CC13xx/CC26x2 Software Development Kits (SDK), and provides support for star-topology networks for a Sub-1GHz application or a 2.4GHz application, depending on your selected device. TI 15.4-Stack runs on MCUs from TI's SimpleLink microcontroller (MCU) family of devices. The Sub-1 GHz implementation offers several key benefits such as longer range in FCC band and better protection against in-band interference by implementing frequency hopping, as well as the ability to send 2.4GHz BLE beacon packets while operating on a Sub-1GHz TI 15.4-Stack network when using dual-band mode on the CC1352. This complete stack offering provides customers an accelerated time to market with a complete end-to-end node-to-gateway solution.
In this lab, we start with the Portable example, which can be easily built and executed on all the various SimpleLink LaunchPads. The Portable example application reads data via I2C from a temperature sensor on a BoosterPack and communicates this data to the user over UART. We will then combine this application with the Sensor example application from the lab Sensor and Collector - TI 15.4-Stack Project Zero, to add RF reporting capabilities to the portable application, using the TI 15.4-Stack.
The purpose of this lab is to demonstrate the portability of applications written for other target devices of the SimpleLink family. The lab contain several tasks:
Task 1: Building and loading the portable app example
Task 2: Combine the portable application with the TI 15.4-Stack application
Task 3: Use the TI 15.4-Stack to send temperature readings generated by the portable app
Technical support
For any questions you may have, please have a look at the relevant E2E forum - TI Sub-1 GHz E2E Forum
Supported Devices/SDKs
This lab is intended to be used with the newest SDKs for each of these TI devices:
| TI Device | SDK |
|---|---|
| CC13x0 | SIMPLELINK-CC13X0-SDK |
| CC13x2 & CC26x2 | SIMPLELINK-CC13X2-26X2-SDK |
Prerequisites
Background
- Basic TI-RTOS and CCS knowledge
- Some basic familiarity with embedded programming
- Complete the Sensor and Collector - TI 15.4-Stack Project Zero lab, since the current lab reuses some of that lab's components
Software
- Code Composer Studio v8.1 or later
Make sure that CCS is using the latest updates: Help → Check for Updates - The corresponding SDK(s) from the list above
- Tera term or any other equivalent terminal program
Hardware
- 2 x Compatible LaunchPads, refer to the Supported Devices/SDKs section
- 1 x Sensors Boosterpack
- 2 x USB Cables
Note
- These labs were done using CC13x0 LaunchPads and the CC13x0 SDK, though the procedure should be the same for every supported platform.
- Some screenshots in this lab may have been taken with an older version of the respective SDK or tool, so your actual screen may look a bit different, however the functionality and overall look and feel should be the same.
Group training additional requirements
Make sure to always use your designated channel, to avoid interfering with other students' operations
Channel allocation
If you are part of a group training, the instructor should give each student a unique number. In this lab, each student uses a designated channel matching its student number: Student #1 should use channel 1, Student #2 should use channel 2, and so on.
Task 0: Label your LaunchPads
If you have already completed the prerequisite lab, you have already done this task. In this case, please skip straight ahead to Task 1. Otherwise, continue with the steps below:
Label each of your LaunchPads with its XDS Device ID, as described here.
Additionally, label one LaunchPad as "Sensor" and the other as "Collector". These labels will be referred to throughout this lab. It is recommended to use a non-permanent marking for this (e.g. sticky notes), as these labels may only be relevant for this specific lab.
Task 1: Building and loading the portable app
In this task, we will run the portable app on your chosen LaunchPad. The same app can also run on other LaunchPads from the SimpleLink family.
Close CCS if it is currently open
Close all instances of any open terminal program
Disconnect both LaunchPads from the PC
Connect Sensors BoosterPack to the "Sensor" LaunchPad
Important!
Verify correct alignment between the BoosterPack and the LaunchPad, by matching pins with the same names, e.g. "3V3".
Connect the "Sensor" LaunchPad to the PC
Open a terminal software on the PC, and connect it to the LaunchPad's Application UART port (the one that has "UART" in its name). Configure the UARTs as follows: • Baud rate: 115200 • Data: 8 bit • Parity: none • Stop: 1 bit • Flow control: none.
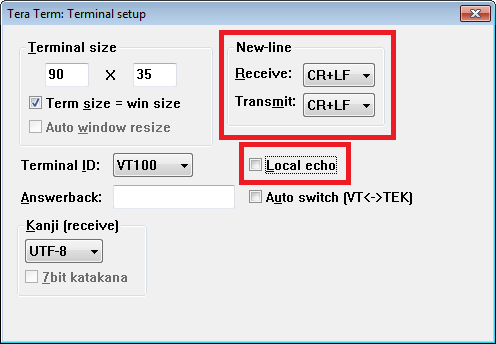
Configure the terminal program to add <LF> character to each incoming and outgoing <CR> character, and disable local echo of outgoing characters. If using TeraTerm, it will look like this:
Read the note below, then open CCS
Important note
If you have already done the lab Sensor and Collector - TI 15.4-Stack Project Zero, please open the same CCS workspace you used for that lab, since we are going to reuse the same projects here. If you have not done that lab yet - do not worry, as you will be given the chance to do the relevant tasks later on. In this case, just open a new workspace.
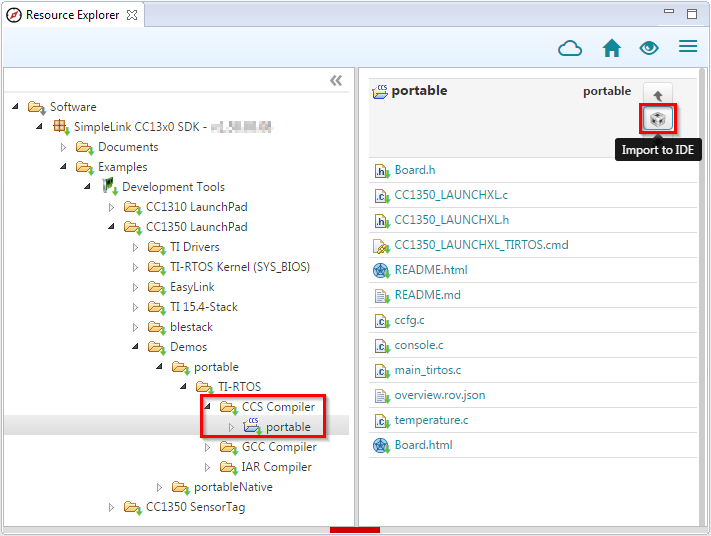
In CCS, select View -> Resource Explorer (Do not use Resource Explorer Classic). Extract the folders as in the figure below, click CCS Compiler in the tree view, then click Import To IDE in the top of the right pane:
You have now imported the Portable example project
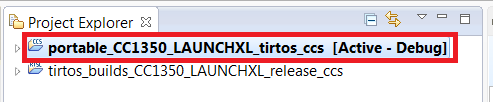
There should now be a new project in the Project Explorer called portable_CC1350_LAUNCHXL_tirtos_ccs:
Note
The TIRTOS kernel is now included as a separate project imported with the example project. It can bee seen above in the tirtos_builds_CC1350_LAUNCHXL_release_ccs project. The TIRTOS kernel project is specific to the board type and compiler and shared by all examples for that Board type / compiler.
Update the target of the portable project to associate it with the "Sensor" LaunchPad - as explained here.
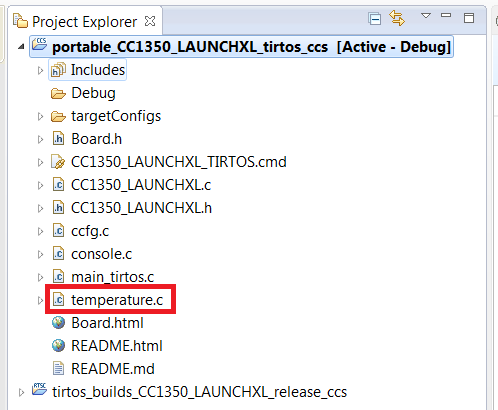
Open the file temperature.c of the Portable project
Click the green bug (or hit F11) to build and download the program to the LaunchPad.
When program download is finished and the Resume button becomes available, press it (or hit F8) to start executing the program on the LaunchPad.
Switch to the terminal emulator window
Does it work?
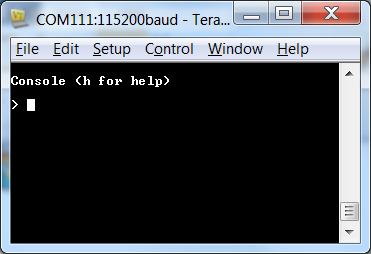
In the terminal window, you should see the welcome message:
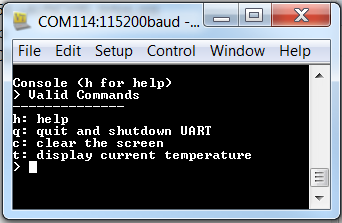
In the terminal window, press h on the keyboard and you will see the following screen:
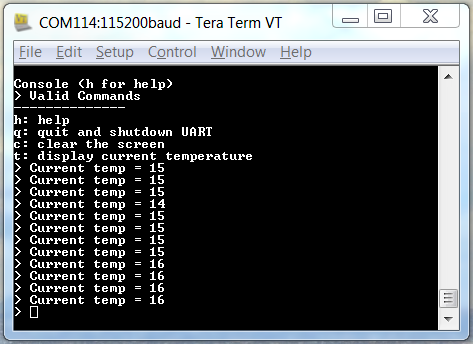
Press t several times to see the temperature measured by the temperature sensor on the boosterpack. Hold your hand about an inch above the BoosterPack and press t again several times. You should see the temperature changing.
Stop the debug session in CCS, by pressing the red square icon (or hitting CTRL+F2)
Task 2: Combine the portable app with the TI 15.4-Stack app
Start with the sensor project (Task 2) from the lab Sensor and Collector - TI 15.4-Stack Project Zero. If you have not already performed that task, please do so now.
If needed, update the target of the sensor project to associate it with the "Sensor" LaunchPad - as explained here.
In the next few steps, you will update the application configuration to add support for the merged portable example:
In the Project Explorer, under the Sensor project, select app.cfg, Right-click and select Open with XDCScript editor: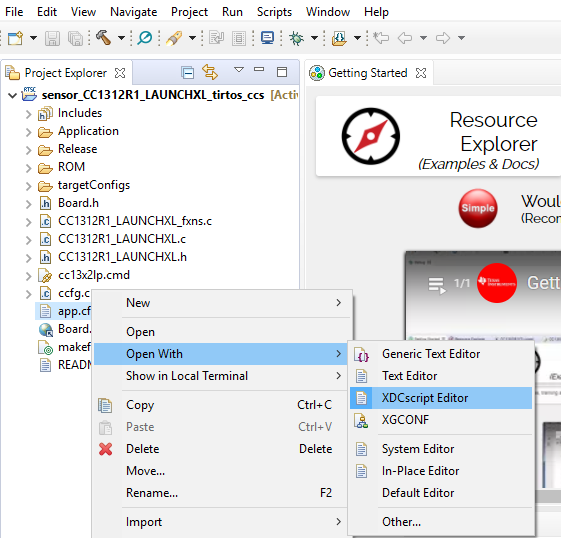
To add support for POSIX libraries, which are being used in the portable app, add the following to the bottom of app.cfg:
/* Include POSIX Support */
var Settings = xdc.useModule('ti.sysbios.posix.Settings');
Add POSIX libs
Create a new folder in the Sensor project to hold the portable example files:
In Project Explorer, right-click the Sensor project, and select New->Folder. Name the new folder "portable"Copy the files listed below from the Portable project to the Sensor project:
In CCS Project Explorer, mark these files under the Portable project, then hit CTRL+C
then click the new portable folder under the Sensor project and hit CTRL+V
The files to be copied are:- console.c
- main_tirtos.c
- temperature.c
- console.c
From this point on, we will not be working with the Portable project itself anymore. Unless otherwise specified, the following instructions refer to the Sensor project.
For POSIX support, add the following line to the start of the include path list, found in CCS menu Project->Properties->Build->ARM Compiler->Include Options->Add dir…:"${COM_TI_SIMPLELINK_[SDK version here]_SDK_INSTALL_DIR}/source/ti/posix/ccs"Add POSIX support to your project
Open main_tirtos.c under the portable folder in the project tree (make sure to select this file in the Sensor project).
Rename main() to main_app()In the same file (main_tirtos.c), inside main_app(), delete or comment-out the calls to Board_initGeneral(), GPIO_init() and BIOS_start():
//    Board_initGeneral();
...
//    GPIO_init();
...
//    BIOS_start();
Comment out these lines, in order to prevent multiple calls to the functions
Open main.c.
In main(), towards the end, just before the call to BIOS_start(), add the following line:main_app();Add main_app(); line
In the same file (main.c), add the following line in the global context, before the start of main():
extern int main_app(void);Declare main_app() as extern
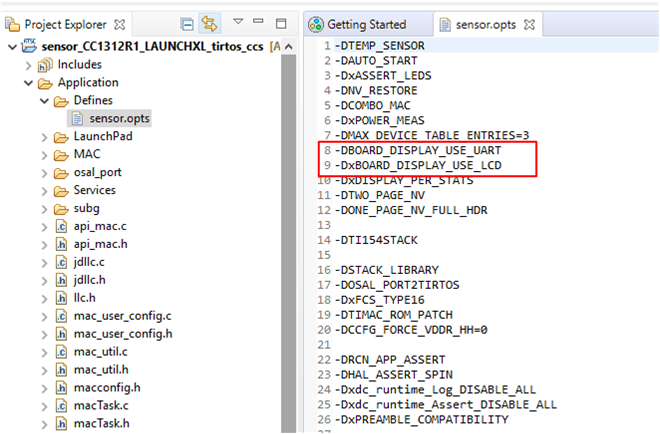
Since UART is include in the portable app code, disable UART support in the sensor application:
In Application/Defines/.opts, add an *x prefix to the following symbols (or delete them altogether):
• BOARD_DISPLAY_USE_UART
• BOARD_DISPLAY_USE_LCD
Clean the project, by right clicking the Sensor project in the Project Explorer and selecting "Clean Project".
Build and load the project by (green bug or F11).
The terminal program should already be connected to the "Sensor" LaunchPad's Application UART. If not, please connect and configure it as described in the previous task.
In CCS, press the Resume button (or F8)
In the terminal window, play with the program by pressing h and multiple t and notice that it has the exact same behavior of the original portable app.
So we got the same Portable example all over again. What's the big deal?
The big difference here, is that now the TI 15.4-Stack is also running in parallel. Actually, this LaunchPad also retaines the original sensor functionality from the lab Sensor and Collector - TI 15.4-Stack Project Zero! Continue to the next step to see for yourself...
Stop the debug session in CCS, by pressing the red square icon (or hitting CTRL+F2)
It is assumed that you still have the "Collector" LaunchPad programmed with the collector example from the previous lab (Sensor and Collector - TI 15.4-Stack Project Zero). If this is not the case, please follow Task 1 of that lab, to program the "Collector" LaunchPad as needed.
For better performance...
If you have not completed the whole Sensor and Collector - TI 15.4-Stack Project Zero lab, it is recommended you also complete its Task 4 now, to get better responsiveness from the Sensor-Collector pair. If you skip this task, you will encounter lengthy delay during the communication between the LaunchPads, resulted from the conservative power-saving default configuration.
Connect the "Collector" LaunchPad to the PC
Open a new terminal window, connect it to the Application UART of the "Collector" launchpad and configure it as explained above
Reset both the "Collector" and the "Sensor" LaunchPads to their factory defaults, by pressing and holding Button 2, then pressing the reset button while Button 2 is still pressed. Do this on both LaunchPads.
Experiment with the collector and the modified sensor - see the section "using the collector and sensor" (Task 3) in the lab Sensor and Collector - TI 15.4-Stack Project Zero
Note the different console output
The Sensor's terminal output will be different than what is described in Sensor and Collector - TI 15.4-Stack Project Zero, since we disabled the respective console output in favor of the portable application's output.
Two different temperature readings
Also note that the temperatures reported on the Sensor's terminal is different than the one on the Collector's terminal. Though both temperatures are measured by the "Sensor" LaunchPad, the one reported locally is read via I2C from the infra-red sensor on the Sensors BoosterPack (as it was in the Portable example), while the one sent to the collector is from the CC13x0 on-chip temperature sensor (as in the original Sensor example).
In the next task, we will modify the Sensor project so that it will send the readings from the Sensors BoosterPack to the collector, in addition to the readings from the on-chip temperature sensor.
Task 3: Using the Stack to send temperature from the portable app
In CCS, select the sensor project. Open sensor.h and add the following line in the global context:
#define EXT_SENSOR_READING_TIMEOUT_EVT 0x0004Add this line in sensor.h
In sensor.c, inside Sensor_process(), before this line: "Is it time to send the next sensor data message?", add the follwoing section
if(Sensor_events & EXT_SENSOR_READING_TIMEOUT_EVT)
{
  /* Process Sensor Reading Message Event */
  processSensorMsgEvt();

  /* Clear the event */
  Util_clearEvent(&Sensor_events, EXT_SENSOR_READING_TIMEOUT_EVT);
}
Add this section in sensor.c
In the same file (sensor.c), remove the keyword STATIC from the following line:
STATIC Smsgs_tempSensorField_t tempSensor =remove STATIC from this line
Open console.c (under the portable folder in the Sensor project) and add the following lines in the global context:
#include "smsgs.h"
#include "mac_util.h"
#include "api_mac.h"
#include "sensor.h"
extern Smsgs_tempSensorField_t tempSensor;
Add this section in the global context of console.c
In the same file (console.c) in simpleConsole(), after the line "case 't'", add the following lines:
tempSensor.objectTemp = localTemperatureC;
tempSensor.ambienceTemp = localTemperatureC;
Util_setEvent(&Sensor_events, EXT_SENSOR_READING_TIMEOUT_EVT);
Add this section
Clean the project (right-click the Sensor project, then select clean project)
Make sure that the sensor project is selected, then build and download the program to the LaunchPad (green bug / F11).
When program download is finished and the Resume button becomes available, press it (or hit F8) to start executing the program on the LaunchPad.
Now operate the "Collector" and "Sensor" LaunchPads:
First, connect the sensor to the collector (see the section "using the collector and sensor" in the lab Sensor and Collector - TI 15.4-Stack Project Zero)Check this
After connecting to the collector, the sensor will report the on-chip temperature to the collector periodically, as it originally did in the lab Sensor and Collector - TI 15.4-Stack Project Zero
In addition, the sensor can now also report temperature read form the Sensors Boosterpack:
Press t on the sensor's console to read the temperature from the BoosterPack and send it to the collector.Well done!
Watch the temperature reported on both the collector and sensor as soon as t is pressed in the Sensor's terminal. In the Collector's terminal, you should be able to tell between the readings of the on-chip/local and the BoosterPack sensors, as their temperatures will probably be different.
Bonus Tasks
The instructions of the bonus tasks are much less detailed than those of the main tasks above. To complete the bonus tasks, you may need some more advanced c coding knowledge.
The bonus tasks can be done in any order.
Bonus Task 4: Add sensor source information
Modify the sensor and collector's program so that the collector will explicitly say for each temperature reading whether it came from the on-chip sensor or the BoosterPack sensor.
Bonus Task 5: Fix race condition
The current method of triggering the temperature reporting from both of the sensors using separate events but a single global variable to store the temperature is prone to a race condition. With some extra coding, this can be fixed.
References
TI 15.4-Stack wiki pages are at https://www.ti.com/ti154stack-wiki
CC13xx Software Overview – Available at https://www.ti.com/tool/cc13xx-sw.
CC13xx Technical Reference Manual – Available here
This work is licensed under a Creative Commons Attribution-NonCommercial-NoDerivatives 4.0 International License.