Introduction
The SimpleLink Wi-Fi CC31xx and CC32xx devices are designed with a rich set of multi-layered features which can enable the development of secure applications. Among these features is the hardware-based Unique Key-Pair of each device. The host application has direct access to the public key of the device and can use the private key indirectly for operations, such as signing and verifying data buffers, through the SimpleLink Network Processor. To learn more about the sign and verify crypto utilities in the CC32xx, refer to the CC32xx Cryptographic Utilities training.
Another possible use for the unique key-pair is mutual authentication in a TLS/SSL handshake. However, mutual authentication for secure sockets requires the system to have a certificate signed by an authority (or chain of trust) that is accepted by the server. This workshop will cover how the SimpleLink Wi-Fi devices enable mutual authentication using the unique key-pair through the generation of a certificate signing request (CSR).
Prerequisites
Recommended material
Software
- Code Composer Studio v10.3 or newer
- SimpleLink Wi-Fi CC32xx Wireless MCUs support installed
- Make sure that CCS is using the latest updates: Help → Check for Updates
- CC32xx SDK v5.20 or newer
- Terminal emulator program such as TeraTerm or PuTTY
- OpenSSL or other crytography software
Important
This workshop relies on a feature that was introduced beginning with service pack verison 3.6.0.3. Be sure you have the latest SDK downloaded and the latest service pack flashed to your device during this workshop.
Hardware
- 1x CC32xx LaunchPad
- CC3235S LaunchPad (LAUNCHXL-CC3235S)
- CC3235SF LaunchPad (LAUNCHXL-CC3235SF)
- CC3220S LaunchPad (CC3220S-LAUNCHXL)
- CC3220SF LaunchPad (CC3220SF-LAUNCHXL)
- 1x Micro-USB cable (included with LaunchPad)
Device Unique Key Pair
The device-unique key-pair is a value unique to each device which is embedded in hardware. The key is an ECC key which uses the SECP256R1 curve. When using the key-pair, the private key is never exposed and is only accessed or applied indirectly through commands to the network processor. The public key can be retreived by the host application as needed.
The details of how the device unique key-pair can be used are described in the CC3x20, CC3x35 Network Processor Programmer's Guide and the CC32xx Cryptographic Utilities training.
TLS/SSL Review
Below is a quick review of some details about TLS/SSL which will be important to know for this workshop.
TLS/SSL
- Refers to the most widely used security protocol in the Internet
- Operates over the TCP transport layer
- Uses asymmetric cryptography for authentication and key exchange
- Uses symmetric encryption for data confidentiality
- Uses message authentication codes for message integrity
- Based on combinations of ciphers that are referred to as cipher suites
Learn More About TLS/SSL
Check out the SimpleLink Wi-Fi Secure Socket Training. For even more information, it is recommended that the reader refer to RFC5246 and RFC6101.
Certificate Signing Request with SimpleLink Wi-Fi
Certificates are used in the TLS/SSL handshake process to authenticate both the server and the client. The certificate contains the public key of the device as well as information that specifies the device's ownership of the key. Typically, a trusted third-party, known as a certificate authority (CA), issues the certificate to the device. The CA signs the certificate, which allows peers that communicate with the device to verify the certificate's authenticity.
Some information
Client authentication is optional in TLS/SSL, but it may be required in order to connect to specfic cloud servers. Client certificates should be unique per device and include the entire chain of trust, excluding only the root CA certificate.
Before an authority can issue a certificate, a certificate signing request (CSR) must be made. The certificate signing request is a message sent from an applicant to the certificate authority to request the creation of a digital certificate. As part of the CSR, the applicant must provide its public key plus a signature of some data (made with the private key) in order for the authority to verify that the applicant owns the public key.
The SimpleLink Wi-Fi device simplifies this process by generating a CSR in PKCS #10 format internally. The CSR is created as a file on the device's file system and can be read like any other non-secure file. An additional benefit of generating the CSR internally is that it allows the private key of the asymmetric key-pair to never be exposed during the certificate creation and registration process.
Important Note
The private key is copied to a secure system file which can only be read by the network processor during the CSR creation process. Once added to the file system, the host microcontroller can only access the private key indirectly using the socket options of the SimpleLink Wi-Fi API.
The following diagram describes the CSR generation process used by SimpleLink Wi-Fi devices to enable mutual authentication based on the device's unique key-pair:

Task 1: Import and Run the CSR Demo
In CCS, open the TI Resource Explorer (View → Resource Explorer)
Expand the folders as shown to select the
Certificate_Signing_Requestexample, then click the Import to IDE icon at the top-right- Be sure you select your desired project variant (CC3235S-LAUNCHXL or CC3220SF-LAUNCHXL, CCS, GCC, IAR)
The following image shows the CC3220S CCS example for this lab:
Certificate_Signing_Request_CC3220S_LAUNCHXL_nortos_ccs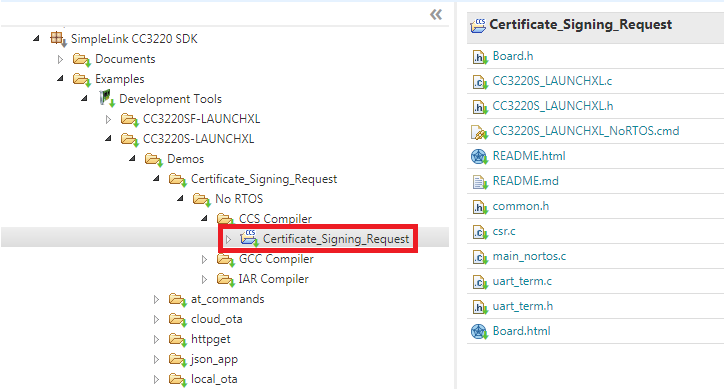
Before running through the exercises in this workshop, we need to flash the latest servicepack to the CC32xx LaunchPad. Plug in your LaunchPad and build the project. Then, select the Flash button from the top menu. This will launch the SysConfig ImageCreator tool from CCS to flash the the LaunchPad with the servicepack and device configurations specified in
image.syscfg.! Updating the servicepack To use many of the features in the lab, the servicepack on the CC32xx LaunchPad needs to be updated to the most recent version (v3.9.0.6 or later). This step is required because the ability to use the unique key-pair of the device for mutual authentication in TLS is enabled in the most recent servicepacks.
Start a Debug session by selecting the project in your workspace and then clicking the green bug in the top menu. Do not run the application yet.
Open a UART terminal on your device's COM port. We want to use the XDS110 Class Application/User UART port with the following parameters:
UART Configuration
Baud rate: 115200
Data: 8 bit
Parity: None
Stop: 1 bit
Flow control: NoneClick the green arrow in the top menu to start executing the code.
Task 2: Fill out the CSR
When the application starts executing, a banner containing the application version, device firmware version, and device MAC address will be printed to the serial terminal. The banner will be followed by the Unique ID of the device and a prompt which will be used to fill out the various fields of the certificate signing request. If no value is provided for a field before pressing enter, a default value will be used for the field. The default value will be printed to the terminal.
The initial print-out to the terminal will look as follows:
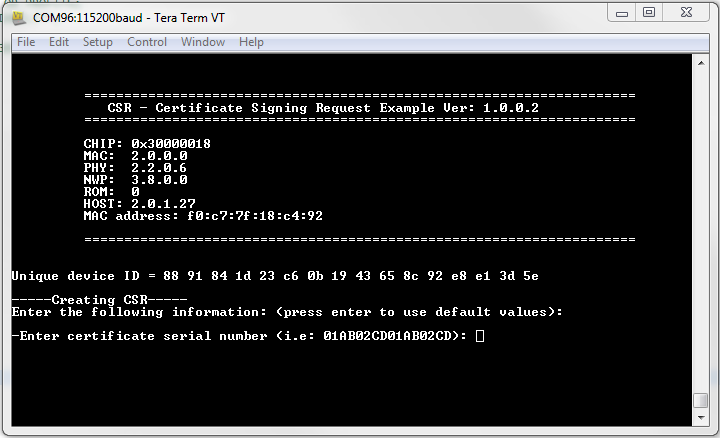
Fill out all fields necessary to generate the certificate signing request:
Certificate Serial Number: The first field that must be entered is the certificate serial number, which must be a unique, positive integer for each certificate issued by a given CA. The serial number can be used to identify certificates that have been revoked by a particular CA. The SimpleLink Wi-Fi devices allow for a serial number up to 8 bytes (64 bits) when generating the CSR. If no value is provided, the application will generate a random value for the serial number.
Validity Period: The period (in number of days) for which the certificate will be valid must also be entered. The actual validity period will be defined as a pair of dates; one for the date on which the validity period begins and one for the date on which the validity period ends. These dates will be set to the current date and the current date plus the number of specified days.
Subject: This field identifies the entity that is associated with the public key of the certificate. It is formed by multiple attributes as described below:
Is a CA: Whether or not the subject is a CA and the public key may be used to verify certificate signatures should be specified. This can affect the how the subject field must be populated and the extensions included in the resulting certificate.
Country: The two-letter ISO country code for the region in which the organization that will own the certificate is located. This should be two upper case characters. For example, "US".
State: This is the non-abrreviated state or region in which the organization that owns the certificate is located. This is a string that can be up to 63 characters long. For example, "Texas".
Locality: Similar to the state, this field specifies a locality such as a town or city. This is a string that can be up to 63 characters long. For example, "Dallas".
Surname: This field can be used to indicate the surname of the subject. This is a string that can be up to 63 characters.
Organization: This field indicates the name of the organization that owns the certificate. This is a string that can be up to 63 characters long. For example, "Company, Inc.".
Organization Unit: A specific unit within the owning organization can be specified. This is a string that can be up to 63 characters long. For example, "Technology Division".
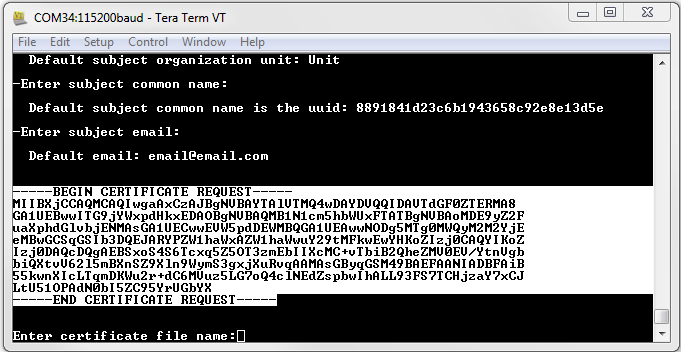
Common Name: This field identifies the common name associated with the certificate. The default value used in this field is the 128-bit unique device ID.
Email: An email address including the "@" symbol may be included as an attribute of the subject. This field is a string that can be up to 63 characters long.
Read More About X.509 Certificates
For more information on these fields, it is recommended that the reader refer to RFC5280.
Task 3: Copy CSR to a File and Sign
Once all fields of the certificate signing request have been entered in the terminal, the CSR file is generated on the file system. The file is named /cert/iot/csr.der and can be accessed directly by the application.
To simplify the process of copying the file from the device serial flash to a local file on your computer, the file is printed to the terminal in this example in PEM format.
To use the generated CSR:
- Copy the content from the terminal and save it to a file. Note that the contents are in PEM format
- Have the CSR signed by an authority - either send to an authority or sign using your own CA (should use the ecc-secp256r1 curve)
The result will be the signed certificate file.
Task 4: Create Certificate File and Use for Secure Socket Connection
When the signed certificate file is ready, it can be written back to the device and used for establishing mutually authenticated secure connections.
In the Certificate_Signing_Request example, the certificate can be written back by entering the file name in the terminal and then pasting the content of the certificate file when prompted. There are no restrictions on the file name, but the file format should be PEM when writing it back to the terminal.
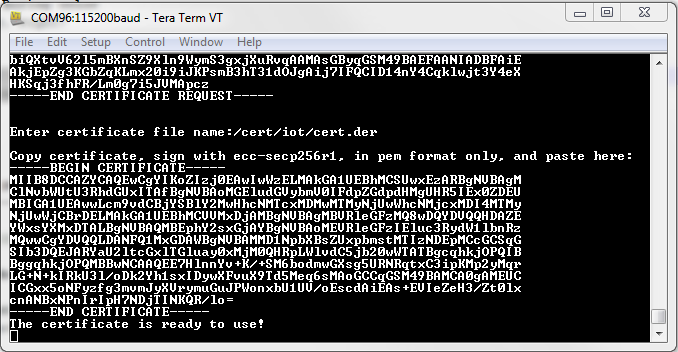
Alternatively, the signed certificate can be added to the device using SysConfig ImageCreator. Once successfully added to the file system, the signed certificate and private key of the device can be used for establishing a secure socket connection by setting the appropriate socket options. The private key will be stored in a secure file in the system files directory: /sys/cert/iot/key.der. The following provides an example of how to set the socket options to use the internal private key and the signed certificate after it is added back to the file system:
int32_t         sd;
int16_t         status;
const int8_t*   privateKeyFileName = "/sys/cert/iot/key.der";
const int8_t*   certFileName = "/cert/iot/cert.der";   // This is just an example name

//[TODO: Open TCP socket]

status = sl_SetSockOpt(sd, SL_SOL_SOCKET, SL_SO_SECURE_FILES_PRIVATE_KEY_FILE_NAME,
                       privateKeyFileName, strlen(privateKeyFileName));
if(status < 0)
{
/* error... */
}

status = sl_SetSockOpt(sd, SL_SOL_SOCKET, SL_SO_SECURE_FILES_CERTIFICATE_FILE_NAME,
                       certFileName, strlen(certFileName));
if(status < 0)
{
/* error... */
}
Set Socket Private Key
Further Reading
CC3x20, CC3x3x Solution Built-In Security Features: This guide describes the security features built into the CC31xx and CC32xx devices, including Secure Key Storage and Hardware Crypto Engines.
CC3x20, CC3x3x Network Processor Programmer's Guide: This guide contains information on how to use the SimpleLink API for writing WLAN-enabled applications and using built-in security features.
UniFlash ImageCreator User's Guide: The Imaging tool manually stores files on the external serial flash. ImageCreator can be used to add vendor created key files to the file system to be used as Installed Key-Pairs.
Technical support
For any questions, please search on the TI SimpleLink Wi-Fi E2E Forum
This work is licensed under a Creative Commons Attribution-NonCommercial-NoDerivatives 4.0 International License.