Introduction
In this lecture, we will explore the SysConfig ImageCreator tool which can program the external serial flash used by the SimpleLink Wi-Fi CC32xx and CC31xx devices. The programming image is a file containing the SimpleLink device configurations and files required for the operation of the device. For the CC32xx wireless microcontroller, the programming image also includes the host application file.
Before beginning development, it's important for SimpleLink Wi-Fi users to understand how to:
- Set up the LaunchPad in Development mode for debugging
- Flash application code
- Update to the latest service pack
- Add user files to the file system
- Utilize some of the security features of the CC32xxS and CC32xxSF devices
This lecture will cover these topics with the CC32xx LaunchPad and the SysConfig ImageCreator tool.
What's new?
What is SysConfig ImageCreator?
In CC32xx SDK 4.40, we launched SysConfig ImageCreator support on all our Code Composer Studio SDK examples. This new tool takes the same ImageCreator functionality from the UniFlash tool and moves it into the SysConfig tool, so we can integrate with Code Composer Studio and simplify development for many of our customers. This means you will see a new image.syscfg file in those examples and you may notice extra build steps in CCS. The new SysConfig ImageCreator tool allows us to add user files, build SLI images, and flash LaunchPads directly from CCS. Customers must use a recent version of Code Composer Studio. The CCS version tested with each CC32xx SDK version is specified in the SDK release notes.
Are you migrating from a previous SDK and don't want to change your flow? You can go to the project properties and switch from the MCU+Image to the Debug build configuration. This will make the project build previous SDKs.
Are you working with an older project? We are still supporting UniFlash ImageCreator.
SysConfig ImageCreator allows our CC32xx customers to develop in Code Composer Studio without having to switch to the UniFlash tool for image creation and flashing. Other benefits of SysConfig ImageCreator include a different project format, so all user files are managed through a root directory on the user's PC. This makes software version control much easier. SysConfig ImageCreator also uses the same Command Line Interface as UniFlash ImageCreator, which is important for many existing customers during production.
SysConfig ImageCreator supports CC32xx devices both inside Code Composer Studio and in the standalone SysConfig tool. CC31xx devices are only supported in the standalone tool.
Hardware Setup
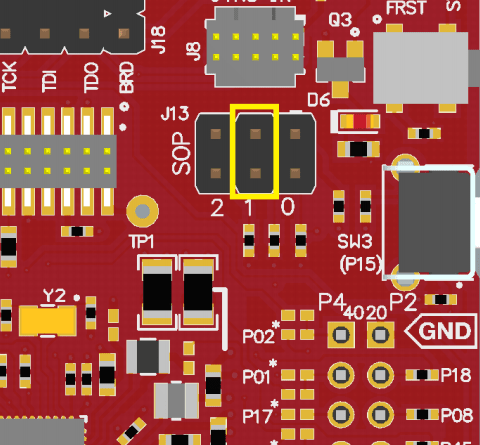
To enable flash programming on the CC32xx LaunchPad, the Sense-On-Power (SOP) jumpers on the board need to be configured correctly. The CC32xx device implements a SOP scheme to determine the device operation mode upon power up. Ensure the SOP jumpers are set to 010, as shown in the image below.
Launching SysConfig ImageCreator
Each ImageCreator project is a workspace for creating an image file for a CC3x20 or CC3x3x device. SimpleLink Wi-Fi devices contain so much more than application code, so different projects allow users to easily develop and test different device configurations, security features, certificates, and user files.
Code Composer Studio
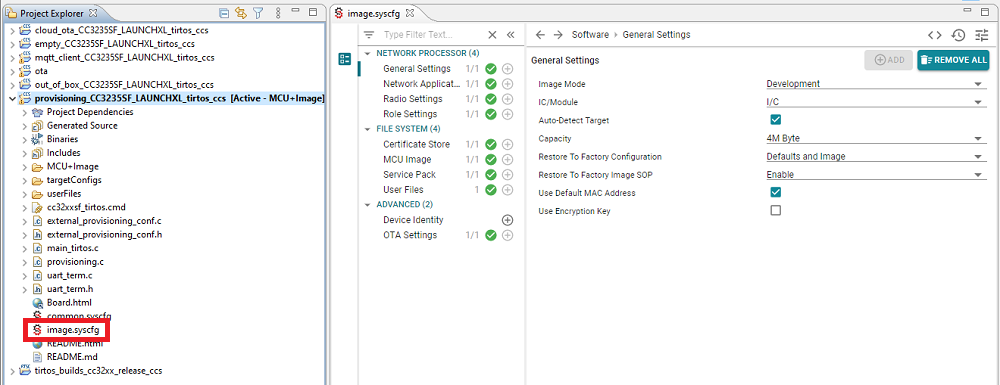
Import any project from CC32xx SDK and double-click on the image.syscfg file in your project. That's it!
Standalone
Install the standalone SysConfig tool and the latest CC32xx SDK. Select the CC32xx SDK as the Software Product and check Image Creator Mode. Then you can pick your Board or Device, and start your new project!
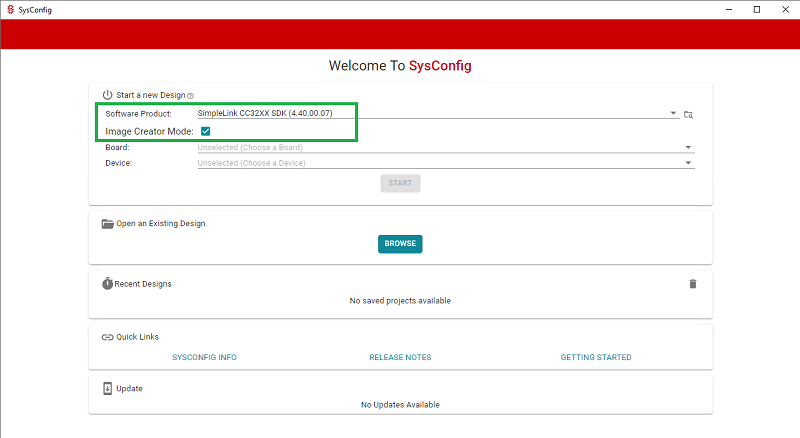
Want to open an existing project instead? Browse for your image.syscfg!
Adding a User File
Code Composer Studio
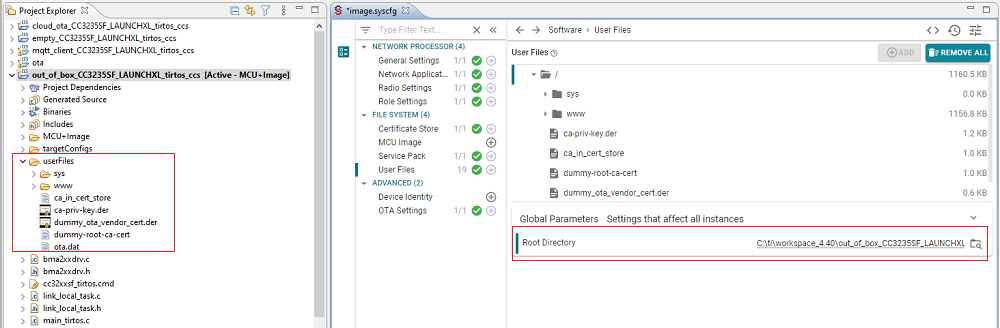
To add a user file to a Code Composer Studio project, simply drop the file into the userFiles folder in your project. If you open image.syscfg and go to User Files, you will see this file has been added to the file system folder structure that will be included in the program image. Note the default root directory in a CCS project is the project's userFiles folder in your workspace.
Click on the files in this file system view to configure file settings. To learn more about available file system settings, see the SysConfig ImageCreator User's Guide or the File System chapter of the CC3x20, CC3x35 Network Processor Programmer's Guide.
Once your user files are added to the project image, you must program it to the device.
Standalone
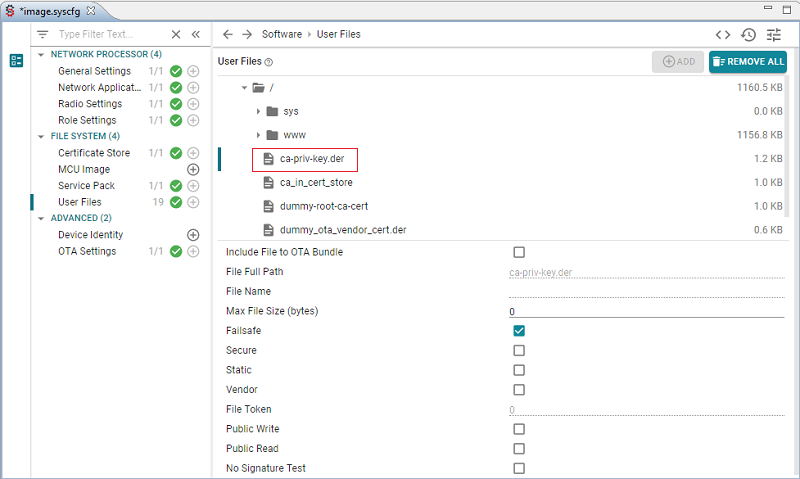
To add a user file to a project in the standalone SysConfig tool, go to User Files and select your root directory. Any changes to this root directory will be reflected in the file system folder structure.
Click on the files in this file system view to configure file settings. To learn more about available file system settings, see the SysConfig ImageCreator User's Guide or the File System chapter of the CC3x20, CC3x35 Network Processor Programmer's Guide.
Once your user files are added to the project image, you must program it to the device.
[[b! Adding the entire "dummy" certificate chain
Some SimpleLink Academy labs and SDK examples will ask the user to flash the entire "dummy" certificate chain to the LaunchPad. This means that the user must add the dummy-trusted-cert, dummy-trusted-ca-cert and dummy-root-ca-cert from the certificate playground provided in the SDK for development. These certificate files can be found in simplelink_cc32xx_sdk_x_xx_xx_xx/tools/cc32xx_tools/certificate-playground.
For a detailed explanation on what is a certificate chain and other certificate questions, please see the SimpleLink Wi-Fi Certificates Handling User's Guide.
Adding the Latest Service Pack
The service pack is a file that contains fixes and new features for the network processor code. At a minimum the service pack is required to be programmed, and you should always use the latest released service pack. Service packs are released in each quarterly SDK in the tools/cc3xxx_tools/servicepack-cc3xxx folder.
By default, the project will include the servicepack that shipped with your selected CC32xx SDK. This SDK version is controlled by your CCS project, or in standalone tool by the software package that you selected on the launch screen.
Once your servicepack is added to the project image, you must program it to the device.
Adding a MCU Image
Code Composer Studio
In CCS, the application binary from your CCS project will automatically be included as the MCU image when you rebuild the project.
Once your MCU image is added to the project image, you must program it to the device.
Standalone
Go to MCU Image and select your MCU application binary. If you built your project in CCS or IAR, this will be a BIN file in your workspace output folder.
To securely sign the MCU image (required on all CC32xxS and CC32xxSF devices), select the private key and root certificate to use for signing. For development, you can use the dummy playground certificates available in the tools/cc32xx_tools/certificate-playground folder of the SDK. For more details on our security features, see the SimpleLink Wi-Fi Built-In Securtiy Features App Note.
Once your MCU image is added to the project image, you must program it to the device.
Using the CC31xx?
CC31xx is a network processor only. Your MCU image must be loaded to your host MCU.
Program an Image
Code Composer Studio
In Code Composer Studio, the ImageCreator tool will generate a new image every time your rebuild the CCS project. You can find these image outputs (all types) in the MCU+Image/syscfg/sl_image/Output folder of your project.
To flash this image your LaunchPad, make sure the correct project is active in the Project Explorer, and then select the Flash button from the CCS menu.

Standalone
To create and flash your program image, go to Image Commands and verify your desired output SLI location. Select Program Image. This will generate the SLI, place it in your output location, and then flash the SLI to the device. You should see a pop-up window showing the progress of the ImageCreator tool.
For more options for creating and flashing images, see the SysConfig ImageCreator User's Guide.
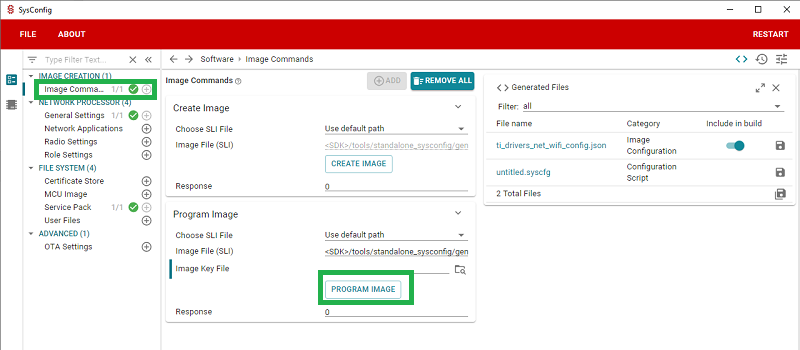
Image Types
Additional image types include different image formats for production methods such as embedded programming and gang programming. You can also create an OTA bundle for Over-The-Air Updates.
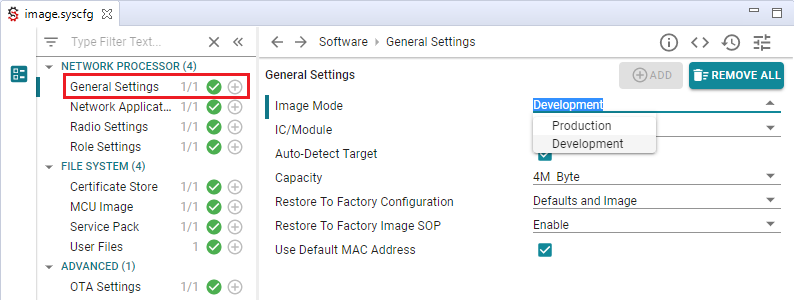
Development vs. Production Mode
To ensure system integrity, the SimpleLink Wi-Fi device applies an image-based programming methodology. Development mode exposes features for easier development without compromising on security. The following functionality is available:
- File-by-file access is permitted from the ImageCreator tool
- File list can be accessed from the ImageCreator tool
- JTAG interface is enabled for debugging
Production mode is appropriate for mass production and enables multiple devices to be programmed with the same image. The JTAG interface is blocked in this mode, so a CC32xx LaunchPad cannot be used with the Code Composer Studio debug tool when it is flashed with a production image.
To change device modes in an existing project, go to General Settings change the Image Mode to Development. Then you must program this image to the device.
For more details on our security features, refer to the SimpleLink Wi-Fi Built-In Securtiy Features App Note.
Common Errors
Cannot launch SysConfig or open .syscfg file
Be sure that you are using the correct SysConfig and Code Composer Studio versions for your SDK version. You can find this information in the SDK release notes. SysConfig should be installed with your CCS installation.
You can update the SysConfig version by going to Project properties -> General -> Products. Select the SysConfig product and select Edit.
If you do not see the correct version, you can install SysConfig as a standalone package from https://www.ti.com/tool/SYSCONFIG. After installation, restart CCS to discover the new product package.
Error: Auto detect failure or XDS not detected
Since all projects are in Development mode by default, the tool needs to know the MAC address of your device to generate a Development image. If the Auto_Detect Target setting is enabled in General Settings, this means you must plug in your target LaunchPad to build the project.
Error: Could not open port COM<x>
The ImageCreator tool needs to access the device via a COM port in order to flash the image. You must close any other program that is holding the COM port, such as a serial terminal emulator.
Error: Cannot locate .sli image file
The SLI image is generated when the project is built. If the SLI image cannot be located, there was an error during build time.
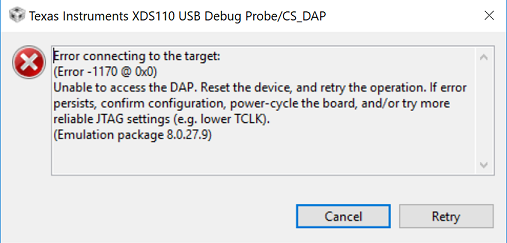
Error -1170 (Unable to access the DAP) while debugging
Error: Unrecognized Arguments
The file path for your project or workspace should not have white spaces in it, such as C:/ti/workspace 1. Replace the spaces in your file path, like C:/ti/workspace_1.
Further Reading
- SysConfig ImageCreator User's Guide
- SimpleLink Wi-Fi Built-In Security Features App Note
- SimpleLink Wi-Fi Certificates Handling User's Guide
- CC3x20, CC3x35 Network Processor Programmer's Guide
Technical support
For any questions you might have, please search on the Wi-Fi E2E Forum.
This work is licensed under a Creative Commons Attribution-NonCommercial-NoDerivatives 4.0 International License.