CoAP Messaging#
Texas Instruments
3 hours read
This lab will teach you about CoAP messaging. By the end of this lab, you will be able to initiate communication from either Border Router or the CoAP Node.
It is assumed that the reader is familiar with the
SimpleLink™ TI Wi-SUN FAN Fundamentals
and has a basic knowledge of general C and Python programming concepts. This lab
is intended as a starting point for users who want to get familiar with CoAP
messaging concepts and running a messaging example.
Introduction#
The Constrained Application Protocol (CoAP) is an application level communication protocol. It is designed for machine-to-machine communication in constrained low-power and lossy networks. CoAP is based on a client/server, request/response communication model and interfaces with an underlying UDP layer. It supports both confirmable and non-confirmable message transmission.
This lab will explain how to use the CoAP application layer for communication over TI Wi-SUN FAN stack. The first task is to setup a Wi-SUN network with a Border Router, Host and a CoAP Node. The second task will be running the out of the box CoAP example, highlighting critical concepts along the way. In the third task, you will extend the CoAP Nodes functionality to send a message to the Border Router and the fourth task will teach you how to send confirmable messages and acknowledgements.
Prerequisites#
For this lab you need the specified hardware and software.
Hardware#
You need two Wi-SUN enabled development boards. Supported devices are:
These devices are interchangeable in the lab.
Software for desktop development#
Python v.3.6.8 or later (including pip)
CCS with support for CC13xx/CC26xx devices
Note
The software is already installed if you completed the SimpleLink™ TI Wi-SUN FAN Fundamentals. If you have problems with the installation, please go back there.
Recommended reading#
Note
This lab expects that you already know how to setup a Wi-SUN Network according to the SimpleLink™ TI Wi-SUN FAN Fundamentals.
CoAP Messaging#
The Constrained Application Protocol (CoAP) application layer code provided in the SDK is a port of ARM’s mbed implementation of CoAP ported to Texas Instruments devices. It is licensed under Apache License Version 2.0.
Communication model#
The communication follows a Client-Server-Structure, where the Client can request GET data from the Server or send PUT data to the Server. Depending on the message the Server will respond with the current state of the requested GET resource or it will change PUT the state of the resource. The relation of Client and Server is visualized in the figure below. Border Router and CoAP Node can both act as Server and Client. This means that the Border Router (Client) can send and request data from the CoAP Node (Server) and the CoAP Node (Client) can send and request data from the Border Router (Server). This will be shown in detail by the tasks.

Communication between Client and Server#
Message Format#
The CoAP messages are sent over UDP and are encoded in a simple binary format which is presented below.

CoAP message format#
The header fields are defined as follows:
Ver: The CoAP version number, which must be set to binary
01.T: The message type is two bits long and indicates if the message is Confirmable (0), Non-confirmable (1), Acknowledgement (2), or Reset (3).
TKL: The token length is a 4-bit unsigned integer providing the length of the variable-length token.
Code: The code is an 8-bit unsigned integer, which indicates if the message is a request, a success response, a Client error response, or a Server error response. For further processing, the code is split into a 3 bit class and a 5 bit detail. The codes are described in detail here.
Message ID: The Message ID is a 16-bit unsigned integer that is used to detect message duplication and to match messages of type Acknowledgement/Reset to messages of type Confirmable/Non-confirmable.
The CoAP header is followed by the token. It can be between 0 to 8 bytes long and is used as well to correlate requests and responses.
Next, options can be appended to the message. The most important one for this example is the uniform resource identifier (URI) which you will use later to select the handling code.
If a payload is added to the message it has to start with the prefix 0xFF
which indicates the end of the options. The payload is optional and can be
None.
Reliability#
To add reliability on the application level, use the confirmable message
type CON. This message has then to be
acknowledged with a message of type acknowledgement ACK by the
recipient. If the Client does not receive an acknowledgement it will resend
the confirmable message. This retransmission happens until the acknowledgement
is received or the request times out. The acknowledgement message must contain
the same Message ID as the confirmable message. In case of any processing
problems on the recipient side it has to answer with a message of type reset
RST. Below a successful communication with a reliable message with the
ID 0x82d2 is shown.
Reliable message transmission#
You can disable the need for acknowledgement by sending a non-confirmable
message. Here you are trading off reliability with traffic. Since you do
not need an acknowledge, the traffic in the network is reduced when using
non-confirmable messages NON. One example is sensor
data that is resent in a certain interval where it doesn’t lead to
application errors if a message is missed. The following figure shows
the behavior of the device when using non confirmable messages. The client
does not retransmit if there is no response from the server. The client sends
a non-confirmable message with the example ID: 0xa37d to the Server. The Message
ID can be used for example for duplication checking. An answer to a
non-confirmable message should also be sent as non-confirmable message.
Unreliable message transmission#
Request/Response Matching#
To differentiate between the CoAP messages The Constrained Application Protocol (CoAP) provides different options. You will learn about two of them used in this SLA.
Token
The first option is to include a token in each CoAP message. As presented
in the section Message Format, this token can have a length of up to 8
bytes. This token has then to be echoed back in the response message to
properly match the request to its response. This is important when concurrent
requests happen.
URI
In the out of the box example, the resource is requested through the use of its URI.
The URI is defined as a string and can be appended as an CoAP option to the CoAP
message. To match the request to its response the URI of the received response is
compared to the URIs of the sent requests.
The PySpinel CoAP implementation includes token and URI support.
When a CoAP request is made from the PySpinel CLI, the token value is saved. And when the response for the request is received, the token in the response is compared with the token in the request. The tokens are saved for all the CoAP requests that are made from the PySpinel CLI.
In case of received CoAP requests the URIs of the requests are compared with the saved URIs. If there is a match, the corresponding action is taken. The appropriate CoAP response echoes the token or/and the URI from the CoAP request.
Request Methods#
The CoAP protocol supports four request methods. The functionality of the methods is determined by the handling code of the receiving application but they should be used as follows.
The GET method is used to obtain the current state of a resource. In the response to a GET request you should pass the code
2.05or2.03. The code2.5indicates that the answer contains the requested resource. Code2.03should be passed to only indicate that the requested resource is valid.
The POST method is used if the passed payload has to be processed or the execution of a certain process on the target device has to be started. This means that it can be used to change the state of a resource or to create a resource. If a resource is created the response should contain the code
2.01and also send the URI of the new resource. If only a resource was changed the response should contain the code2.04. A deleted resource should be indicated by a response containing the code2.02.The PUT method is used to update the state of the requested resource or to create the requested resource. If the requested resource exists and its state gets updated the response should contain the code
2.04(resource changed) and if the requested resource is created the response should contain the code2.01(resource created).The DELETE method is used to delete the requested resource. The response to a DELETE should contain the code
2.02indicating that the resource got deleted or did not exist.
Task 1 – Setting up the TI Wi-SUN FAN#
This task will lead you through the setup steps that are required to start with the example.
Note
If you need more information about setting up the network, please refer to the the SimpleLink™ TI Wi-SUN FAN Fundamentals.
Border Router Setup#
To start the network you need to setup a Border Router. Import the project
ns_br to your CCS workspace. It is found in the ti_wisunfan examples
folder:
<SDK_INSTALL_DIR>\examples\rtos\<BOARD_NAME>\ti_wisunfan\ns_br\tirtos7
Connect one of the LaunchPads to your pc and flash it with the ns_br project.
The procedure is described in detail in the
SimpleLink™ TI Wi-SUN FAN Fundamentals.
CoAP Node Setup#
Use a second LaunchPad for the following steps.
You will use the ns_coap_noad project that supports CoAP. It is found
in the ti_wisunfan examples folder:
<SDK_INSTALL_DIR>\examples\rtos\<BOARD_NAME>\ti_wisunfan\ns_coap_node\tirtos7
Import it to your CCS workspace and flash the board with the CoAP Node application. The procedure is described in detail in the SimpleLink™ TI Wi-SUN FAN Fundamentals Task 2 – Run the Router Node Project.
Warning
Please note that the application.c is linked for all TI Wi-SUN node
examples. Make sure you import it as a copy to keep the source clean.
Import the application.c file as copy…
Open the project that you want to include in your file explorer. In this case the filepath is:
<SDK_INSTALL_DIR>\examples\rtos\<BOARD_NAME>\ti_wisunfan\ns_coap_node\tirtos7\ticlangOpen the .projectspec file with your editor.

Open the .projectspec file#
Open the searchbar pressing
Ctrl+F. Search forapplication.c.
Search for
application.c#Now you have to change the action to
copy.
Change the action to
copy#Now you’re ready to import the project in CCS. It will now import a copy of the
application.cfile. You will see that it was successful when you see like below that the icon of theapplication.cfile does not show a blue arrow in the explorer.
Include as copy was successful#
Setup the network#
Now, using the PySpinel CLI, get the border router to set up the Wi-SUN FAN. Wait until the CoAP Node joined the network. If you need to review the steps look back at SimpleLink™ TI Wi-SUN FAN Fundamentals.
Note
We aim for fast join times but it can still take a while until the CoAP Node joins the network. If the CoAP Node has not joined the network after 15 min please restart the LaunchPad running the CoAP Node application by pressing the Reset button.
Start the PySpinel CLI using the following command with the COM port of the Border Router. The “Module readline unavailable” message can be ignored.
python spinel-cli.py -u COM9

CMD output of the of the start of the PySpinel CLI#
Now, start the Wi-SUN FAN interface using the command ifconfig up.
ifconfig up

CMD output of the ifconfig up command#
To start the network insert the command wisunstack start.
wisunstack start

CMD output of the wisunstack start command#
To verify that the network is setup and working correctly you can use multiple PySpinel commands. First you can check the router state with the command:
routerstate
The output on the terminal should tell you that the Border Router is in state 5
which means it opened the network and is operational.

CMD output of the routerstate command#
To verify that the CoAP Node joined the network you can check the connected devices with the PySpinel command:
connecteddevices
The output on the terminal shows you a list of devices that are in the routing table of the Border Router, with their IP addresses.

CMD output of the connecteddevices command#
Now, you can use the IP address of the device which you got from the previous command to verify that the CoAP Node is operational. You can ping the device with the following command:
ping <ipv6 address>
The output shows you how many bytes have been received from the device and in which time. If you see an output like the following the device is working correctly.

CMD output of the ping command#
Task 2 – Send a CoAP message from the Border Router to the CoAP Node#
In this Task you will use the coap command of the PySpinel CLI. In the
ns_coap_node example application, a CoAP Server has been implemented
(check the application.c source file for the implementation). This Server
is running on the CoAP Node and responds to the coap requests made by using
the coap command of the PySpinel CLI. The PySpinel CLI in combination with
the Border Router is the Client. It will get and put a resource
of the CoAP Node. The communication that you will perform is visualized below.

Border Router (Client) sends request to the CoAP Node (Server), each of the requests sent from the Client to Server corresponds in order to the commands you will perform#
Introduction of the coap command#
To get familiar with the command you can use the help command. This will show you the explanation of all parameters and also some examples.
help coap

CMD output help coap#
Perform CoAP requests#
Now you’re ready to use the command. Please follow the steps:
You will request the state of the led resource of the CoAP Node. Therefore, you use the
coapcommand with thegetoption and you use theconoption to perform a confirmable request. Finally you add the URI of the resource which you want to accessled. The command looks than like this:coap <ipv6 address> get con led
In the output you can see that a packet from the CoAP Node was received. It is of type
2which means it’s confirmable and the state of the two LEDs is displayed.
CMD output
coap <ipv6 address> get con led#After you know the state of the CoAP Nodes LEDs you can now modify their state by sending a
coap putcommand. Also here you use the theconoption to perform a confirmable request. To address the LED you add the resource which you want to accessledand also the flag--led_state r 1. This flag addresses the red LED and will light it up. The complete command is the following:coap <ipv6 address> put con led --led_state r 1
In the terminal you can see that a packet from the CoAP Node was received. It is of type
2which means it’s confirmable and also it states that the LED state was successfully set. If you look at your Router Node LaunchPad you will see now that the red LED is lit.
CMD output
coap <ipv6 address> put con led --led_state r 1#You can request the led state with the
getcommand you used for 1. but this time you perform a non-confirmable request by using the parameternonas shown below.coap <ipv6 address> get non led
In the output you can see that a packet from the CoAP Node was received. It is of type
1which means it’s non-confirmable and the state of the two LEDs is displayed. You see that the state of the red LED changed to1which means it is lit.
CMD output
coap <ipv6 address> get non led#Now you can turn-off the red LED again by performing another set request, this time using the
POSTmethod with thecoap postcommand. Also here you use the thenonoption to perform a non-confirmable request. To address the LED you add again the resource which you want to accessledand the flag--led_state r 0. This flag addresses the red LED and will turn it off. Please note that in this example a request using thePOSTmethod leads to the same code execution as using thePUTmethod. Since you change a resource of the target device it would be best practice to use thePUTmethod. The complete command is the following:coap <ipv6 address> post con led --led_state r 0
In the terminal you can see that a packet from the CoAP Node was received. It is of type
1which means it’s non-confirmable and also you see the code2.04which means the resource was changed. If you want to learn more about response codes you can have a look at The Constrained Application Protocol (CoAP) documentation. If you look at your Router Node LaunchPad you will se now that the red LED is now turned-off.
CMD output
coap <ipv6 address> post non led --led_state r 0#
Task 3 – Send a non-confirmable request from the CoAP Node to the Border Router#
One possible use case is an ev-charging station that registers new cars
when the user plugs in the charger. This example will be used in the next
tasks. The CoAP Node is connected to the ev-chargers and transmits all changes
via the Wi-SUN FAN to the Border Router, which is the central unit hosting a
GUI/Cloud interface to monitor the status of all chargers. In the figure below
the network structure is illustrated with its functionality. In the next tasks
you will modify the
code so that when the button BTN-1 of the CoAP Node is pressed, a new car will
be registered as plugged in. If the button BTN-2 is pressed, this will be
registered as unplugging a car. The CoAP Node keeps track of how many cars are
plugged in and sends the current count to the Border Router whenever it changes.
The naming used fits this example.
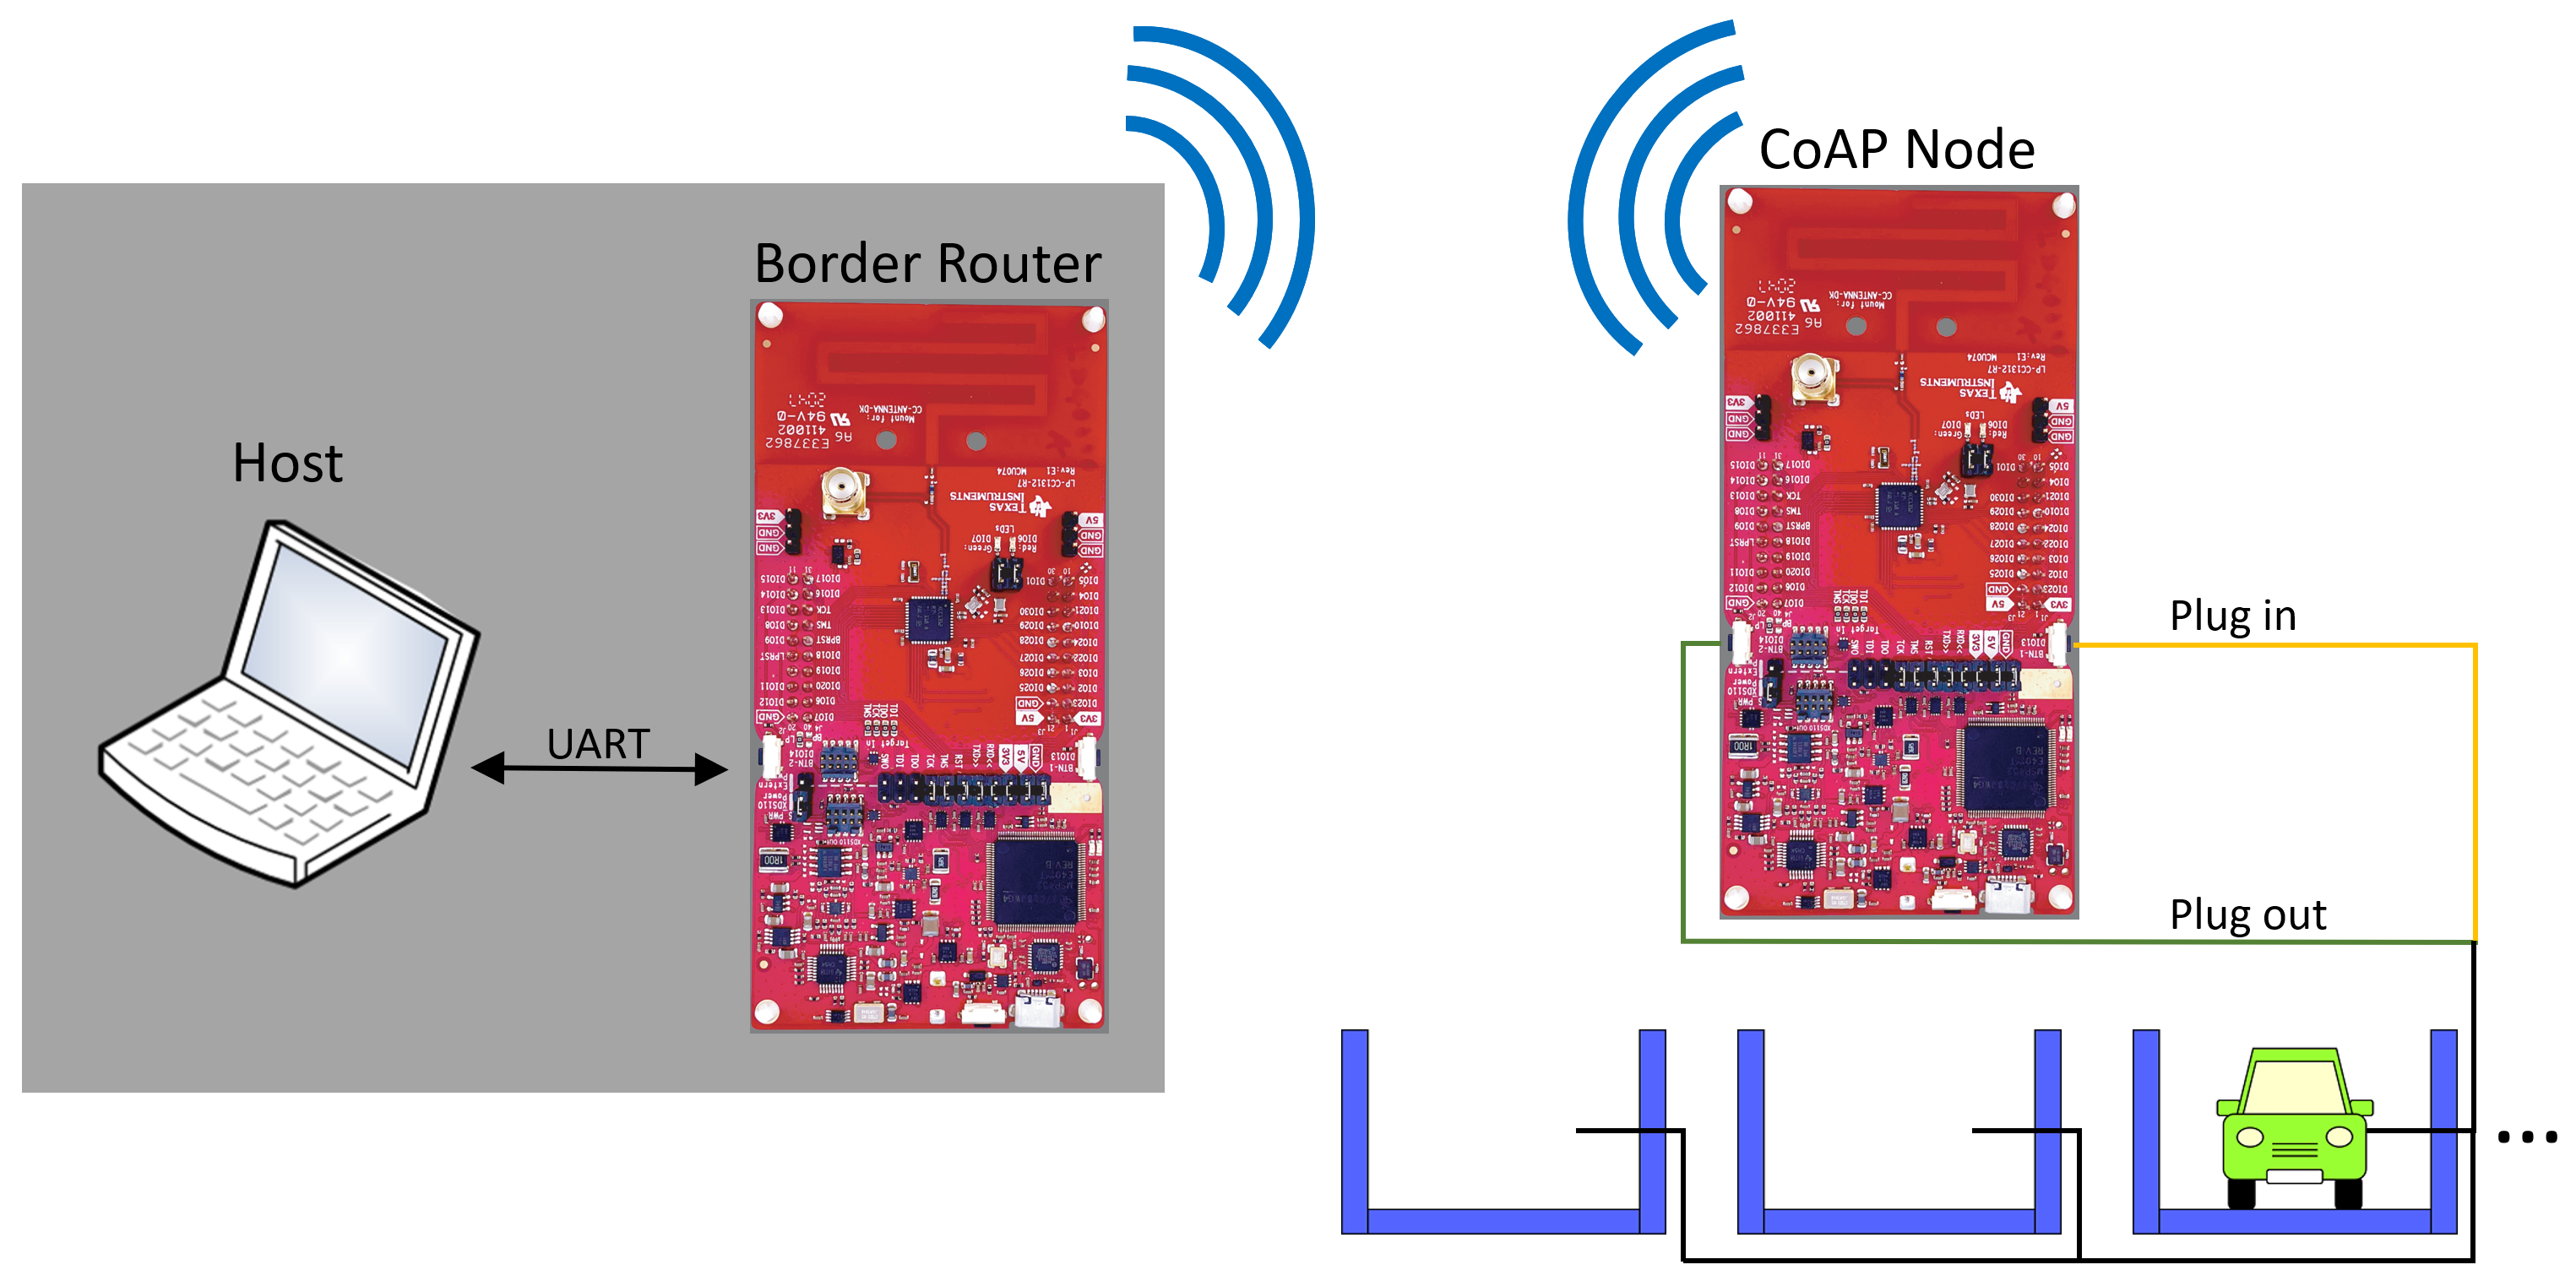
Network of the ev charger CoAP Node with Border Router and Host#
In this Task you will send a non-confirmable request from the CoAP Node to the Border router. First, you have to modify the application code and then the code of the PySpinel CLI. Afterwards you will test the new feature. The performed communication will look like shown in the following chart.

CoAP Node (Client) sends a non-confirmable request to the Border Router (Server)#
Modify the application code#
The application code has to be modified such that the application will use the
buttons to simulate a user plugging the charger in or out. Button BTN-1 is
simulating the plugging in of the charger and button BTN-2 the plugging out.
You have to apply the following extensions to the application.c file, located
at:
C:\ti\<SDK>\source\ti\ti_wisunfan\apps\udp_nanostack_mesh_tirf\application.c
To differentiate between the different CoAP requests the URIs are used. Therefore, you define first a new URI which will be used to sign the request to update the number of plugged in cars. Insert the code in the define section in the beginning where also the
COAP_LED_URIis defined.Solution
#define COAP_UPDATE_NUM_CARS_URI "upd_num_cars"
CoAP URI to sign the update of the number of cars#
Next you have to add a new global variable to count the number of plugged in cars. Insert the code at the top into the CoAP global variable section where the
led_stateis also defined.Solution
uint8_t num_cars_plugged_in = 0;

Global variable to count the number of plugged in cars#
To handle the button press you need to define a function. Therefore, insert the function definition in the CoAP function definition section in the beginning of the file after the function
coap_panid_list_cb.Solution
static void coap_handle_button_press(uint8_t btn_id);

Function definition to handle a button press#
When a button is pressed, the button interrupt handler is executed. To send a CoAP message when the button is pressed, you need to add a function call to our previously defined handling function in the function
btn_interrupt_handler.Solution
coap_handle_button_press(index);

Call the CoAP button press handling function from the button interrupt handling function#
Finally, you need to add the function definition of the CoAP button press handling function. The code has to be inserted at the end of the file.
Solution
static void coap_handle_button_press(uint8_t btn_id)
{
    // ev charger
    if (btn_id == CONFIG_GPIO_BTN1)
    {
        // car was plugged in
        if (num_cars_plugged_in < 255){
            num_cars_plugged_in += 1;
        }
    }
    else if (btn_id == CONFIG_GPIO_BTN2)
    {
        // car was unplugged
        if (num_cars_plugged_in > 0)
        {
            num_cars_plugged_in -= 1;
        }
    }

    if(connectedFlg)
    {
        // send a non-confirmable request with the URI to update the number of cars
        // to the Border Router
        coap_service_request_send(service_id, 0, root_unicast_addr, COAP_PORT,
                            COAP_MSG_TYPE_NON_CONFIRMABLE, COAP_MSG_CODE_REQUEST_GET, COAP_UPDATE_NUM_CARS_URI,
                            COAP_CT_TEXT_PLAIN, &num_cars_plugged_in, sizeof(num_cars_plugged_in), 0);
    }
}

Implementation of the function to handle the button press and sending a CoAP request#
Flash the CoAP Node and wait for it to rejoin the network.
Modify the PySpinel CLI code#
To receive the CoAP message you have to slightly extend the PySpinel Client.
Open the PySpinel CLIs application file. The filepath is:
C:\ti\<SDK>\tools\ti_wisunfan\pyspinel_repo\ti-wisunfan-pyspinel
First you have to register the new URI of the message, so that you can identify the message when it arrives. Remember, you defined the messages URI in the first step of the application modification. You need to insert the following code at the beginning of the file where also the
PANID_LIST_BASE_URIis defined.Solution
# CoAP ev charger: update number of cars plugged in
COAP_UPDATE_NUM_CARS_URI = "upd_num_cars"

Define the URI for the number of cars update message#
To handle the incoming message, you need to extend the
wpan_callback()method. You will add anelifstatement to identify the CoAP URI of the message and assign the correct packet type. Insert the code in between theelifcase that checks for aCOAP_JOIN_REQand theelsecase printing the string “Invalid coap option base URI”.Solution
elif option.option_val == str.encode(COAP_UPDATE_NUM_CARS_URI):
    # Handle ev charger CoAP message
    # The coap message type is a coap post request.
    coap_packet_type = "EV_CHARGER_NUM_CARS_UPDATE"
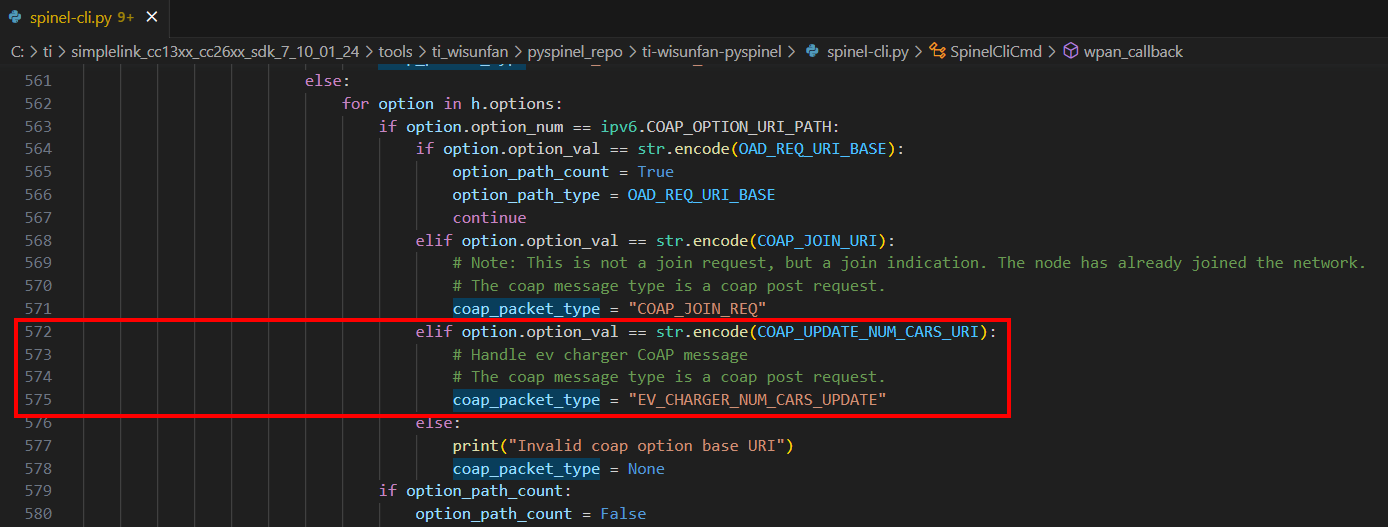
elifstatement in thewpan_callback()method to determine the number of cars update message type#Now, it is only the message handling code that is missing. You will add it at the end of the
wpan_callback()method which is handling the different types of messages. Theelifstatement will check for the packet type you assigned and the method of the received packet. Then it will execute the handling code which is so far only going to show you the current number of plugged in cars on the terminal. Add theelifstatement in between the check for the packet typePAN_REDISCOVER_RESPand theelsecase for no CoAP payload.Solution
elif coap_packet_type == "EV_CHARGER_NUM_CARS_UPDATE":
    # Handle ev charger CoAP message
    if h.code == ipv6.COAP_METHOD_CODE_POST:
        print("Number of cars plugged in: {}".format(list(p.payload)))
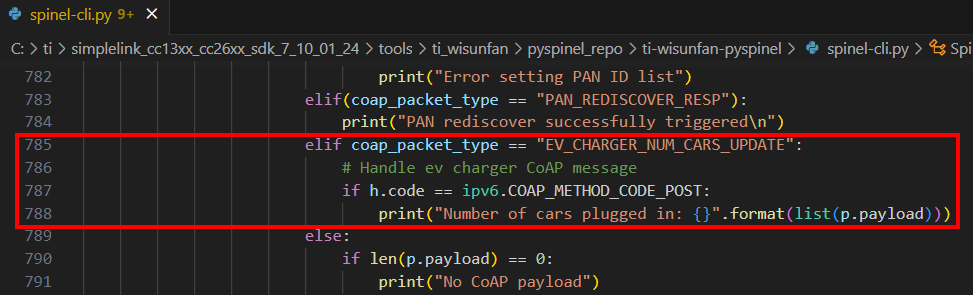
elifstatement in thewpan_callback()method to handle the number of cars update message#Restart the PySpinel CLI.
Test the new feature#
To test if the communication works as intended you can press now the button
BTN-1. After pressing the button you should see in the open PySpinel CLI
that is connected to your Border Router the following message. The terminal
has some constraints on reaction time.

New car plugged in (BTN-1 was pressed)#
Following the example use case a new car was now plugged in and the CoAP Node notified the Border Router with a CoAP request message. The Host registered the message and handled it with the print message.
If you now press the button BTN-2 you see the terminal output shown below
that states, that the car was unplugged so that no cars are anymore connected
to the charger.

New car unplugged (BTN-2 was pressed)#
Task 4 – Send a confirmable update from the CoAP Node to the Border Router#
The CoAP protocol provides also the option to send messages that are confirmable. These messages have to be acknowledged by the receiving device.
In this lab you will modify the CoAP Nodes application code such that the message is sent as confirmable message and that it can handle the expected acknowledgement. Then you change the code of the Host to send an acknowledgement.

The Border Router (Server) responds with an ACKnowledge message to the CoAP Node (Client)#
Modify the application code#
Please follow the steps to modify the application accordingly.
First you have to modify the
coap_handle_button_pressfunction so that it sends a confirmable request. Therefore, the coap message type has to be changed fromCOAP_MSG_TYPE_NON_CONFIRMABLEtoCOAP_MSG_TYPE_CONFIRMABLE. Now this message will be acknowledged by the receiver. So, you can add functionality to handle acknowledgements for these messages. A pointer to this function can be passed as the last argument ofcoap_service_request_send. In this case, you have named itcoap_client_response_acknowledge.Solution
static void coap_handle_button_press(uint8_t btn_id)
{
    // ev charger
    if (btn_id == CONFIG_GPIO_BTN1)
    {
        // car was plugged in
        if (num_cars_plugged_in < 255){
            num_cars_plugged_in += 1;
        }
    }
    else if (btn_id == CONFIG_GPIO_BTN2)
    {
        // car was unplugged
        if (num_cars_plugged_in > 0)
        {
            num_cars_plugged_in -= 1;
        }
    }

    if(connectedFlg)
    {
        // send a confirmable request with the URI to update the number of cars
        // to the Border Router
        coap_service_request_send(service_id, 0, root_unicast_addr, COAP_PORT,
                                COAP_MSG_TYPE_CONFIRMABLE, COAP_MSG_CODE_REQUEST_POST, COAP_UPDATE_NUM_CARS_URI,
                                COAP_CT_TEXT_PLAIN, &num_cars_plugged_in, sizeof(num_cars_plugged_in), coap_client_response_acknowledge);
    }
}
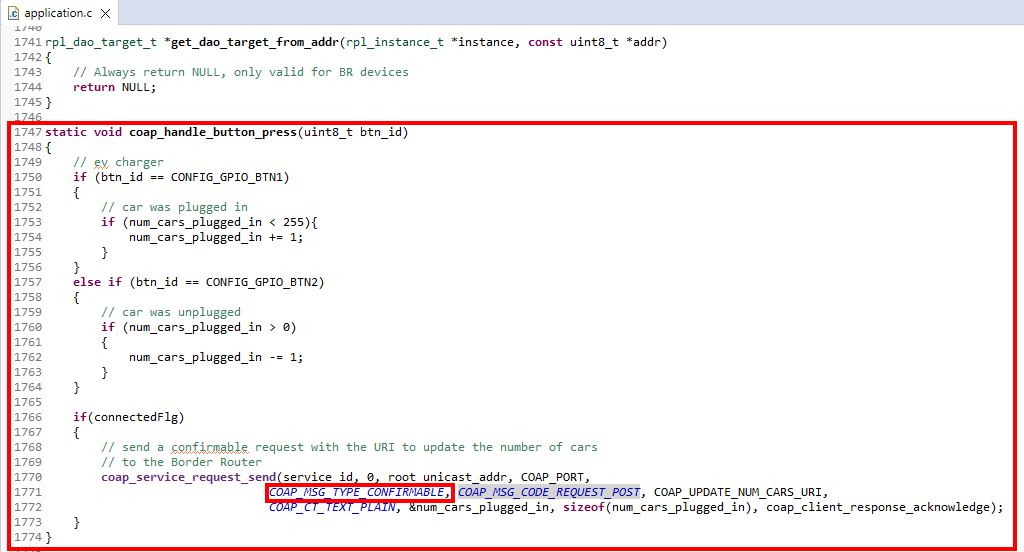
Change the
coap_handle_button_pressfunction to send an acknowledgeable message#Declare the function which will handle the acknowledgement in the section of CoAP function declarations, right after your declaration of the function
coap_handle_button_press.Solution
static int coap_client_response_acknowledge(int8_t service_id, uint8_t source_address[static 16],
        uint16_t source_port, sn_coap_hdr_s *request_ptr);

Declaration of the function to handle the Border Routers acknowledgement#
The function to handle the acknowledgement has to be defined at the end of the file. Implement that it toggles an LED to receive visual feedback of the acknowledgement received.
Solution
static int coap_client_response_acknowledge(int8_t service_id, uint8_t source_address[static 16],
            uint16_t source_port, sn_coap_hdr_s *request_ptr)
{
    if (request_ptr->msg_code == COAP_MSG_CODE_RESPONSE_CONTENT)
    {
        for (int i = 0; i<4; i++)
        {
            sleep(1);
            GPIO_toggle(CONFIG_GPIO_RLED);
        }
    }
    return 0;
}
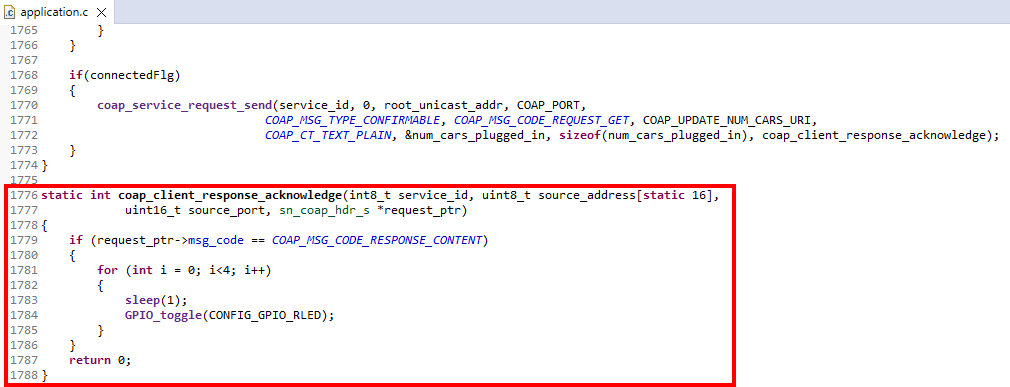
Definition of the function to handle the Border Routers acknowledgement#
Flash the CoAP Node and wait for it to rejoin the network.
Modify the PySpinel CLI Code#
The functionality of the PySpinel CLI has to be extended such that it sends an acknowledgement to the CoAP Node after receiving a confirmable message. You have to extend the
elifcase you use to print out the payload. You will check if the received message is a confirmable message and if so answer it with an acknowledgement message.Solution
if h.type == ipv6.COAP_TYPE_CON:
    try:
        srcIPAddress = pkt.ipv6_header.destination_address
        # Send an acknowledgement to the CoAP Node
        coap_req = self.ipv6_factory.build_coap_request(format(srcIPAddress), pkt.ipv6_header.source_address, ipv6.COAP_TYPE_ACK,
            ipv6.COAP_RSP_CODE_CONTENT, None, payload=None, msg_id=(h.msg_id+1), tkl=h.tkl, token=h.token)
        print("Send acknowledgement")
        self.wpan_api.ip_send(coap_req)
    except:
        print("Failed to send acknowledgement")
        print(traceback.format_exc())
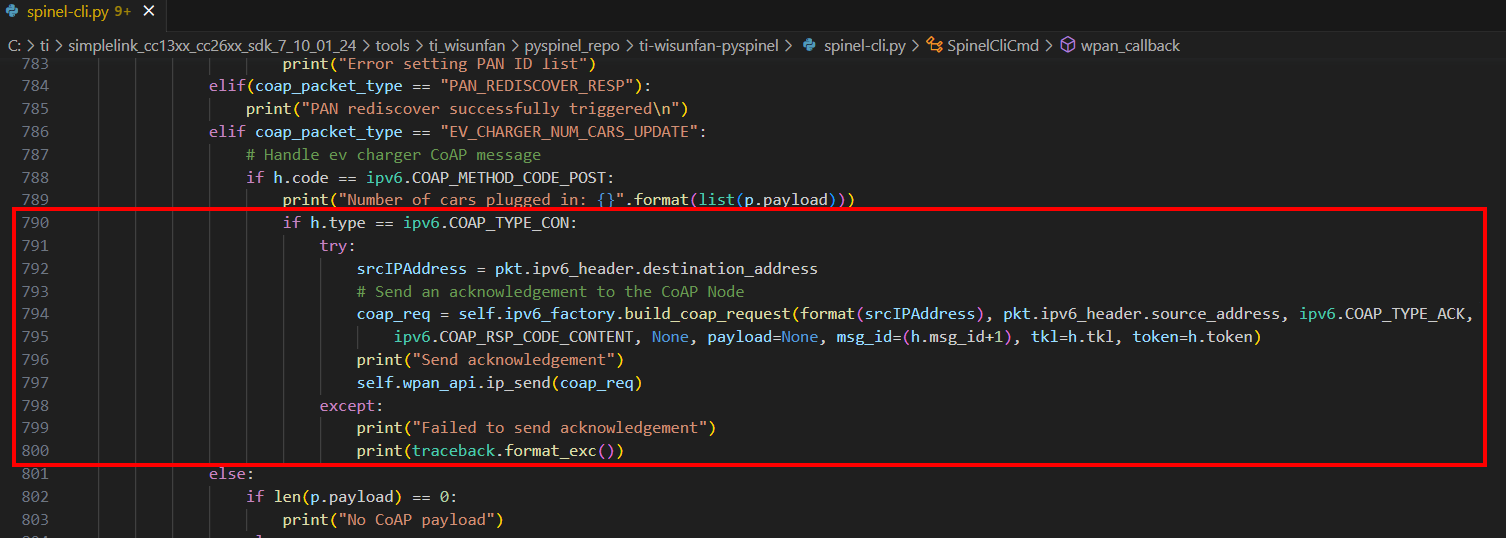
Code extension for the
wpan_callback()method to send an acknowledgement#Restart the PySpinel CLI.
Test the new feature#
The program keeps the functionality from the previous tasks. The added
feature you see is the following. If you press the button BTN-1 you’ll see now
on the terminal that the Host sends an acknowledgement to the CoAP Node.

New car plugged in (BTN-1 was pressed)#
The CoAP Node toggles the red LED 4 times because it receives the acknowledgement.
This LED behavior is implemented in the coap_client_response_acknowledge callback.
If you now press the button BTN-2 you will observe the same behavior.

New car unplugged (BTN-2 was pressed)#
Now, you know how to initiate and handle confirmable and non-confirmable CoAP messages from the CoAP Node. If this was an ev charger network communicating with a central node, these messages could be used for managing the power and balancing load on the charging network.
Hint
Congratulations, you’ve done CoAP Messaging!